Logistical forms
Logistical forms are located in the app. Logistical forms are used to manage the logistics of customer deliveries and prepare the packing list.
Stock configuration by company
Access : Application configuration → Apps management → Stock management, configure → click on the company file to access stock configurations by company.
-
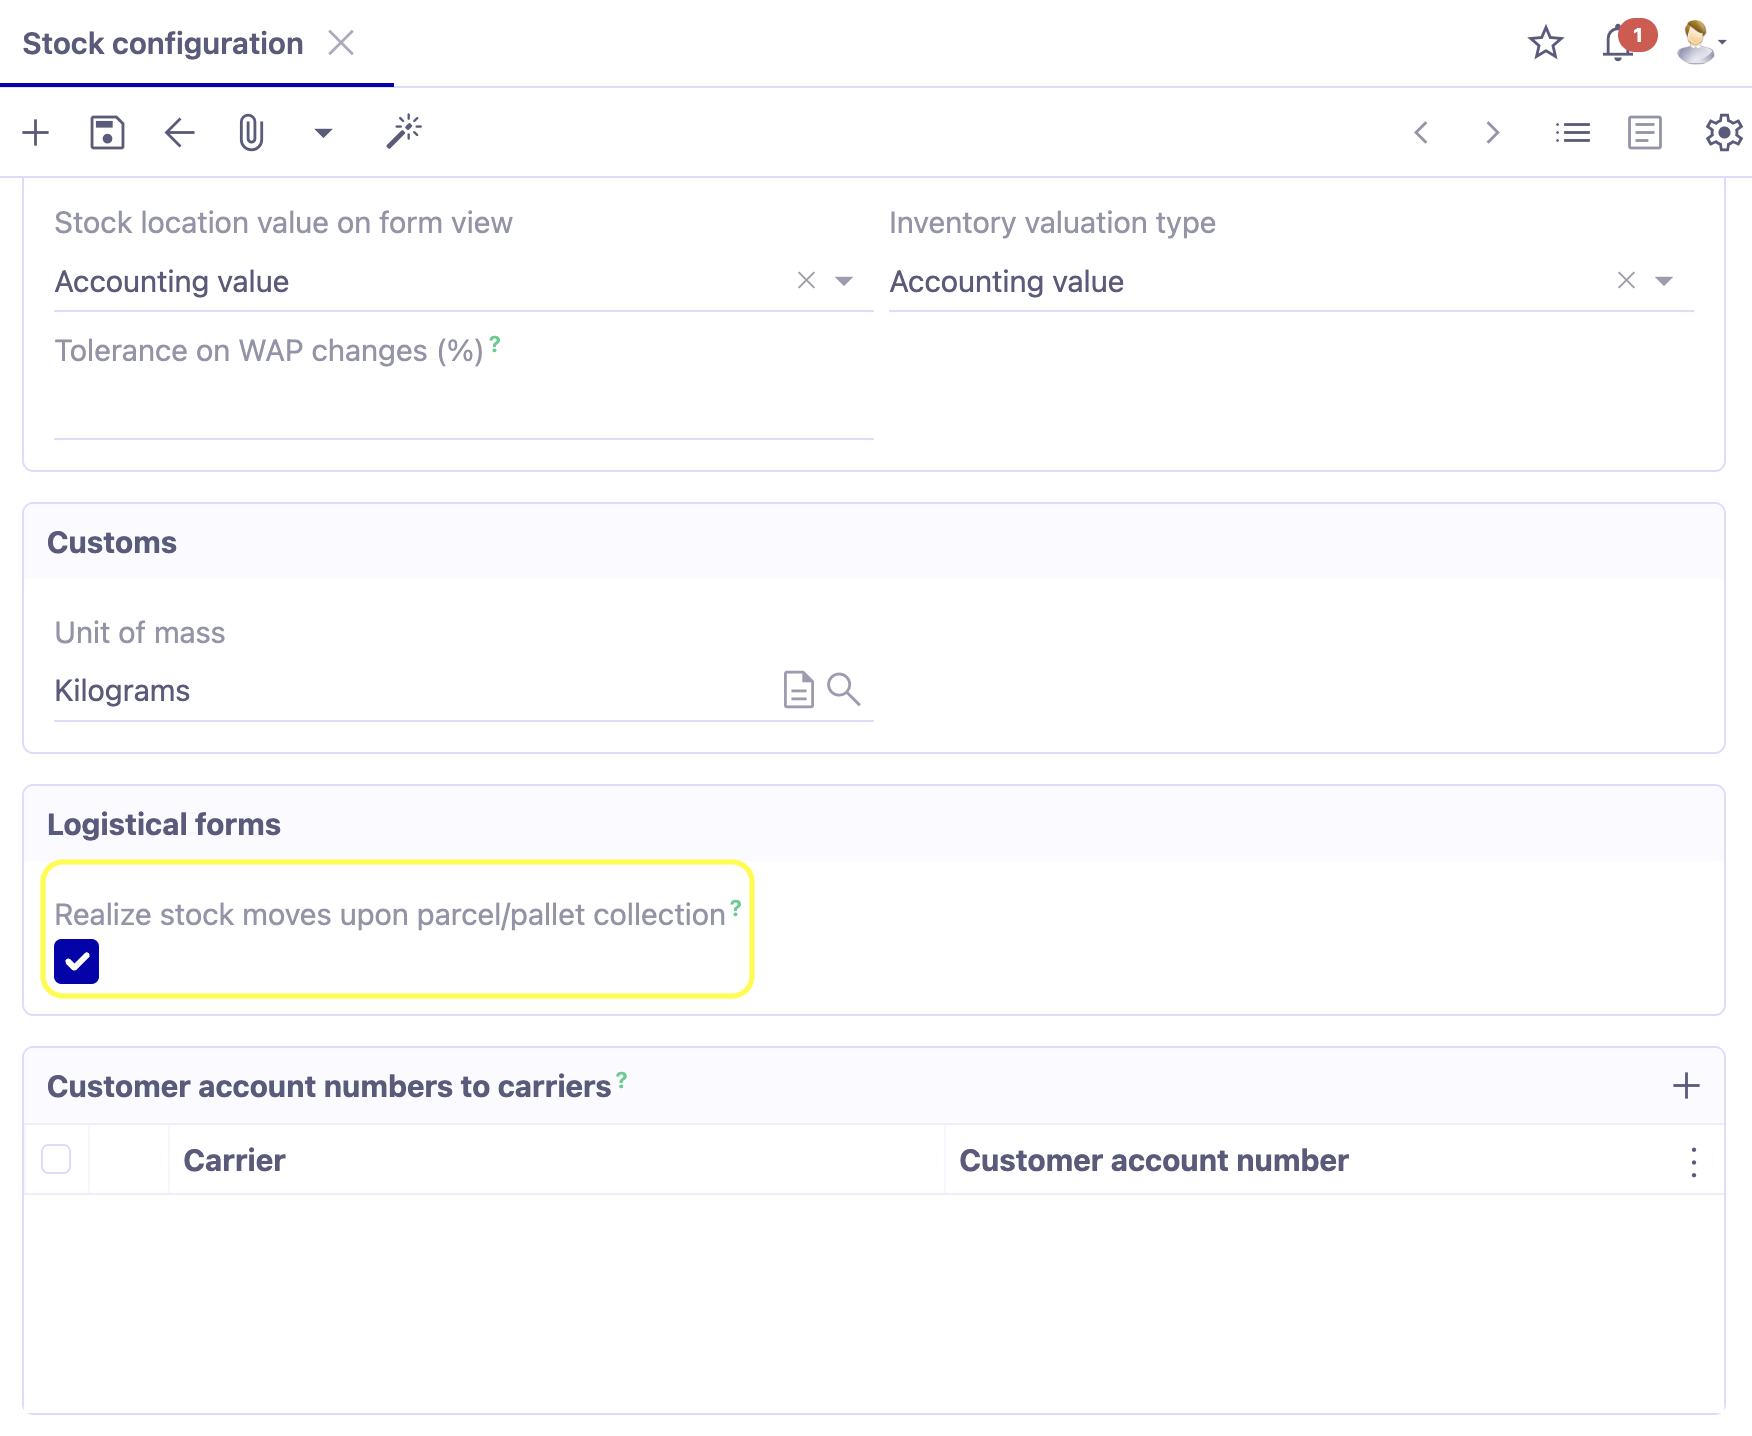
On the Stock configuration by company page, find the logistical forms section.
-
Realize stock moves upon parcel/pallet collection : activate the "Realize stock moves upon parcel/pallet collection" checkbox. This feature is used to automatically transfer Customer deliveries to status "Realized" (i.e. carried out) when a logistical form changes to status "Collected". The status "Collected" describes the physical takeover of the delivery by the carrier.
Functional example
Access : Sales → Sales orders
-
In the example, the order has the status "Confirmed". It is associated with the customer 123 Services.
-
The order is for laser printers with a stock location in the main warehouse.
-
Click on the "Generate customer deliveries" button.
-
The stock move window for a customer delivery will open. For the moment, the status of this customer delivery is "Planned".
-
The next step is to create a logistical form.
Create a logistical form
Usually, a logistical form has the following selectable fields when it is created:
-
Company ;
-
Collection date ;
-
Customer delivery ;
-
Stock location.
The logistical form has two tabs: the General tab and the Lines tab.
-
Open the logistical form (Stock management → Delivery → Logistical forms → + ).
-
Fill in the necessary information. For example, associate the customer who is being delivered with a sales order.
-
Select the stock location. In the example, it's the main warehouse.
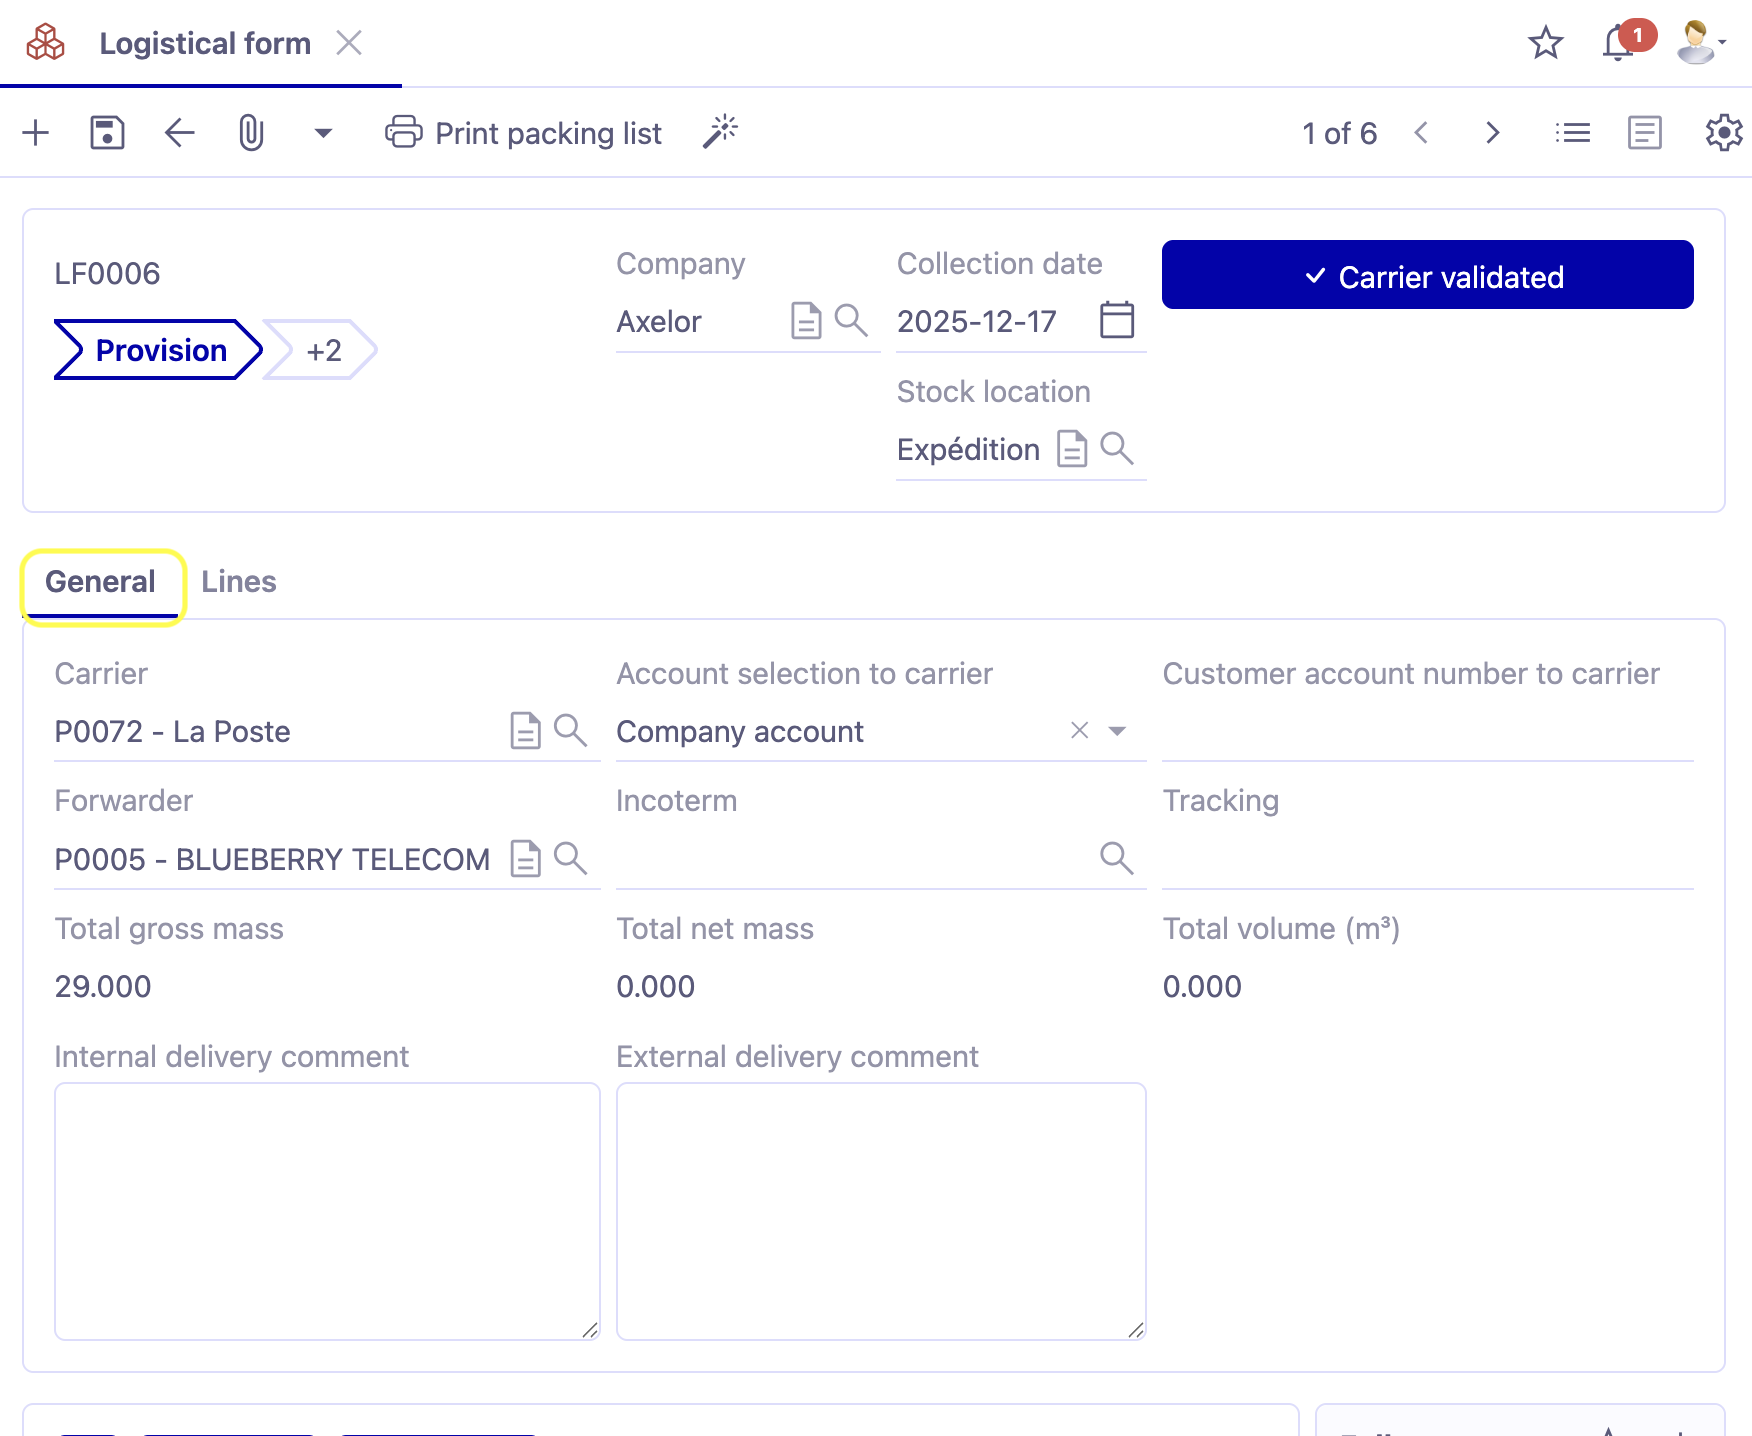
General tab
In the General tab, fill in all the information concerning the transport.
-
Carrier: in the General tab, select a carrier (for example, UPS).
-
Account: select the account with the carrier (in this case, the company account).
-
Customer Account Number: enter the customer account number with the carrier.
-
Forwarder: select the forwarder if applicable.
-
Incoterm: select an incoterm. In the example, it is "Loaded on board".
-
Tracking: add a tracking number for your shipment.
-
Internal delivery comment: add an internal comment in this space.
-
External delivery comment: add a comment, visible on the logistical form.
The physical characteristics of the shipment (net, gross weight & volume) are calculated from the "Lines" tab.
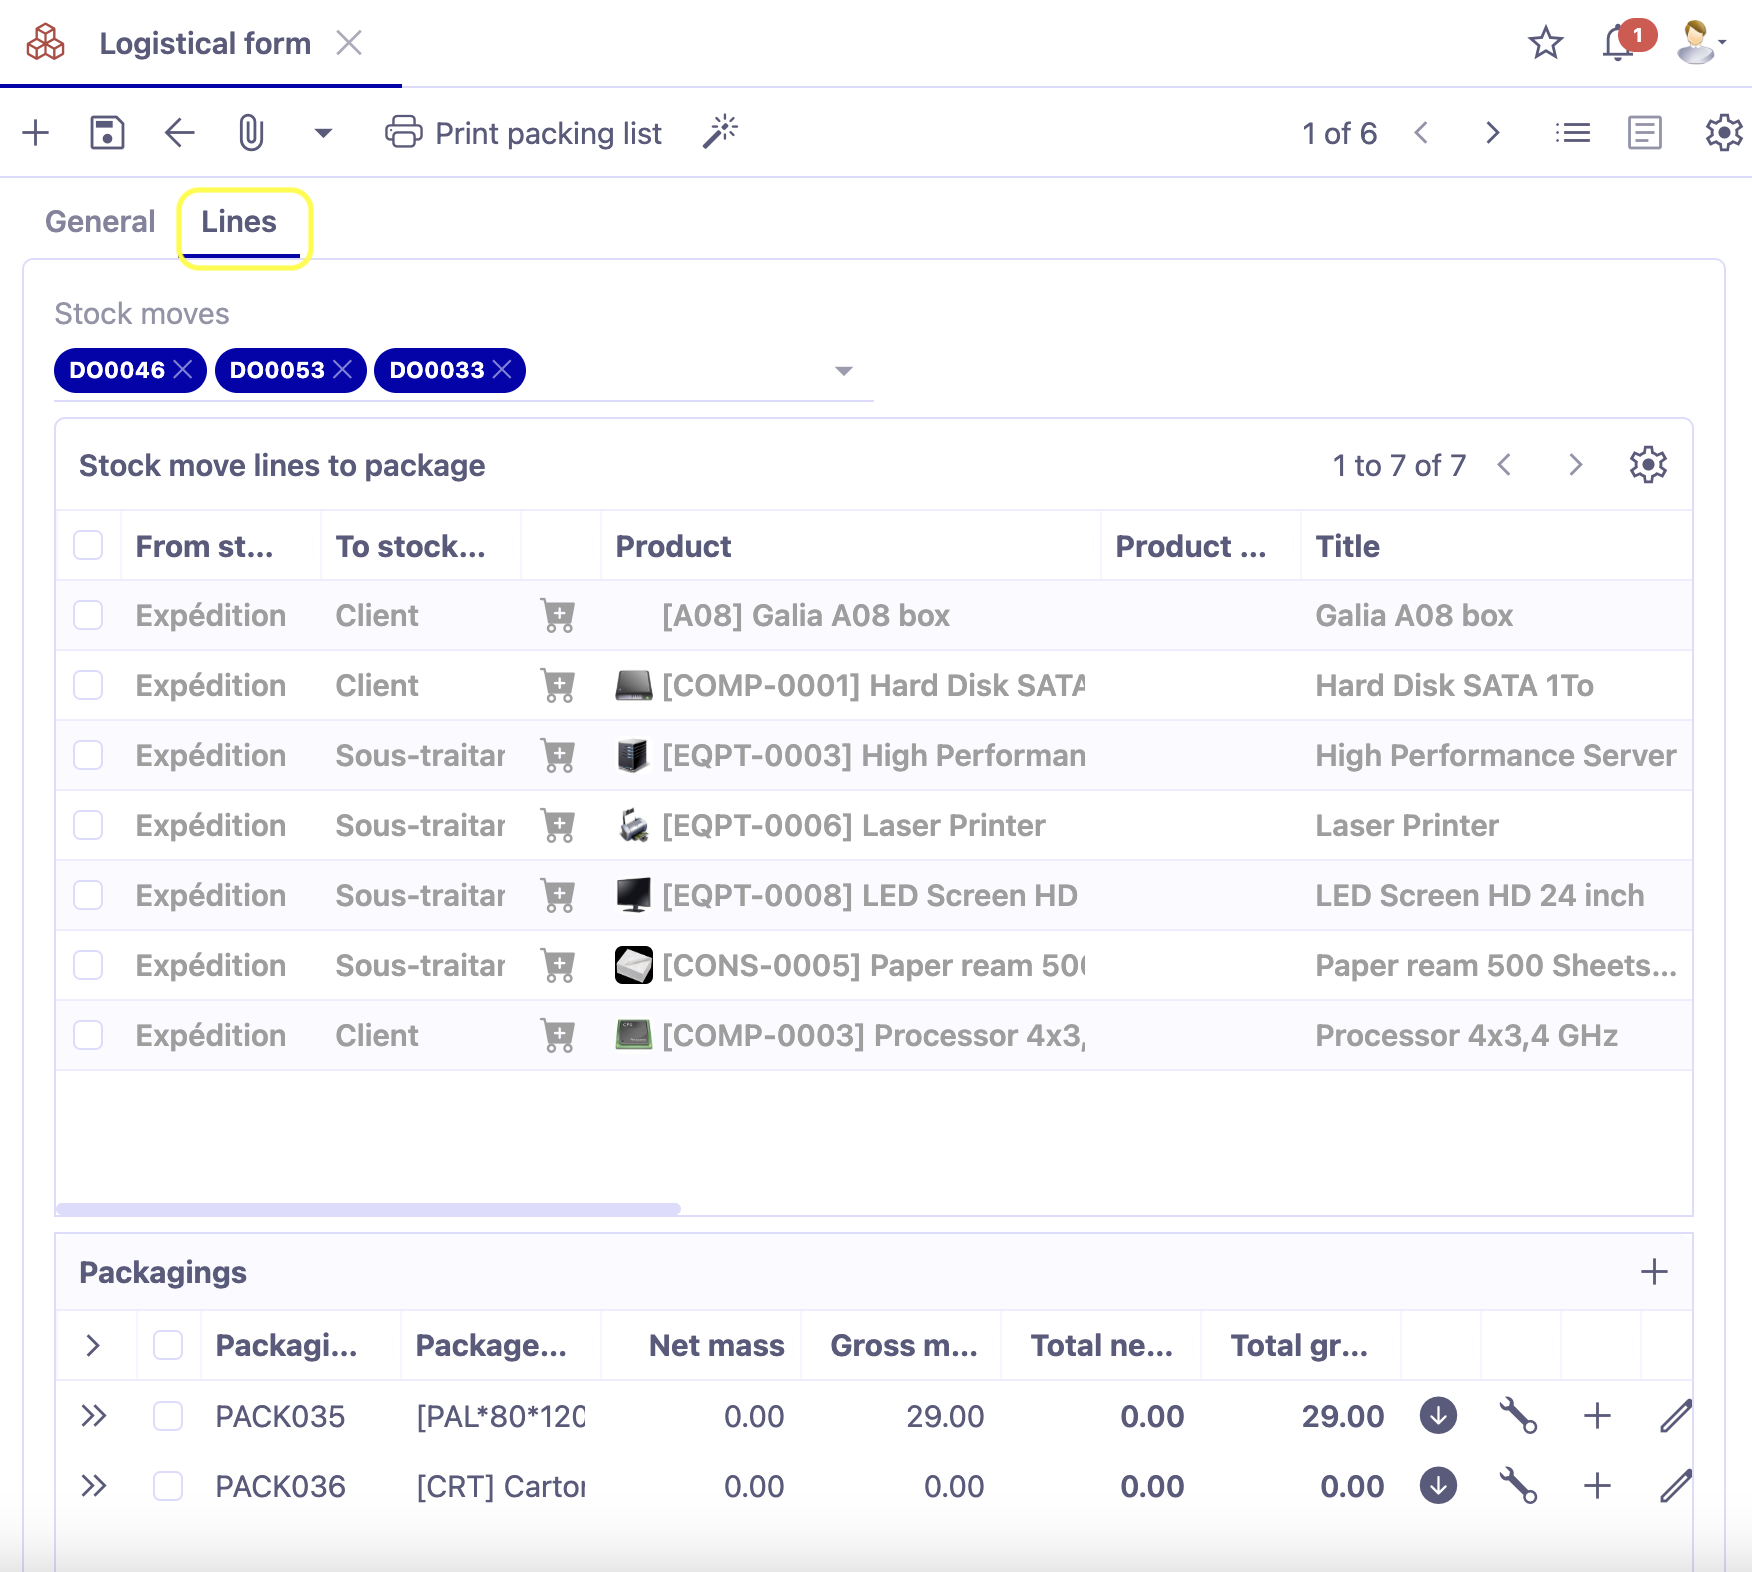
Lines tab
The Lines tab is used to specify the products to deliver, as well as the packaging methods (parcel, pallet, detail). From the "Stock movement" field, you can import the product lines present in a Customer delivery (delivery note) in Planned status. You can import them by pressing the "Add" button after selecting the required customer delivery. You can import several planned deliveries for the same customer.
In terms of packing lines, pressing the "+ New" button allows you to create a new packing method (parcel, pallet, detail). On each packaging line, you can change the type of packaging and enter the gross weight (including the weight of the package) and its dimensions.
Here's a detailed example:
The logistical form has three statuses: Provision → Carrier validated → Collected.
-
In the Stock move field, select a customer delivery item.
-
Then click on the "Add" button.
-
In the "Packing lines" table, the detail lines associated with the customer delivery will be loaded automatically.
-
Packing line : click on the packing line to open the "Packing line" window.
-
Type : in this window, select the type of packaging. For example, select from Parcel / Pallet / Detail.
-
Still in the "Packing line" window, enter the gross weight.
-
Refresh the product net mass : when you return to the logistical form, you will find the "Refresh the product net mass" button at the top of the page. This button allows you to recalculate the net weights on the logistical form.
-
Carrier validated : once the form has been filled in correctly, click on the "Carrier validated" button. The status on the file will change to "Carrier validated".
-
Once the carrier has been validated, the information on the logistical form is updated. The total gross weight is now displayed, as well as the total net weight in the General tab.
-
You can then print the information. The "Print packing list" button at the top allows you to create a packing list in PDF format.
-
Back to provision: by clicking on this button, the user can return to the previous status.
-
Collected: this button is used to confirm that the status has been changed to "Collected", i.e. that the parcel has been loaded onto the lorry.
- Once you have changed the status of the logistical form to "Collected", go back to the Customer Delivery file. Remember to refresh the page.
Update status
-
The status on the Customer Delivery file has changed to "Realized" (completed).
-
The status on the Customer Order form has also changed: the status has changed to "Order completed" because the delivery has been made.
Workflow
-
On the logistical form in "Provision" status, the user can press the "Carrier validated" button, after completing all the necessary information. The status changes to "Carrier validated".
-
Once the status "Carrier validated" has been reached, the user can return to the previous status by clicking on the "Back to provision" button. The user has the option of changing to "Collected" status via the "Collected" button.
-
The status "Collected", if the "Realize stock moves upon parcel/pallet collection" feature is activated (Application config → Apps management → Stock, configure → click on the company file → in the company's stock configuration, activate the option). The "Collected" status means that the parcel has been collected by the carrier. The delivery note will then automatically change to "Completed" status, and the order status will change to "Completed" status.
Logistical forms : packaging
Access: Stock management → Deliveries → Logistical forms
The logistical form is used to describe to the carrier the contents that will go into the truck (pallets/weight/number of pallets/height, etc.).
New tables have been added to the logistical form (Lines tab, Packagings & Stock move lines to package table).
-
Deliver to customer: select the delivery customer.
-
General: enter the information in the General tab (carrier/freight forwarder/selection of carrier account, etc.).
-
Lines: open the Lines tab.
-
Stock movement: select the stock movement.
-
Packagings: a packing line will appear. For example, this line concerns 200 hard drives.
-
Packaging: added lines will allow order pickers to describe the packaging that is used. Click on + to add packaging. Select, for example, a pallet.
- Add child packaging: click on the round icon (on the right) to add new packaging or click directly under the packaging line (on the left, at the beginning of the line).
-
Add packaging lines from selected stock movement lines: click on the cog icon to open the “Add packaging lines from selected stock movement lines” window. From this window, you can select the stock movement lines in the corresponding table.
-
Add packaging lines: once you have selected the products you want to put in the package, click on the “Add packing lines” button.
-
Packaging: the packaging will be visible in the “Packaging” table (Lines tab) on the logistics sheet. If you click on a line, a sub-table “Packing lines” will open. The packing line contains information about the contents of the package, for example, 100 hard drives.
-
Change allocated quantity: in the packing lines, it is possible to modify the quantity. Click on a line in a “Stock move lines to package” table. For example, instead of 100 hard drives, you want to put only 50 hard drives in the box. As a result, the “Stock move lines to package” table will be updated. To reflect the fact that the order is incomplete, the line in the “Stock move lines to package” table changes color (orange).
-
Remaining quantity to be packed: The remaining quantity to be packed will be visible in the “Remaining quantity to be packed” column in the “Stock movement lines to be packed” table.
-
When you add another package (Package table) with the remaining products, the line in the “Stock move lines to package” table will be updated. Once the order is complete, the line changes color (green) to reflect this fact.
The modified packaging quantity can be seen in the General tab of the logistics sheet, in the “Gross weight” and “Net weight” fields.
The Stock Movement sheet (Carrier tab) also takes into account changed packaging quantities (number of packages, pallets, and gross weight). If the changes have been made but you cannot see them, remember to refresh the page.
- Print packing list: on the logistics sheet, click on the ‘Print packing list’ button. New information has been added to the printout: the package, the pallet, the weights, and the quantity.
Set default packaging for each product: open the Product sheet (Sales → Products & Services → Packing tab).
In the Product packaging section, configure the default packaging for this product.
In order to configure the default packaging for a product, remember to configure the packaging beforehand. Access: Stock management → Deliveries → Packagings. It is always possible to create new packaging according to user needs.
This product is packaging: check the “This product is a packaging” option when it is packaging.
Multi-client logistical form
Starting from version 8.5, the new “Multi-client logistics file” option is now available in the company configurations.
Access: Application config → Apps management → Stock → click on the company file → in the “Stock move information” section, activate the “Multi-client logistical form” option.
-
Multi-client logistical form: once this option is activated, the customer field will disappear from the logistical file.
-
Lines: on the logistical file, open the Lines tab (Access: Stock management → Deliveries → Logistical forms).
-
Stock move: it is now possible to select several deliveries from different customers in the Stock move field.
-
Print packing list: when printing, multiple customers will be visible on the packing list.