Create and perform a bank reconciliation
Creating a bank reconciliation
In order to create a bank reconciliation, go to the menu :
Access: Accounting → Bank Reconciliations → Bank Reconciliations
-
From the list view, click on the + icon to create a new record, which will open with the preloaded values.
-
Start the bank reconciliation: in the form view of a bank statement, click on the “Start bank reconciliation” button.
Bank reconciliation process
The bank reconciliation process consists of 8 main steps:
-
Session settings: define the parameters for the reconciliation session (Statement, Journal, Cash account, Currency, Dates). If you are reconciling directly from the statement, this data will be preloaded. Otherwise, you can fill in the fields manually.
-
Load statement: button to load statement lines (and if enabled, accounting + auto-reconciliation).
-
Bank reconciliation table: here you will find the statement lines and, if the “Include other statements” option is checked, you will also find old statement lines that have not been fully reconciled.
-
Accounting moves table: moves (entries) are filtered by date and account, if applicable.
-
Automatic accounting: here you will find the Automatic accounting button. This button is used to manually trigger automatic accounting. It will use the automatic accounting rules to generate the accounting entries corresponding to the defined rules and the various statement lines.
-
Automatic reconciliation: click on this button to perform automatic reconciliation on the various statement lines with the entries to be reconciled.
-
Reconcile/Unreconcile: it is possible to perform manual reconciliation/unreconciliation.
-
Calculate balances: it is possible to check the balances and recalculate them by clicking on this button.
-
Validate reconciliation: validate the reconciliation once all the information has been entered.
The different bank reconciliation statuses:
Draft: initial status. A sequence is assigned only when saved.
Validated: this status is assigned after clicking on the “Validate reconciliation” button (consistency checks apply).
Under correction: once the status is “Validated,” you can click on the “Correct” button to correct the reconciliation.
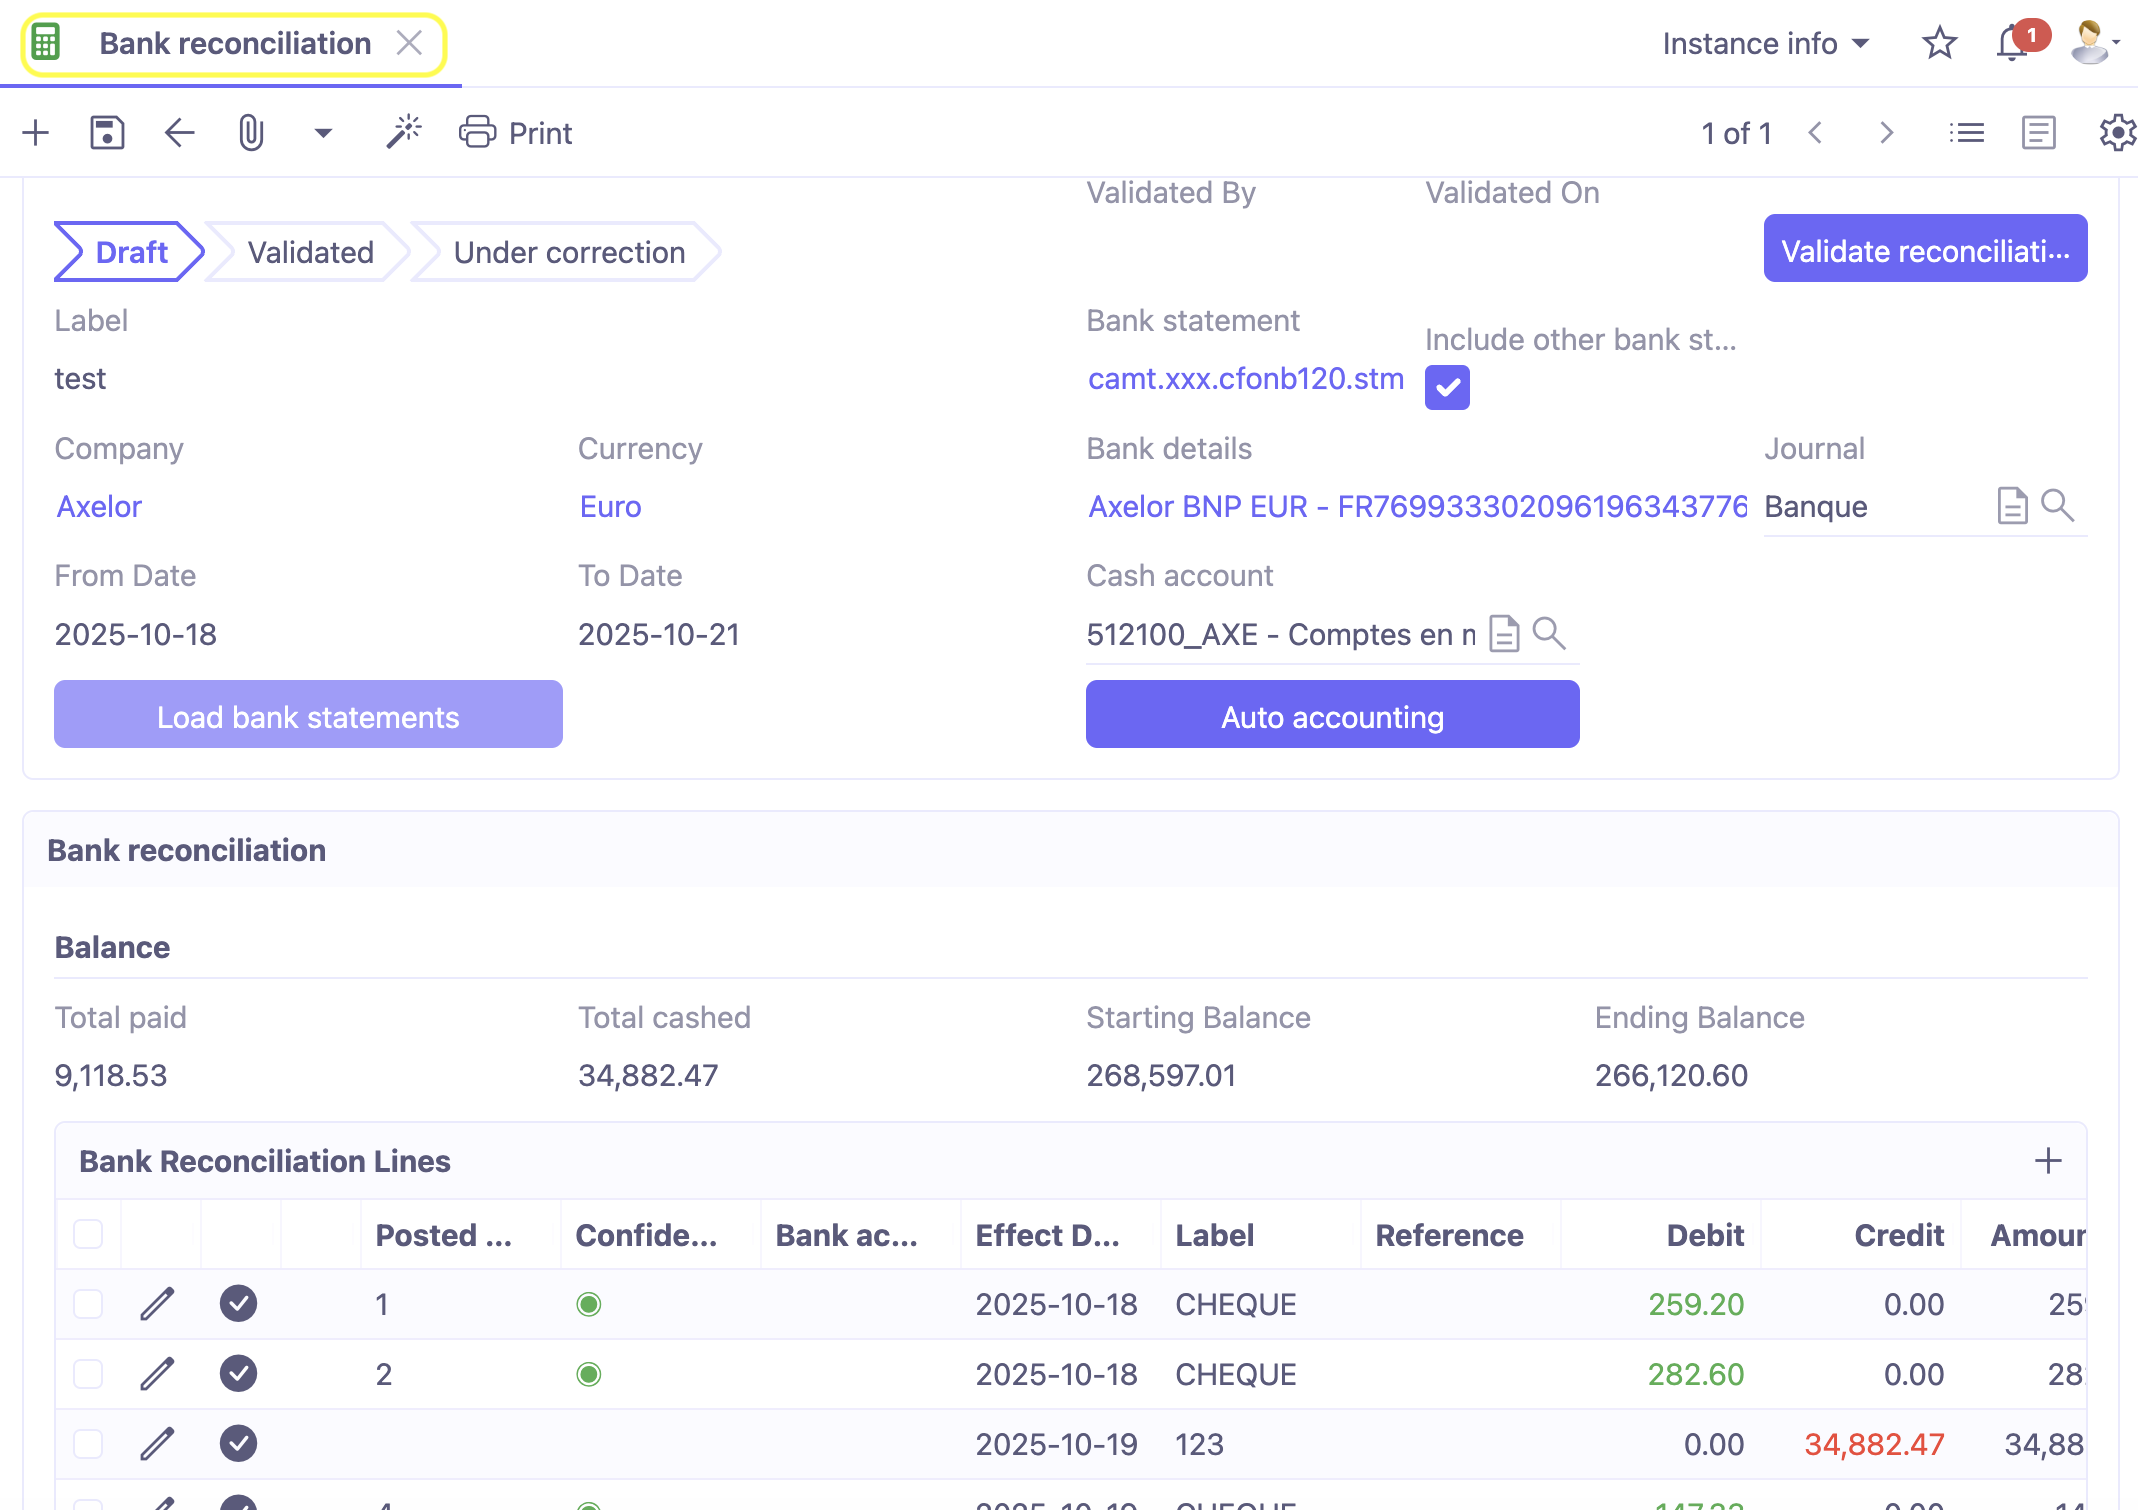
Step 1: Complete the header
The bank reconciliation header consists of the following fields:
-
Status: the status is used for accounting and certain associated settings.
-
Description: identifies what the bank reconciliation corresponds to. It can be free text or pre-filled with the statement reference if it was generated from a statement.
-
Company: company to which the statement is linked.
-
Currency: currency of the statement.
-
From-to date: date range corresponding to the statement.
-
Bank statement: selection of a bank statement to load.
-
Include other bank statements: you can include lines that have not been fully reconciled with other statements.
-
Bank details / Journal / Liquidity account: these fields are used to define the reconciliation environment. By default, you will have a liquidity account and/or a journal per bank account (bank details).
Step 2: Load bank statement
The “Load bank statement” button allows you to upload the bank statement lines to the “Bank reconciliation lines” table. Either there are only lines that have been selected, or there may also be old unmatched lines (in this case, the “Include other lines” option must be enabled).
In Bank payment settings:
-
Auto accounting: when this option is enabled, the system will launch Automatic posting after loading the bank reconciliation lines (equivalent to the manual action of the “Automatic posting” button).
-
Auto reconcile: once this option is enabled, the system will launch Automatic reconciliation after loading the bank reconciliation lines (equivalent to manually clicking the “Automatic checking” button).
Step 3: View the reconciliation lines
The Bank reconciliation lines table contains the following information:
-
Link to the bank statement line.
-
Fields that are required for reconciliation which will be taken from the statement line:
-
Effective date;
-
Description, reference, origin;
-
Debit, Credit;
-
Amount remaining to be reconciled.
- Fields allowing posting upon validation of the bank reconciliation:
-
Type: General, Supplier, Customer (to specify the line type);
-
Partner: partner (third party) involved in the transaction;
-
Account: Account taken from the partner record which will depend on the selected type.
-
Reconciliation entry line.
-
Only in the list view:
-
Reconciliation number: this number is carried by the reconciliation line and transferred to the accounting move line to which it is attached;
-
Confidence index: is used for automatic accounting and associated with the reconciliation using a rule;
-
Accounting/reconciliation rule (query): rule that resulted in the reconciliation.
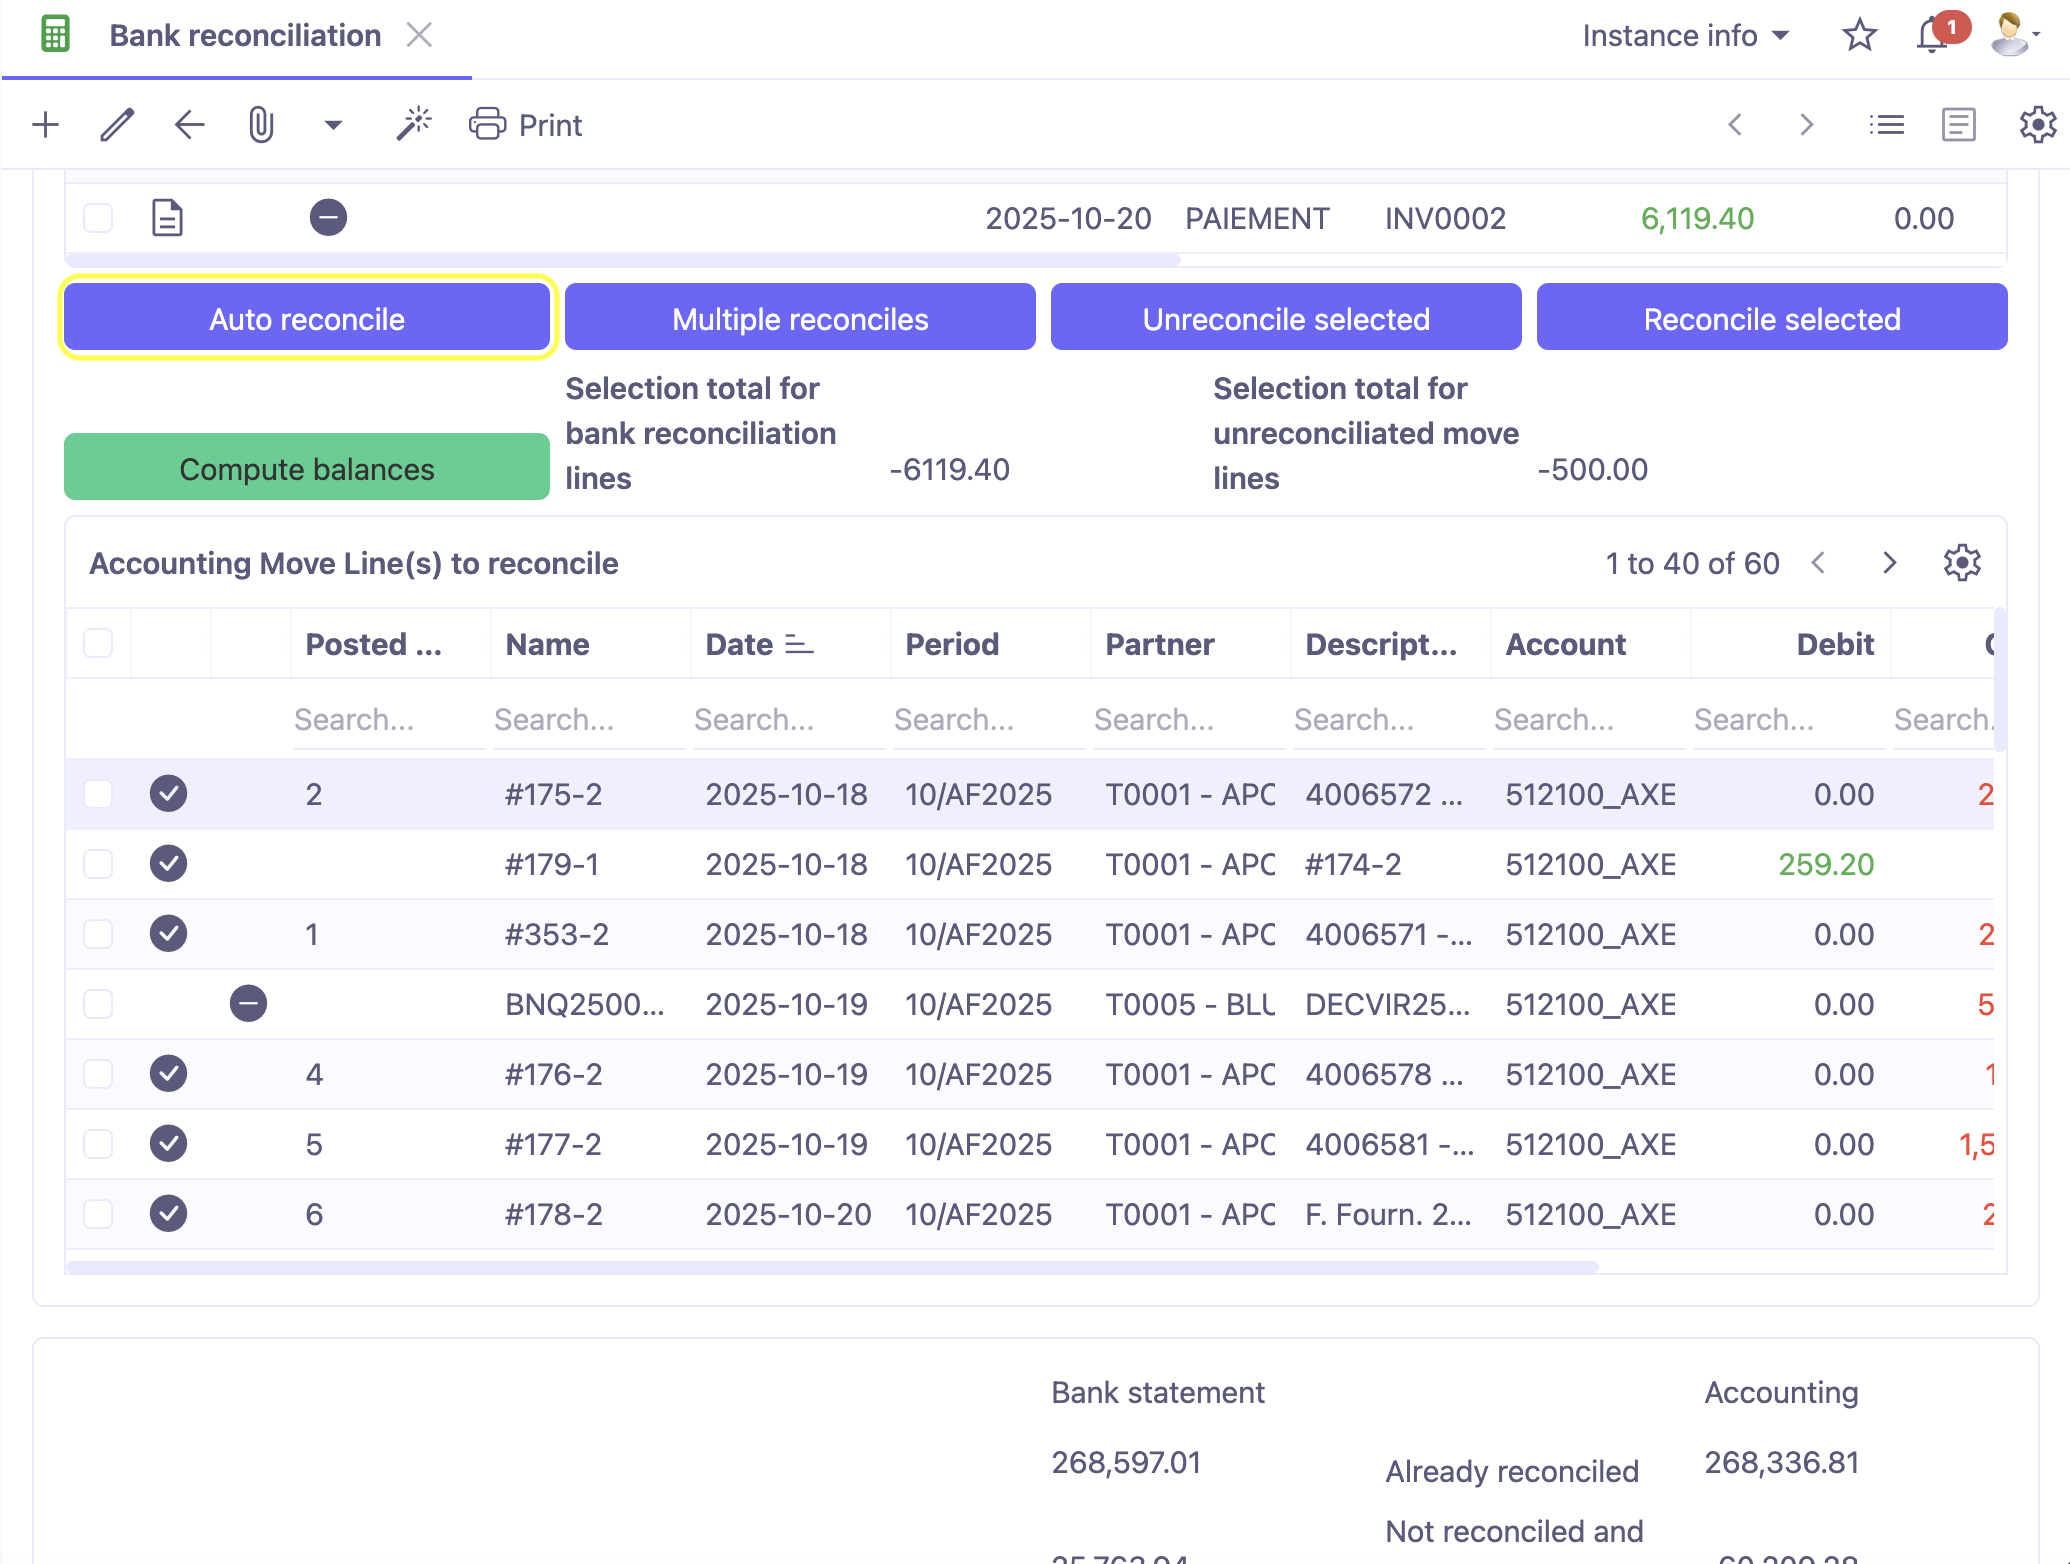
Step 4: Search for moves to reconcile
The “Moves to be reconciled” table lists the unreconciled accounting entries on the selected cash account, taking into account following information:
-
Move lines on the financial account (if selected in the header).
-
Move lines in the journal (if selected in the header).
-
Move lines whose reconciled amount is less than the move amount.
-
If the reconciliation:
-
Includes other statements: no filter on dates;
-
Does not include other statements: entry date between the date limits for reconciliation.
- The Print button at the top of the taskbar allows you to print the list of moves:
-
First part: the table of unmatched moves;
-
Second part: the table of bank reconciliation lines.
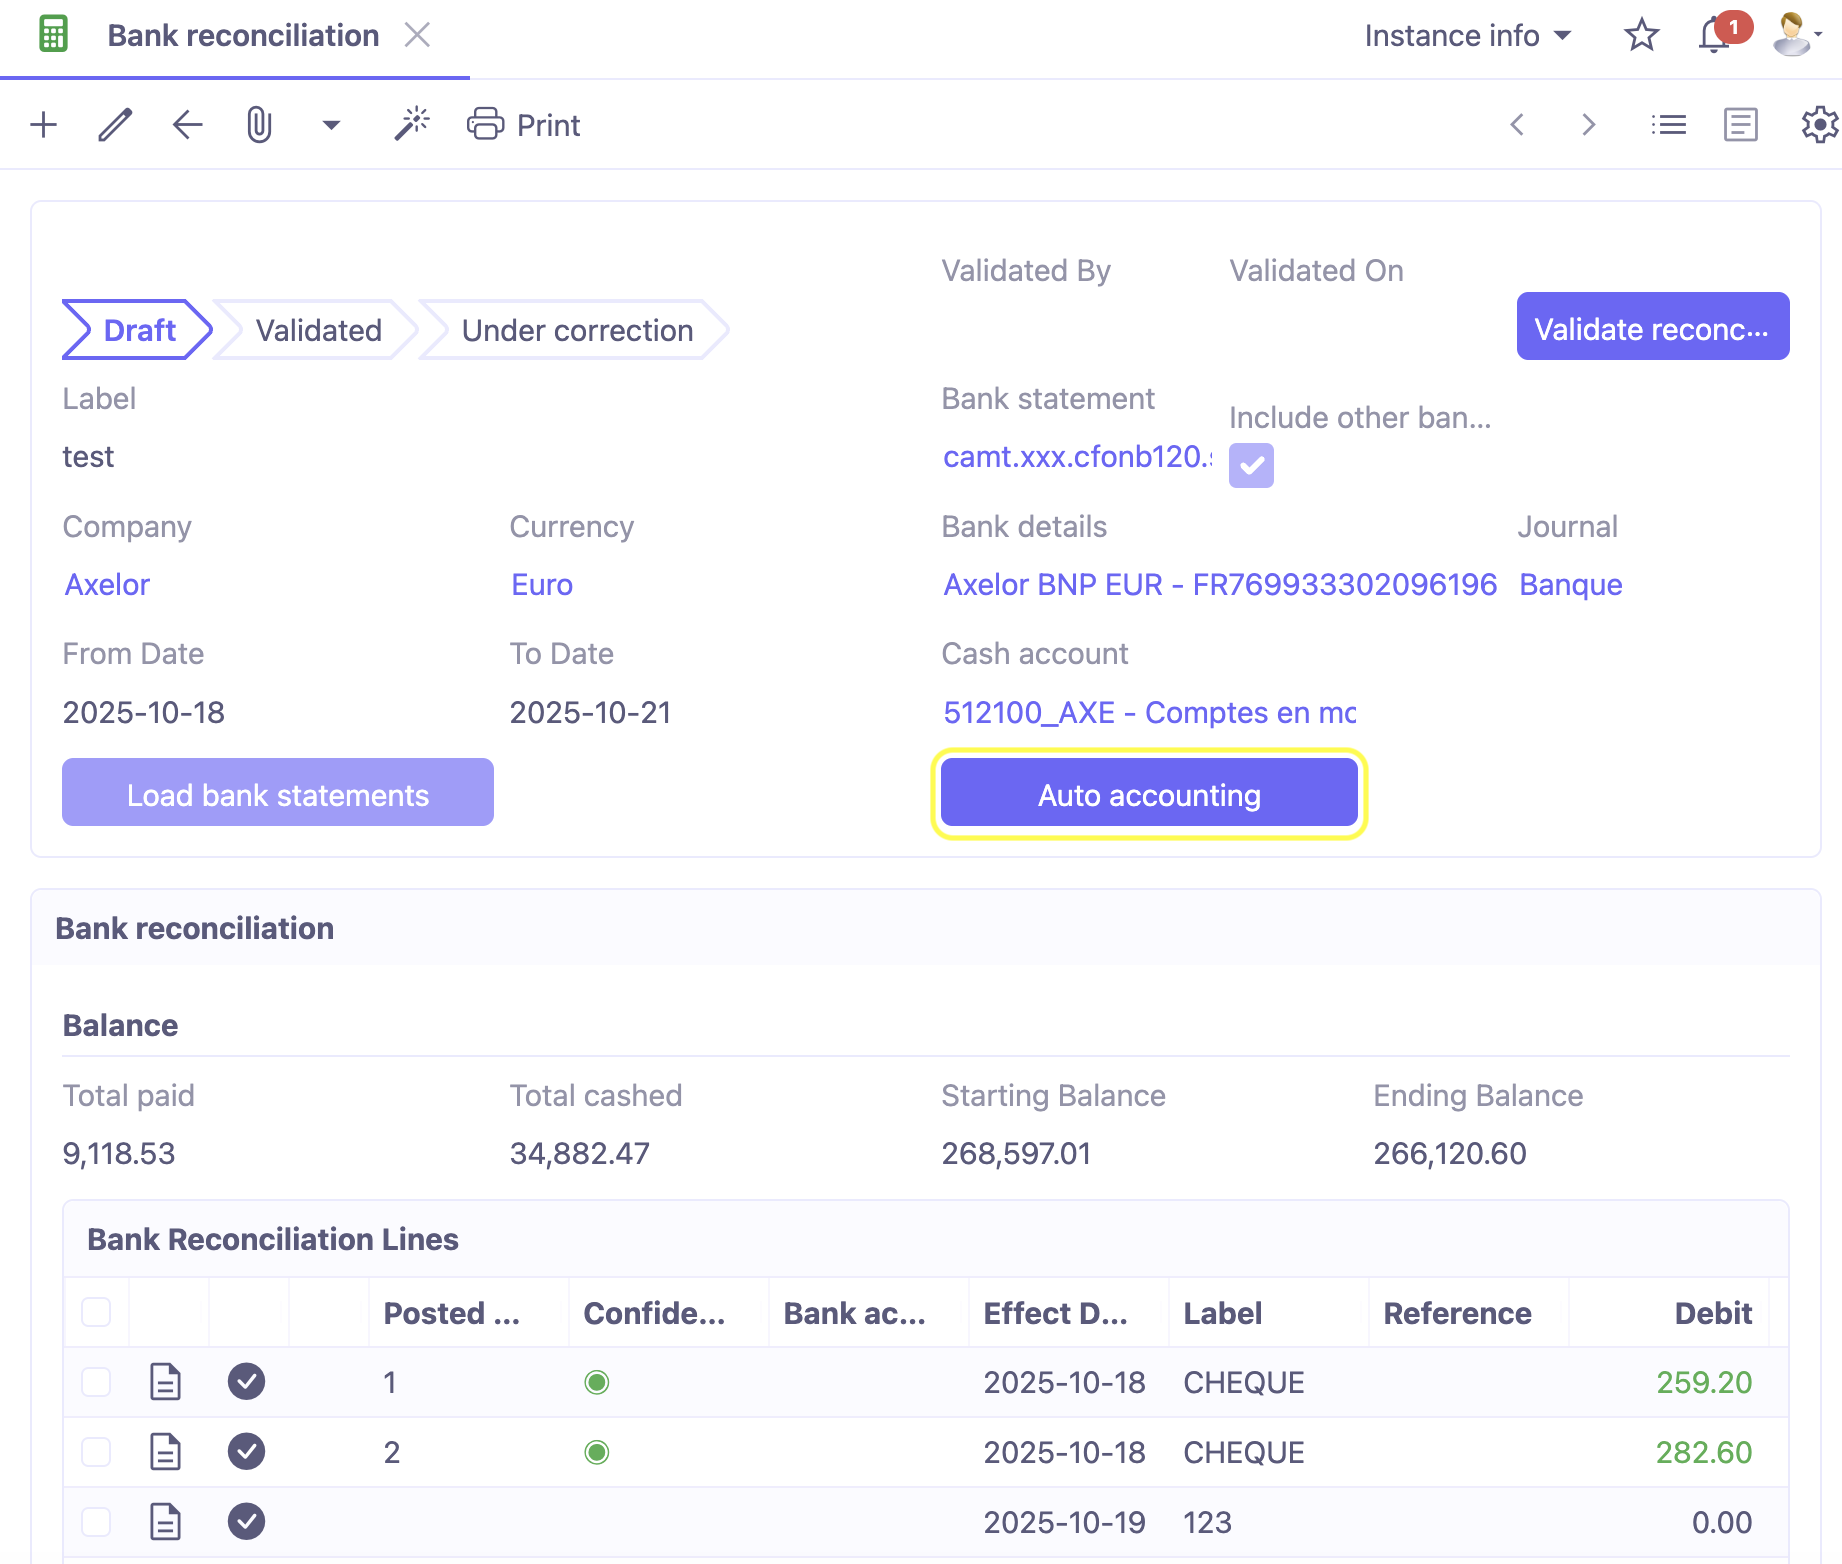
Step 5: Automatic accounting
Auto accounting: the “Auto accounting” button allows you to manually trigger the automatic posting mechanism.
AOS will check each reconciliation line to see if one of the rules linked to the statements is applicable. As a reminder, it is the query associated with the rule that drives the test, namely:
-
If, for example, the query is based on “Description containing”.
-
That on the rule, the label searched for is, for example, FR14ZZZ012345 (which is an ICS creditor number).
-
Then, if the bank reconciliation line contains this label in its description, an accounting entry will be generated automatically with:
-
Journal = the bank journal associated with the rule or a bank account journal;
-
Date = Value date of the line or effective date;
-
Partner = Partner that has been defined for the rule (selected for the rule, or defined dynamically by a Groovy formula based on a defined rule);
-
Move line 1: on the bank account defined on the Payment Accounting Management rule.
-
Move line 2: on the contra account defined on the rule linked to the statements
-
Amount: same amount, if debited on the statement then credited to the bank account, if credited on the statement, then debited to the bank account.
- Thus, if automatic accounting is applied, the reconciliation line on the statement will be updated with the following characteristics:
-
A reconciliation number;
-
A green confidence indicator (because the match was generated via a configured rule);
-
No accounting/reconciliation rule (reconciliation);
-
Selected move line.
Step 6: Auto reconcile
The “Auto reconcile” button allows you to manually trigger the automatic reconciliation mechanism.
AOS will check each of the reconciliation lines to see if any of the Automatic Reconciliation bank statement requests meet the criteria compared to the entries in the “Accounting move lines to reconcile” table. The rules are executed in sequence (field to be defined in the rule).
The following information must be true:
-
The most precise rules come first with a “Green Circle” confidence index.
-
Rules with one interval come second with an “Orange Square” confidence index.
-
Rules with two intervals come last with a “Red Triangle” confidence index.
-
If the rule for reconciliation returns true, then the bank reconciliation line will be assigned:
-
A reconciliation number (visible on the bank reconciliation line);
-
A reconciliation confidence index to alert the user;
-
The link to the rule that enabled the reconciliation to be established;
-
The link to the move line will be created;
-
The move line will be assigned the reconciliation number (which will appear in the table of moves to reconcile).
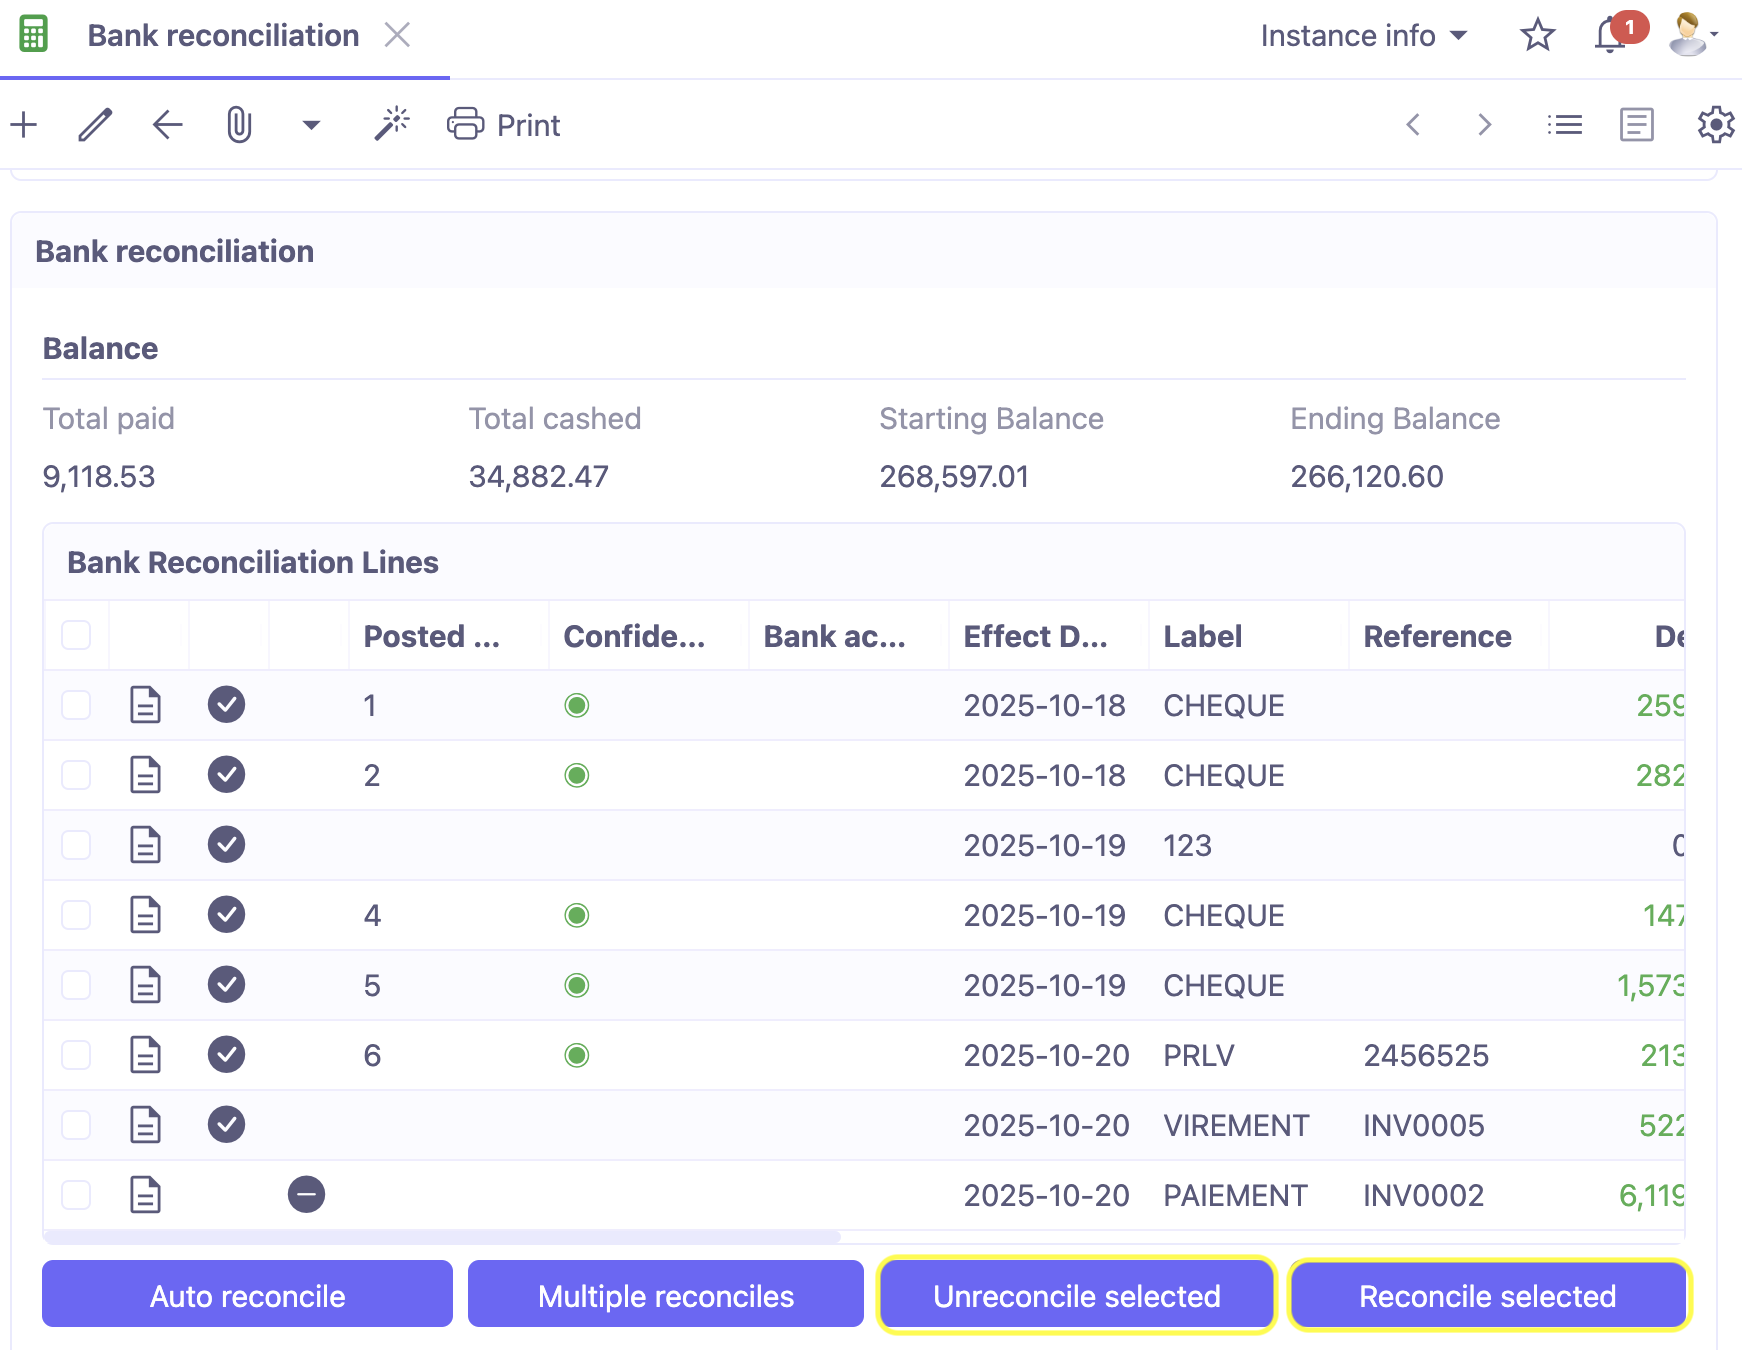
Step 7: Manual reconciliation/unreconciliation
If, for a particular reason, manual reconciliation must be performed, the user has several options.
CASE 1: Manual reconciliation/unreconciliation using the Select button:
-
Reconcile: manually select a line in each table, then click on the “Reconcile” button. In the Bank reconciliation lines table, click on the ✔ button (the “Confirm” check mark). In the Journal Entries table, click on the ✔ button. Then click on the “Reconcile” button.
-
Unreconcile: to unmark, the process is the same, except that only the Bank Reconciliation line needs to be selected. Then click on Unmark, which will delete the marking number on the lines and delete the entry on the bank reconciliation line.
CASE 2: manual reconciliation/unreconciliation by selecting/deleting the entry line:
-
Reconciliation: for a reconciliation line that does not have an entry line, switch to edit mode on the line. Then select a Move Line from the list in the Move Line column (using the magnifying glass). A reconciliation number will be automatically assigned to both the Reconciliation Line and the move line table.
-
Unreconciliation: the same process applies, but in reverse: by deselecting the move line, the link number will be deleted.
CASE 3: reconciliation by selecting the type/partner/account and generating the move when the reconciliation is validated:
-
For a reconciliation line that does not have a move line, switch to edit mode on the line.
-
Then select a type, a partner, and a counterpart accounting account of the bank account.
-
Then click outside the table to return to read-only mode and save the line.
-
Once the reconciliation has been validated, the move line will be generated automatically.
-
When the reconciliation is validated, if at least one line has a partner and an account, a warning message will be displayed. Click OK to generate the move line.
CASE 4: multiple checking by selecting the reconciliation line and moves: in some cases, particularly in global and non-detailed operations (e.g. transfers), the statement shows a single line even though several payments have been executed together.
-
Select the line (CTRL + left click or with the checkbox at the top of the line), then click on the “Multiple reconciliation” button.
-
A pop-up window will open allowing you to select the payment move lines on the relevant bank account (same moves as in the Moves to reconcile table).
-
Once the moves have been selected, the amount of the selected moves is displayed at the bottom left. Click on the “Validate” button.
-
Finally, back on the bank reconciliation screen, AOS will have performed the following actions:
-
Split the line into N reconciliation lines corresponding to the amount of the selected entry lines. In the example shown here, the customer credit line 123 Service of 38,442.47 is broken down into 2 lines of 13,953 (40%) and 29,929.47 (60%).
-
The new reconciliation line that has been generated (the one with reconciliation No. 9) is linked to the initial statement line.
-
Each line has been automatically pointed to the original move line.
Step 8: Checking balances
The principle of bank reconciliation is to check that there are no discrepancies between the accounts and the bank statement. To this end, the reconciliation provides a printout and several indicators for the balances:
- The detailed report can be printed as a PDF (print button at the top of the page) and is divided into two parts:
-
Part 1: reconciliation statement showing the reconciled lines on the left and the corresponding accounting entries for the period on the right.
-
Part 2: statement of unmatched entries, showing the unmatched reconciliation lines on the left and the corresponding unmatched/reconciled accounting entries from the bank journal for the period on the right.
- Indicator panel No. 1: this can be found above the bank reconciliation lines.
-
Total paid: total amount debited from the lines in the reconciliation table.
-
Total received: total amount credited to the lines in the reconciliation table.
-
Opening balance: balance from the previous bank reconciliation (or, in the case of the first bank reconciliation, equal to the opening balance on the statement).
-
Closing balance: Opening balance + SUM of (Debit - Credit) of the bank reconciliation lines (with a selected entry line / 3rd indicator in the table at the bottom).
-
The closing balance is updated as reconciliations are made.
-
Indicator panel No. 2: can be found at the bottom of the form.
-
On the left are the balances from the bank statement, and on the right are the balances in the accounts.
-
The “Calculate balances” button updates the balances.
-
Already reconciled: is about the sum of the amounts in the validated reconciliation lines VS the lines in the bank account (Reconciled amount);
-
Unmatched and pending: sum of the amounts of unmatched reconciliation lines (without entry lines) and pending reconciliation (with entry lines) VS unmatched lines and pending reconciliation on the accounting account;
-
In progress: sum of the amounts of the reconciliation lines in progress (reconciliation not validated) compared to the accounting moves that were selected in the reconciliation in progress;
-
Remaining to be reconciled: sum of the amounts of unreconciled reconciliation lines on the statement compared to unreconciled accounting moves on the accounting account (without reconciled amount or reference number);
-
New Theoretical Balance: Already reconciled + In progress.
- Validating the bank reconciliation results in:
-
The reconciliation status changing to Validated;
-
Reconciliation lines with a move line are marked as “Accounted” (see checkbox at the end of the line);
-
The move lines in case No. 3 mentioned above are generated. That is, the lines that were with a selected bank account and/or a selected partner will be generated directly when you validate the bank statement.
Moves: this button opens the list of reconciled entries. ::
Correct a reconciliation
When the reconciliation status is “Validated”, the “Correct” button allows you to correct the statement in case of an error during reconciliation.
The status changes to “Under correction” and the reconciliation lines table is no longer read-only and the “Validate reconciliation” button can be clicked again. This allows you to re-validate the correction.
The correction must be accompanied by a comment in order to be validated. A specific field is located next to the balance calculation box.
Once the correction has been made, click on the “Validate” button to confirm the reconciliation correction and the reconciliation status will return to "Validated".
If you make any changes, you will need to press the “Calculate balances” button again to update all balances.