Install & Configure File Generator
Introduction
This section describes the procedure for adding the File Generator module to an existing project.
It is essential to ensure that you implement the version of the module that corresponds to the version of AOS currently deployed. A compatibility summary table is available in the first pages of the documentation to guide you in this choice.
Prerequisites
Before proceeding with the installation, certain conditions must be met:
-
Licenses: it’s compulsory to have valid Guardian licenses to use AOS products.
-
AOS environment: it’s mandatory to have previously deployed an operational AOS webapp.
-
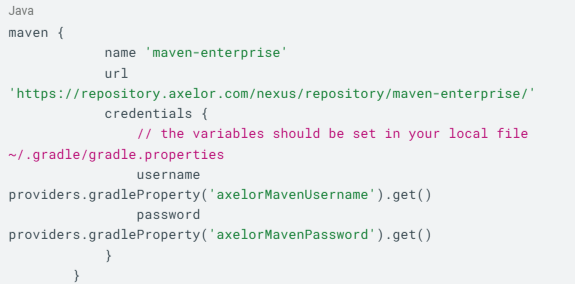
Maven configuration: add a Maven reference to the webapp's settings.gradle file, allowing the necessary dependencies to be retrieved from the enterprise Nexus.
Installation
During installation, it is essential to check compatibility between the desired version of the File Generator module and the version of Axelor Open Suite (AOS) currently in use. To integrate the Dematerialization module, the Nexus dependency corresponding to the appropriate version must be added to the project. Depending on your needs, you can also add specific dependencies, including:
-
Edifact (for inter-company data exchange files),
-
Mindee or Rossum (for certain additional features).
If the project is limited to processing files in Edifact format, it is not necessary to integrate the entire Dematerialization module. Adding the Edifact dependency alone is sufficient.
Additional libraries
The use of the Edifact-lib library does not require any additional configuration, as it is directly included in the Edifact module.
Configuration
File generation can be customized by configuring the elements described above.
This section presents, step by step, the method to follow to configure the File Generator module, in a logical and intuitive order. Each AOS object is first interpreted to produce an intermediate JSON file.
This JSON is then converted to the desired output format (e.g., Edifact, Factur-X, etc.). All configuration examples shown are based on the JSON structure, which is the common basis. Specific sections later in this document detail the specific characteristics of each format (e.g., Edifact).
Schema
Access: File generator → Configuration → Schema
The first step is to fill in the schema header by specifying:
-
the name of the schema,
-
the type of document to be generated (e.g., invoice, purchase order, etc.),
-
the type of target format (Edifact, JSON, etc.).
Fill in the schema fields. The goal of the configuration is to reproduce the JSON structure by filling in the schema with the corresponding keys and values. To do this, the module uses the tree-grid widget (tree view), which allows you to visually represent the data hierarchy.
When it is necessary to go down the JSON hierarchy, you must specify the key of the parent element and add a sub-element to the schema. Thus, each level of depth in the JSON is translated in the schema by a nested tree structure, ensuring a faithful correspondence between the source data and its configured representation.
Example: Let’s suppose that the reference of an object must be stored under a segment entitled “general information” and associated with the key “tracking number”. The configured schema will then produce a structure similar to the following in the reference JSON:
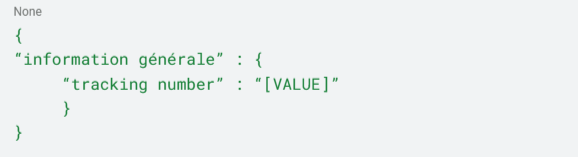
This results in the following schema:
“General information”
“tracking number” ☐ [reference]
Filling in the schema fields
In the schema field previously named reference, select the element of the AOS object from which the information will be extracted.
-
In the meta field, indicate the specific field to be retrieved.
-
It is possible to associate a mapping rule in order to:
-
Interpret the extracted value (e.g., transformation, conversion),
-
Or define a default value when the information is not available.
List management:
-
To generate a list, simply check the box provided for this purpose.
-
If this list will contain information from the lines of an object, it is necessary to enter the meta field corresponding to these lines in the schema field of the parent element.
-
This way, the sub-elements of the list will only have access to data specific to this type of line.
Example: invoice lines
The lines of an invoice must be represented by a list containing, for each line, the name of the product and its quantity. The configured schema must therefore allow the production of a JSON structured as follows:
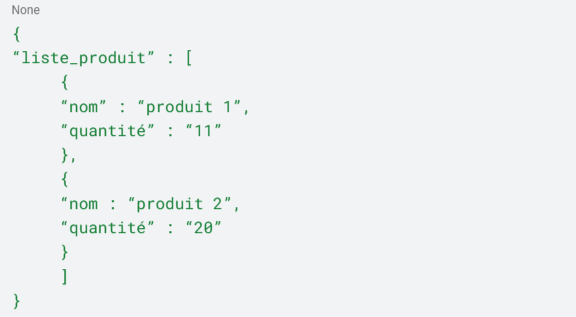
In the diagram, in order to use the lines of the invoice object, it will give:
“product_list” ☑ [invoiceLineList]
‘name’ [productName]
“quantity” [quantity]
In the example below, the parent element product_list contains two essential pieces of information:
-
An indication that it is a list.
-
The link to the relevant line type (here, invoiceLineList).
Thanks to this configuration, the sub-elements name and quantity can directly access the data of the corresponding line, such as productName and quantity.
Managing object-type meta fields
When the meta field corresponds to a complex object (e.g., a company), it is generally not relevant to include the simple technical reference of the AOS object in the output file. It is preferable to select more meaningful business data, such as:
-
the company name,
-
or its SIREN number.
To do this, while creating the field in the schema, if the selected meta field corresponds to an object, it is then possible to select a new element associated with this object (which will correspond to the name or SIREN number).
It will be displayed in the schema as follows: “Company name” [company: name]
Capture parameter
Access: File generator → File generator settings
Generate a template: enter the chosen schema in the “Schema” field, then select the object from which the file is to be generated and click on “Generate a template”.
Template
The template is an intermediate step that allows you to view the JSON file generated from the values extracted from the AOS object. This representation allows you to check and, if necessary, modify the data before generating the final file.
Generate a template: clicking on the “Generate a model” option opens a new window displaying the file in the chosen format (JSON, Edifact, Factur-X, etc.). From this interface, it is also possible to download the file for use or verification outside the application.