MCP
- What you can do with MCP
- Before you start
- Privacy Mode (enabled by default)
- Configure an MCP client in BI Studio
- Custom MCP client (custom apps or CLI tools)
- If a client fails to connect with DCR
- Claude: Add a custom MCP server
- Mistral: Add a custom MCP connector
- ChatGPT: Add a custom MCP server
- Prompting best practices for MCP clients
- Security notes
MCP lets approved AI assistants connect to your BI Studio workspace so they can help explore data, build charts, and work with dashboards through a secure, permission-aware connection.
What you can do with MCP
-
Connect supported AI clients to your BI Studio workspace.
-
Ask AI to discover datasets and dashboards you already have access to.
-
Create or update charts and dashboards according to your permissions.
-
Use SQL assistance in guided workflows.
Before you start
-
You need access to the
AI Settingsarea. -
Setup tasks usually require administrator-level rights.
-
Decide which AI clients you want to connect (for example Claude, ChatGPT, Mistral, or a custom client).
Privacy Mode (enabled by default)
Privacy Mode is enabled by default to help protect sensitive information from your BI Studio instance and connected resources.
When Privacy Mode is enabled, the actual data values returned to connected AI clients are masked. The assistant can still reason about the structure of your data and build charts, but it does not receive the underlying cell values, helping you maintain greater control over what information is exposed.
For tasks that depend on user identities or other personal data, the AI client may have less context available and may provide less personalized responses.
If your environment allows AI clients to access data values, you can disable Privacy Mode to provide additional context and improve the quality of responses for those tasks.

| Privacy Mode masks data values only. Structural information is always shared with connected AI clients regardless of this setting: dataset and chart names, column names, and the SQL definitions behind datasets and charts (including any comments in that SQL). Avoid placing sensitive or confidential details in object names or SQL comments, and only connect AI clients you trust. |
| Because data values are hidden from the assistant while Privacy Mode is enabled, the AI cannot preview real results. Always open the generated chart or dashboard in BI Studio to confirm it populates with the expected data before relying on it. |
Configure an MCP client in BI Studio
-
Hover on the
Settingsmenu. -
Click
AI Settingsto open the AI configuration page.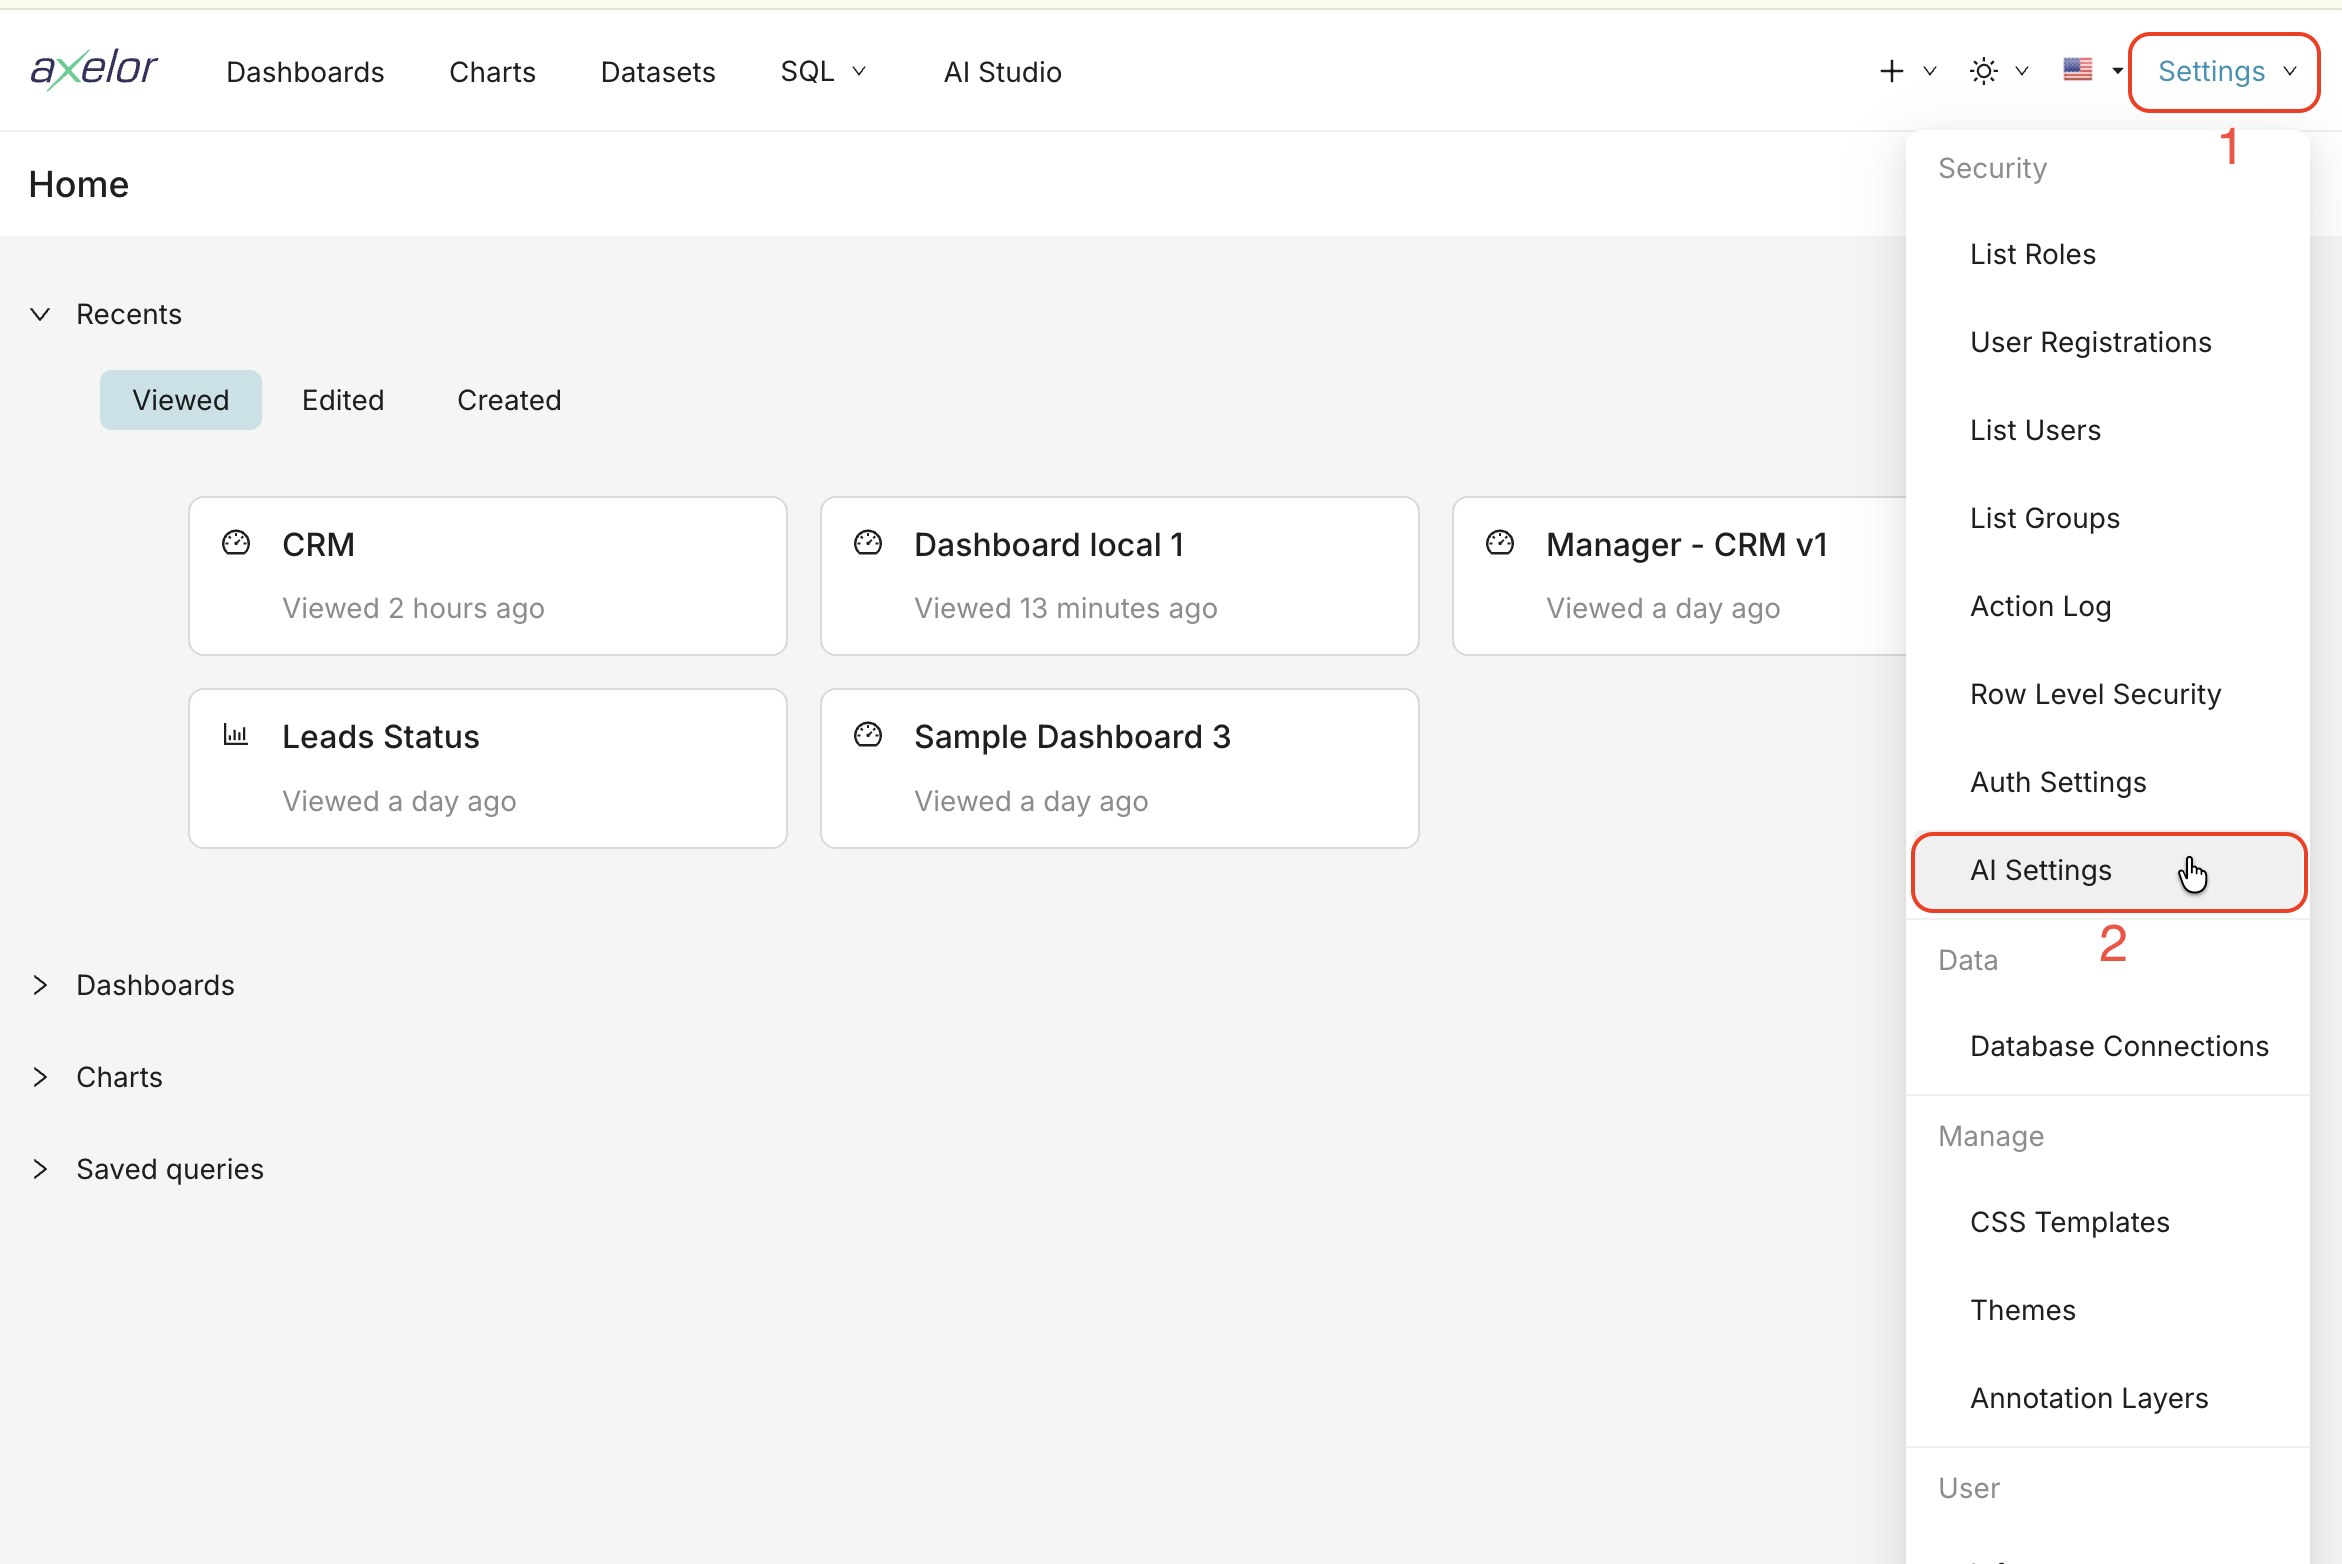
-
Open the
MCPtab. -
Copy the
MCP Server URLdisplayed in the MCP tab. -
Click
Add Clientto register a new MCP client.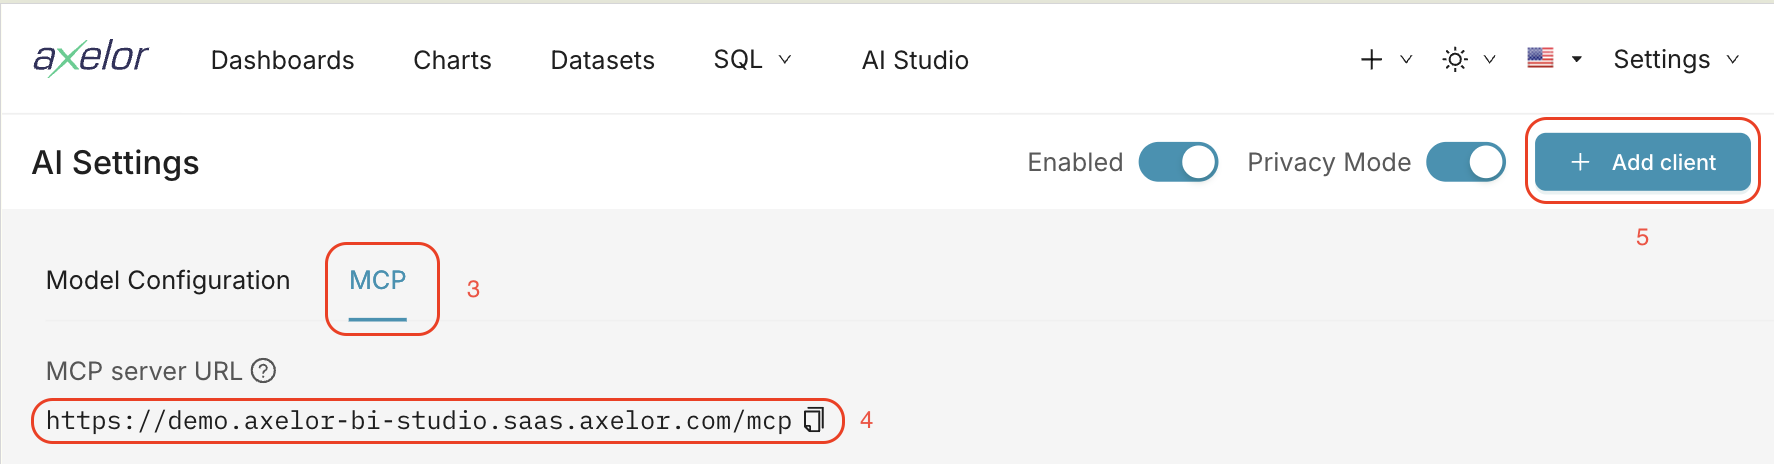
-
Choose a client type from the dropdown.
-
Enter a descriptive name in the
Namefield. -
Click
Createto create the client.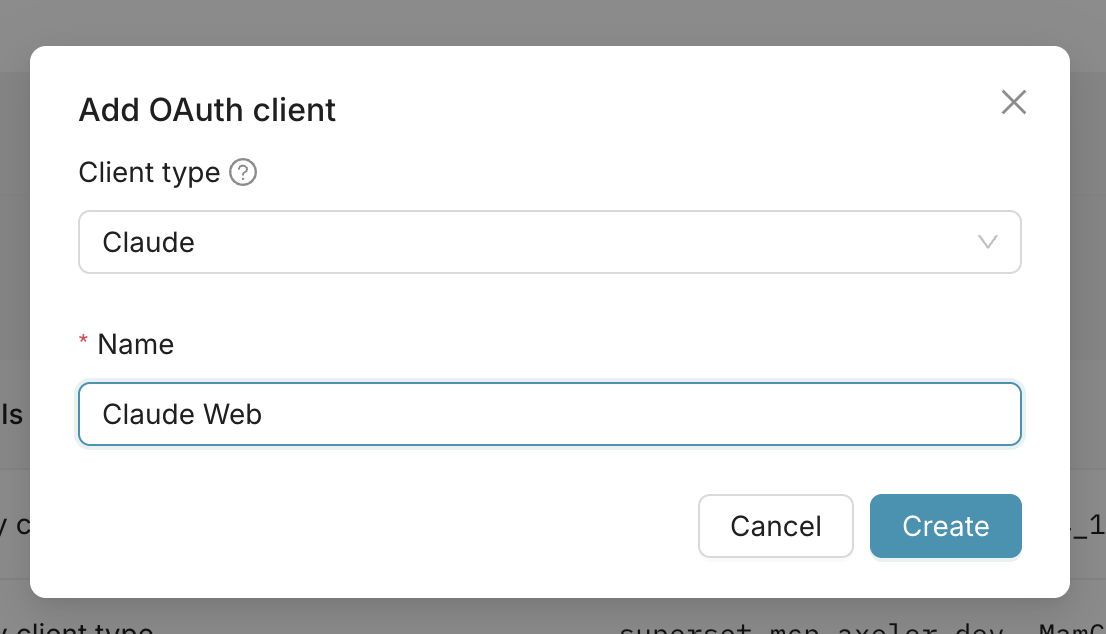
Keep the MCP Server URL copied while completing client setup below, then paste it into the configuration of the MCP client of your choice. If you lose it, you can return to AI Settings → MCP and copy it again at any time.
|
| Saving generated client credentials is optional. BI Studio supports Dynamic Client Registration (DCR), so most MCP clients do not require manually configured credentials. Keep generated credentials only if your MCP client does not support DCR or if automatic registration fails. |
| An MCP client represents the connecting application (for example Claude, ChatGPT, Mistral, or a custom app), not an individual user. Create one client per application for your workspace — every user connects through it, signs in with their own BI Studio account, and the assistant always acts with that user’s own permissions. You do not need a separate client per user. Clients that support DCR register themselves automatically, so in most cases no manual client is required at all. |
Custom MCP client (custom apps or CLI tools)
If your MCP client is not listed below, you can register it as a custom client.
-
Open
AI Settings→MCP. -
Click
Add Client. -
In the client type dropdown, select
Custom. -
Enter a client name.
-
Enter the redirect URL required by your client or CLI integration.
-
Click
Create.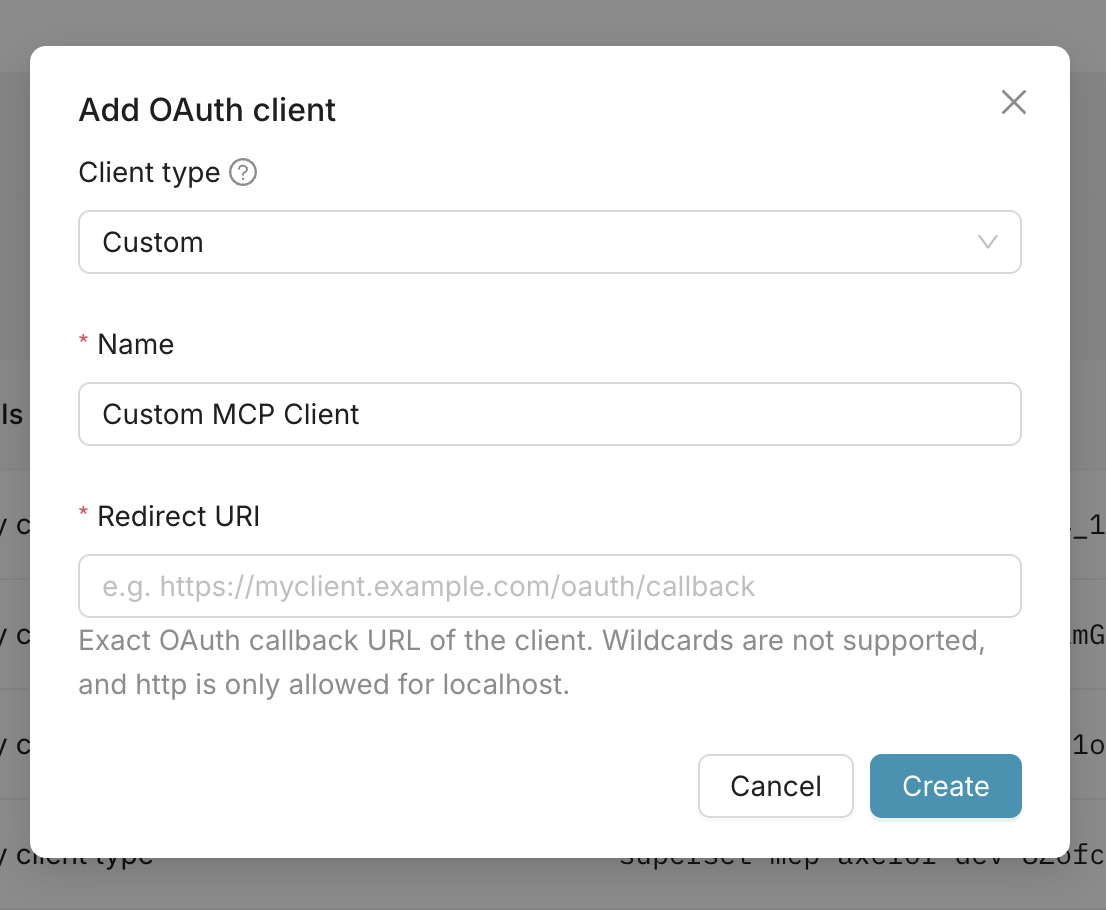
After creating the custom client, use the MCP Server URL together with the generated credentials in your client configuration.
|
If a client fails to connect with DCR
If automatic Dynamic Client Registration (DCR) fails for a client, use manual credentials:
-
Open
AI Settings→MCP. -
Create (or reuse) an MCP client in BI Studio.
-
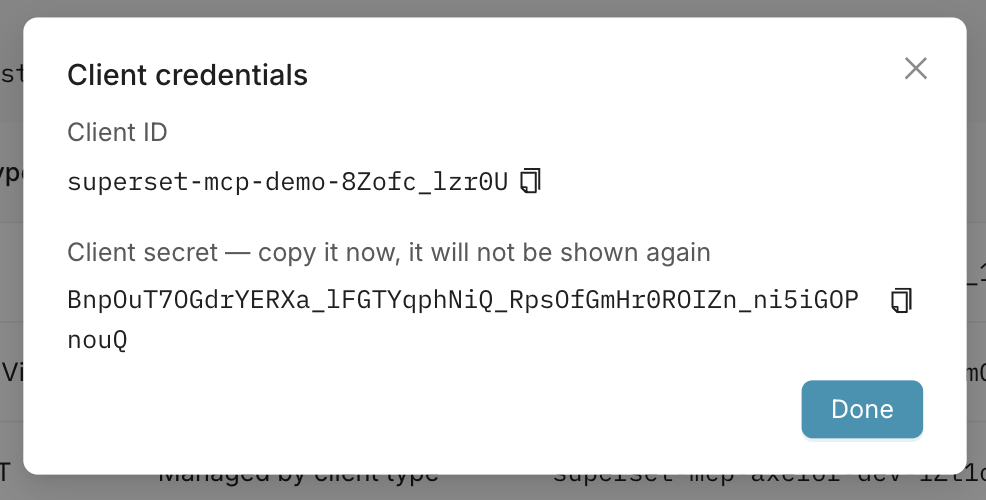
Copy the generated
Client IDandClient secret. -
In your AI client, configure the
MCP Server URL,Client ID, andClient secret. -
Retry sign-in and authorization.
| The generated client secret is sensitive and should be stored securely. |
Manual credentials apply only to clients that use a confidential OAuth client. Claude and Claude Code register a public client and sign in with PKCE, so they will reject a manually supplied client secret (you will see an invalid_client error). For those clients, do not paste credentials — instead remove and re-add the connector to retry automatic registration.
|
Claude: Add a custom MCP server
The steps below reflect the current Claude interface, which may change over time. For the latest instructions, see Anthropic’s Get started with custom connectors using remote MCP guide.
| If you are using a Claude Team or Enterprise plan, only the plan owner can add a custom connector. |
-
Navigate to claude.ai
-
Click your profile button in the lower-left corner.
-
Select
Settings. -
Open
Connectors. -
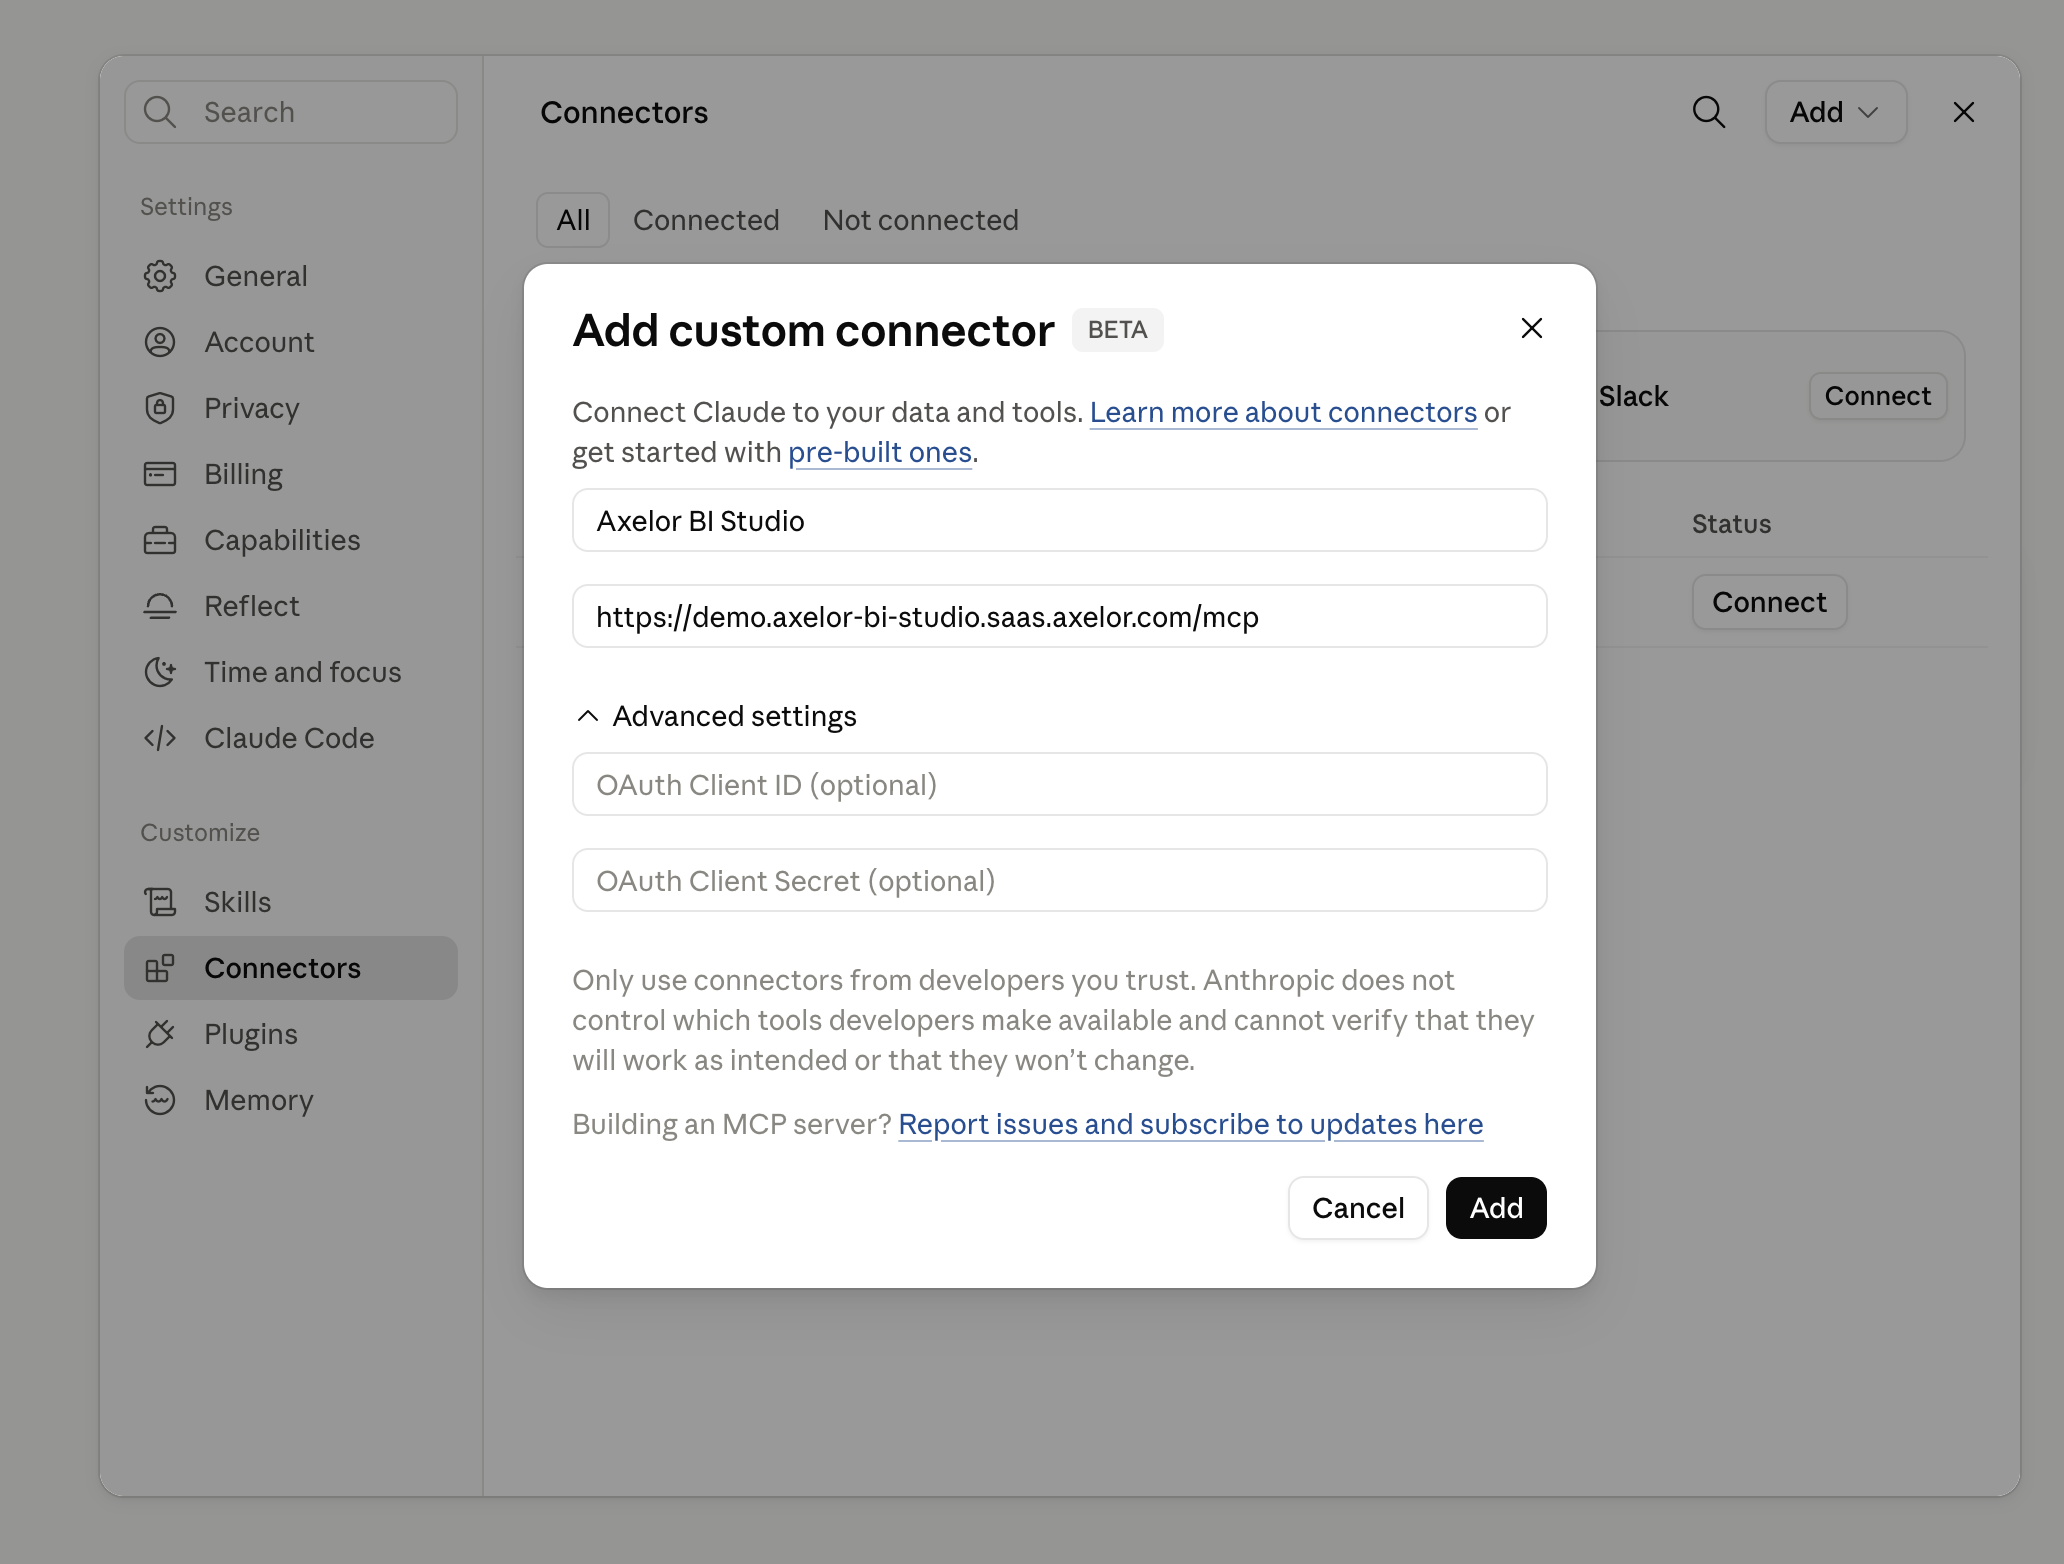
Click on
Adddropdown. -
Select
Add custom connector. -
Enter a name for your connector.
-
Paste the
MCP Server URLcopied fromAI Settings→MCP. -
Click
Addto save the connector. -
Click
Connectto establish the connection.
Mistral: Add a custom MCP connector
The steps below reflect the current Mistral interface, which may change over time. For the latest instructions, see Mistral’s MCP Connectors documentation.
-
Navigate to console.mistral.ai
-
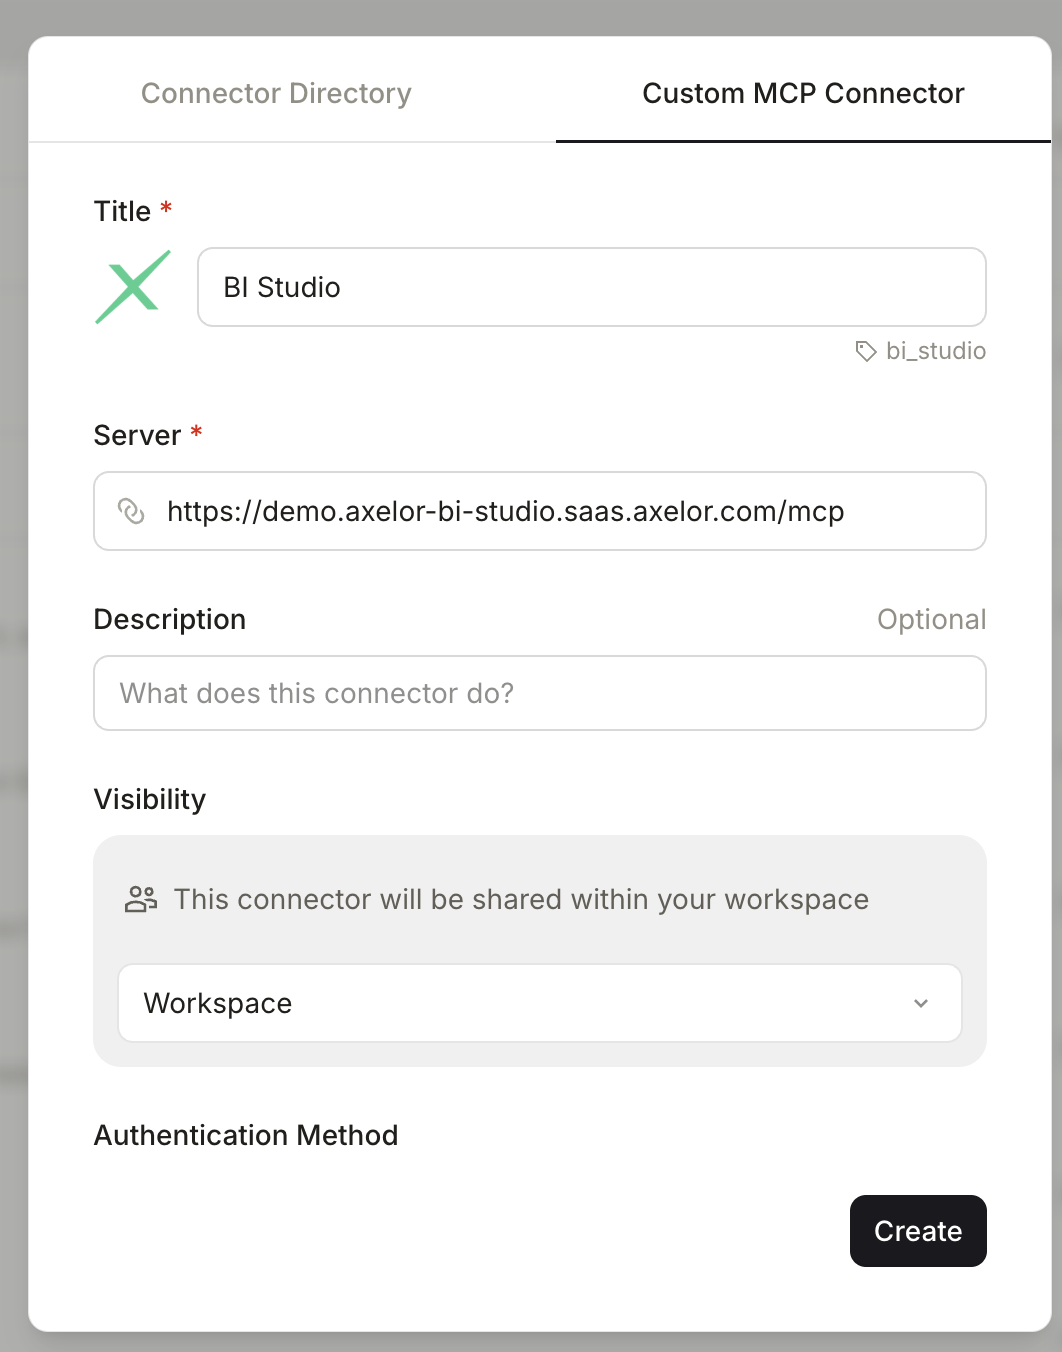
Click
Connectorsin the left sidebar. -
Click
Add Connector. -
Select the
Custom MCP Connectortab. -
Paste the
MCP Server URLin theServerfield copied fromAI Settings→MCP. -
Click
Create. -
Navigate to chat.mistral.ai
-
Click the
+button in the prompt box to open the available integrations. -
Select your connected BI Studio MCP Server.
ChatGPT: Add a custom MCP server
Custom MCP servers require Developer mode, which is available on paid ChatGPT plans (Plus, Pro, Team, Enterprise, and Edu). OpenAI has relocated these settings more than once; if the steps below do not match your account, look for a Developer mode toggle under Settings, then manage custom MCP servers under Settings → Plugins (or go directly to chatgpt.com/plugins). See OpenAI’s Developer mode and MCP apps in ChatGPT guide for the latest instructions.
|
-
Navigate to chatgpt.com
-
Open your profile menu and click
Settings. -
Enable
Developer modeto allow custom MCP servers. -
Open
Settings→Plugins(or go directly to chatgpt.com/plugins). -
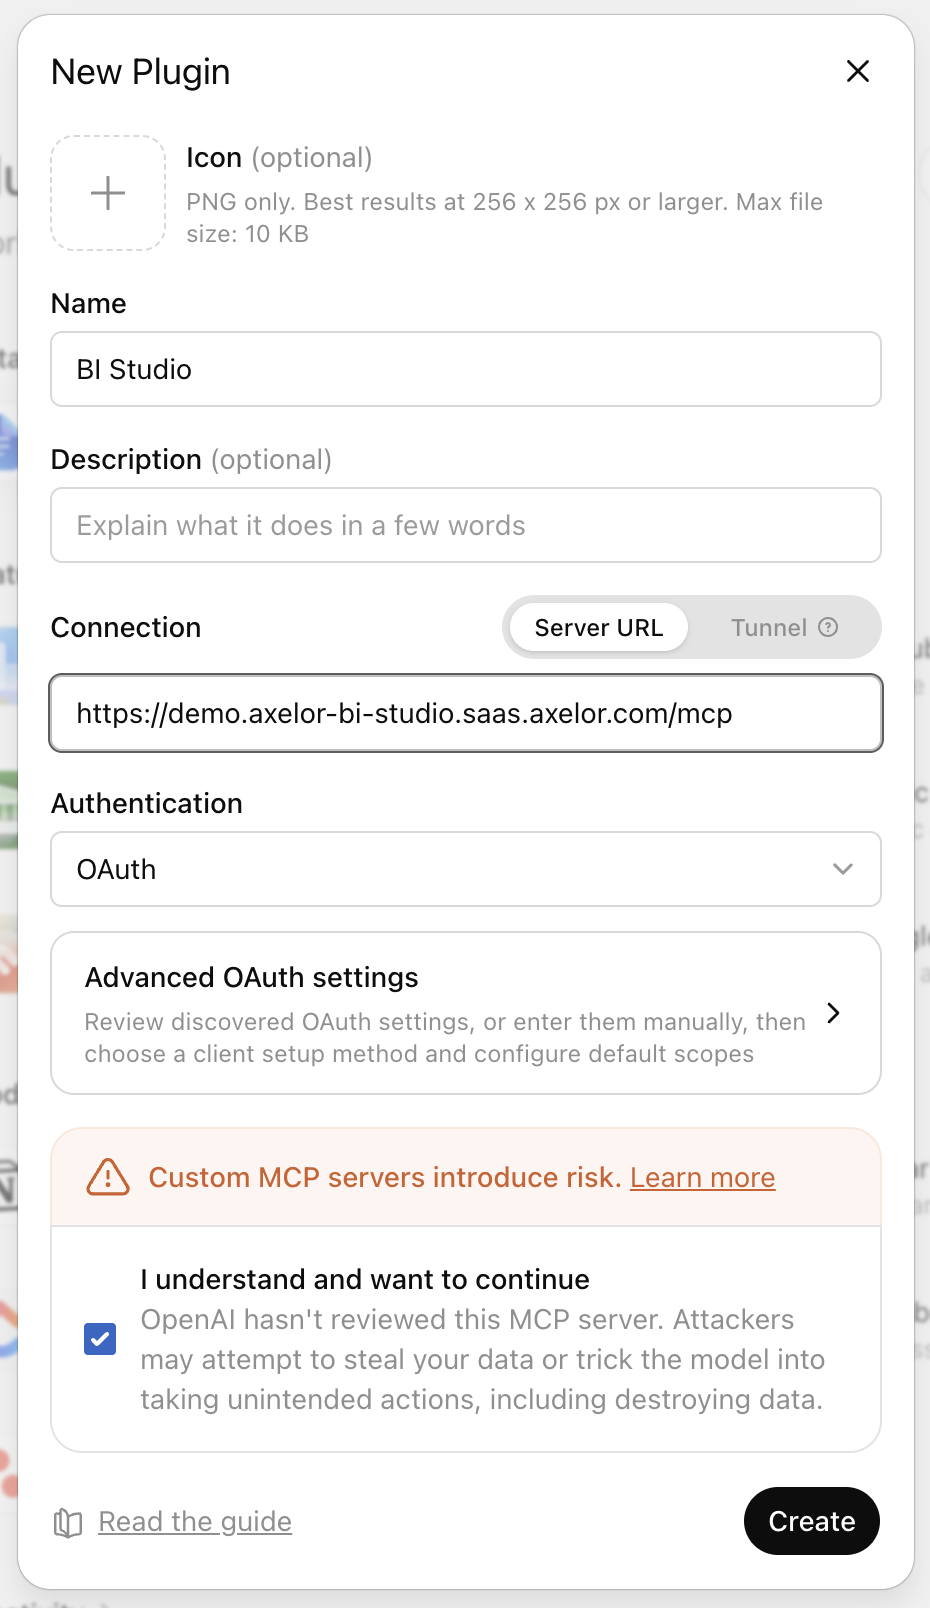
Click the
+button to create a new custom app (developer-mode app). -
Enter a name for your BI Studio MCP server.
-
Paste the
MCP Server URLcopied fromAI Settings→MCP. -
Acknowledge the warning by selecting the confirmation checkbox.
-
Click
Create. -
Click
Sign in with <BI Studio MCP Server Name>and complete authentication. -
Start a new chat.
-
Click the
+button to open the available tools. -
Select your BI Studio MCP Server.
| Developer mode lets the assistant perform write actions through the custom app. OpenAI flags it as powerful but risky: review custom apps carefully, stay alert to prompt-injection attempts, and confirm write actions before they run. |
Prompting best practices for MCP clients
To get better results, write prompts with five parts:
-
Goal: What outcome you want.
-
Scope: Business area, dataset, and time range.
-
Output format: Chart, table, summary, or SQL result (you can change this at any step).
-
Save behavior: Preview only, or save permanently.
-
Constraints: Filters, grouping, sorting, and granularity.
Example:
-
Context: I am analyzing monthly B2B revenue for EMEA.
-
Task: Build a trend chart and highlight growth/decline.
-
Constraints: Last 18 months, only closed-won deals, group by month.
-
Output: Show preview links first. Save only after approval.
Useful prompt starters
-
Show datasets and dashboards I can access for sales analytics.
-
Inspect dataset
<name>and recommend 3 visualization ideas. -
Create a preview of
<metric>by<dimension>over<time range>. -
Save this chart as
<chart name>. -
Create a dashboard from selected charts and name it
<dashboard name>. -
Add chart
<chart id>to dashboard<dashboard id>. -
Run SQL for
<business question>and summarize key results.
| You can change the output format at any time, for example: "Show this as a table instead", "Switch to a line chart", or "Summarize this in 5 bullets". |