Partner File
Partner referential
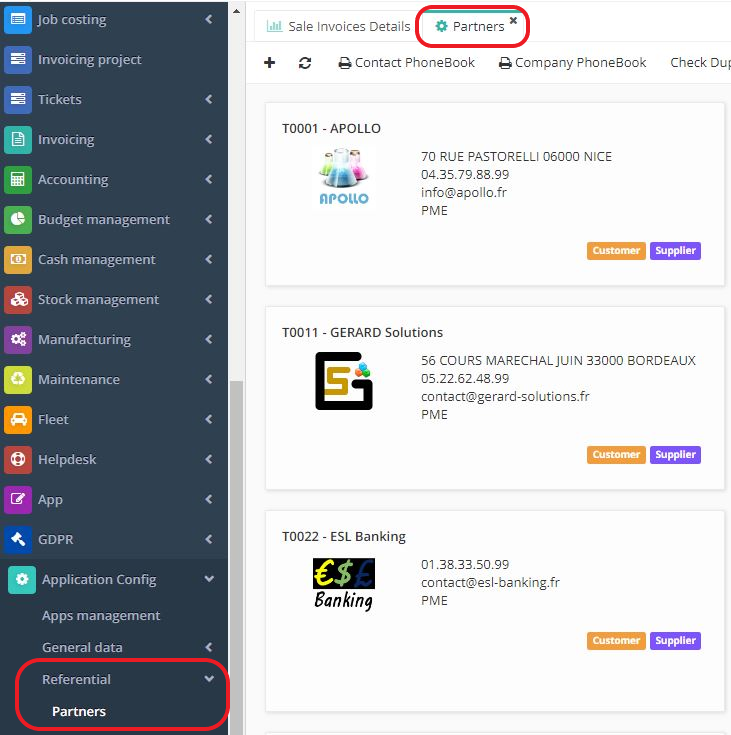
The program allows to consult the partner referential. This referential contains all partners.
Access: Application config → Referential → Partner
In each module it's possible to find partners that are connected to that module in particular.
For example, in the Sales module there are Customer type partners, while in CRM there are Prospect type of partners. The Purchase module has its Supplier type of partner.
Types of partners
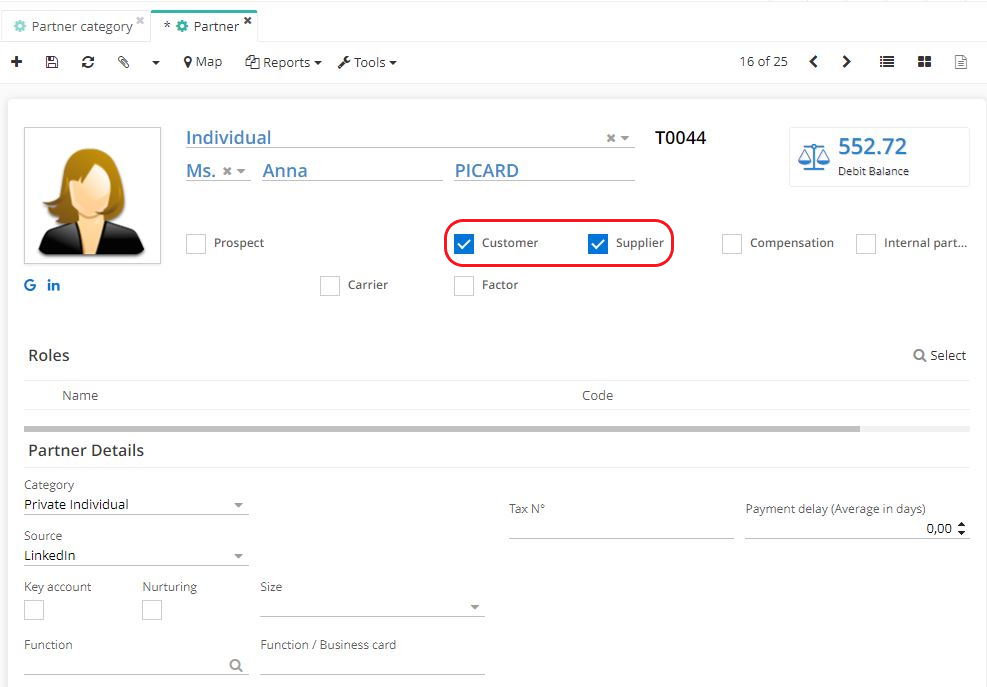
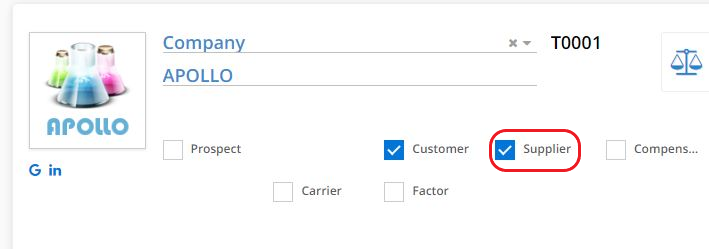
There are différent types of partners: it can be a prospect, customer, supplier, internal partner, carrier or a factor. The type of partner is configured on the partner file.
Please note that some partner types are compatible with each other and it is therefore possible for a partner to belong to multiple types, for example customer and supplier. However, some types are mutually exclusive: one partner cannot be a prospect and a customer at the same time.
A partner cannot be a prospect and a customer at the same time.
Creating the customer file
The customer file can be created from various menus.
Create a customer file from the referential by accessing it via Application Config (Application Config → Referential → Partner). Click on the + icon. On the file, check the "Customer" box to define this partner as a customer.
However, it's equally possible to create a customer file from the Sales or CRM app by clicking on the "Customer" menu and then clicking on the + icon (Sales/CRM → Customer → New).
Another option : convert a lead (CRM → lead) into a Customer type of partner.
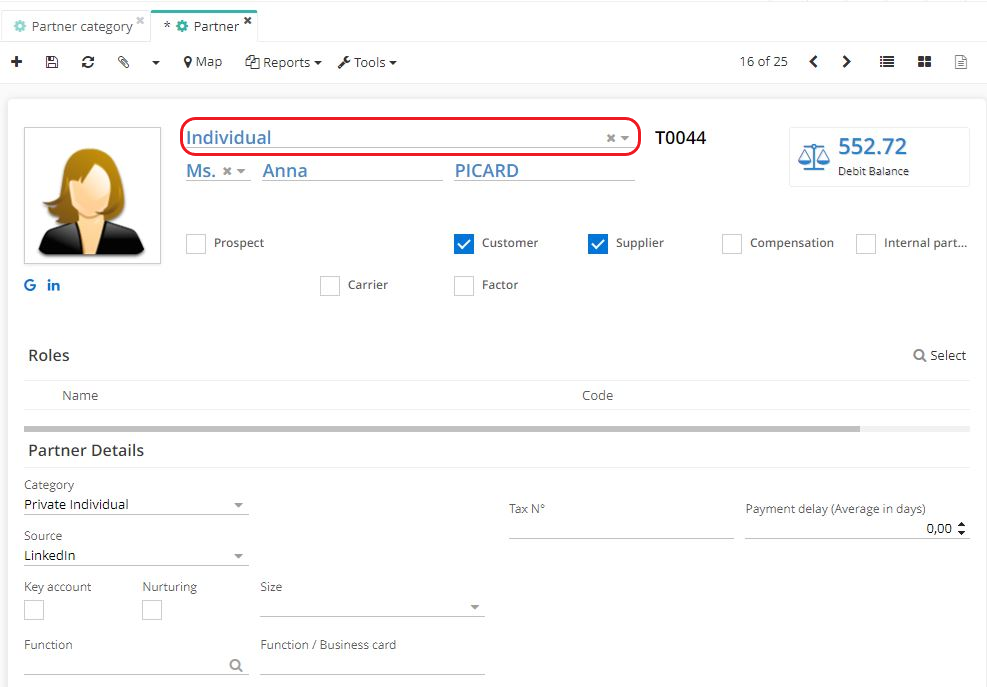
When creating the customer file, select in the very first field if it's a Company or an Individual. Attention, there is a difference between Company or Individual.
The difference is that on the Company customer file you will have a company file that is not attached to someone in particular. This company file can be used to attach multiple contacts to it.
On the other hand, if a partner is defined as an individual, there will be a single record (for example, Anna Picard), meaning that this file is both customer and contact all-in-one, unlike a customer - company file with multiple associated contacts.

If you indicate that the customer file is a Prospect, the file will automatically become a Customer when the first order is confirmed.
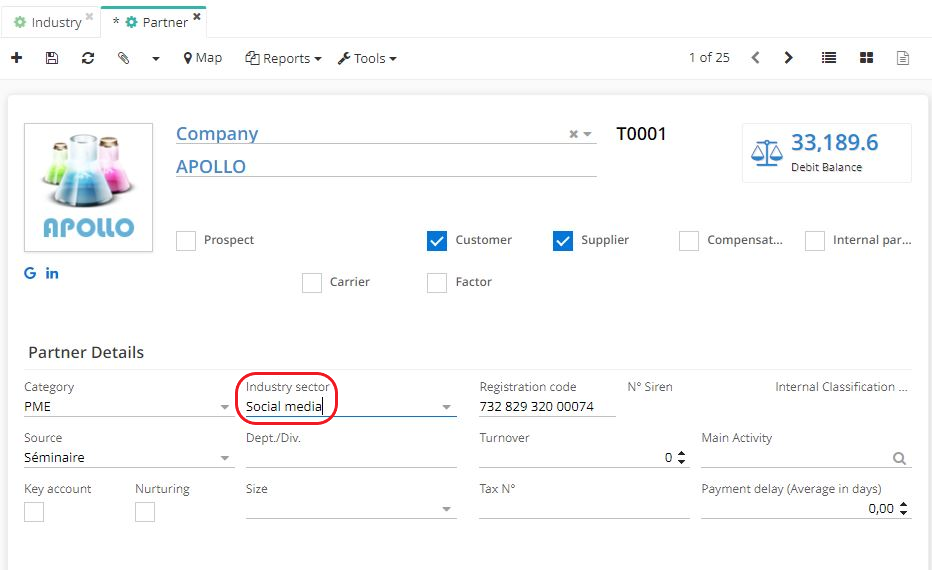
Complete the information. Select a category in Partner Details section.
It is possible to create a customized category (access: Application config → Referential → Configuration → Partner categories).
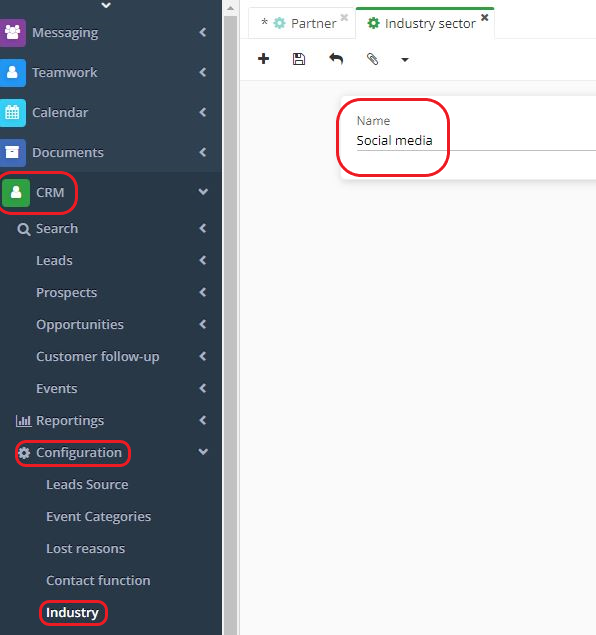
- Select an industry sector. It can be anything, depending on the sector occupied by partner. When necessary, create an industry sector manually. Access it via the CRM menu : CRM → Configuration → Industry → click on + in order to add a new industry sector.
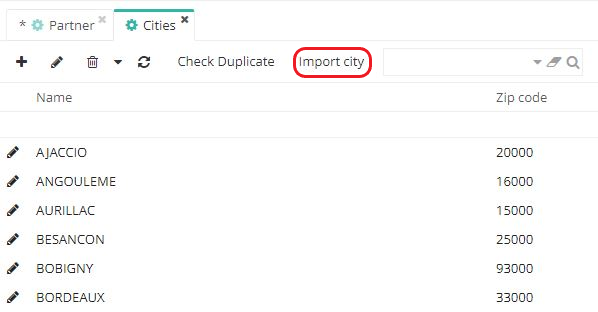
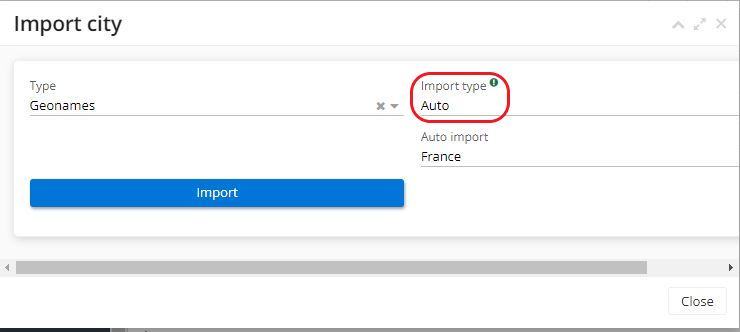
- On a partner file, in the "Information" tab, enter the address. Either select an existing address or add a new one. A new "Address" tab will appear. If a city is missing, new cities can be added (Application config → Organisation → Territories → Cities → on the Cities page click on "Import city"). Cities can be imported either by importing CSV files or by importing via Geonames.. After clicking on the "Import city" button, it's possible to launch the import. Select the import type (either auto or manual; with the manual type it's possible to import user's own files).
Importing cities via Geonames can take a long time.
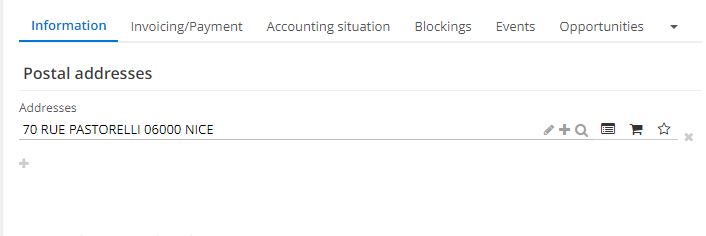
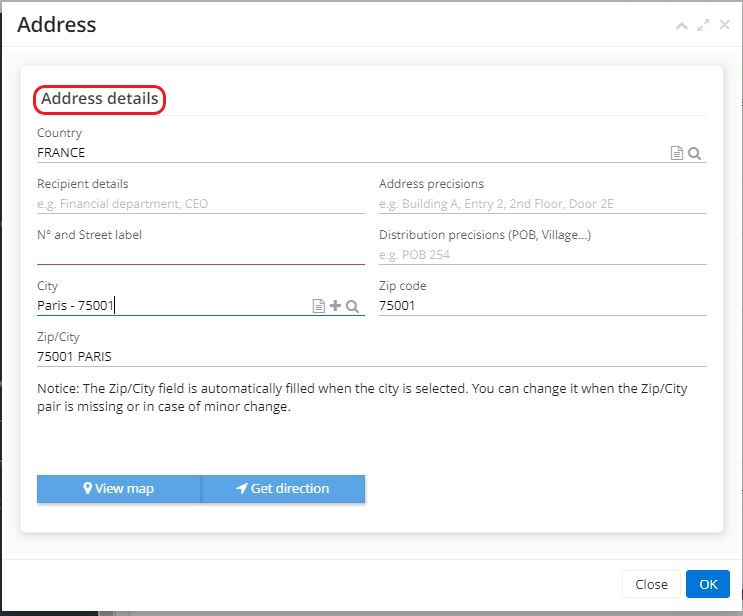
- Once the address field is completed, enter the type of address. Icons in the field indicate the type of address : select between Invoicing address / Delivery address / Default address.
It's always possible to add an additional address by clicking on +.
This way, define one address as the delivery address and another address as the billing address.
Hover mouse cursor over an icon in order to see a brief descritption of the icon.
Select the default language in the section "General contact details ", (French or English). This choice will have an impact on all the documents generated for this partner, i.e. documents will be generated in either English or French. This could be an order form, a quotation, a delivery note, an invoice, etc.
The "Assigned to" field is used to find out who is in charge of this account and which sales team it belongs to.
The "Companies associated to" field. This field is useful for multi-company accounts; it is possible to indicate whether a partner is attached to a particular company, or whether this partner is common to the various entities in the group. This way, there is no need to create multiple files.
In addition, it is also possible to separate the repository with permissions and rights so that everyone can have access to their own records.

Save the changes.
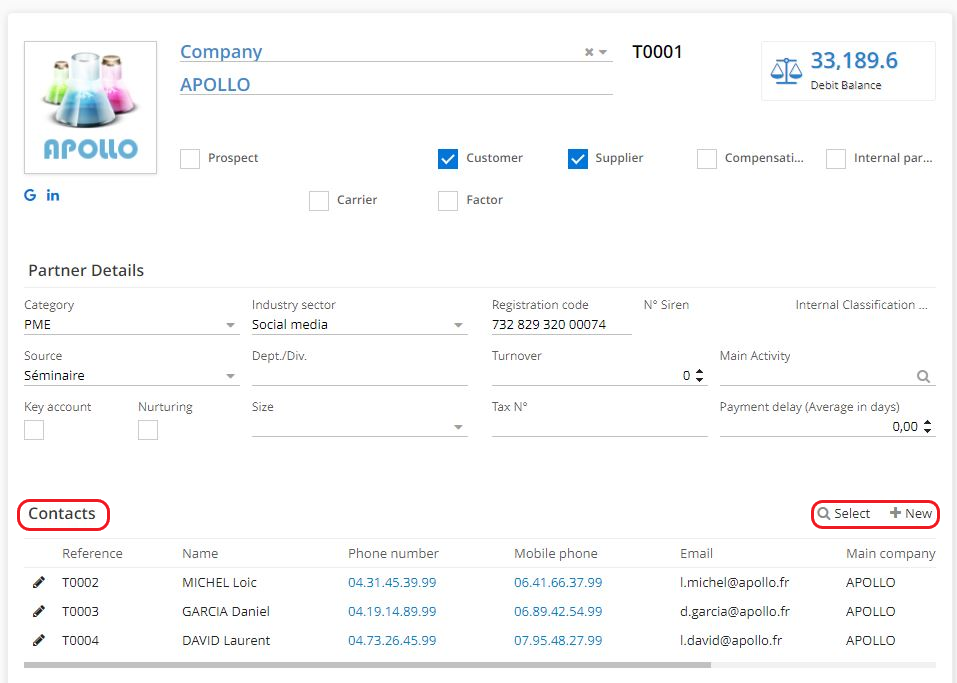
Add contacts in the "Contacts" section. Either select an existing contact or create a new contact.
The Contacts section only becomes visible once the Partner file has been saved.
- Activate Subsidiary management / Delegation management for partners.
Parent company & Subsidiaries - How to activate subsidiaries?
Access: in order to activate subsidiaries open Application config → Apps management → Base, configure → on the Base app page, click on the Configuration tab → activate the "Manage subsidiaries on partners" option.
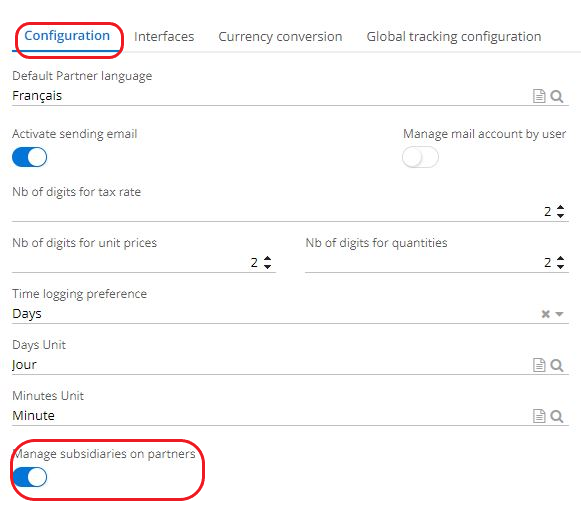
Once you have activated this checkbox, save and refresh the page in the Base app.
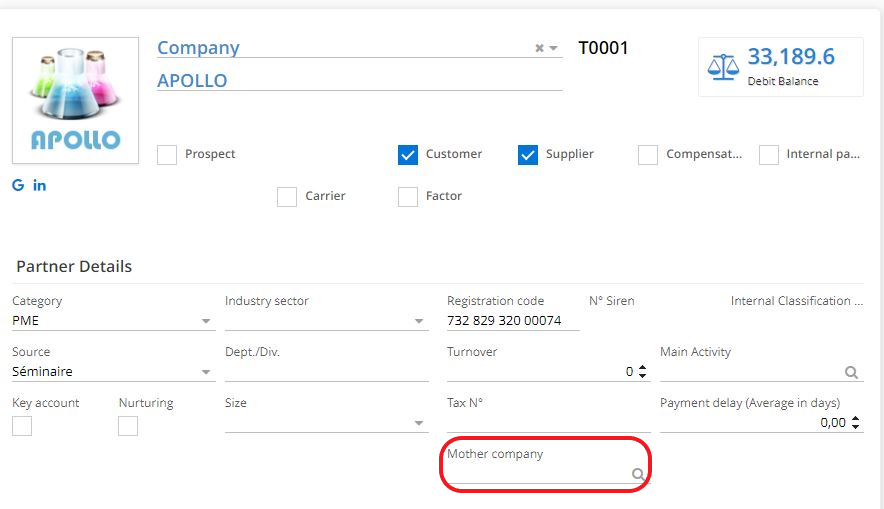
You will notice that the "Mother Company" field has appeared on the partner file (Partner Details section).
Once you have defined a Mother Company, on the mother company file in the Subsidiaries section you will be able to view all attached subsidiaries.
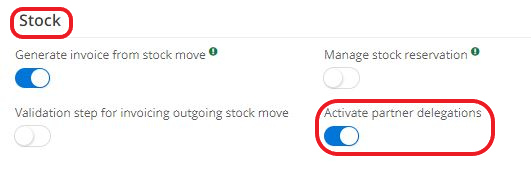
Option "Activate delegations between third parties".
- There is a possibility to activate another option, the "Activate partner delegations" configuration (Application config → Apps management → Supplychain, configure → check the box "Activate partner delegations").
This option allows you to specify the relationships between different partners, in particular between a holding company and its various establishments. This option allows you to tell the system about relationships in terms of orders, deliveries and invoicing.
For example: this type of relationship lets you know that one of your customers is a subsidiary who placed the order, but the delivery is planned for another establishment, taking into account the fact that the invoice will be sent to the holding company. Automatically, the delivery note will be generated for one entity, while the invoice will be automatically generated for another company.
Remember to save and refresh the page.
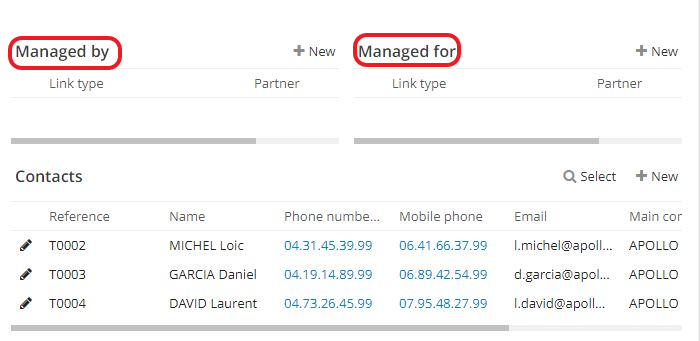
On the partner file you will notice that the fields "Managed by" and "Managed for" appear.
Managed for: it means that this partner will manage either the delivery, invoice or order for another partner (choose between "Delivered for" / "Invoiced for" / "Ordered for" ).
Select another existing partner for which this company will manage the delivery / invoice / order.
For example: Apollo is the mother company of the subsidiary 123 Services. To indicate that Apollo is going to manage the invoicing for 123 Services, on the Apollo file in the field "Managed for", select "Invoiced for" in the type of link, and 123 Services as the partner.
- Managed by: on the subsidiary file, in the section "Managed by" you can see who manages the invoicing.
To continue with the previous example, on the partner file of the company "123 Services", in the "Managed by" section, select the option "Invoiced by" in the link type, and attach Apollo as the partner.
Invoicing/Payment tab on the customer or supplier file
Select the Sending method of payment notices (Email or None) and then select Invoice sending media (Email / Paper / Email and paper). After that, indicate the number of copies of the invoice, etc.
In payment mode: this is the default payment method by which the partner will pay (customer payment or supplier refund).
Out payment mode: this is the default payment method by which you will pay the partner (supplier payment or customer refund).
It's always possible to change the payment method later.
Payment condition: these are the default payment terms for this partner.
Define fiscal position : the fiscal position is used to define tax and accounting account equivalents for a third party in relation to those defined by default on the product. If, for example, the customer is abroad and you need to export merchandise to them, you can assign them a tax status that allows you to apply tax exemptions for exports and accounting accounts for exports. This will be taken into account automatically as soon as an order or invoice is registered for this customer.
Fill in the currency field.
Select Import/Export or Intra EU, and then choose the fiscal position.
For example: for an EU customer, set an Intra EU tax position. You will automatically have accounting account equivalences or tax equivalences. You can therefore automate these elements and avoid having to activate them manually each time.
Apply a Financial discount if necessary.
It is also possible to fill in a DAS2 Activity in a dedicated field.
If necessary, complete the Analytic distribution template field.
The Show invoices and "View all unpaid invoices" buttons will redirect you to a new tab, in order to view either all associated invoices or only unpaid invoices.
You also have the option of entering Bank details. Once completed, enable the option "Active" which means that this account is active and used for different types of transactions.
You can also activate comments that will be displayed on the invoice, especially if the customer wants certain information to be displayed on the invoice (only for this customer). The same approach applies to proformas.

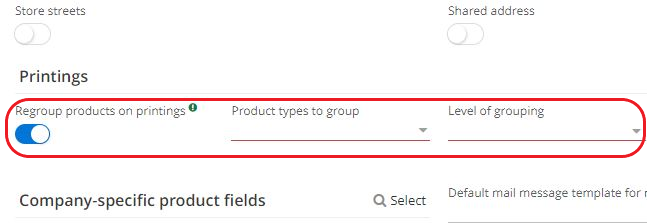
Please note that it is possible to activate the option "Regroup products on printings".
Access: Application config → Apps management → Base, configure → in the "Configuration" tab, in Printings section, activate the option "Regroup products on printings".
This action allows several product lines to be regrouped into a single line on printings.
Next, select product types to group (services / product or both), and the level of grouping (global or by category). You can also enter the name of the grouped services / name of the grouped products.
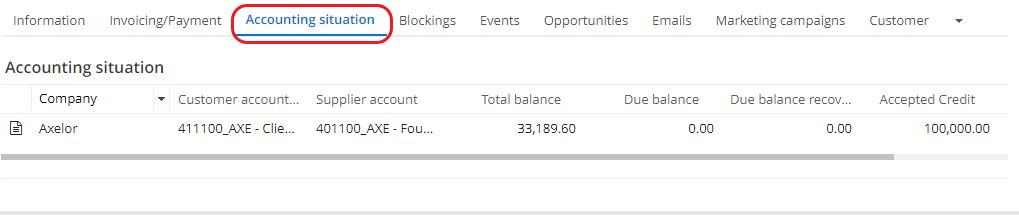
Accounting situation tab in a partner file
- Click on a company file to configure the accounting information on the Sales app.
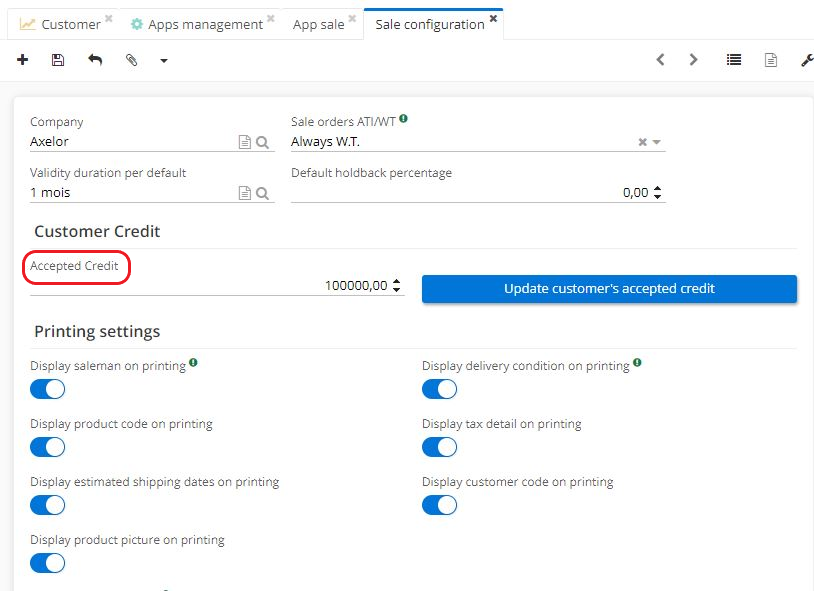
The amount of accepted credit can be configured in the Sales module.
Access: Application config → Apps management → Sales, Configure → On the Sales App page, in Sale configuration, click on the Company → you will be redirected to the Sale configuration page on which you can define the amount of Accepted Credit in the dedicated field under Customer Credit section.
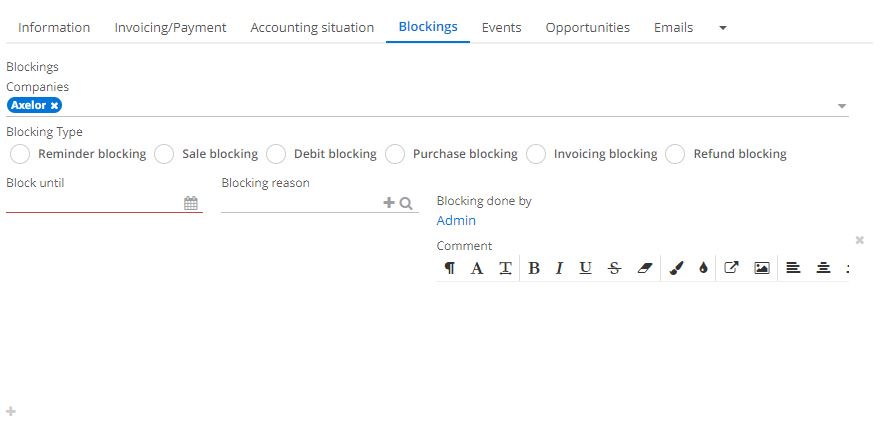
Blockings tab on the customer / supplier file
The purpose of this function is to set up different blocks.
If more than one company is associated with this file, you can define which company will set the block.
In this tab you will find several types of block (reminder blocking / sale blocking / debit blocking etc).
For example :
If there is a dispute in progress, you can set a sales order blocking and consequently the salesperson will not be able to create a sale order for this customer.
At the same time, enter the dates in the field Block until and fill in the blocking reason.
It is possible to create a new blocking reason (e.g. dispute).
Add a comment if you would like an additional explanation as to why this block has been applied.
Types of blockings:
Refund blocking: if there is a dispute with the customer, this block prevents the customer from being refunded.
Invoicing blocking: used to block the creation of invoices.
Debit blocking: if the customer asks you to stop direct debits for a certain period, you can do so using this block.
Reminder blocking: this block concerns collection; the collection function allows you to send automatic reminders, particularly to a customer in the event of non-payment. However, if you have negotiated an extension of the payment period with the customer, this block stops the automatic reminder from being sent in this specific case.
How to track activity on the customer/supplier file?
Thanks to the "Emails", "Events", "Opportunities", "Marketing campaigns", "Customer / Supplier", "Carrier" and "Delivery" tabs, you can carry out genuine monitoring from A to Z.
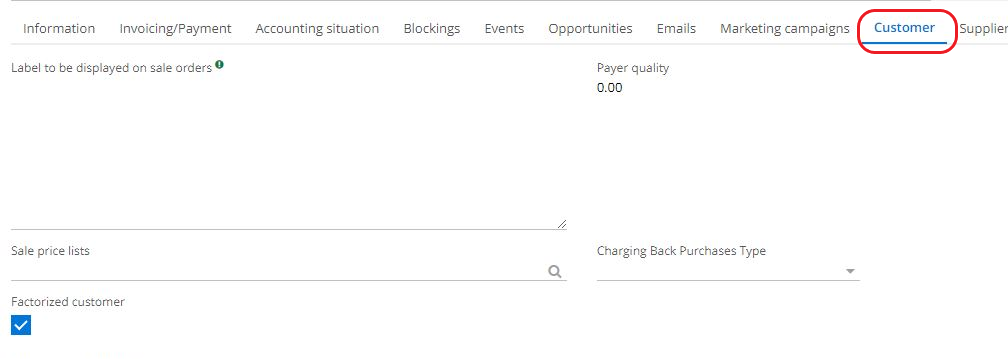
Customer tab
Open a partner file (in the example it's Customer file but it could be also Supplier file), and then click on the Customer tab.
In this tab you will find information relating to the customer's business activity:
Label to be displayed on sale orders: if the customer wishes to display certain information on the order form, fill in the information to display in the "Label to be displayed on orders" field.
Payer quality: updates automatically according to customer payments (depending on whether the customer has paid their invoices on time, etc.).
Sales price list: allows you to attach a list of sales prices for all negotiated price lists with the customer.
Charging back purchase type: Allows you to indicate whether you re-invoice identically / whether re-invoicing is carried out using a price list / or whether re-invoicing is applied using a percentage by taking a margin.
Factorized customer: the tick box is used to indicate whether or not the customer is factored. This box is linked to factoring, which concerns collection.
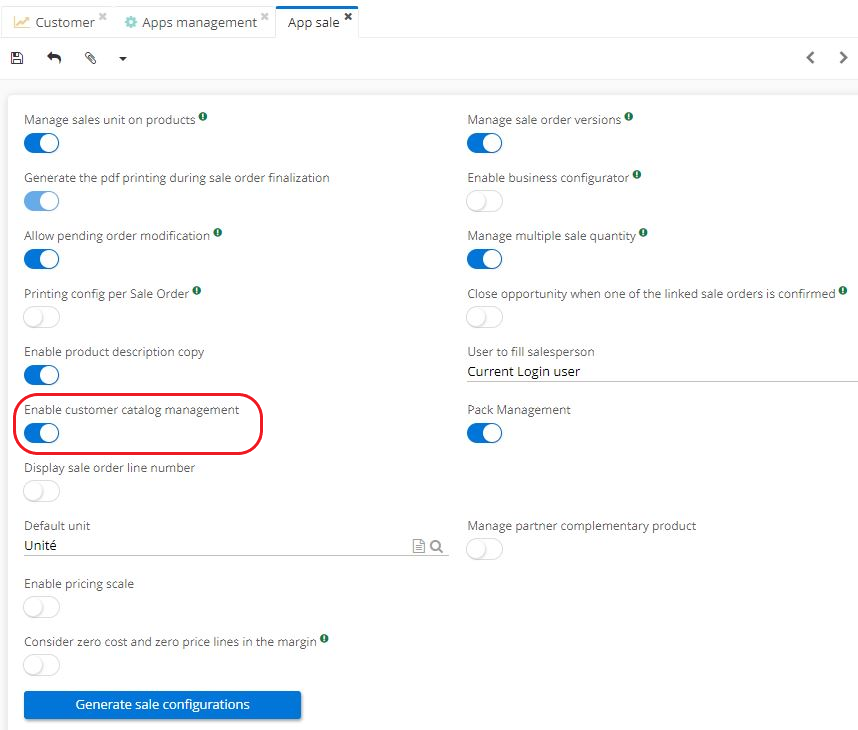
Customer catalogue:to access the customer catalogue in the customer tab on the customer file, it's necessary to activate the feature.
Access : Application config → Apps management → Sales, configure → on the sales app page click on "Enable customer catalogue management".
After the changes have been made, refresh the browser in order to make appear Customer Catalogue on the customer file.
The option "Activate customer catalogue management" in the sales app config allows you to indicate that some of your products** have different names and/or codes for certain customers.
This means that when creationg a sale quotation for this customer, instead of taking the name and code of the product written on the product file, the software will use the name and the code defined in the customer catalogue.
Customer shipping carriage paid configuration: it allows you to configure shipping fees.
Check box Account blocked is linked to late payments. Ticking this box blocks the customer account. This means that if you subsequently try to confirm a customer order, a message "Customer is blocked because of late payments" will appear.
Comment to display on sale order: add a comment which will then be displayed on the sales order.
Sales details by product: allows you to view what has been sold to the customer (product / total quantity sold / average selling price / total price).
Sales orders: find the lines relating to quotes and orders in this table.
Create sale quotation button : clicking on the button will open a new sale quotation page.
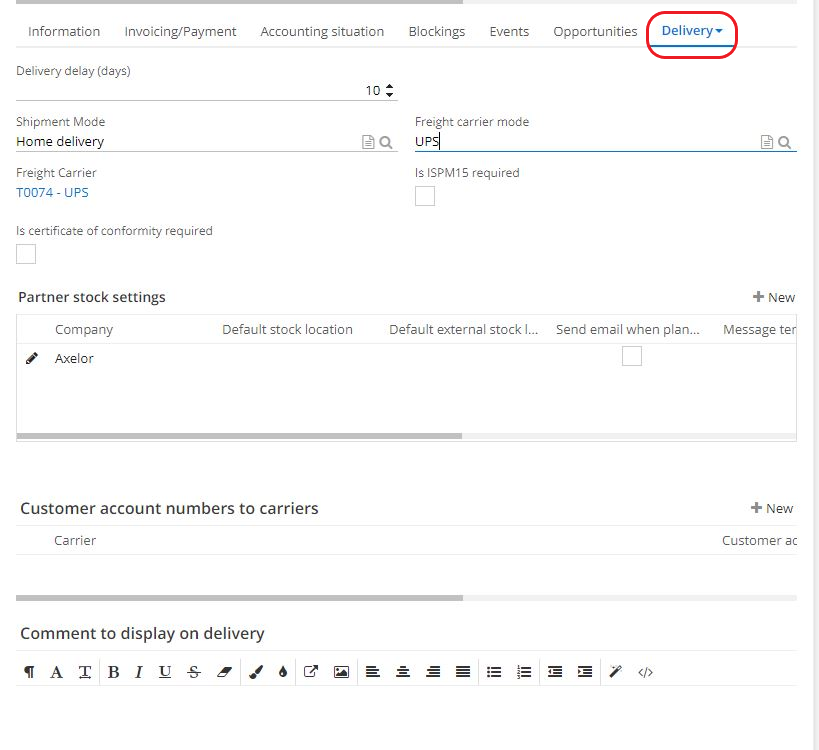
Delivery tab
In this tab, view all the delivery information for a third party.
Enter the delivery delay (in days).
Define the shipment mode. Once selected, the freight carrier mode field will appear. Choose one from available options.
The freight carrier field is filled in automatically once the freight carrier mode has been configured (a carrier must be attached to the carrier mode).
Freight carrier is attached to the freight carrier mode
How to configure freight carrier modes?
First, create a Shipment Mode. Access : Stock Management → Configuration → Shipment Mode
Then, create a Freight Carrier if necessary.
Next, configure Freight carrier mode. Note that in order to create a new Freight carrier mode, it's necessary to configure a Freight Carrier first since it will be attached to a freight carrier mode file. Access : Stock Management → Configuration → Freight Carrier mode menu. Then add a carrier, which will be filled in on the customer file.
Is ISPM 15 standard required: when this box is checked, it means that shipments for this customer are covered by the ISPM 15 standard (international standard applicable to wood packaging), and therefore this information will be displayed on the delivery notes for the customer.
Certificate of conformity required checkbox indicates whether a certificate of conformity is required for products shipped to this customer.
Partner stock settings:
These settings allow you to define specific characteristics for a customer or supplier concerning the default source location and destination location for this third party. You can therefore specify that deliveries for a third party are destined to a particular stock location (and not necessarily a default virtual customer stock location). This feature is particularly useful for managing remote stocks.
If this section is not completed for the third party, the default locations defined in stock configurations of a company will be applied.
It is also possible at this level to indicate whether you wish to send an email to the third party when planning and carrying out the stock movement (useful in case the option has not been activated globally in the stock configurations by company and you wish to manage this on a case-by-case basis).
Customer account numbers to carriers.
Add comments on delivery notes: allows you to add comments that will only be displayed on delivery notes for this customer.
Add Comment to display on picking order : add comments that will only be displayed on this customer's preparation notes.
Product tab
The Product tab will appear on a partner file once this feature is activated.
Access : Application config → Apps management → Sales, configure → activate the feature "Manage partner complementary product". Save changes.
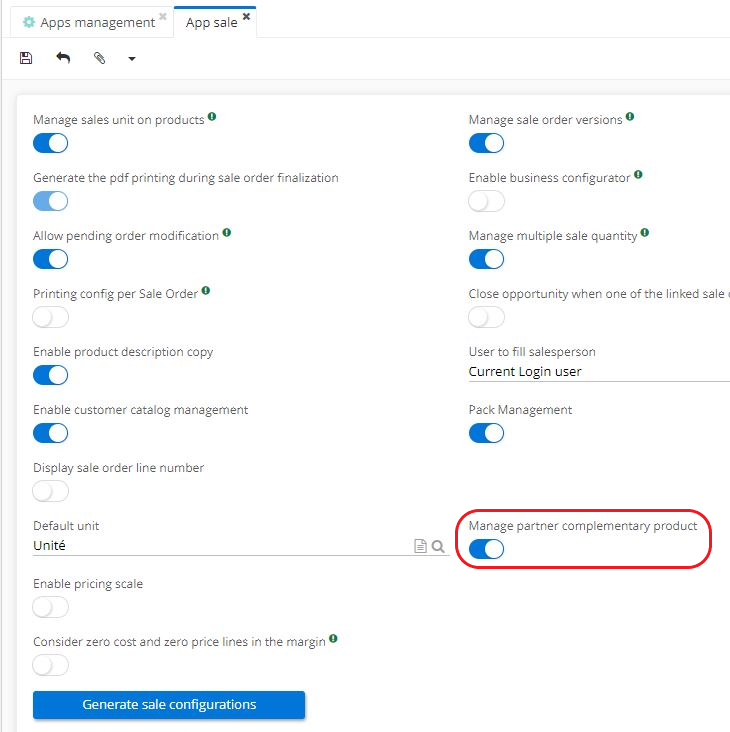
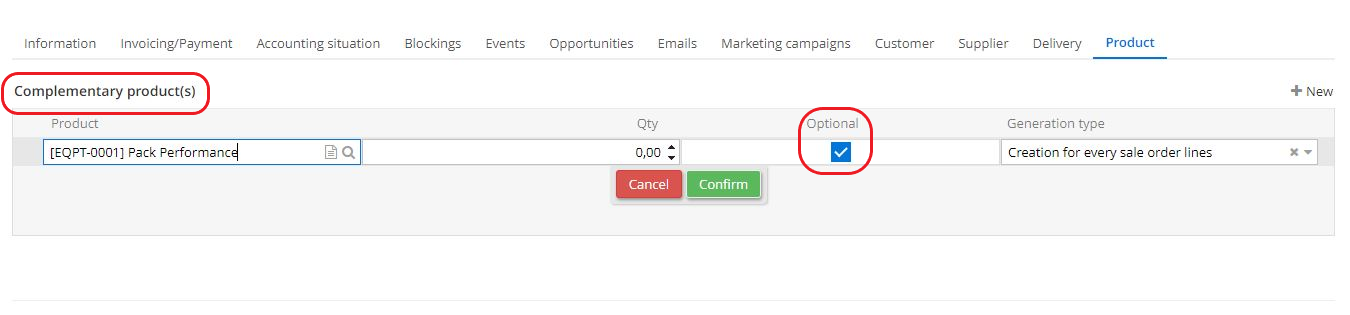
The "Manage partner complementary product" option allows to add a complementary product to a product on sell. This feature can be automated.
A complementary product can be offered to customers and thus it will be displayed on a sale quotation.
The optional product is not automatically added to the quote. On the product's quote line, this product will be offered as an option, and if it is selected, it will be added to the quote.
Supplier file (Purchases module)
You can usually find Supplier files in the Purchases module.
When creating a partner file, simply tick the "Supplier" box for the file to be considered as a Supplier.
The structure of a supplier file is similar to the structure of a customer file.
In general, you will find the same types of information as on the customer file.
However, instead of sales orders, there will be purchase orders linked to this supplier (click on the Supplier tab to view the purchase orders).
When the "Supplier" box is activated, the "Supplier" tab will appear in the tab bar on the page.
The Supplier tab contains the following fields:
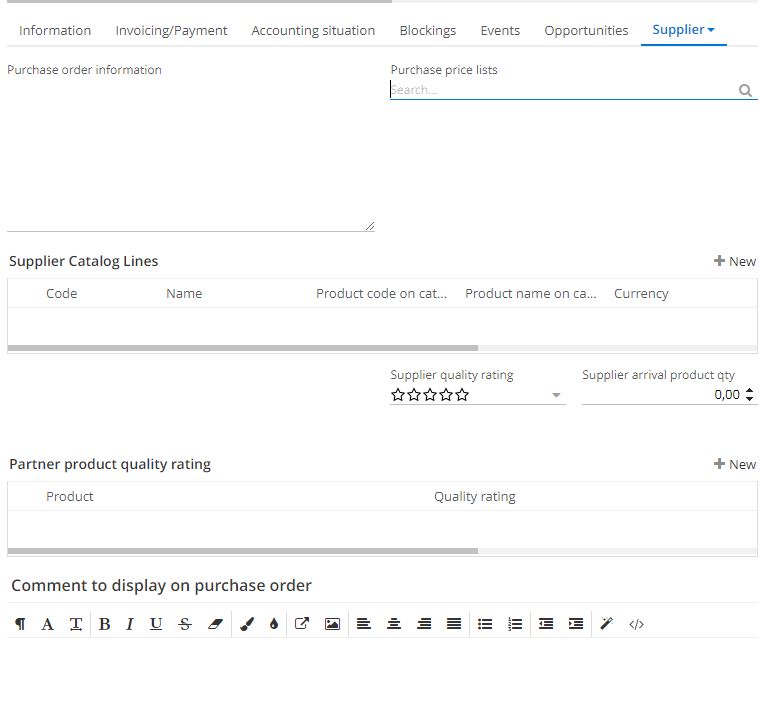
Purchase order information: enter a text to be displayed in red on the supplier quote and purchase order. Color red serves to warn useurs of some information in particular or give them instructions when ordering from this supplier.
Purchase price lists (if you have negotiated rates with the supplier): are used to select a purchase price list.
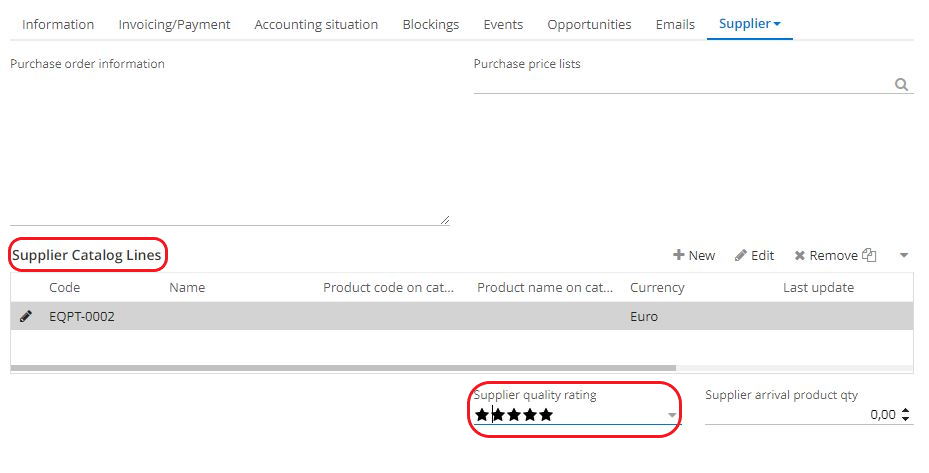
Supplier catalogue: consult the supplier catalogue, which contains all the products listed for this supplier. It is always possible to add a new product (by importing / connecting to the supplier portal / updating the catalogue).
Supplier quality rating. This notion is used to reflect the level of products received. The score can be filled in manually, otherwise it will be determined automatically according to the results of conformity checks carried out during supplier acceptance. As standard, a compliant reception gives 5 stars, a non-compliant reception 0 stars.
Supplier arrival product quality : this option enable you to set up conformity checks (not compulsory). As a result, at each reception it will be possible to indicate whether the products are compliant or non-compliant. Entering the product quality will be reflected in the score displayed in the "Supplier quality rating" field.
Partner Product quality rating: this table lists all the products received from this supplier, their quantity and the grade of their controls.
Comment to display on purchase order: used to indicate a text which will be displayed on the purchase order for this supplier.
"Create purchase quotation" button.
Purchase order: lists all purchase orders to this supplier.
Other useful information for customer/supplier file: envelopes / tools / map
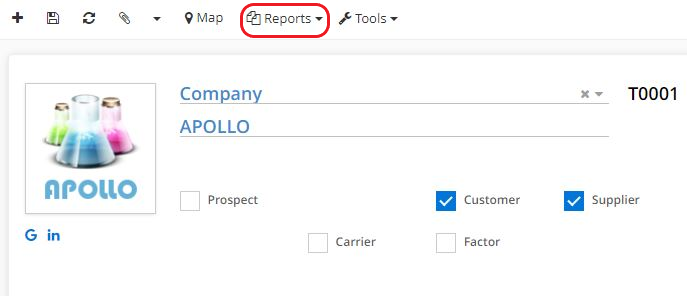
- Reports and Envelopes
This action can be used on customer and supplier files.
Envelope is used to generate a record with the customer's / supplier's address, ready to be printed.
On a customer or supplier file, click on Reports to print an envelope with the address or a third party.
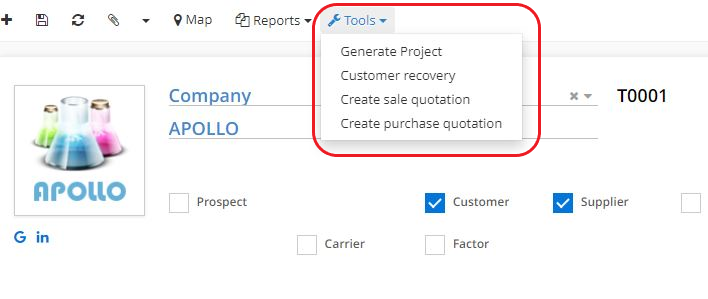
- Tools
This tab allows you to perform several actions such as "Generate project", "Customer recovery", "Create sale quotation", "Create purchase quotation".
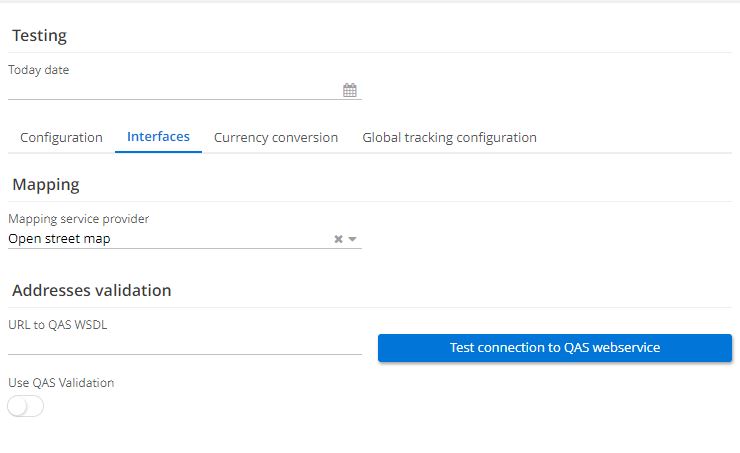
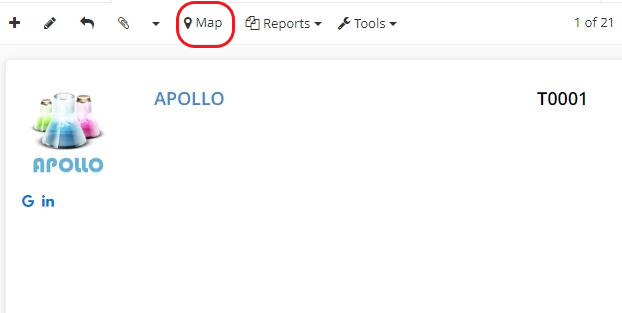
- Map
Click on "Map" to display the geographical position of the customer / supplier.
Map is configured in the Base app.
Access: Application configuration → Apps management → Base, configure → click on Interface tab → In Mapping serivce provider field, select either Google or Open Street map.
You may have to pay for Google Map features.