CRM
Introduction
CRM: thanks to this module, manage successfully customer relations and prospecting by tracking leads and prospects and creating sales opportunities. CRM is equally useful at managing events and appointments and creating customer quotes.
Configurations
Access: Application Config → Apps management → CRM, configure → configure the settings on the CRM app page
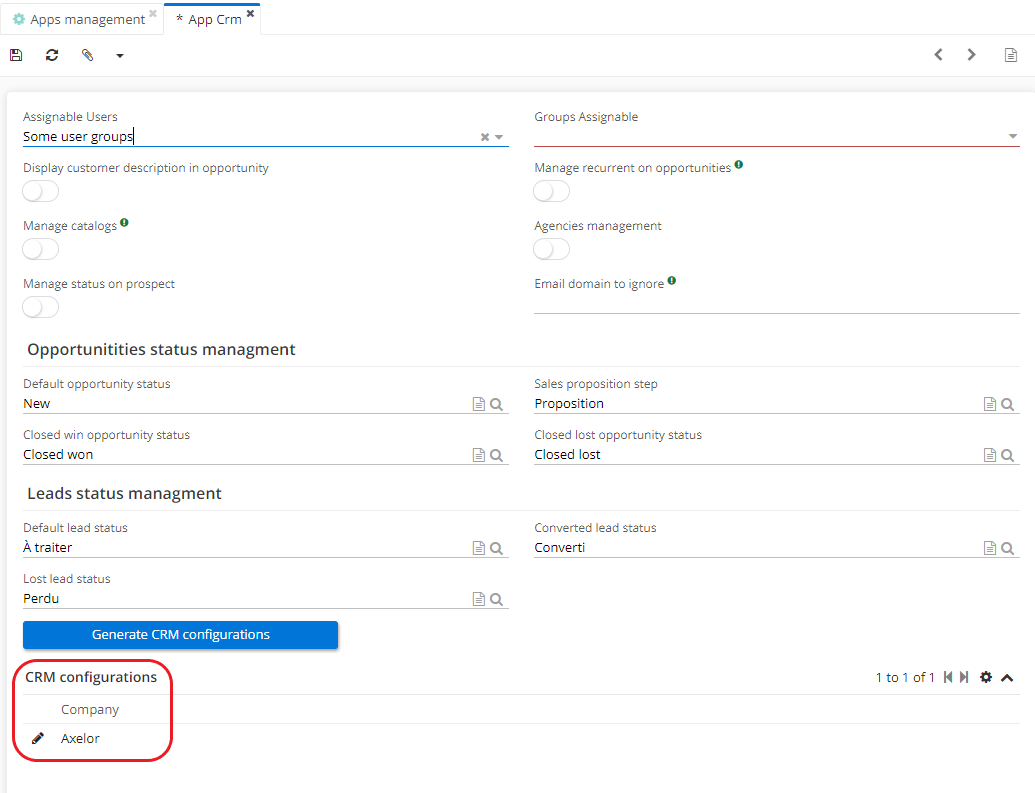
The options described below can be configured at CRM Application level.
Save the changes in order to apply new features.
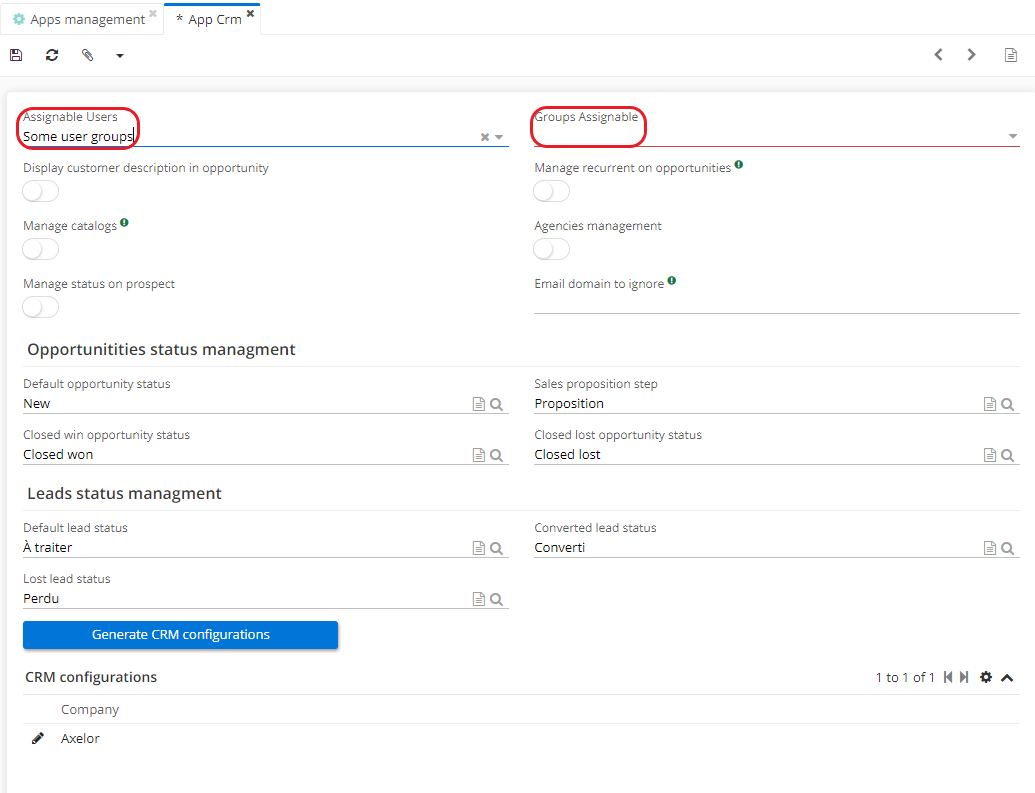
Assignable users
If necessary, assign customers to users ("Account owner" field on a customer record that is found in the Information tab). This option helps to decide whether the administrator allows customers to be assigned to all users or to certain groups of users. If the user selects "some user groups", the "Assignable groups" field will appear. For example, customers can only be assigned to the sales group.
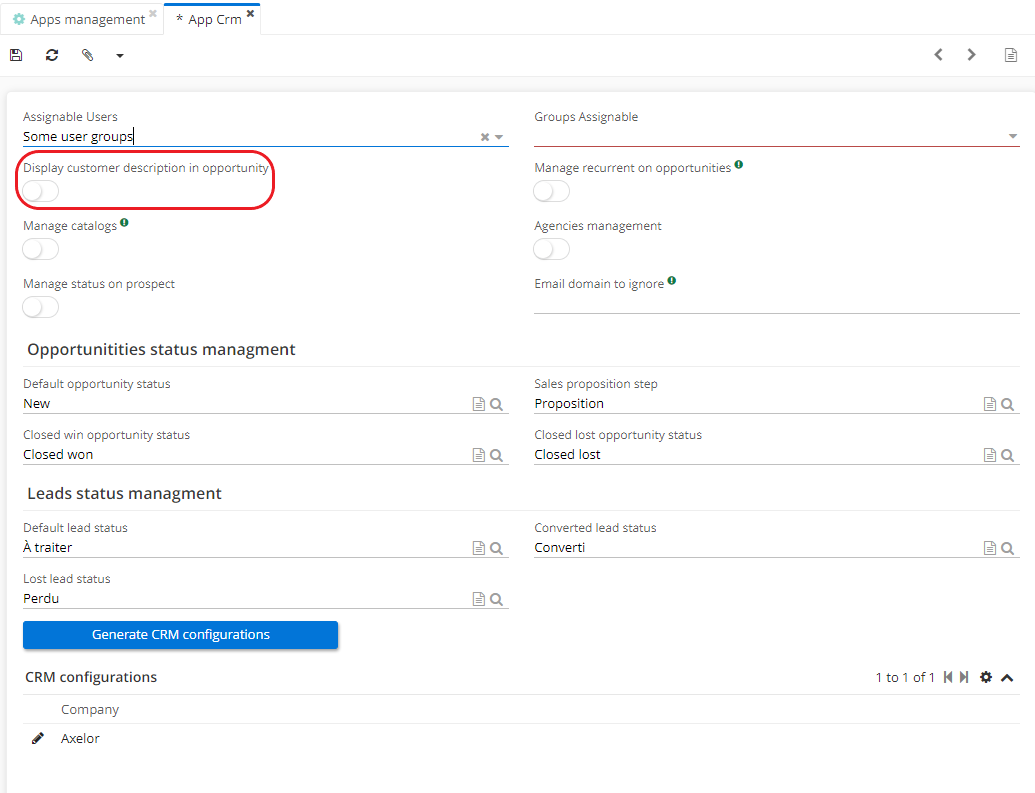
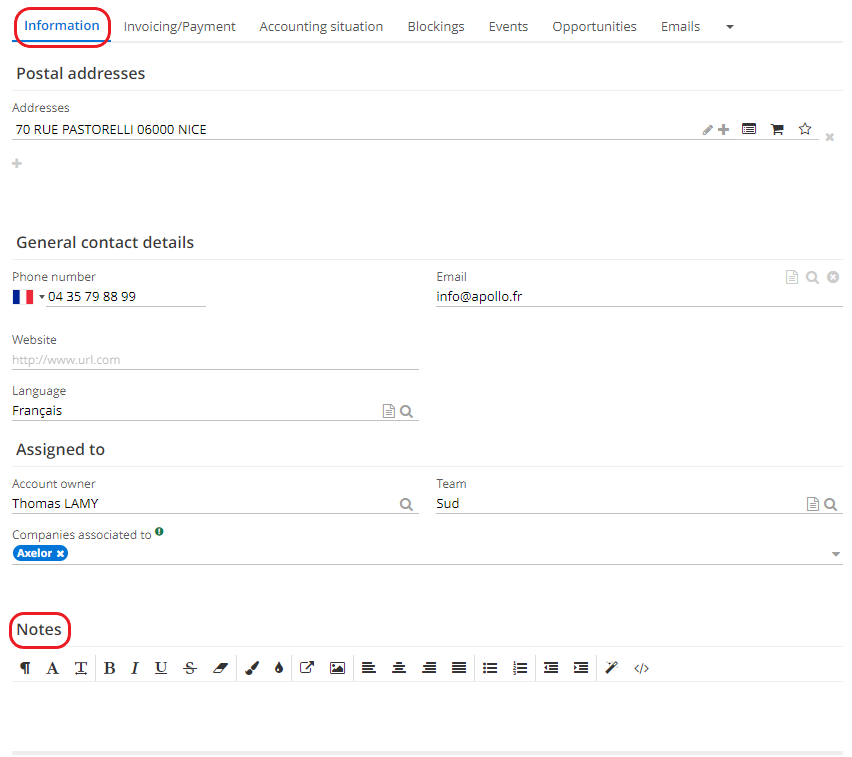
Display customer description in the opportunity
When active, this function will display the customer description in Opportunity files. In this case, activate the "Display customer description in Opportunity" checkbox. Enter a description in the "Notes" field on a customer record. This description will consequently be displayed in the opportunity once the function has been activated.
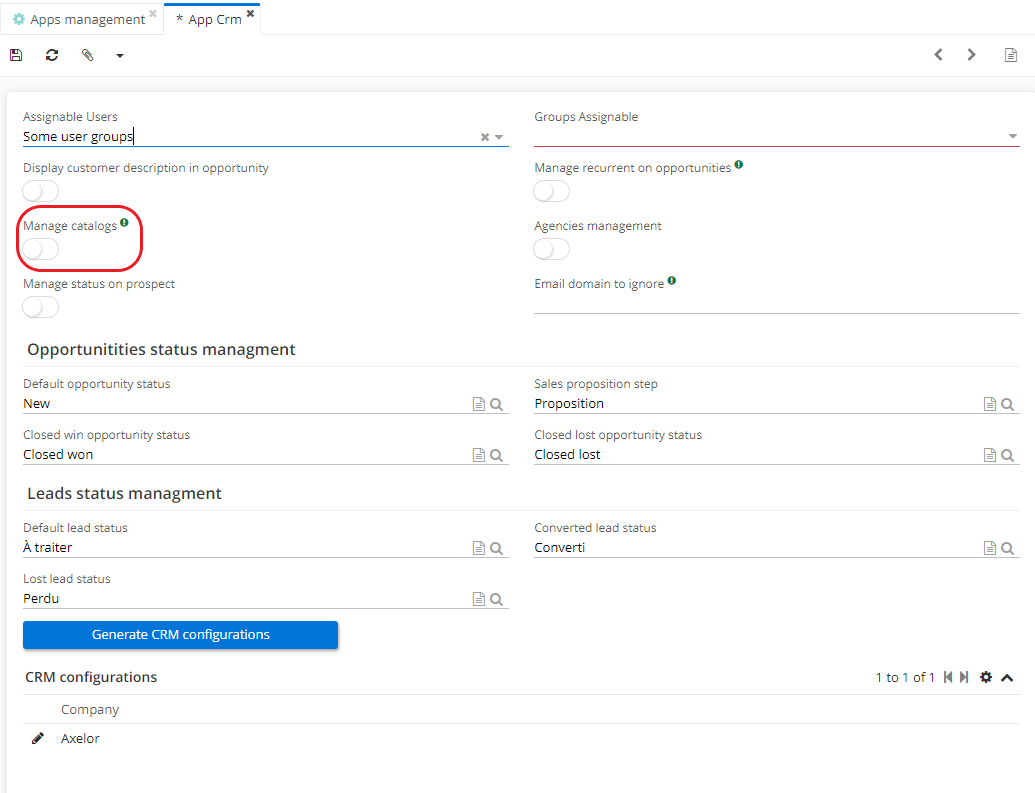
Manage catalogues
The "Manage catalogues" checkbox: managing catalogues will make appear the Catalogues menu entry. This menu allows you to save and store PDF catalogues, particularly if you sell different types of products of different brands, which is useful for sales staff who want to access their product catalogues quickly. Once active, new menu entry appears in the CRM module.
Manage recurrent revenue on opportunities
The "Manage recurrent revenue on opportunities" checkbox : when active, it shows an expected recurring revenue amount for an opportunity. In a dedicated field, note an expected amount of profit and a default recurring period (in months). For example, if the company is selling an annual subscription, it will be possible to indicate a period of one year in the "Default recurring period (in months)" field.
Agencies management
When active, the "Agencies management" function associates leads or customers / prospects with agencies. It makes then possible filtering the leads or customers / prospects linked to certain agencies from a report. It makes it possible to share a repository across a company or different agencies if you have different agencies / establishments.
Configurations by Company
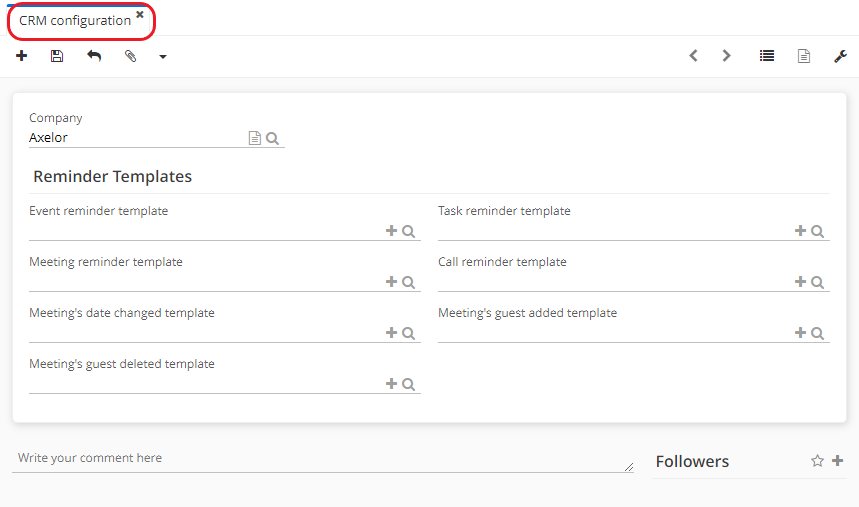
Access : Application Config → Apps management → CRM, configure → on the CRM app page, scroll down to the CRM Configuration section, and there click on a company record to access the configurations by company.
In case of a multi-company system, it is possible to configure certain parameters differently for each company.
Define email templates according to your needs (reminder / invitation / event etc).
Email templates are configured in Application Config → Message → Templates.
Features of CRM module
Lead management
The user may wish to create a lead following the first contact with a company / person who has, for example, filled in a form on the website. Or maybe there is a need to import a mass file of contacts after an event in order to record them as leads.
The lead is a "flexible" object often used by marketing or sales to make an initial qualification. If the lead proves interesting, it can be converted into a partner in the CRM.
This partner can be a prospect, a customer or something else (depending on the module, for example a partner supplier).
Partners (i.e. third parties) are the system's real reference base.
The lead is what enables to make an initial qualification. It avoids entering too much unecessary data for the customer repository.
If a lead is of commercial interest, it will be converted into a prospect and subsequently into a customer; however, if the lead is not of interest, it may be labelled as "lost" and then it will be archived.
This feature makes it possible to manage a large volume of prospecting and to carry out initial qualification.
The use of a lead is not mandatory; it is possible to directly create a prospect or customer record.
How to create a lead
Access: CRM → My Leads / Opened Leads → New
- Create a new lead.
Enter the necessary information (surname / first name / company).
In the "Industry sector" field, select an industry sector.
It's compulsory to create the industry sectors beforehand in the CRM configurations.
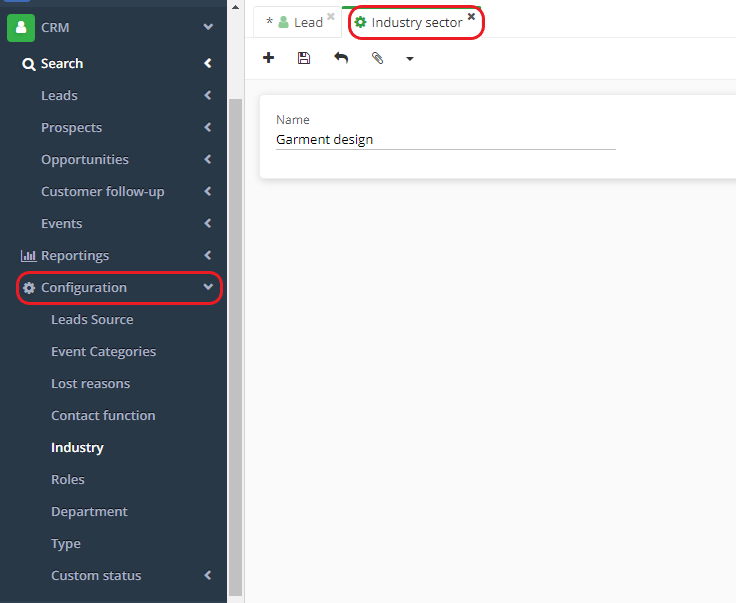
- Create an industry sector.
Access : CRM → Configuration → Industry → New
Create new industry types (Service / Public sector / Garment design / Game development etc).
Keep in mind, you can import industries via a CSV file.
Save the changes you have made.
- Select an industry sector.
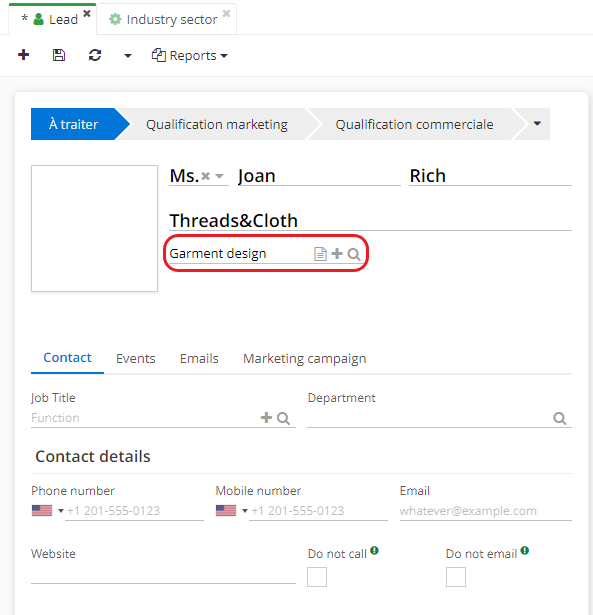
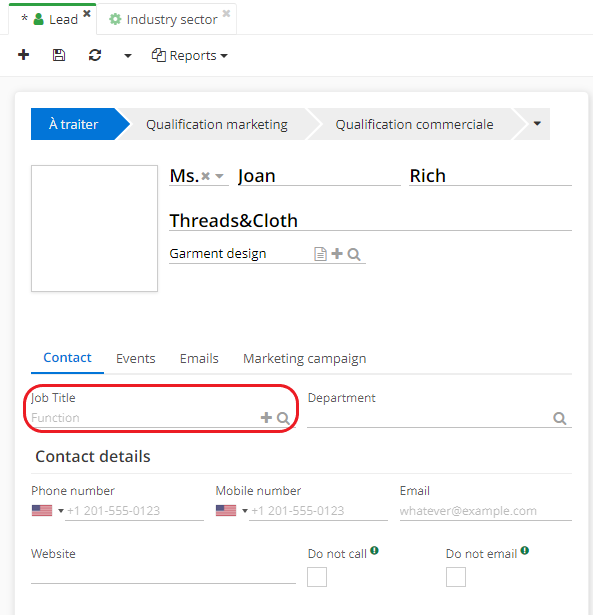
Next, enter the contact details, e.g. job title and contact details.
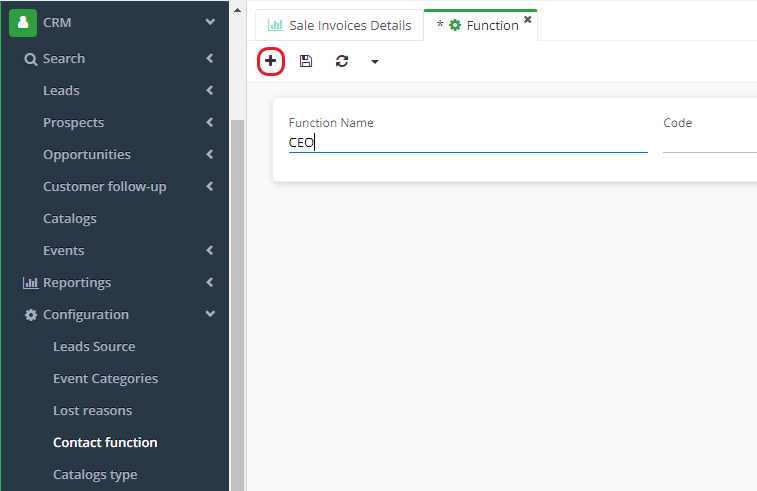
How to create a new job title?
Unlike an industry sector, it is possible to create new functions directly on the Lead record in the Job title - Function field by clicking on the +.
Or create a new function from the "Contact function" menu entry (Access : CRM → Configuration → Contact function).
However, when the user wishes to carry out queries or reporting, it is possible to limit usage and offer only the selection that had been previously defined by the administrator.
When you let a user create functions / sectors themselves, keep in mind that it could result in duplicates (i.e. different titles for the same position). Duplicates can complicate queries and the creation of reports.
Define the department. The department can be configured in the "Department" menu ( Access :CRM → Configuration → Department).
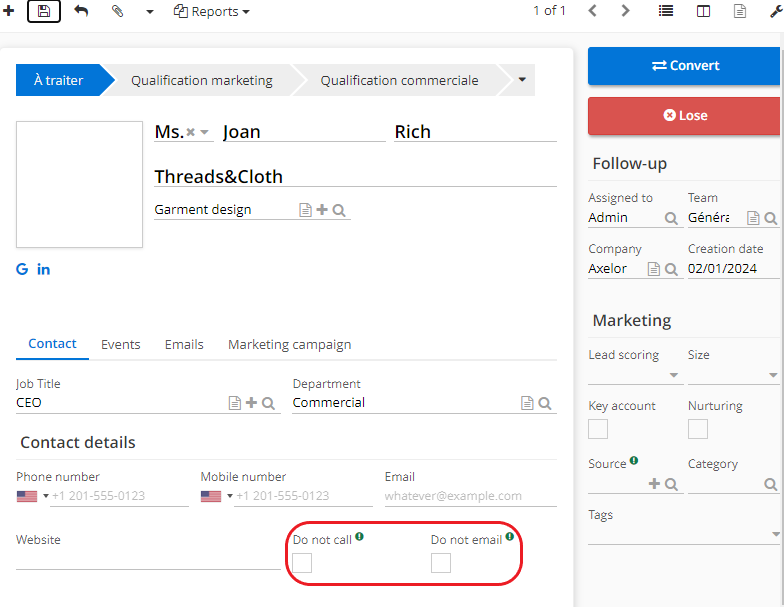
If a contact does not wish to recieve calls or emails, tick the boxes "do not call" or "do not send email".
Enter the main address if necessary (not a mandatory field).
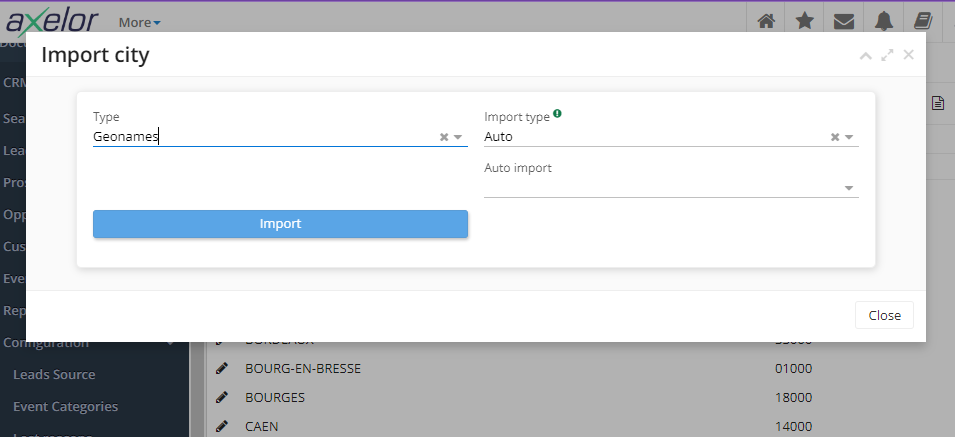
Cities is a repository that can be accessed from the Cities menu entry (Application Config → Organization → Territories → Cities). At the same place, find other menu entries such as Countries, Departements, or Regions.
If you can't find the city you're looking for, import the data either via CSV files or from Geonames website (click on the "Import city" button). Cities can be imported automatically or manually (select from the "Import type" field). With the "Auto Import" field, select between France or other countries.
Importing cities can take time.

- On a Lead record, find the "Description" field. This field is useful for noting information about the lead, such as an exchange report or details of its requirements. This field is an HTML field, so it's also possible to add images and create page layouts.
There is always an option for storing documents on the record itself in document management. Simply click on the paperclip icon.
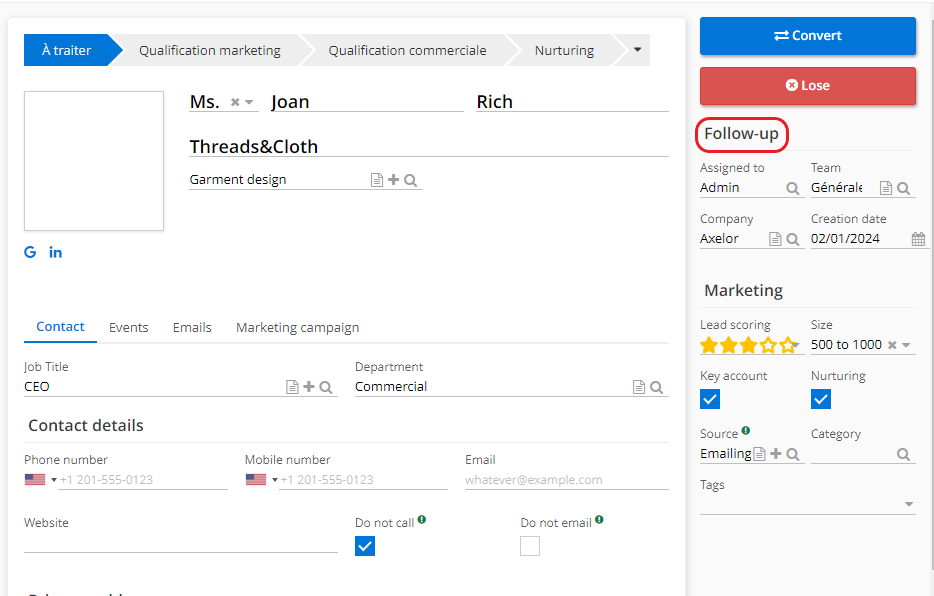
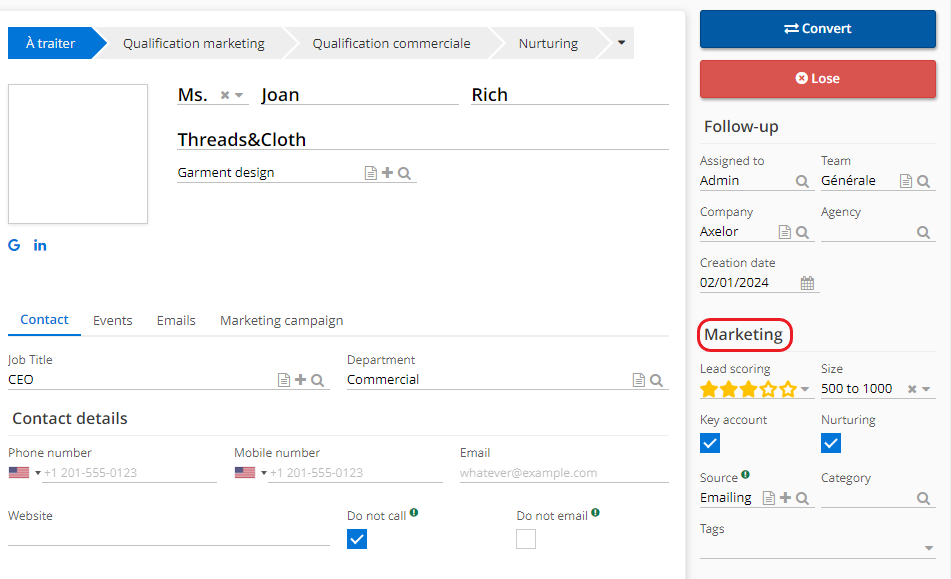
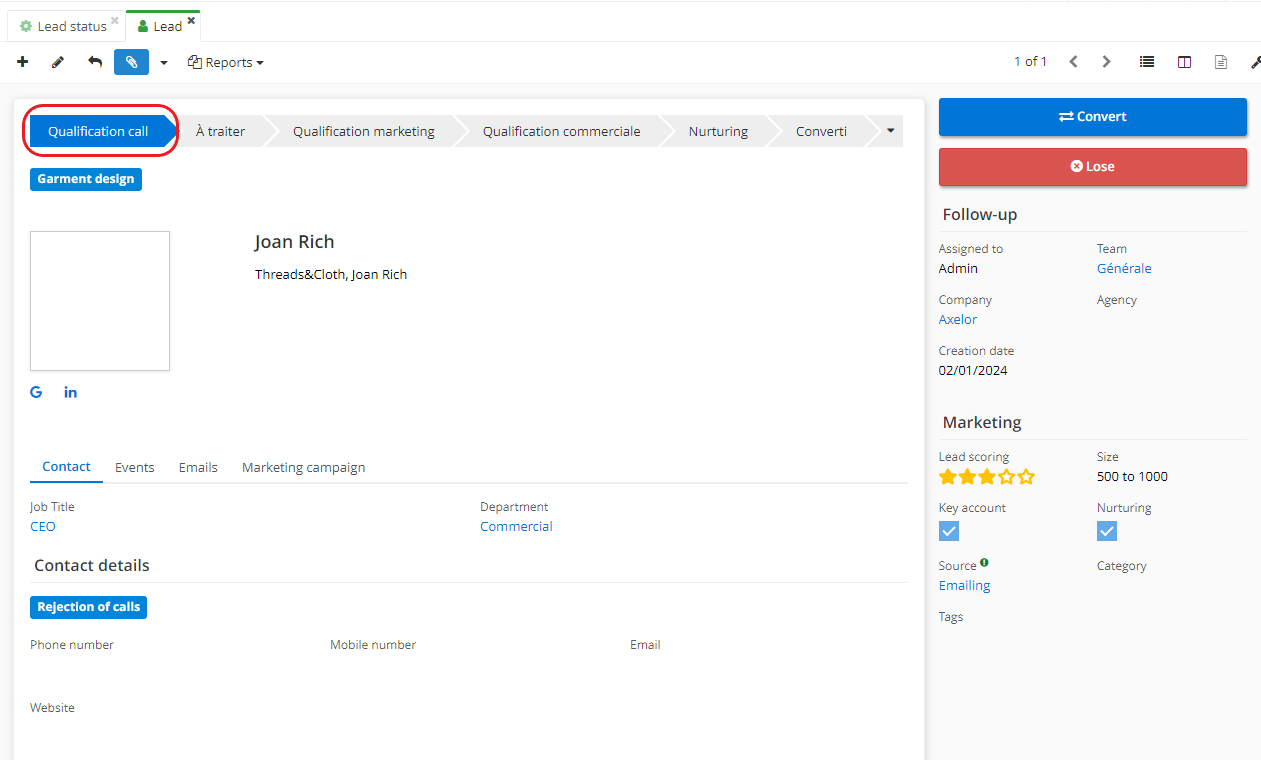
- On the lead record, in the space on the right you will find the Follow-up information. Thanks to this information, find out who is the assigned user of this lead record.
In the "Assigned to" field, select a user. Consequently, the lead will be assigned to this person. Without filters, it will be possible to select any user.
Team: in this field, select a team responsible for this lead.
Agency: add members on the agency field. This way, search for all leads or prospects of an agency in the reporting. This feature can be useful for companies with several establishments / agencies.
Configure agencies from Application Config (Access : Application Config → Users/Company → Agencies).
Notice, in order to open Agencies menu, Agencies management should be first activated on the CRM app page.
The Company field : in the case of multi-companies, the Company field on a lead record shows that this lead belongs to a particular company.
"Date of last event" and "Date of next scheduled event" are filled in automatically according to the dates of the next and last events attached to the lead.
Configuring lead marketing inrecordation
Add lead scoring. The aim of lead scoring is to be able to give a five-star rating to a lead in terms of commercial interest (for example, one star means "this prospect is of little interest", and five stars means "this prospect is very interesting"). Lead scoring helps to quickly identify the most interesting leads visually.
Size: this field concerns the size of a company. Search and query the database to target companies of a certain size with this field.
Key Account : is used to identify important and strategic accounts from a commercial point of view, for example a large company that the user would like to have as a customer. This feature makes it easy to carry out searches by displaying key accounts quickly. From a marketing point of view, these accounts will be given priority.
Nurturing : it means that the lead needs to be nurtured with Marketing content / this lead is not necessarily very active in the buying cycle / its buying project could be on pause / or it could be in advanced prospecting / it is also possible that there are no sales actions to be carried out by the sales team.
Consequently, the Nurturing lead is most often followed up by Marketing service (for example, they can send some white papers or webinar invitations).
Source of the lead: indicate a lead origin in this field (website contact record, webinar participation, prospecting by a sales rep, etc.). You can either view the source from "Lead source" menu or create a new one. Access : CRM → Configuration → Lead source.
Category: with this feature, categorise leads (for example, Association / SME / Investor etc). The category is customizable. Access : Application Config → Referential → Configuration → Partner categories.
Tags: tags can be created. Tags are used to search for specific keywords. Enter the name of the tag and the colour (for example, "Open Source" in red). Tags make it possible to further categorise leads, make queries and search for them more easily.
Find shortcuts to Google and Linkedin on a lead record. Remember download the company logo.
Lead status & Workflow
Workflow
Customize Workflow directly from the CRM configurations, without going through the BPM.
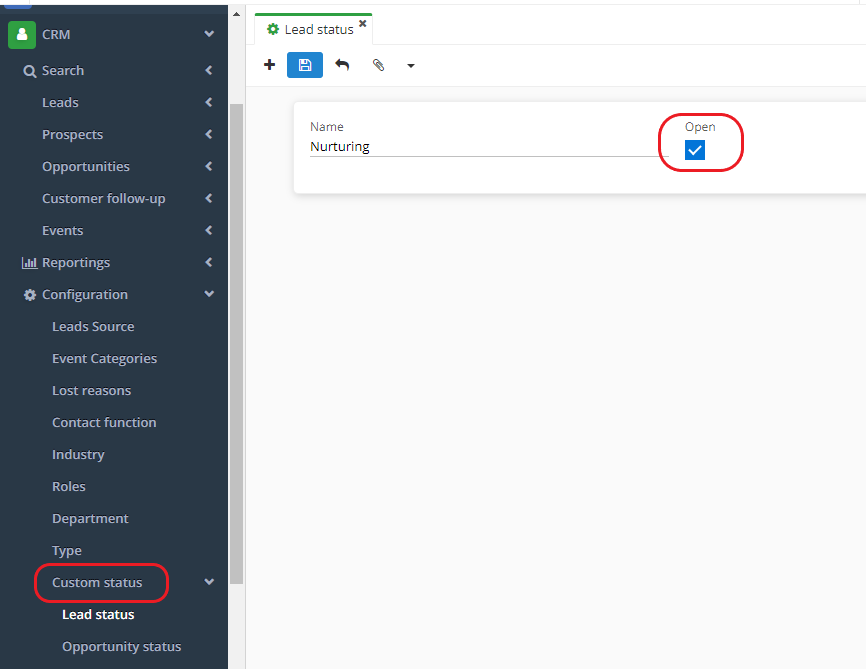
View lead statuses via CRM → Configuration → Lead statuses.
It is always possible to create a new status.
Lead status
For illustration, new status could be called "Qualification call".
The status can be "Open" or "Lost" (tick box).
Open": all leads with "Open" status will appear in the Lead menu entry.
Lost": all leads with this status will be archived.
Note that the status can be changed at any time.
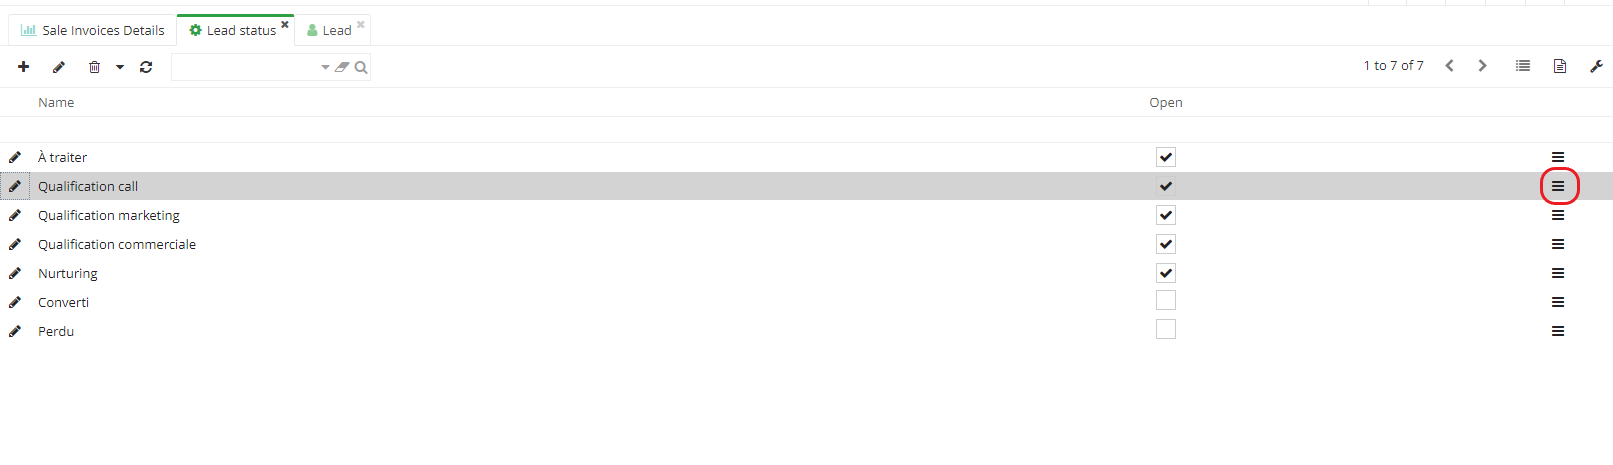
All leads with a status where the "open" box is ticked will appear in the Leads menu entry, and all leads with a status where the "open" box is not ticked (i.e. they are lost) will appear in the Lead archives.
The "closed lost" status cannot be deleted, nor can the "closed won" status.
These are the so-called "standard" statuses that are essential to the operation of a lead.
Sequence
Access : CRM → Configuration → Custom statuses → Lead statuses
Sequence on a lead record defines in which order appears each status.
- In the old version of software, it was possible to add a sequence immediately on the same page when creating a lead status.
In the old version of the software it's possible to add a sequence directly on the new custom lead page. Note, it is preferable to indicate the Sequence with tens, for example 10 - 20 - 30 etc. It makes it easier to insert a new sequence between 2 existing sequences.
- However, since version 6.5, all statuses are placed directly on the list with all existing statuses (custom statuses). Therefore, on a lead status page, click on the three-line icon and move the statuses into the correct order. This order will be respected on a lead record.
Access : CRM → Configuration → Custom status → Lead status → on the list with all current statuses, click on the icon and rearrange the order.
- Then, save the changes and refresh the browser page so that the changes take effect. The lead record now shows the new status in the workflow.
Some statuses have processes behind them, such as "Converted" status. This status is used to convert a lead into a Partner / Prospect / Customer.

Event management
Once everything has been configured, it's time to create events and monitor them for the first time.
How to create an event?
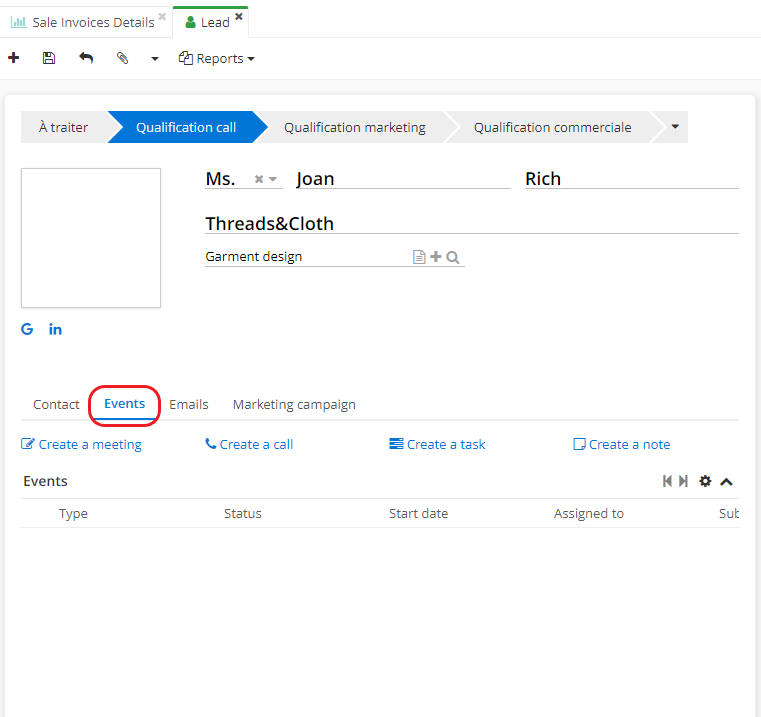
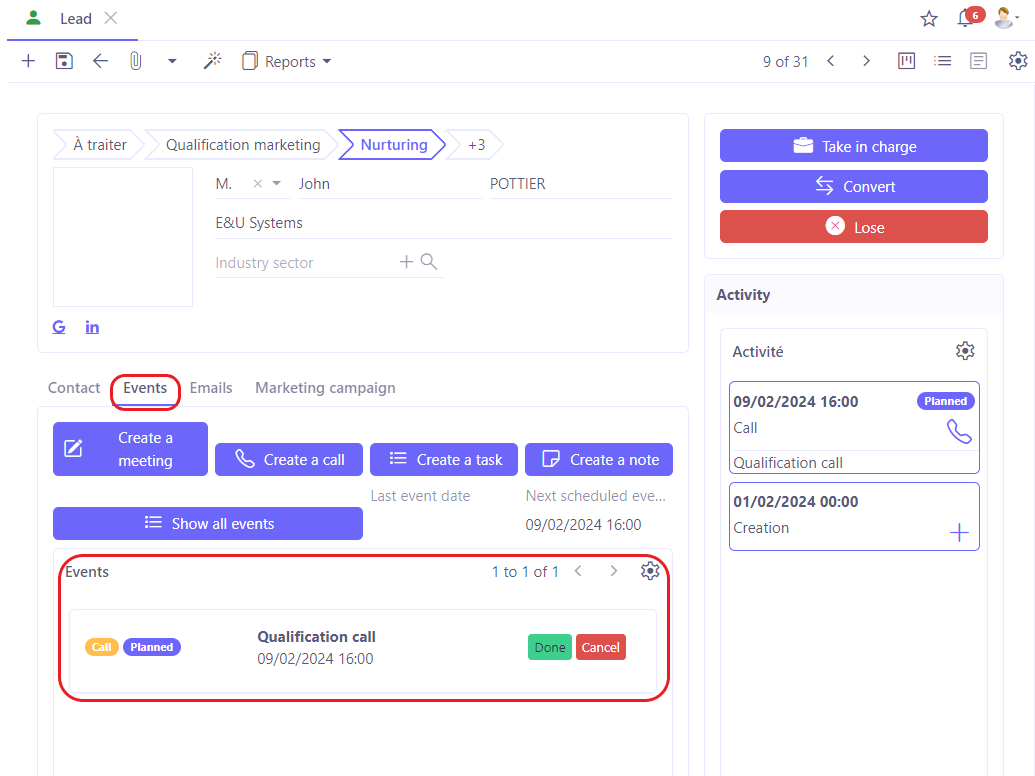
- On a lead, prospect, customer or contact file open the "Event" tab.
Click on one of the suggested events:
Create a meeting ;
Create a call ;
Create a task ;
Create a note.
In the example, the user clicks on "Create a call". It opens a new Event window.
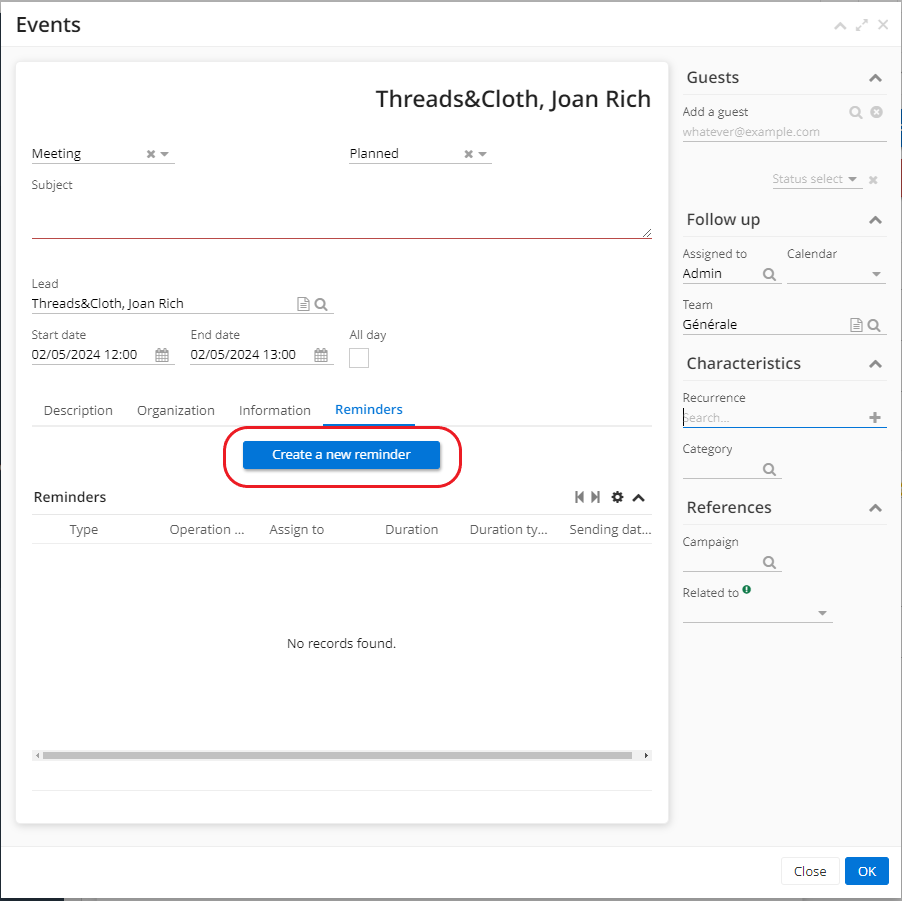
- Enter the necessary information in the "Event" window (for example, in the "Subject" field, type "Qualification call"). If there is a contact information, it will be automatically added to the "Guests" section.
Check out how to configure the Calendar. The calendar must be configured if the user wishes to synchronise events with another calendar and / or applications such as Office 365 or Gmail/Outlook. This feature is available in the commercial version of Axelor.
Note that even if the user clicks on "Create a call", it is still possible to select another type of event (Call / Meeting / Note / Task).
For a call, indicate whether it is an Outbound or Inbound call.
Enter the date.
Use the "Description" field to write notes / report on the event.
Organization tab allows you to enter a Location (this tab mainly serves for information purposes).
Information tab is linked to the calendar. Indicate whether the event is public or private.
Create a reminder in the "Reminders" tab. This feature allows you to send a reminder by email. Reminders are not compulsory.
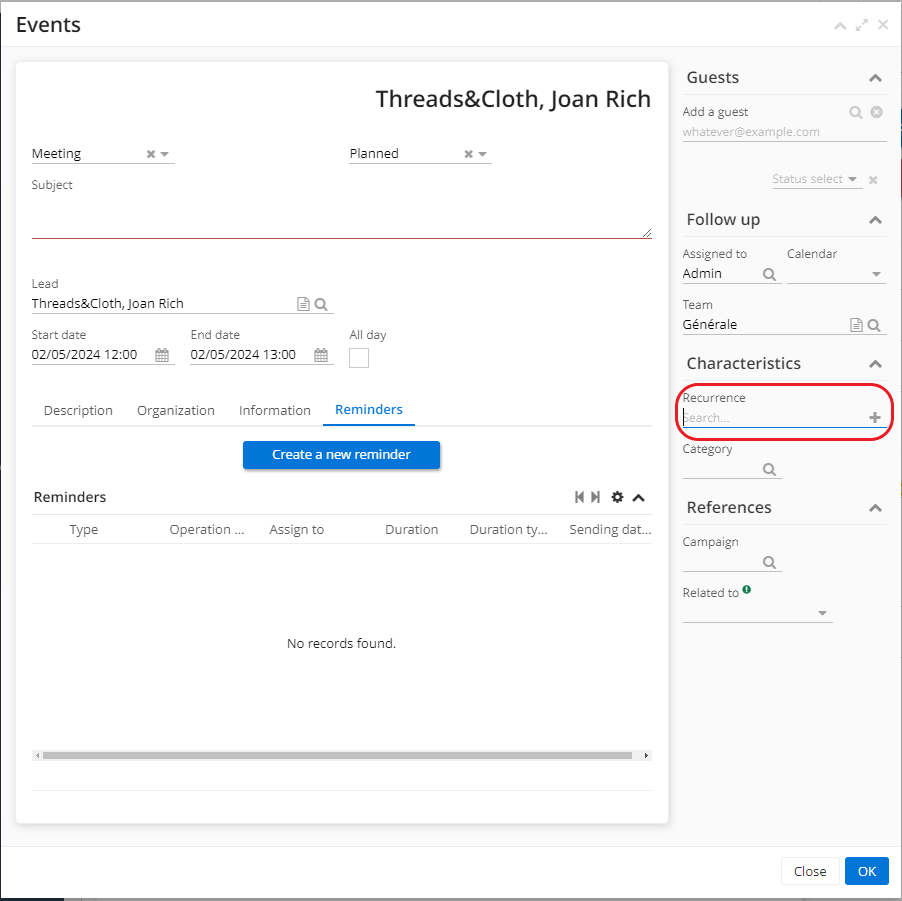
Recurring event
In addition, the user can set up recurring events, such as Follow-up meetings.
Click on "Create a meeting" → then on the Event window click on "+New" in the Recurrence field in the Features section.
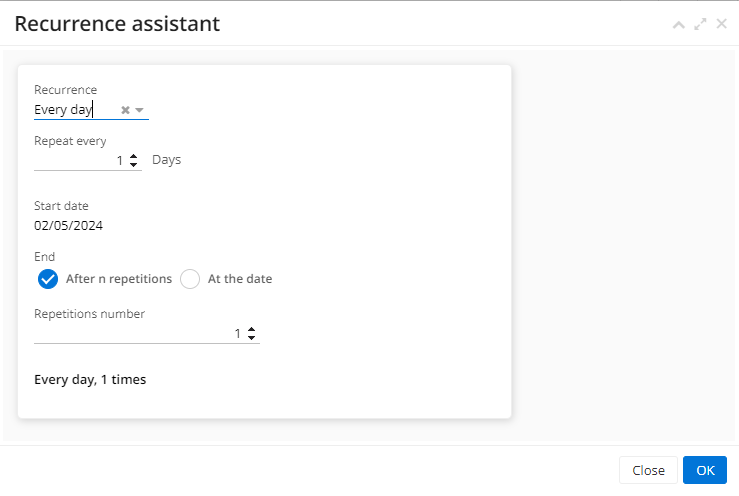
A new "Recurrence assistant" window will then open. On the "Recurrence assistant" page, configure the recurrence.
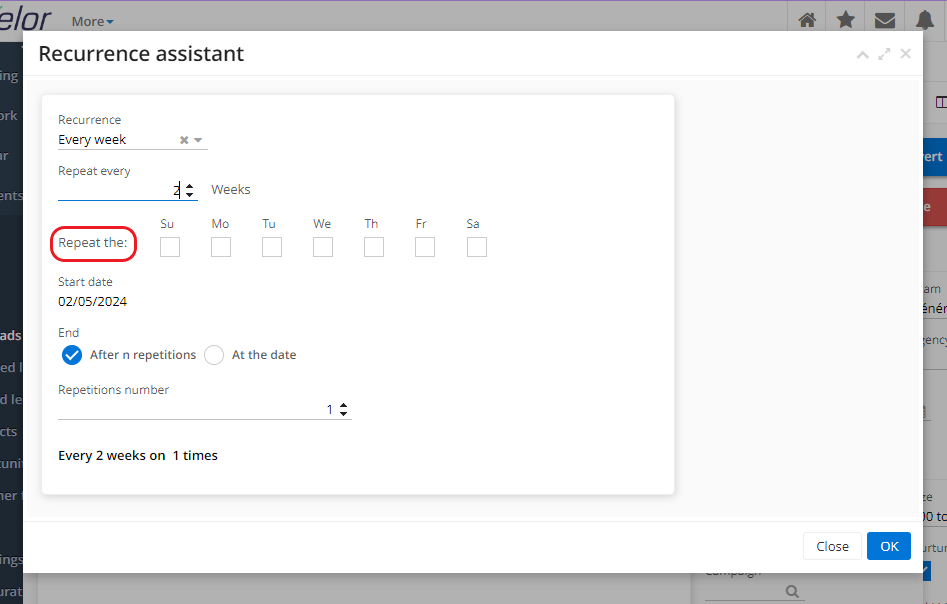
In the "Recurrence" field, select the frequency of the reminder (for example, every week / every day).
In the "Repeat every... " field, enter the number (for example, "repeat every 10 days").
If you have chosen "repeat every week", then select the day in the "Repeat on Sunday / Monday / Tuesday / Wednesday / Thursday / Friday / Saturday" field.
Repetion number: enter the total number of repetitions (e.g. 5 means that there will be a total of 5 repetitions).
At the bottom of the page, the user will see a summary of the recurrence settings (Every week on Monday, 5 times).
Events can be created in several ways: on the prospect or contact record, on a customer file or directly in the Events menu(access : CRM → Events). Please note that you will then need to attach this event to a file, whereas creating an Event from a file attaches it directly to the said file.

Keep in mind that Events can be linked to a marketing campaign (find it on the Event window on the right, in the References section). Or, click on the Marketing campaign tab directly on a lead record.
The Event can also be linked to different elements (third party / contact, project / business, lead, quote /order etc).
Once all the fields have been completed, click "OK".
A tab "Apply changes" will then open. You can choose to :
"Apply changes to this event only".
"Apply changes to all recurring events".
In addition, the Event tab contains other actions:
Create a note: is used for taking notes. The contents of the note are displayed.
Create a task in the Event tab.
The event list on the lead record (or prospect, customer or contact record) : on a record, in the Event tab the user can view all scheduled events. These events are distinguished by color labels. Each event has its own label.
In addition, you can click on the "Done" button to confirm that the event has taken place. Click "Cancel" to cancel the event.
When necessary, apply filters to the list of events.
Date of next scheduled event : on a record, click on Events tab. On the right side consult the date of the next scheduled event and the date of the last completed event.
Events are not limited to a lead record. It is also possible to create an Event from a Prospect, Contact or Customer file. Use the same settings.
On a lead record, find future and/or recurring events in the Events tab.
Events menu entry
In the CRM module, find the Events menu entry. Access to this menu entry will depend on the access rights granted to users.
It is possible to filter the Events repository by selecting a Status, or group (click on "Assigned to" and then select "Group" or "Ungroup"). The user can also apply the Advanced Search, which offers a wide choice of filters.
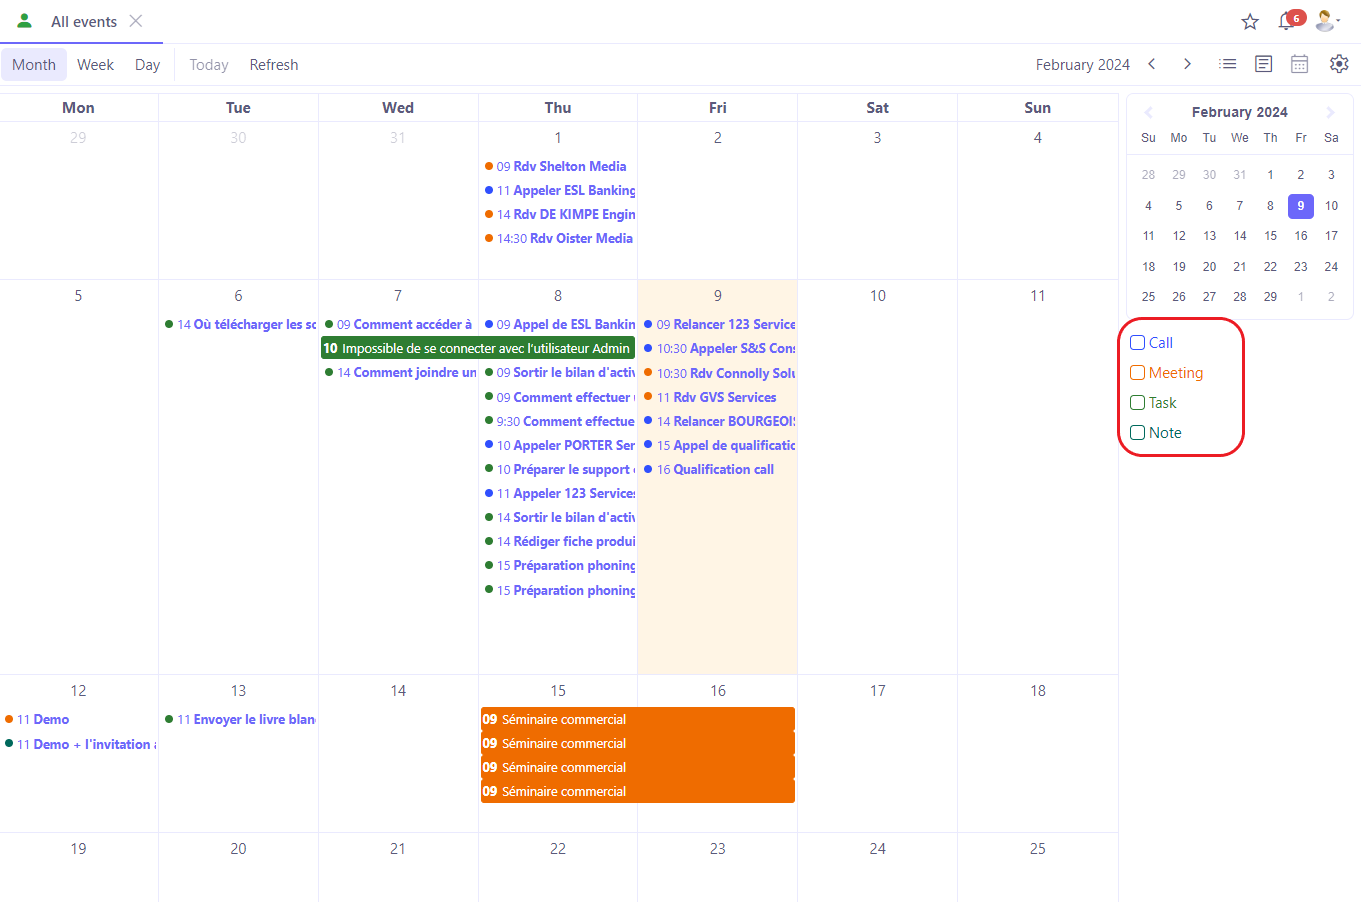
Click on the calendar icon to activate the "Calendar" view.
In the "Calendar" view, sort events according to their nature.
When clicking on an event in the calendar, it's possible to either modify it or delete it.
Set up a new event by clicking on the free space in the calendar. However, if the user creates an event directly on the calendar, it is essential to link it to a partner / lead / contact etc ("Related to" field). "Related to" field enables to select another type of object (order, event, project) to be linked to the event. "Related to" field is found on the right lower side of "Events" page when creating a new event on the calendar.
Bear in mind that when the user creates an Event on a lead record, it will automatically be linked to it. However, it is not the case when creating an Event with the Calendar or from the Event menu entry. Therefore, complete the "Related to" and "Add a guest" fields in order to attach it to a record.

Emails
Send emails from the leads, prospects, customers and contacts files.
The principle is the same for sending emails from various files.
View incoming and sent emails directly from the relevant file.
It is compulsory to have a pre-configured email account in the software.
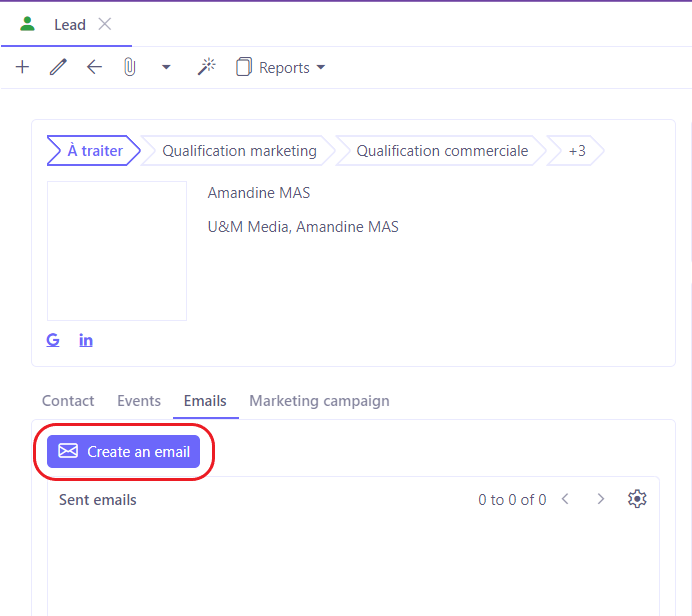
To create an email :
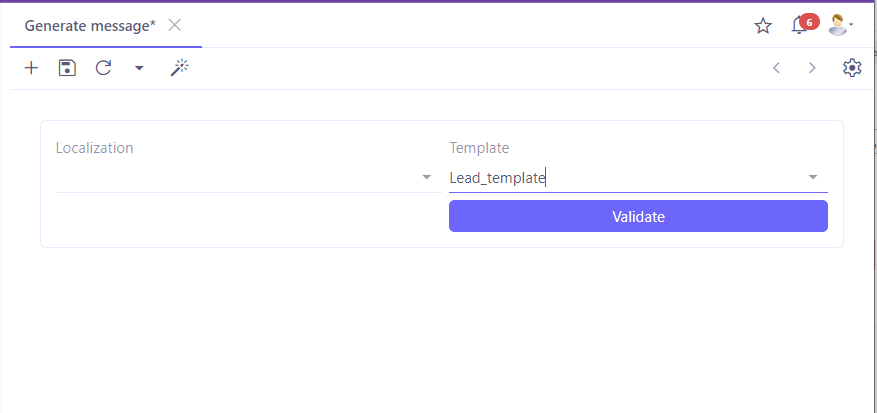
- Click on "Create an email" button on the file. It will open the email generation window. Select the language and template. Click on "Validate". Clicking on "Validate" button will open the email configuration page.
In order to be able to choose from templates on the email generation window, these templates must be linked to an object of the email. For example, an email could be connected to a lead (as object).
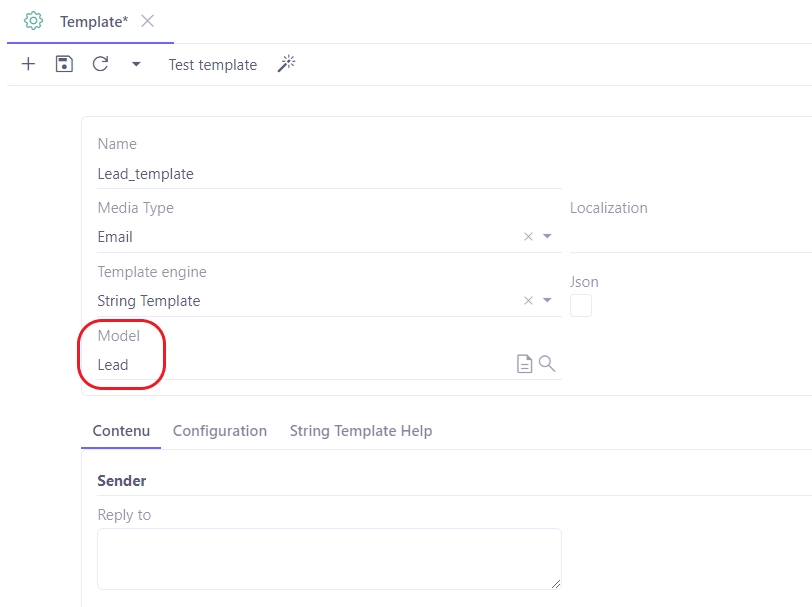
Note, the template must be configured beforehand in Application config → Message → Template.
On the Template configuration page, define Lead as the object in the Model field. This way it can be selected when creating an email on a lead record.
Keep in mind, it's important to select the correct type of media. For example, in order to create an email for a lead, use email type of media. For a marketing module, use "marketing campaign" type of media.
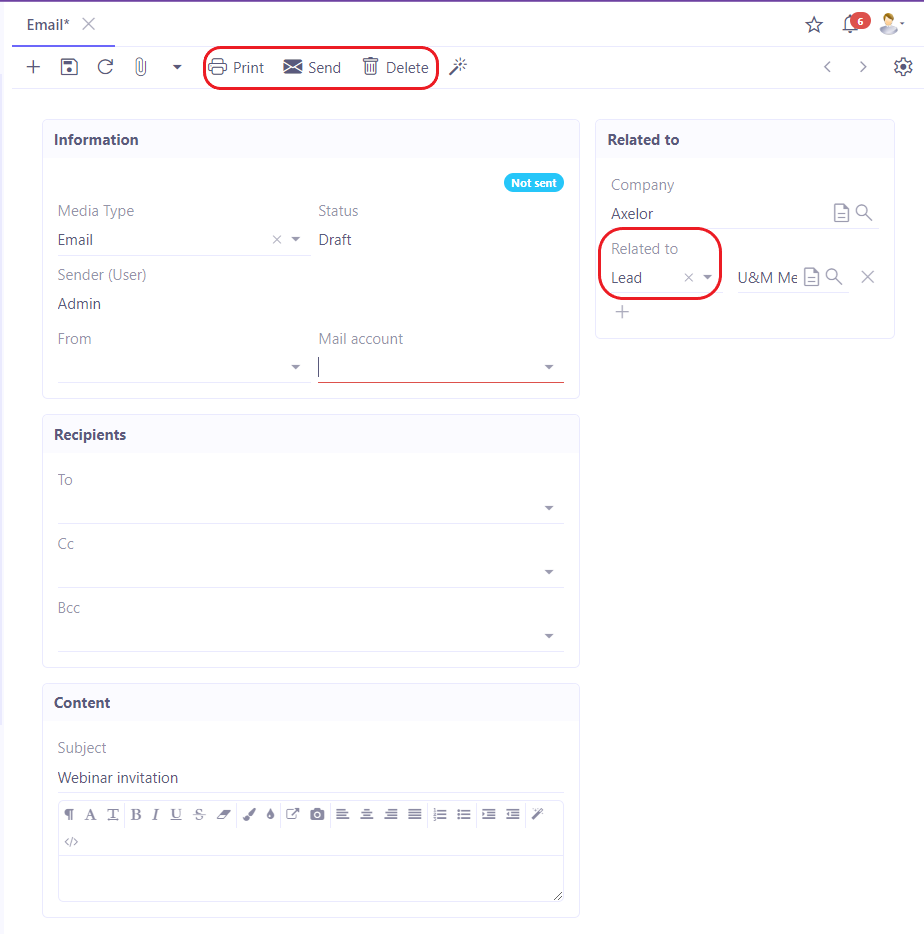
- On the email configuration page, complete all necessary information. Click on the "Send" button to send it. In the "Related to" field, note that this email is linked to an object, in this example it's a lead. All sent emails will appear in the "Sent emails" section on a relevant record, which is helpful when there is a need to consult email history.
Note, when using Gmail or Office 365 connectors, emails can be synchronised. This feature is in particular interesting since lead or contact / customer emails can be retrieved and attached to their records.
For example, if someone sends an email and their contact exists in the CRM, the received email will be synchronised and will then appear on the contact's record.
Marketing campaigns
The marketing campaign shows whether the person has taken part in a marketing campaign.
Marketing campaigns can be viewed from the Marketing module (access : Marketing → Campaigns).
Note, it's also possible to view all the campaigns a lead / prospect / customer / contact has participated in directly from its record. Simply click on the Marketing campaign tab that can be found on any record.
Mass update from the lead repository
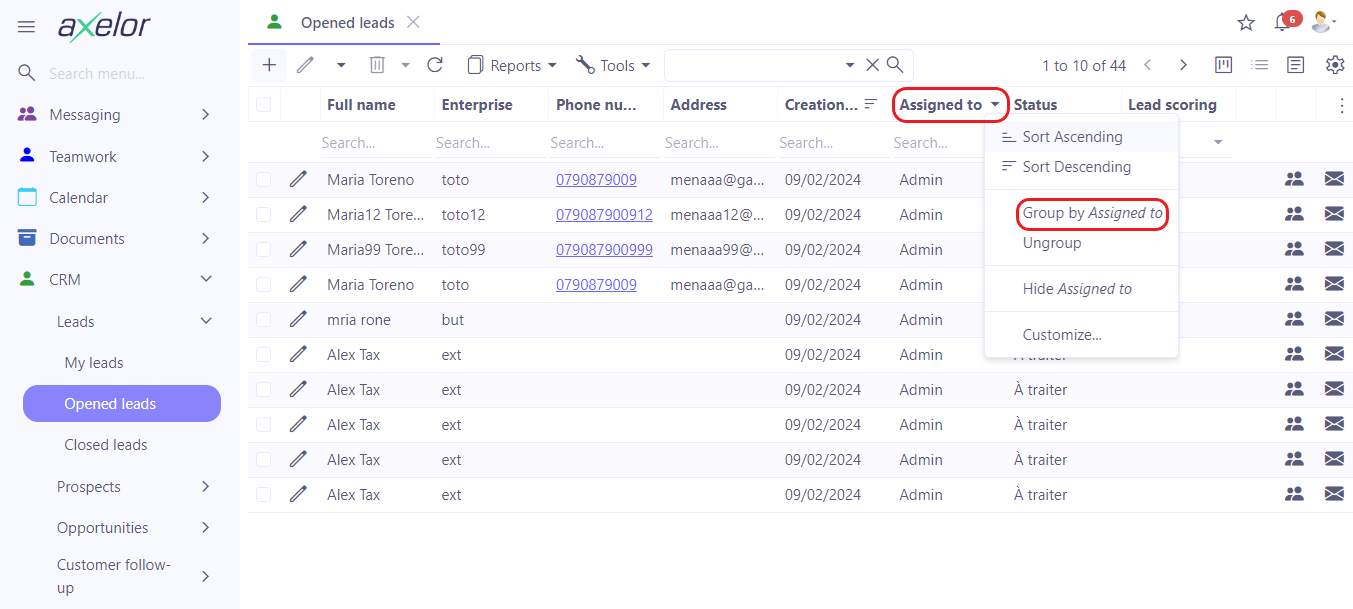
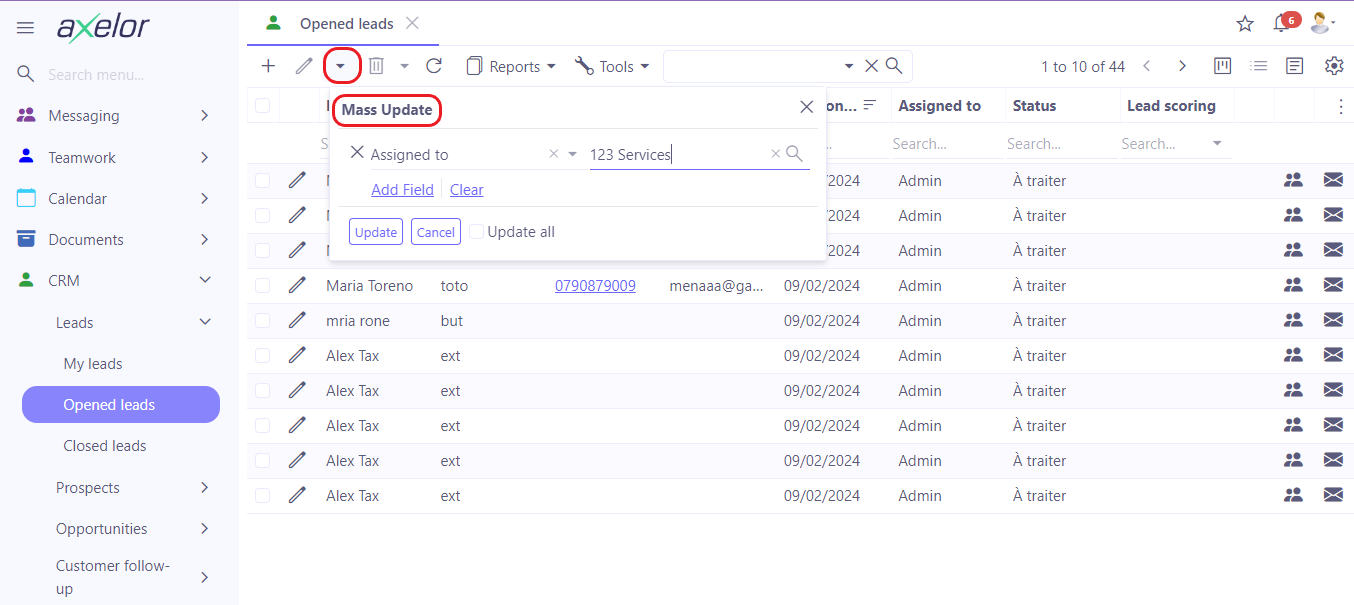
From the lead list view, carry out a mass update for certain elements. Select "Assigned to", "Team" or "Industry sector".
For example:
Access the leads in list view (CRM → leads menu entry).
Sort the leads by clicking on "group by Assigned to" in the "Assigned to" field.
Select a user's lead lines using the shift arrow (the line selection will be coloured grey).
In the "Mass update" tab, choose "Assigned to" and in the second field select the person to whom you wish to mass reassign the leads.
Click the "Update" button.
Converting a lead into a prospect
Leads are used for initial qualification.
When a lead is of genuine commercial interest, the user can convert it into a Prospect and then create an Opportunity (opportunities can be found in CRM → Opportunities).
In addition, if the user wishes to create a Customer Quote or place an order, it is necessary to use a Prospect or Customer type third party record, as it is impossible to create a quote for a lead.
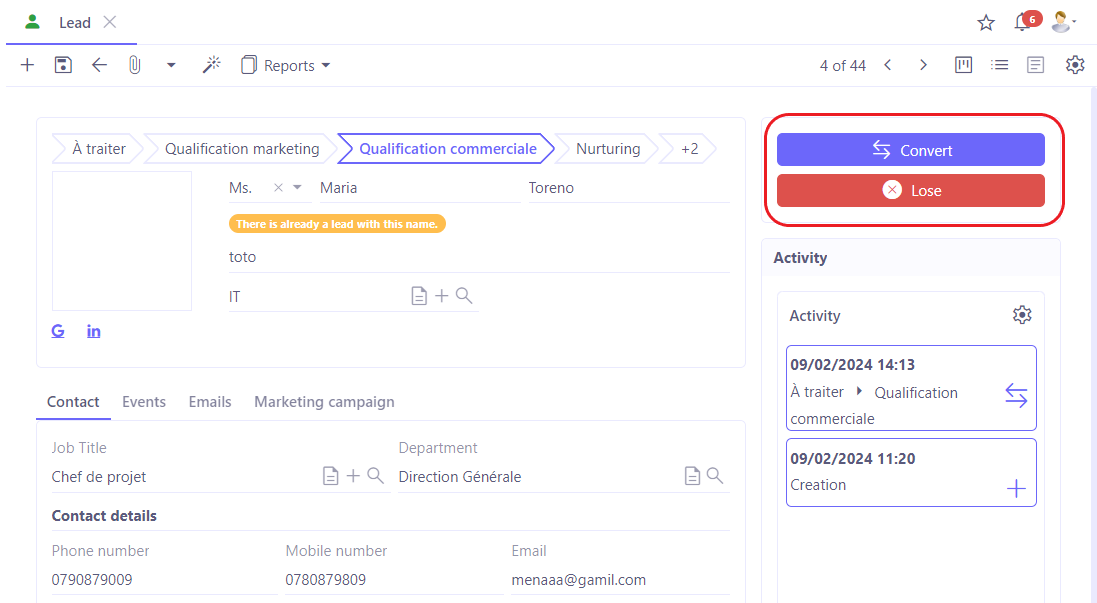
The lead must have a "Commercial qualification" status (it is possible to change the status manually).
Open a lead record with "Commercial qualification" status.
Click on "Convert".
Following this action, a new "Convert lead" window will open.
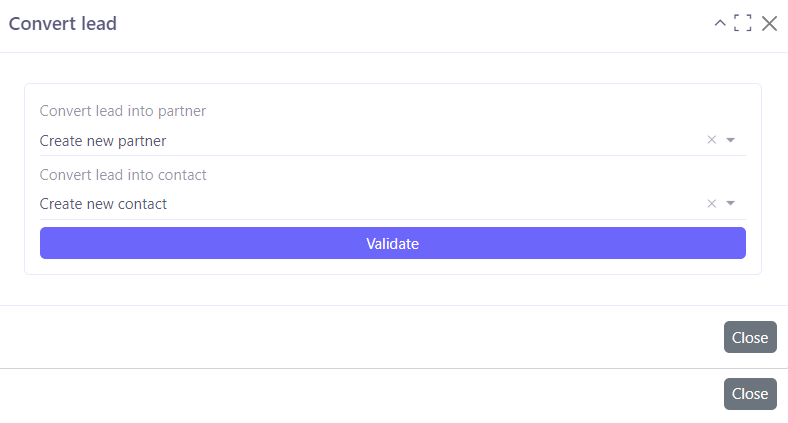
- On the "Convert lead" page
- In the "Convert lead into partner" field, select between "Create new partner" and "Select an existing partner".
Select an existing partner" allows you to attach the lead to an existing third party, thus avoiding duplicate records.
If the user chooses this option, a new "Select a partner" field will appear.
There are customers of "Individual" type (in the "Partner information" section, the user must select either "Individual" or "Company"). In this case, a single Customer file will be created.
- In the "Convert lead to contact" field, it is possible to choose between "Create a new contact" and "Select an existing contact".
The "Select an existing contact" becomes a choice provided the user has opted for "Select an existing partner" in the "Convert lead into partner" field.
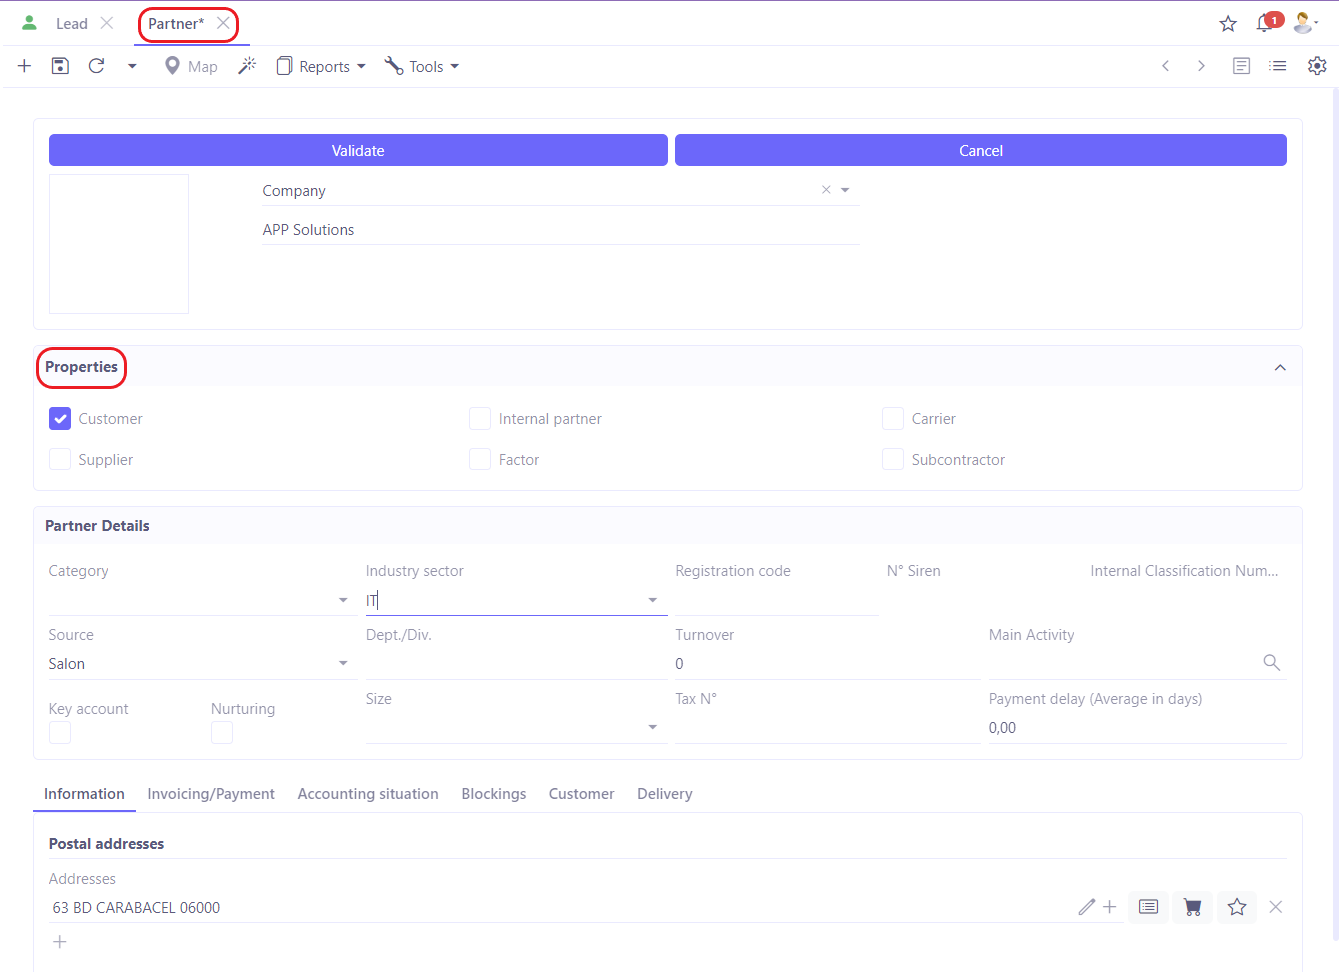
Create a new partner on the "Convert lead" page
- The converted lead first becomes a partner record with a Prospect status. However, the partner can be defined directly as a customer.
The user can also create a Supplier record when there is a need to use the CRM to prospect and search for suppliers by creating a Supplier record. This supplier record will appear in the Purchases module.
A Prospect automatically becomes a Customer when their first order is confirmed.
In the "Settings" section, select the language. The choice of language corresponds to the language of communication with the Prospect.
Once the language has been selected, all documents generated using the software, such as a quotation, delivery note or invoice, will be generated in this language.
This only applies to English and French as standard languages.
The default language: the default language for partners can be configured in App Base (Application config → Apps management → Base, Configure). On the App Base page click on the Configuration tab and then select the language in the "Default Third Party Language" field (English or French).
Save the changes and refresh the page.
The converted lead is also assigned to someone. Select the user to whom it will be assigned.
Fill in the contact details on a converted lead record. Following this action, a new contact record will be created (find it at the CRM → Contacts) as well as a Lead record. The contact record will be associated with a company.
Creating an opportunity
- Create an opportunity either directly from the "Opportunity" menu (CRM → Opportunity), or from the "Convert Lead" file (older versions of software offer this possibility).
Tick the box "Create Opportunity" in order to be able to create an opportunity on a convert lead record.
- It is also possible to create an opportunity from the Prospect or Customer record (Opportunities tab, click on "Create Opportunity").
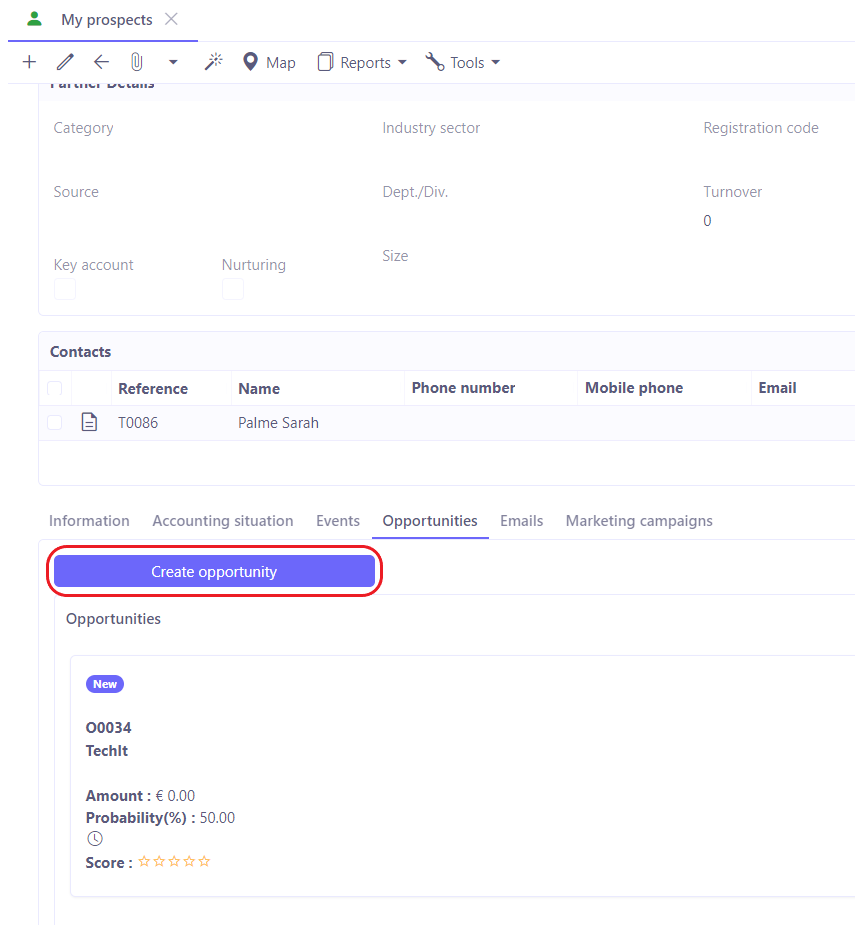
- On the converted lead record, click on "Validate" at the top of the page.
Once everything has been validated, a new Company file will be created. This new record can be found in the Prospects menu (CRM → Prospects).
- Role: on the contact record you can indicate the role of this contact. Roles are created manually (CRM → Configuration → Roles). For example, "General Management", or "Accounting Department".
Attach an Opportunity or Quotation / Order from the Contact record. View all the third parties attached to the contact in the Partners tab.
- Attach a Contact from the Company File.
Open the Company file and in the Contact section click on "Select" to add a Contact.
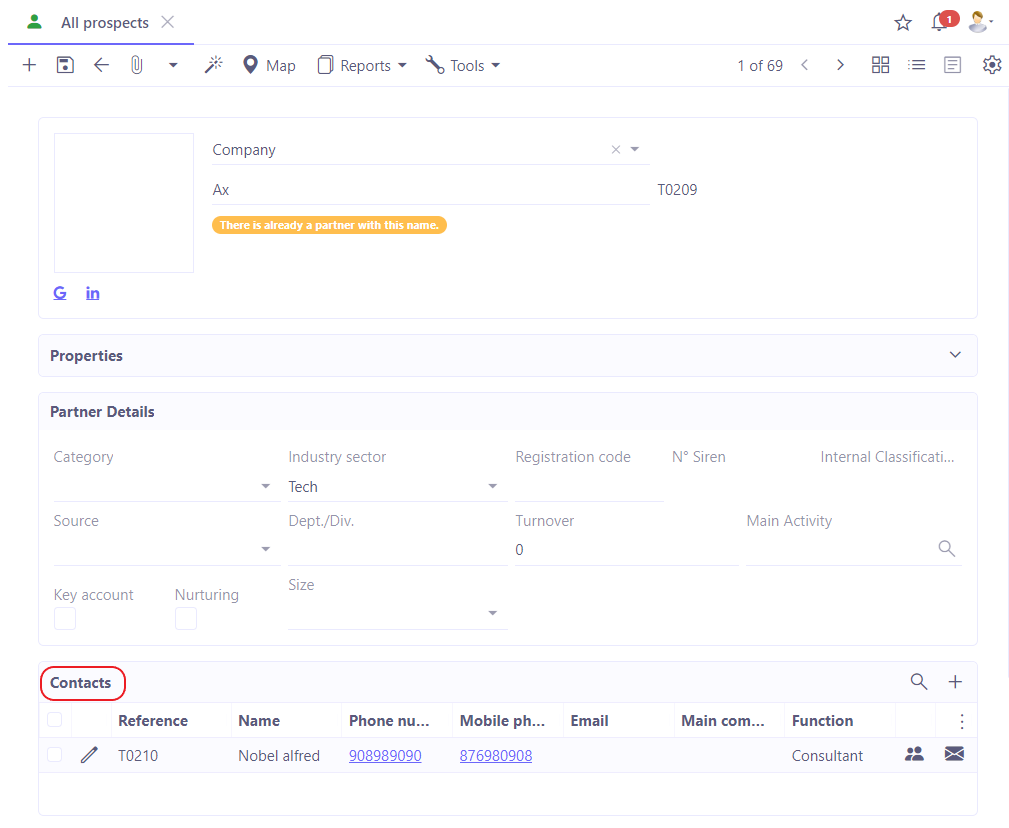
Attach a contact from the prospect file in the "Contact" section, by clicking on "select" or "create a new contact".
Complete the information and save it. This way, the "Contact" section will appear on the record.
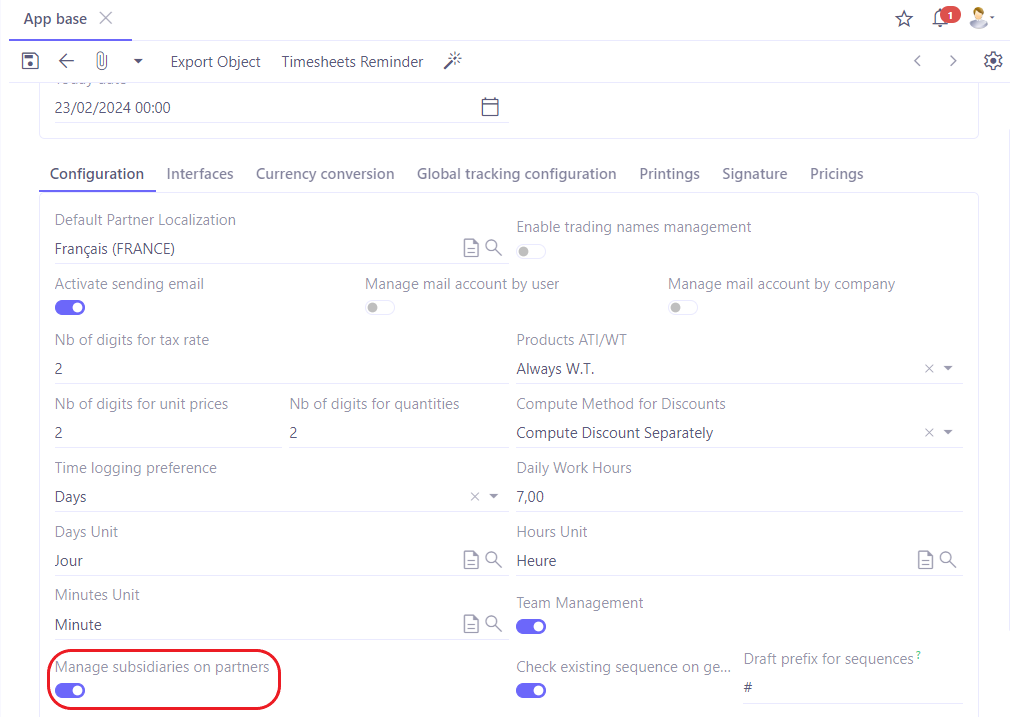
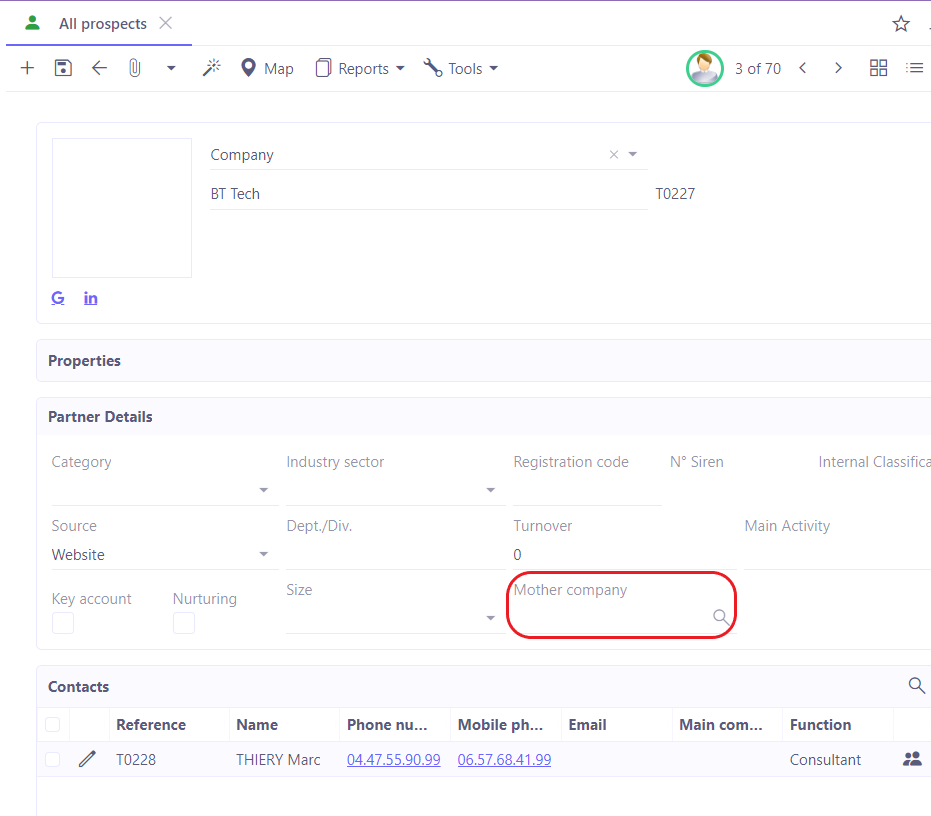
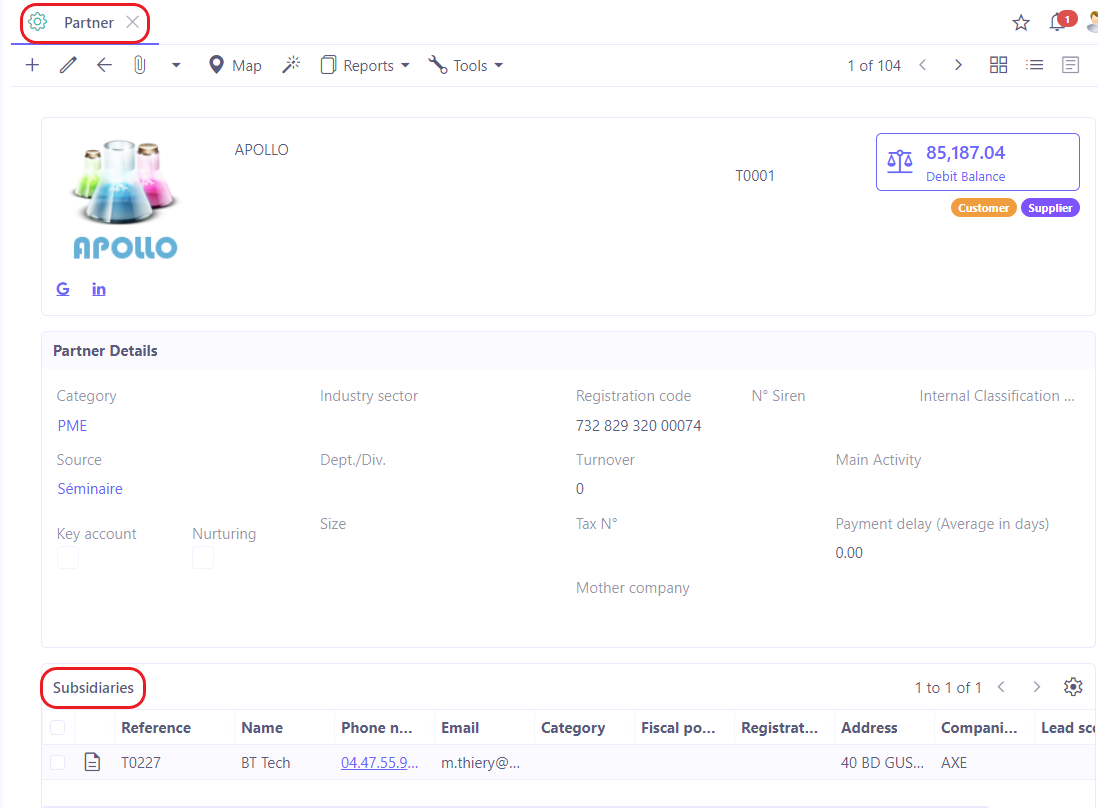
- Mother company on the Prospect record: to add a parent company to the record, activate the box "Manage subsidiaries on partners" (access : Application Config → Apps management → App Base → enable "Manage subsidiaries on partners" feature). On the Prospect record, enter the Mother Company in the "Mother Company" field in the "Partner Details" section. Save. Following this action, the "Subsidiaries" table will appear. Subsidiaries are configured at parent company level. Open the parent company file (customer file). On the parent company file, in the Subsidiaries table, find the subsidiaries of this parent company.
- Other information concerning the parent company and subsidiaries :
Other elements can be used to indicate the relationship between the parent company and its various subsidiaries.
How to activate these elements?
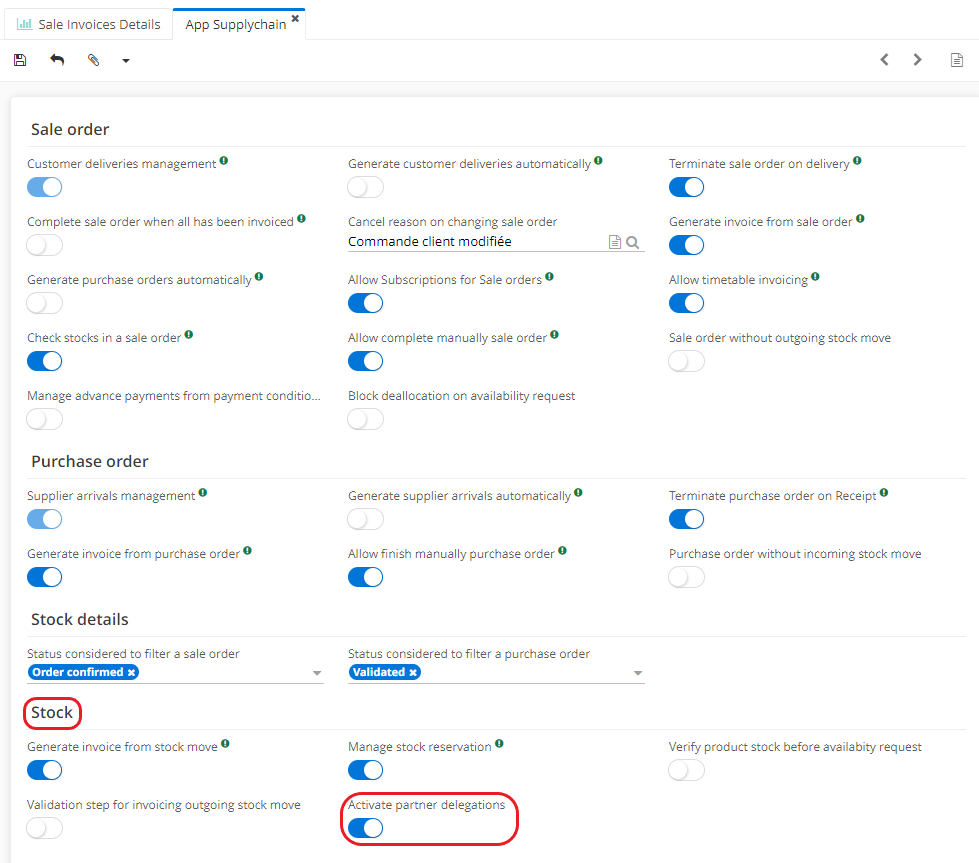
Open Application config → Apps management → Supplychain, configure → on the App Supplychain page, tick the box "Activate partner delegation" in the Stock section.
When this feature is active, it becomes possible to set relations between third parties. Save the changes you have made.
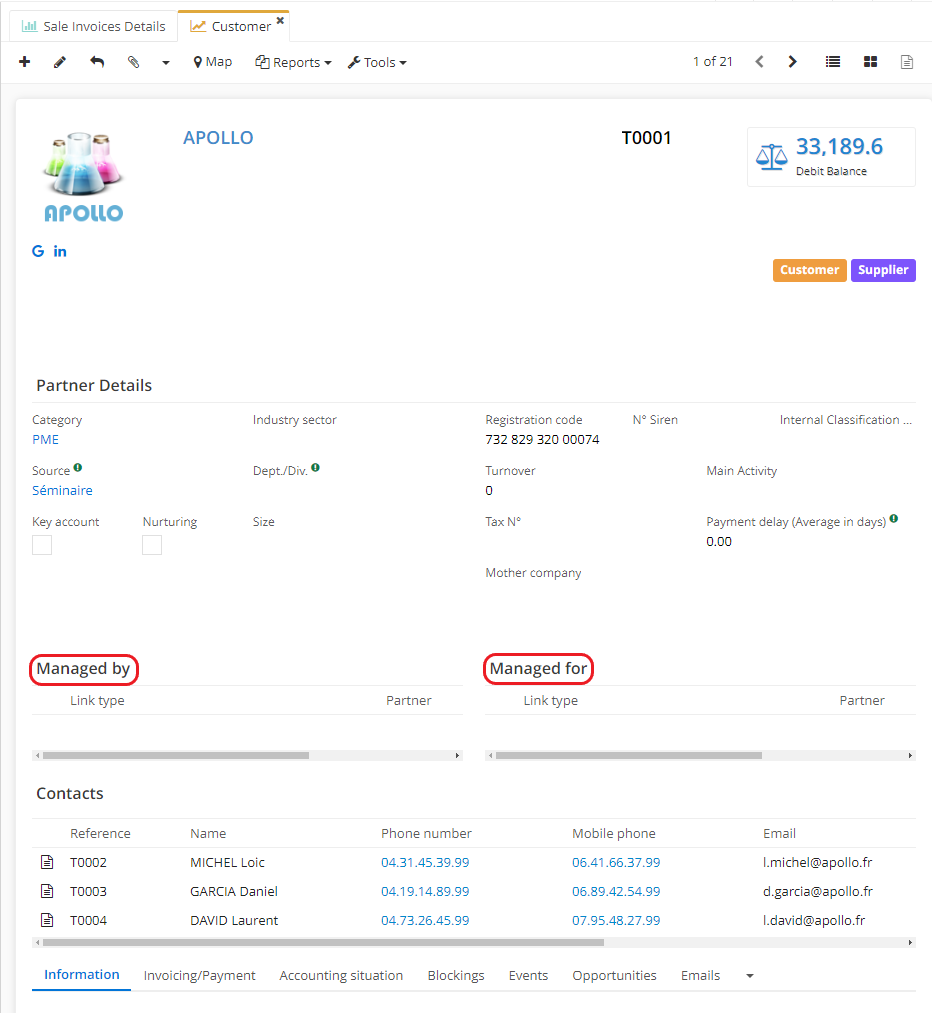
For example, on a company's customer file, define the type of link and the third party in the fields of "Managed for" and "Managed by" sections.
In the example, the company Axelor manages invoicing for Axelor France. In other words, Axelor France will place the order, but Axelor parent company will be invoiced. This is useful for group customers who have several establishments.
Find more information in the Sales / Invoicing / Delivery processes.
Miscellaneous
Duplicate management
Avoid creating duplicates. Check and merge duplicates in the CRM module in "List" view for leads and prospects.
For leads :
Open any lead menu in "List" view in the CRM module.
Click on "Tools" at the top of the taskbar.
Click on "Check duplicates".
Then select the fields to fine-tune a search for duplicates (name, e-mail address, etc.). Once the duplicates have been detected by the system, merge them by using the "Merge duplicates" button.
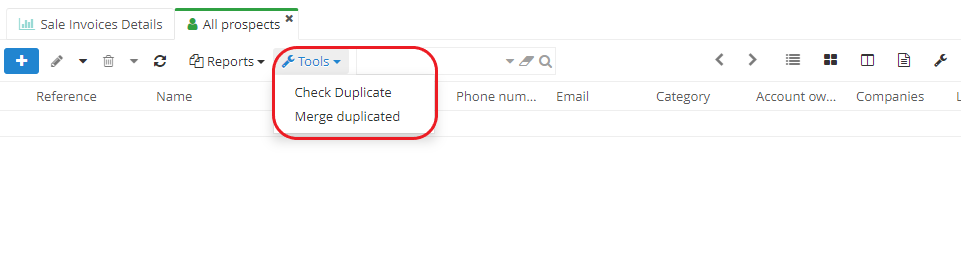
For prospects :
Open any prospect menu in "List" view in the CRM module.
Click directly on "Check duplicates" or "Merge duplicates" at the top of the taskbar.
Select the fields from which you wish to search for duplicates (name, e-mail address, etc.).
This action is also possible from the customer repository (Sales Module) and your supplier repository (Purchasing Module).

Postal address on a customer file
Access : CRM → Customer follow-up → Customers → on a customer file, click on Information tab and find there Postal addresses section
In the Postal Addresses section, specify what each address corresponds to. For example, the user can define a billing address or a delivery address using the icons in the field. These icons are useful in the sales, stock and invoicing modules by allowing to define default address, since delivery and invoicing addresses may be different.
Sales follow-up at opportunity level
Consult existing opportunity file in Opportunities (CRM → Opportunities).
Or, view the opportunity directly from the Prospect or Customer record.
- Opportunity file
An opportunity file helps to monitor the progress of opportunity.
Note that a prospect record can have several opportunities. The opportunity is a step-by-step sales follow-up.
Opportunity is not a compulsory step : it is entirely possible to create a quote independently and then place an order.
Remember, opportunity statuses are fully configurable (CRM → Configuration → Opportunity statuses).
Some statuses are impossible to delete (closed won / closed lost).
Complete information on an Opportunity file.
Indicate the amount. In the "Best case" and "Worst case" fields, indicate the maximum and minimum amounts expected. This is not a compulsory field.
For information purposes, indicate the estimated probability of success.
In the "Recurrent" tab, configure the conditions of the recurring amount (the amount itself, start date, end date, expected duration of the recurring income).
Access : Application Config → Apps management → CRM, configure → enable "Manage recurrent on opportunities"
For the reccurent tab to appear, enable the feature "Manage recurrent on opportunities".
Create a precise description of the opportunity in a dedicated space found in the Description tab.
If there is a need, enable the feature "Display customer description in opportunity". Access : Application Config → Apps management → CRM, configure → enable the feature "Display customer description in opportunity"
To attach files, click on the paperclip icon at the top of the toolbar.
Status: change the status manually by clicking on the desired status. The final step is "closed won" or "closed lost".
- If the opportunity is considered as "closed won", create a quote or plan an event. To do this, click on "Tools" in the toolbar at the top and select "Create a quote" or "Scheduled event".
There is no need to wait for an opportunity to be closed before creating a quote or planning an event. The customer quote can then be tranformed into an order.
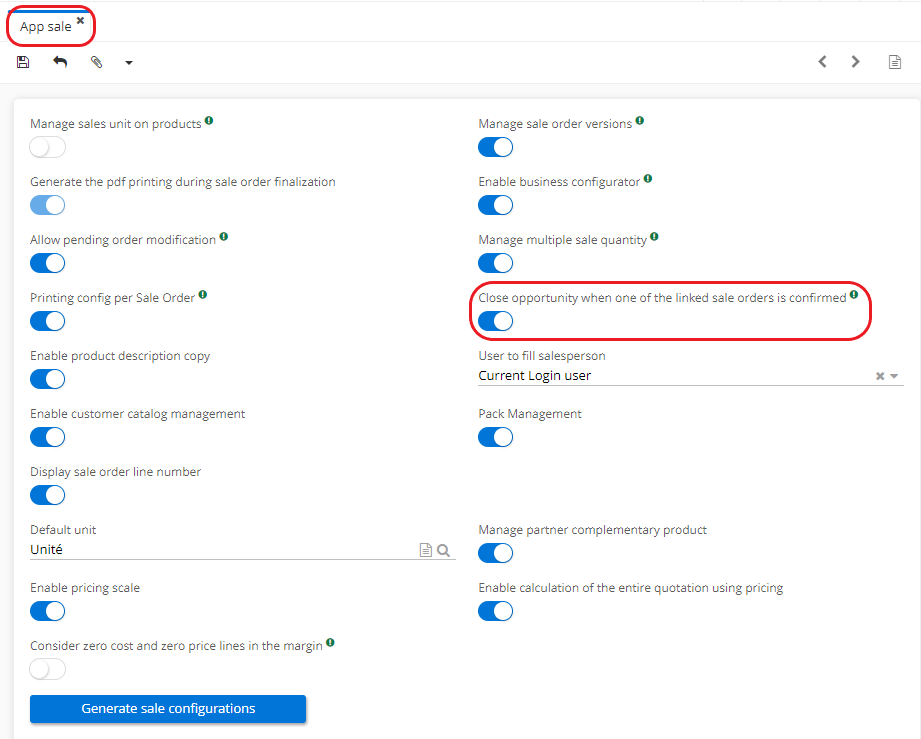
The "Close opportunity when one of the linked sale orders is confirmed" checkbox allows you to change an opportunity to "closed won" status, once you have created a quote and subsequently confirmed the order. Access : Application config → Apps management → Sales, configure → on the Sales App page, enable the "Close opportunity when one of the linked orders is confirmed" checkbox.
Geographical position
Geographical position helps to view the prospects and customers on a map.
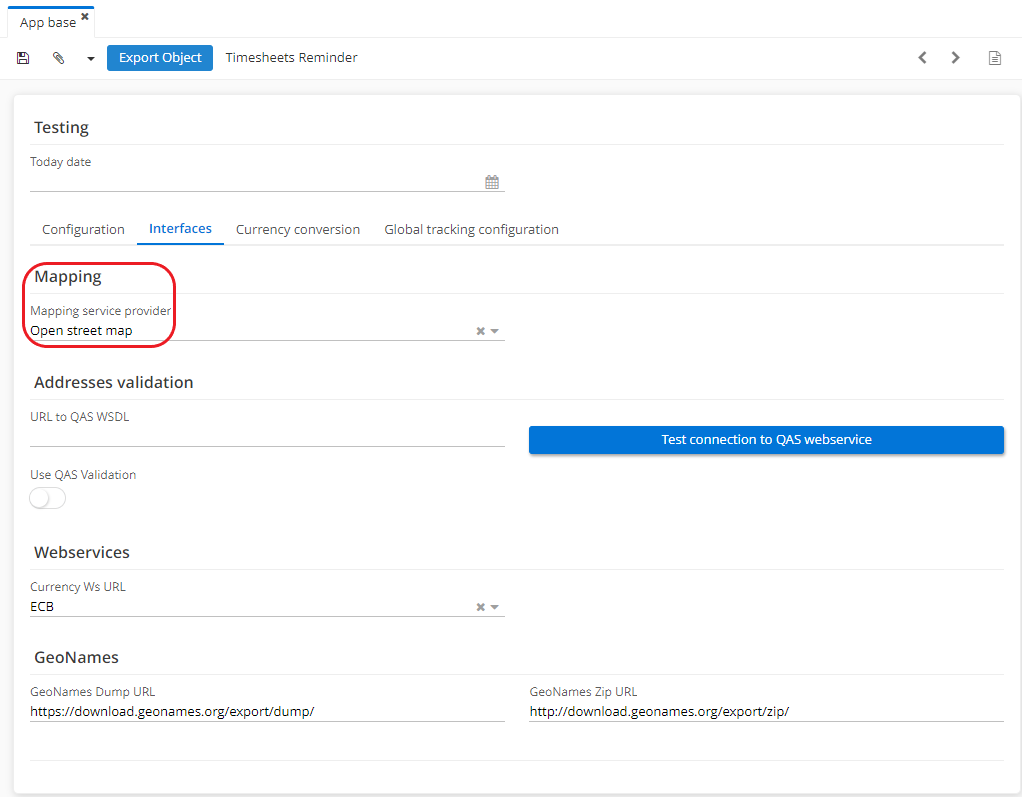
Activate the geographical position in Application Config → Base, configure
On the App Base page, click on the "Interfaces" tab.
In the "Correspondence" section, define a mapping service provider (the default one is Open street map, however it's possible to select Google map).
Google map services may come up with a fee.
Then, on a Prospect or Customer record, click on the "Map" icon at the top of the page to view the company on the map.
It is also possible to view the geographical location of customers / prospects in another way. Access: Sales → Reports → Map → Customers / Prospects
How to generate an envelope with the company's address? Access: Sales → Reportings → Maps → Customers / Prospects
-On a customer / prospect record, click on "Reports" and then on "Envelope" to generate an envelope (PDF) with the customer / prospect's company address.
Catalogues
How to activate catalogues ? Access : Application config → Apps management → CRM, configure → on the CRM app page, tick the "Manage catalogues" box → save and refresh the browser
The catalogue is a very simple object that allows you to store product catalogues that can be viewed in pdf.
Access: CRM → Catalogues
Configure the catalogue:
Fill in the missing information and indicate the type of catalogue.
Click on "PDF file" and download the catalogue.
Click on "View PDF" to view it.
Note : it's also possible to configure the catalogue types. Access: CRM → Configuration → Catalogue types. The catalogue type allows you to group together products of the same type (for example, "child product").
Lead history
Allows you to view the history of converted leads.
Sales pipeline follow-up
Access : CRM → Customer follow-up → Sales pipeline follow-up
The Sales Pipeline follow-up helps to search for leads or third parties (partners) and view opportunities or events by using specific key criteria.
For example, search for events or opportunities by clicking on "Show opportunities" or "Show events" and defining key values such as country, industry sector or type (partner or lead).