Product file
How do I create a product file or view an existing file?
path the product file via Application configuration → Referential → Products → select either Products or Services.
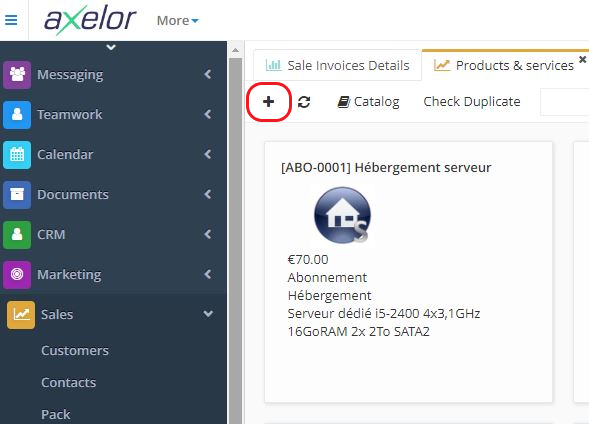
You can also path it via the Sales / Purchases apps by clicking on the Products & Services menu to path the Products and Services referential.
In different modules you will find different types of products.
In the Sales app you will find all products and services that can be sold. These products will be selectable on sales quotations. In other words, if you click on a product/service file, you will see that the "Sellable" box is ticked in the Sales tab.
Products that you can buy have a "Purchasable" box (Purchases/Costs tab on the product file), and are found in the Purchases app.
In Stocks you can consult all the products for which you are going to manage stocks.
In the production app you will find all the components, finished and semi-finished products that can be used in production.
The product file can be created via different modules (Sales, Purchases, Stocks, Production, Application configuration).
- path the app of your choice to create a new file, for example, Sales. Click on the "Products & Services" menu and then click + to create a new product file.
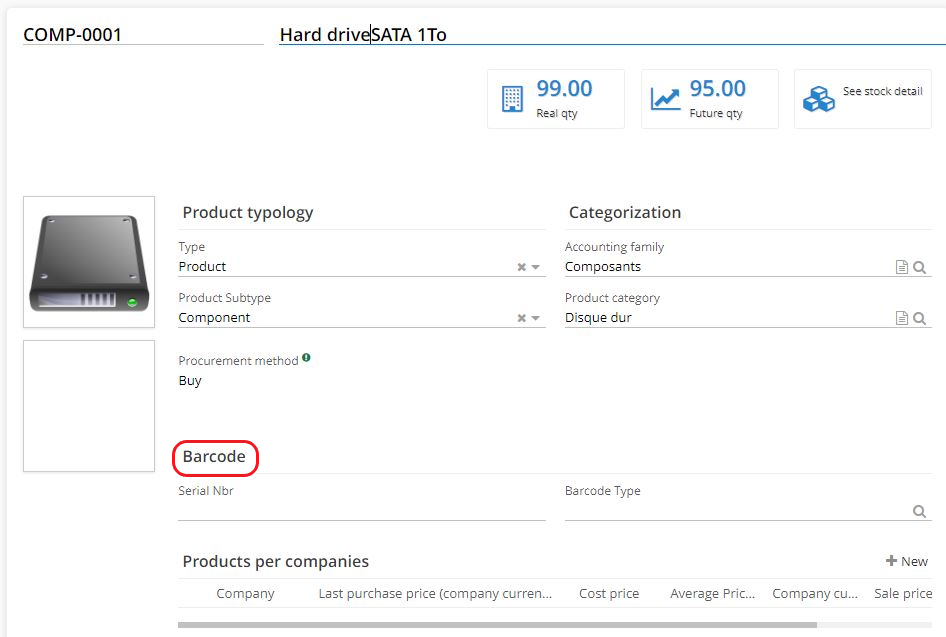
- On the product file, fill in the necessary information such as the product code and name.
If you need to, it is possible to set up a sequence (the sequence will set a specific code for each product created).
Indicate product type (service or an item). An item is a product that can be managed in stock, whereas a service is considered to be a service.
If it is an item, you can indicate the product sub-type (finished product / semi-finished product / component). The product sub-type is displayed when the Production app is installed.
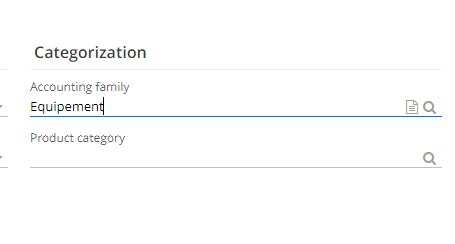
The accounting family is used to automatically retrieve the family's accounting configurations at product level.
If there is no accounting family, click on the "Accounting" tab on the product file.
Click on "New" and fill in the following fields : company / fixed asset category / purchase account / purchase tax / account of purchase / sale account / sale tax, and if necessary an analytic distribution model and a fixed asset category.
Keep in mind, if the accounting family has not been created, you will have to fill in the Accounting section manually for each product.
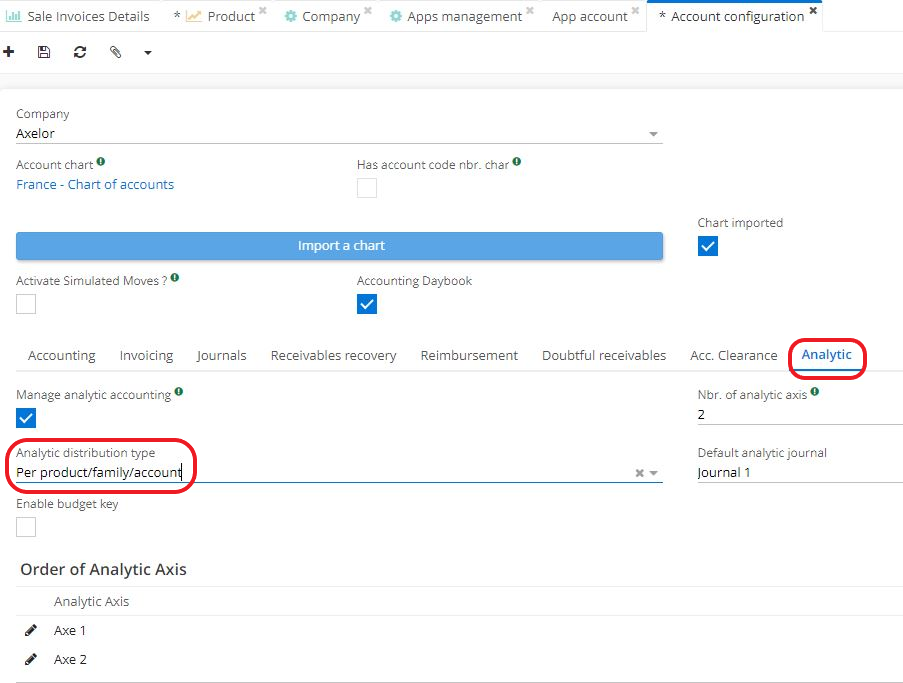
In order to be able to fill in the analytic distribution model on a product file, note that the company selected on a product file has to be configured beforehand. path the company file via : Application config → Apps management → Accounting, configure → scroll the page down and click on a company found in a section "Account configurations" → on a page of Account configuration, click on Analytic tab → select the Analytic distribution type as "Per product / family / account".
Consequently, it becomes possible to apply an Analytic distribution model in Accounting tab on a product file.
However, in case these settings are not applied, il will be impossible to select an analytic distribution model on a product file.
The accounting family therefore allows the product to inherit the pre-existing configuration of the accounting family.
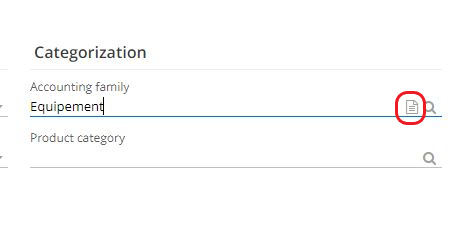
Select an accounting family in Categorization section and click on the "View" icon. A new "Accounting Family" window will open.
On this window, you can click on the file to open and consult the Account management.
Selecting the accounting family avoids having to configure each product manually.
Accounting families are configured at the level of : Application configuration → Referential → Configuration → Product accounting families.

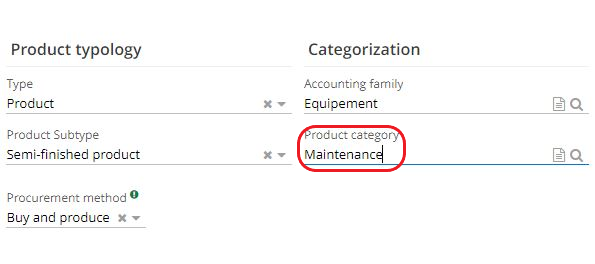
- Product Category: is used to categorise the product.
On the product file, in the Category field, under Categorization section, enter the product category.
It is also possible to create a product category (path: Application configuration → Referential → Configuration → Product categories). Categories can have a tree structure, and there are parent and child categories.
- If the need arises, add a product image on a product file.

- How to activate a bar code or QR code ?
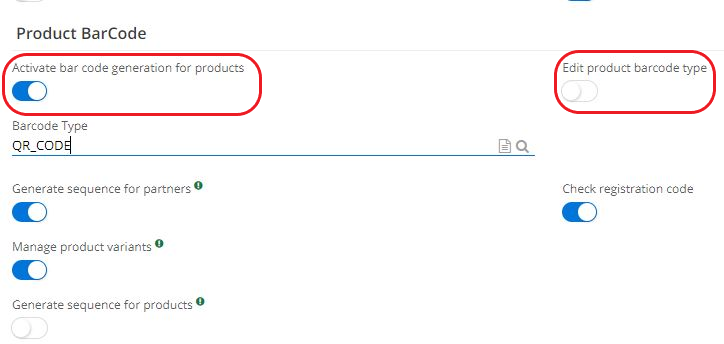
Path: Application configuration → Apps management → Base, configure → in the Configuration tab, in the Product barcode section, tick the box "Activate barcode generation for products".
Then select the type of barcode applied by default.
Tick the box "Edit product barcode type" Activating this box allows to apply several types of barcode. Ticking this box will allow to edit barcode type directly on a product file.
Save new settings. Refresh the browser. Refreshing the browser without saving will result in losing all the changes that have been made.
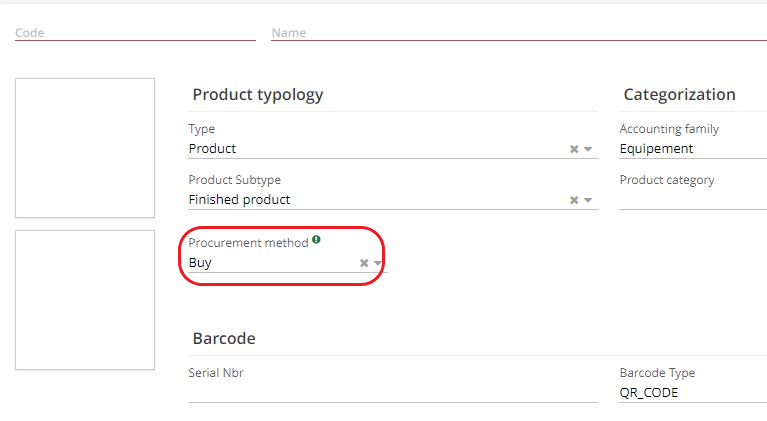
- Next, on the product sheet you will find the "Procurement method" field.
If this product will be bought from a supplier, select the "Buy" procurement method. For a manufacturing company which is going to manufacture its products, select the "Produce" procurement method.
Some products may correspond to both Buy and Produce, in which case select "Buy and Produce".
- Products per companies allows you to manage different characteristics depending on the company, such as different selling prices, cost prices or purchase prices. This is useful in the context of multi-company ERP, when you wish to define different management methods or different prices for certain products.
For example, in some cases a product may be sellable or purchasable depending on the company, the supply method may differ, price calculations and management coefficients may be different, etc.
Products per companies are configured in :
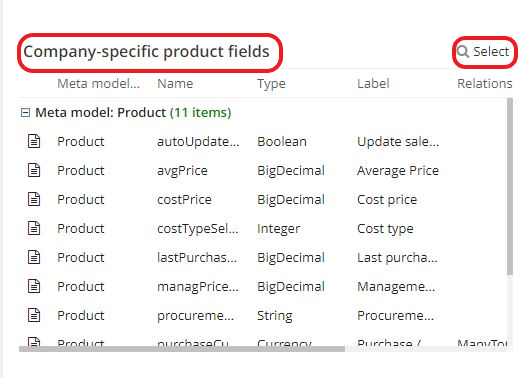
Application config → Apps management → Base, configure → Table Company-specific product fields.
All the product fields that you want to manage differently by company can be found in the "Company-specific product fields" table. You can always add other fields by clicking on "Select".
These fields in the table "Company-specific product fields" can be found on the product file in the section "Products per companies".
If it's a single company and there is no need for the "Products by Company" section to appear on the product file, follow next steps :
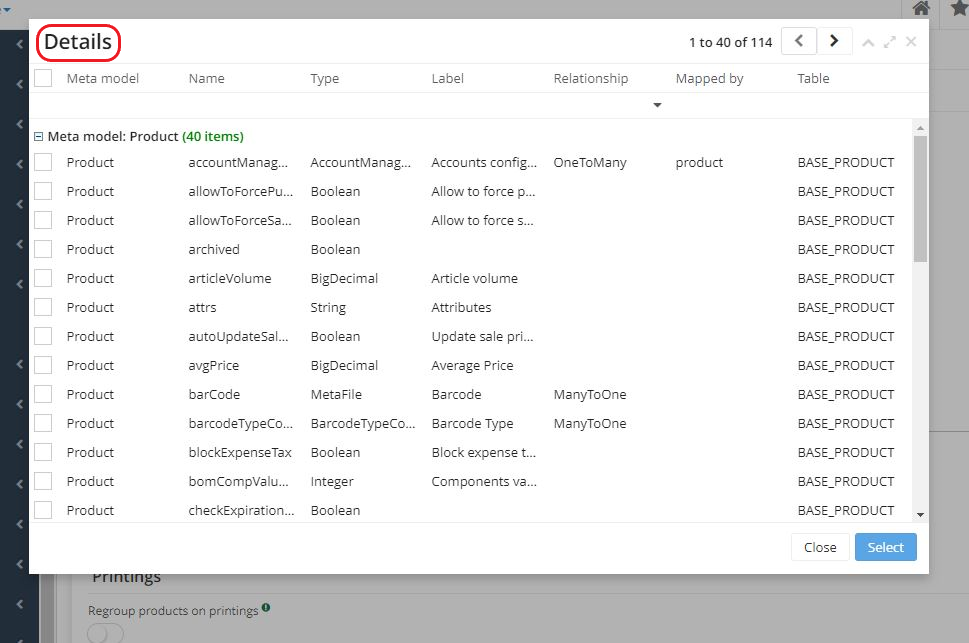
Open the Base app page, select all the product fields in the "Company-specific product fields" table and click Delete.
Please note that in order for the Delete button to appear, you must first select the fields in the table.
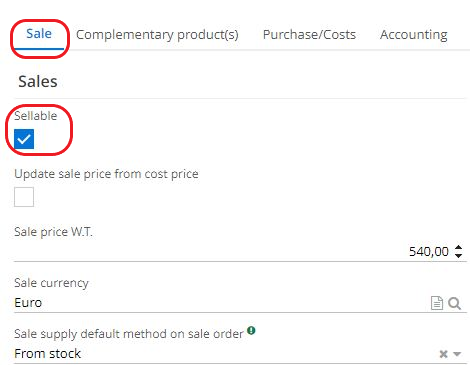
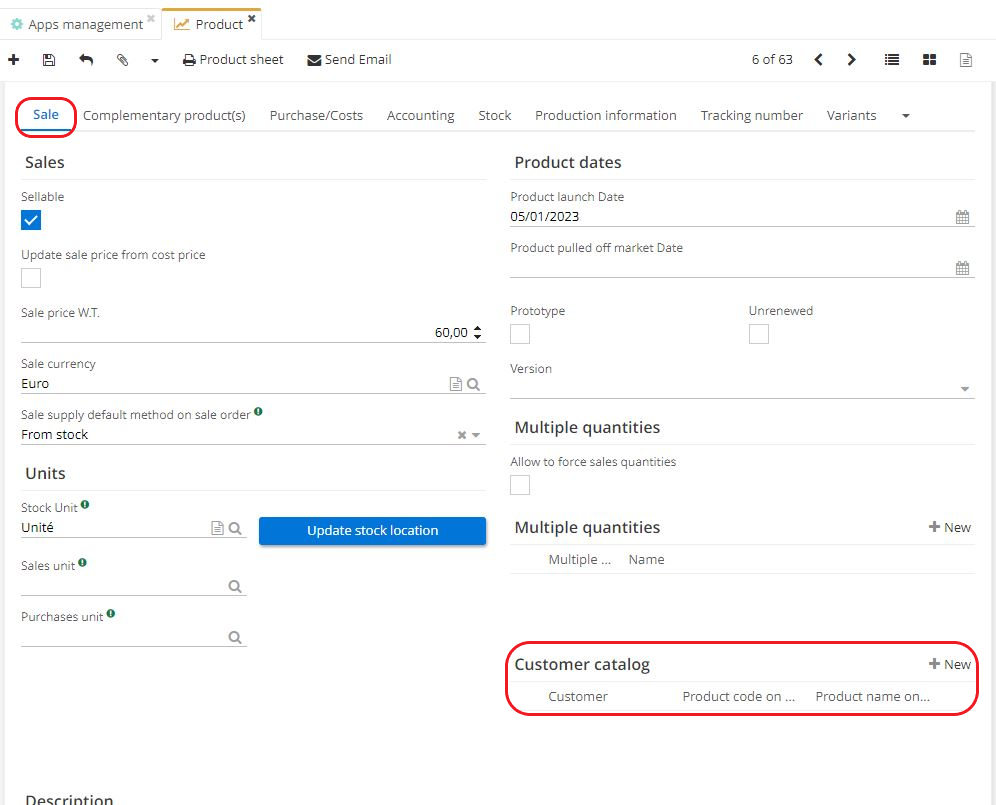
Sales tab
This tab is for products that can be sold.
In order for the product to be sold, check the "Sellable" box.
If this box is not ticked, it will be impossible to select this product in quotes or orders.
Contents of Sales tab:
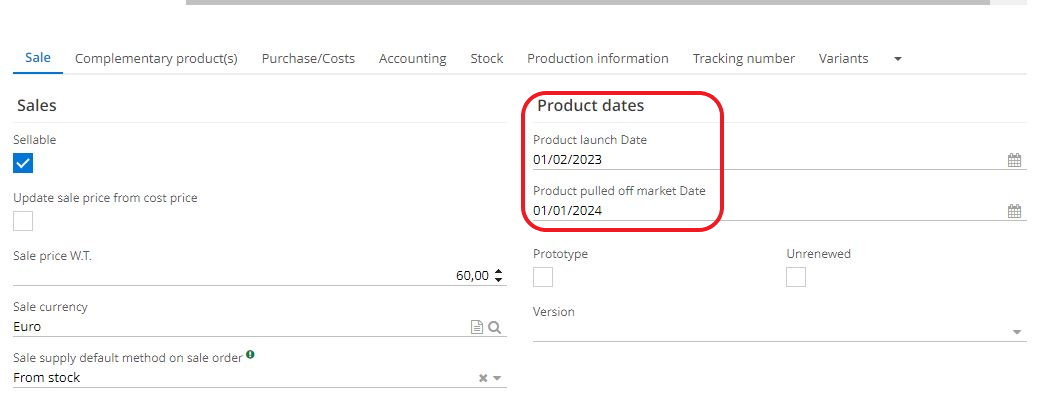
- Product dates: in this section, you will find the "product launch date" and the "product pulled off market date".
Product launch date: if the date on the quotation is an earlier date than the date indicated as the product launch date, it will be impossible to select this product. For example, if the product launch date is 01/12/2023 and the date on the quote is 01/11/2023, the product cannot be selected on the quote.
Product pulled off market date: if you have exceeded the date, it will also be impossible to select the product in an order.
- The following values can be used to filter products:
Prototype checkbox: indicates whether this product is a prototype.
Unrenewed: indicates whether the product has not been renewed.
Version: specify the version of the product (there is no process behind it, this box is for information only).
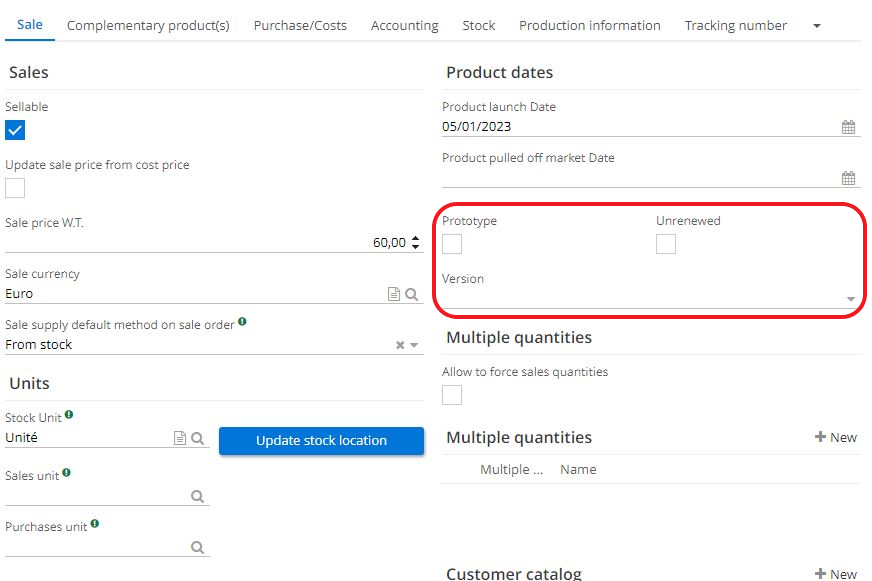
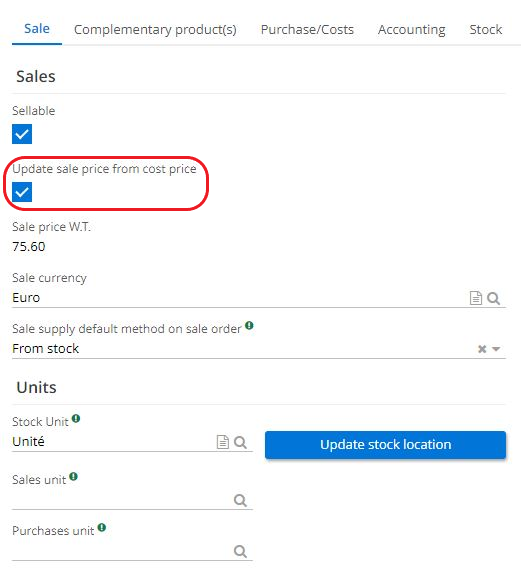
- The sales price WT (without tax) field: you can fill in this field manually OR check the box "Update sales price from cost price". If this box is ticked, the sales price will be updated automatically according to the cost price defined in the Purchases/Costs tab.
In addition, in the Sales tab you can also define the Sale Currency in the dedicated field.
Default supply method for sales orders
Following information applies to the sale quotations and sale order lines it contains. Once sale order is placed, it's possible to view a sale order line on a sale quotation in a Content tab, within the Details Lines table.
From stock: when a customer places an order for this product, you can define that it is a product that you will manage in stock (i.e. if you have this product in stock, you take it from stock). This option is therefore preferable for products that are often in stock. However, it is possible to select other options.
Purchase: the supply method can be defined as "Purchase", i.e. you will buy this product from a supplier following an order from a customer. This option can be used for products that you rarely have in stock, or that you don't want to keep in stock.
This process can be automated (the customer order triggers the purchase from the supplier).
path : Application Config → Supplychain, Configure → Sale orderds → activate the box "Generate purchase orders automatically".
If the product's supply method is "Buy" and this configuration is activated, a supplier order with draft status will be automatically generated once the sales order is confirmed.
Produce: this option is for products that are going to be manufactured on demand, and therefore offer the possibility of generating a production order from the sales order.
None: no supply method has been defined for this product and therefore it will be defined on a case-by-case basis at quote/order line level.
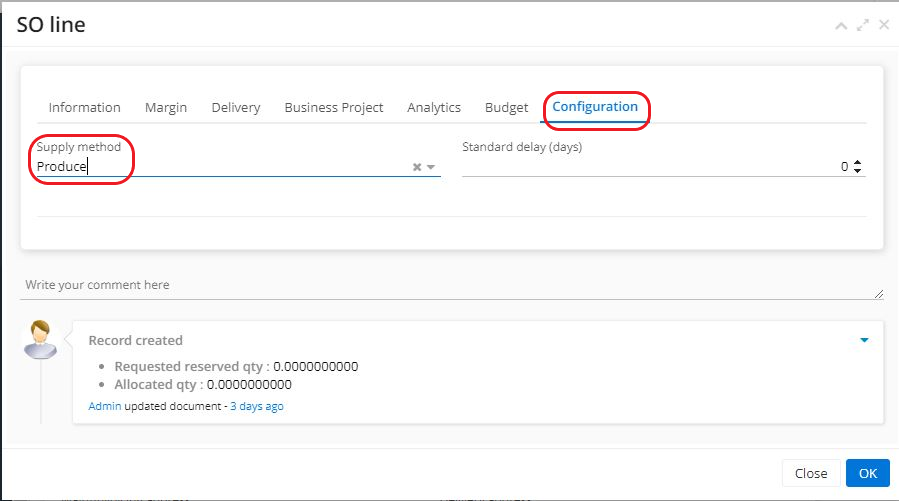
The default supply method can be found in the quote/customer order lines, in the "Configuration" tab.
Path : Sales app → Sale Quotations → click on a quotation → on the quotation sheet, click "Edit" and then click on the Contents tab → in this Contents tab, click on a line in the Details Lines table → you will be redirected to the Sale Order Line.
On the Sales Order Line, click on Configuration and you will see the Supply Method" field with the method selected. When in edit mode, it is possible to modify the supply method.
It is always possible to select another supply method on the Sales Order Line tab on the Sales Quotation sheet.
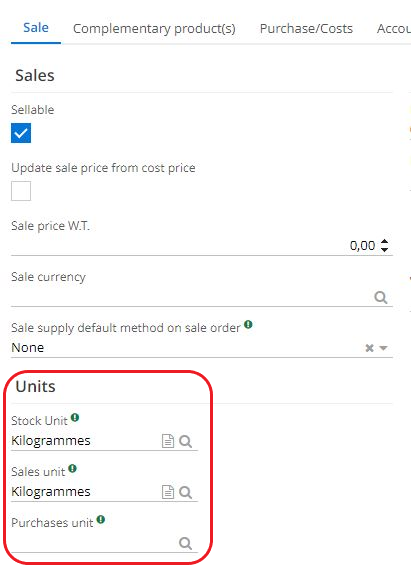
Units & multiple quantities
Default units can be defined on the Sales app page (Application config → Apps management → Sales, configure → define values in the Default units field).
On a Product file in the Sales tab, you can also define the different stock/sales/purchase units. For example, if you buy a product in tonnes, you can define that it is sold in kilograms.
These parameters therefore allow you to make automatic conversions.
Create your own units according to your needs (Application config → General data → Units → New).
- You can create Unit Conversions. Unit conversions allow this system to operate between different purchasing, sales and storage units.
Application config → General data → Unit conversions
For example, you can define a conversion from a box of 100 pieces to the unit.
There are different types of conversions, such as a coefficient or formula.
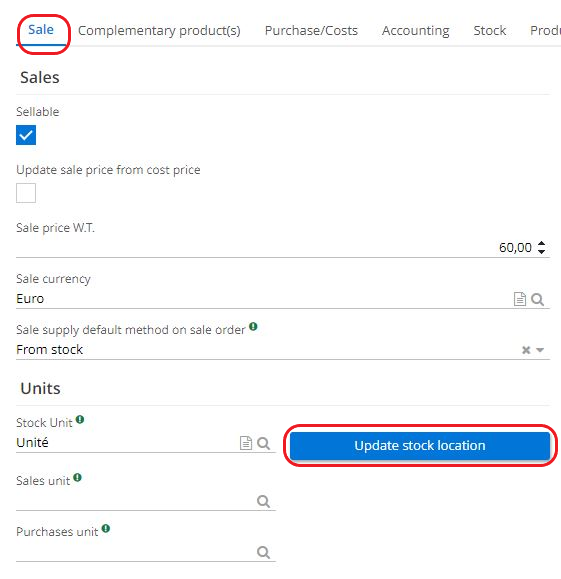
In addition, on a product file in the Sales tab you can click on the "Update stock location" button. This button updates the unit in the stock location.
Multiple sales quantities
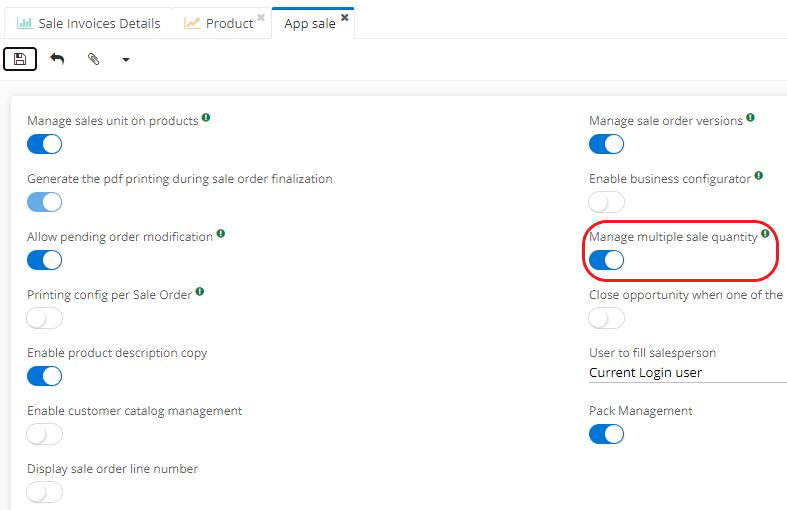
This feature is activated on the Sales app page by ticking the checkbox "Manage multiple sale quantity" (path: Application config → Apps management → Sales, configure → Activate the checkbox). Once activated, the Multiple quantities section can be found on a product file in a Sale tab.
This feature indicates that you want to sell products only in certain multiples.
For example, to buy coffee capsules you have to buy them in tens, therefore it will only be possible to buy 10, 20, 30 capsules etc and it will be impossible to buy 2 or 5 capsules.
The order will be blocked at quotation level and a message indicating "the quantity must have been a multiple of..." will appear. It will then be impossible to validate the Sales Order Line on a Sale Quotation form.
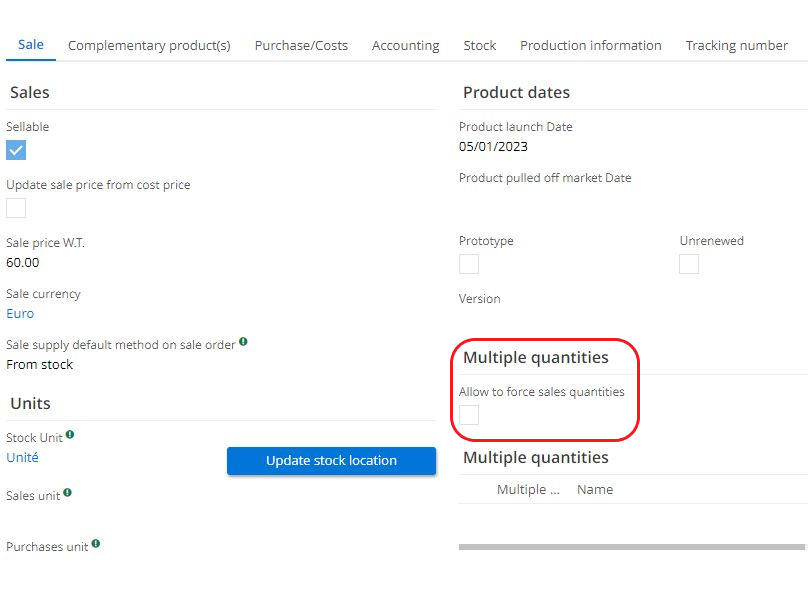
However, it is possible to tick the box "Allow to force sales quantity" on a product file, in the Sales tab. Ticking this box allows you to bypass the obligation to sell multiple quantities.
Note, the checkbox "Allow to force sales quantity" appears only when the "Manage multiple sale quantity" functionality has been activated in App Sales.
Customer catalogue / description / additional product tab
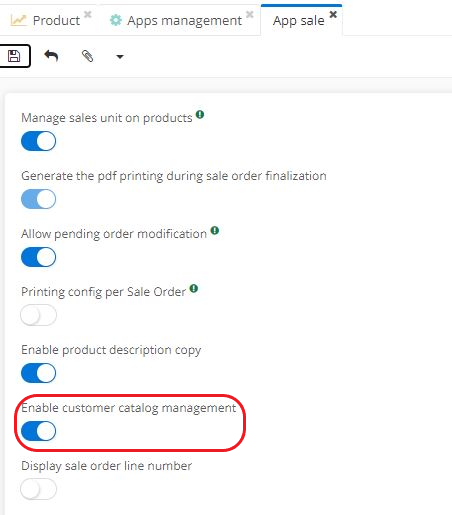
In order for the Customer Catalogue to appear on the product file, you need to activate the functionality on the Sales app page (Application config → Apps management → Sales, configure → click on "Enable customer catalog management").
The customer catalogue will allow you to indicate that this product has a different name/code for a particular customer. So this name / code can be different from the one displayed on the product file.
Customer catalog section can be found on a product file, in the Sale tab.
Description / Internal description fields
The description can be retrieved from quotations, orders and invoices.
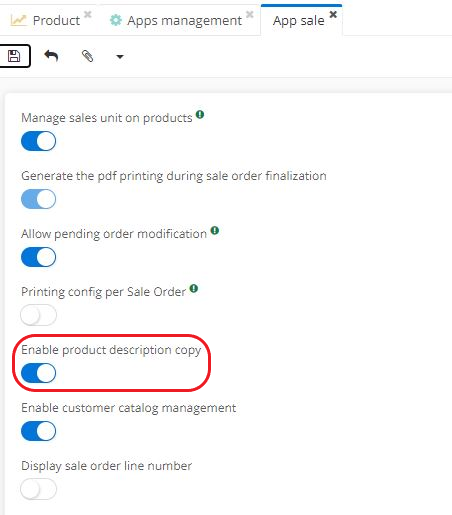
To fill in a description, you need to activate the function in the Sales app.
On the Sales app page, activate the "Enable product description copy " box (Application config → Apps management → Sales, configure → check the Enable product descritption copy).
View the description
Where can you view and consult the description?
For example, once the estimate has been validated, you can click on "Product sheet" and then "Print".
On the generated PDF document you will see that the "Description" column contains the product description.

Internal Description is for internal use only and does not appear on quotes or orders.
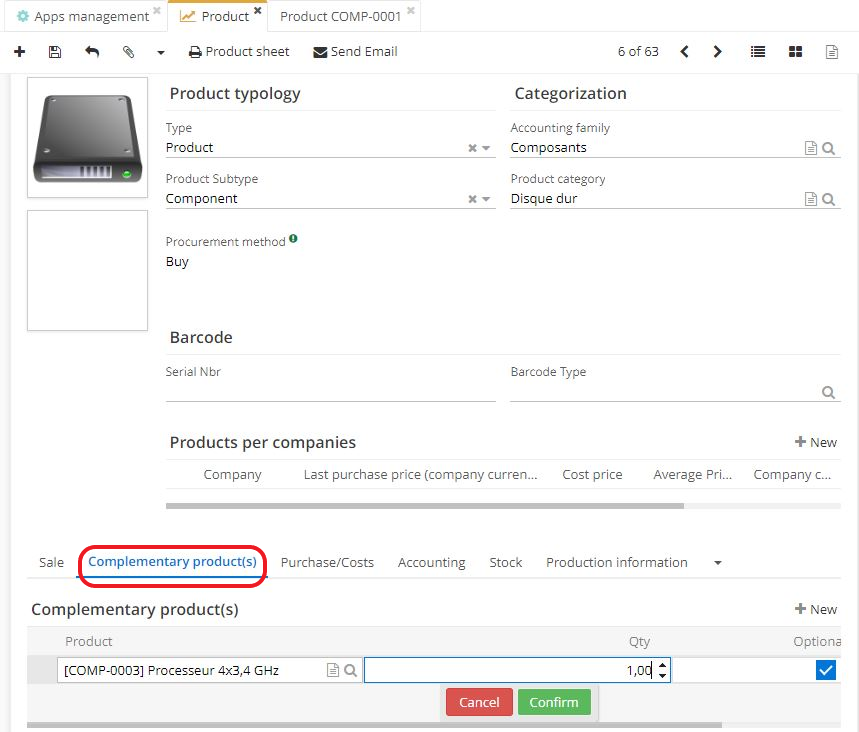
Complementary Product tab on the product file helps to manage various options concerning additional products. For instance :
You can automatically add a complementary product with the selected product e.g if you sell a telephone, a warranty extension is automatically added to the quote.
It is also possible to offer an additional product as an option when selling a selected product.
In addition, the "Complementary Products " table is also visible and configurable on the Sales Order Line on the quotation sheet. Nevertheless, complementary products must be pre-configured on the product file.
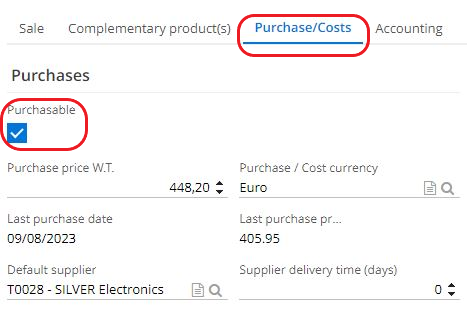
Purchase/Costs tab
Supplier catalogue on product file
If the product is marked as Purchasable (the Purchasable box), it will be possible to select it in supplier quotes and purchase orders.
In the Purchase/Costs tab, fill in the necessary information.
Note that the system shows you the last purchase price (it is filled in once an order has been confirmed) and the date of the last purchase.
Define the default supplier.
You also have the option of entering Supplier delivery time (days). Entering the supplier's delivery time can be useful if the product is going to take a long time to be supplied, in order to anticipate the purchase. This field is taken into account in the calculation of requirements when purchase proposals are made.
The Supplier Catalog table. In this table you can list the different suppliers, simply add a line. Click on +New to add a new line. You must enter a catalogue product code.
This field is not compulsory. As a general rule, this code is obtained from the supplier who sends you his catalogue.
This action can also be carried out from the supplier file (Purchases menu → Suppliers → open a supplier file, click on the Supplier tab which contains the Supplier Catalog table). In this table you can always add a new line by clicking on New/.
You can also import a catalog via a CSV file.
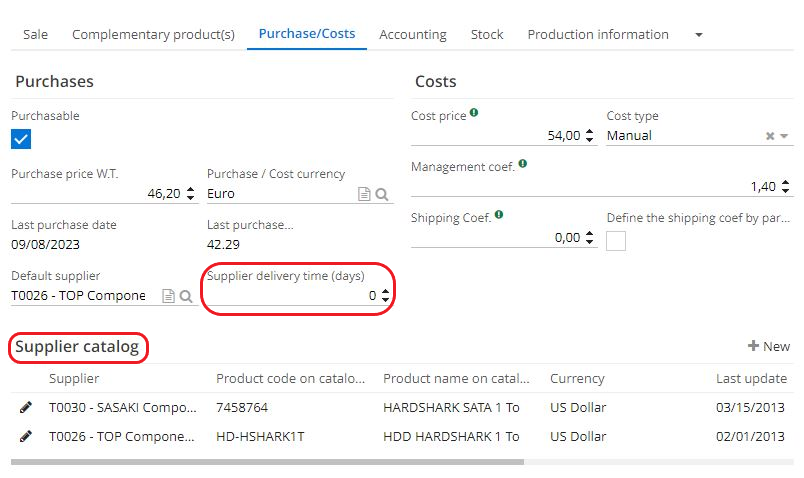
- The different types of cost calculation
On the Purchases/Costs tab, in the Costs section you can define the different types of costing.
The management coefficient is used to calculate a margin if you automatically define the selling price via the cost price. Otherwise, the margin will be the difference between the selling price and the cost price.
Here is an example :
The box "Update sale price from cost price" is ticked on the Product file (the Sales tab).
In the Purchases/Costs tab you have defined the cost price as 40 euros, the cost type has been defined as manual, with the management coefficient equal to 1.
If you go back to the Sales tab, you will see that the sales price W.T. is equal to 40 as you defined it in the Purchases/Costs tab.
However, if you wish to apply a margin of 50%, enter a value equal to 1.50. in the "Management Coefficient" field (Purchase/Costs tab).
Consequently, when you return to the Sales tab, you will see that the sales price W.T. is 60 euros (the cost price of 40 + a 50% margin).
Other options on the Purchases/Costs tab:
- Cost type average: weighted average price. This price takes into account the different purchase prices of products in stock in order to produce a weighted average price. The calculation formula is : (quantity in stock existing WAP) + (quantity received unit price / total quantity of product in stock).
Other characteristics may be taken into account in this calculation, such as the approach cost coefficient for receipts, or the valuation at actual or standard cost for production if it is a manufactured product.
Cost type at last purchase price: in order to select this type of cost, the product must be purchasable (tick the "Purchasable" box in the Purchase/Costs tab). The cost price of the product is then automatically calculated at the last purchase price.
Shipping coefficients: are used to give an estimate of shipping costs to suppliers. The final costs of receiving the item into stock can be defined either at product level or at supplier level.
In this case, tick the box "Define the shipping coef by partner". In this case, the "Shipping coeff" field will disappear from the product file.
Example: the cost price is 40 euros and the approach charge coefficient is 2.00 (i.e. the cost is doubled). As a result, once the product has been put into stock and received, in the Stock tab, in the Stock table you will see that the product's AWP is 80 euros because of the approach costs.
Stock tab on the product file
If this is an item type product, for which it's necessary to manage stock, open the Stock tab on the product file.
- Indicate whether the product is managed in stock or not by ticking the box "Stock managed". If the box is ticked, it means that the product is therefore managed in stock.
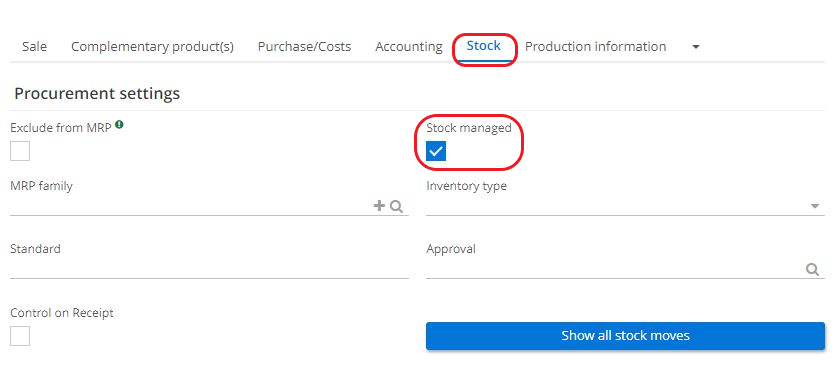
It's also possible to tick the box "exclude from MRP" (if the box is ticked, the inventory management of the product is excluded from the calculation of needs). Or, assign a product to a MRP family.
Define the inventory type (yearly or cycle counting).
Indicate whether the product has a standard or approval.
If necessary, tick the box "Control on receipt". This means that when you receive the product, in order to validate the delivery note, you must carry out an incoming inspection and confirm whether the product is compliant or non-compliant. Consequently, ticking this box will force a conformity check to be carried out on receipt.
"Show all stock moves" allows you to view the history of stock moves.
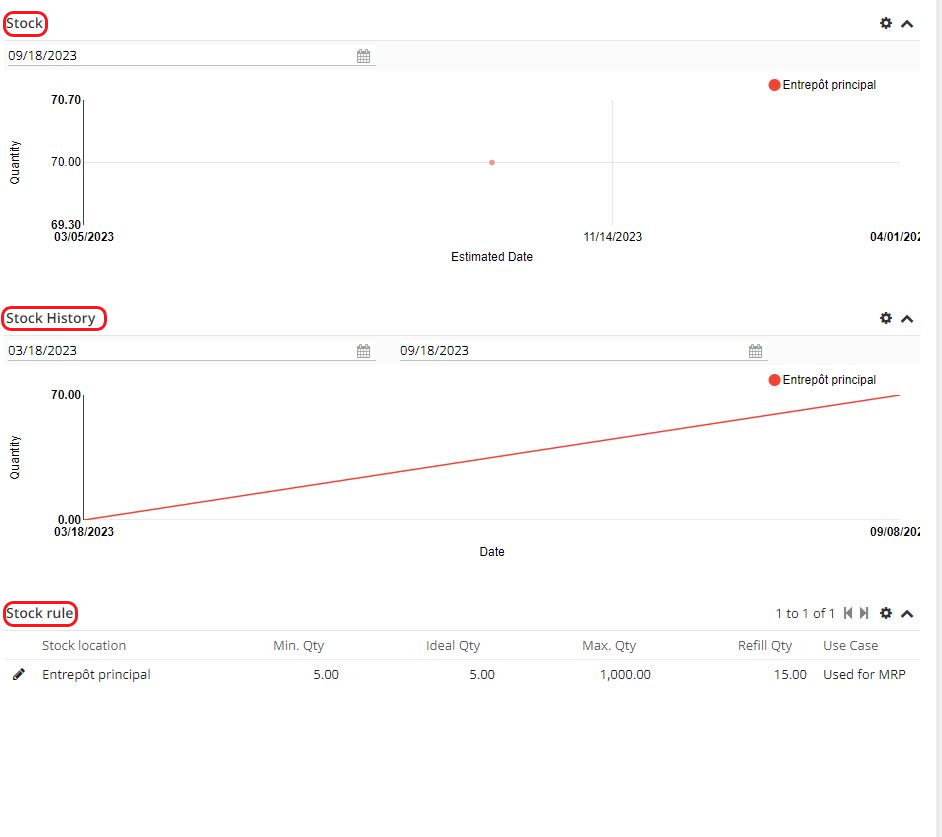
On the Stock tab you will find other information, such as the Stock table. Within this table you can view the Stock location (bear in mind that multi-location can be applied and an item can be found in several locations) as well as the available Quantity.
By scrolling the page down, you can also view stock, stock history, stock rule and stock history line.
Select a date to view stock levels by period.
Stock rules: for each product, you can define stock rules. You can define safety thresholds with the minimum quantities you wish to have in stock for these products.
These rules will be taken into account when calculating needs. The rules will send an alert if stock is too low.

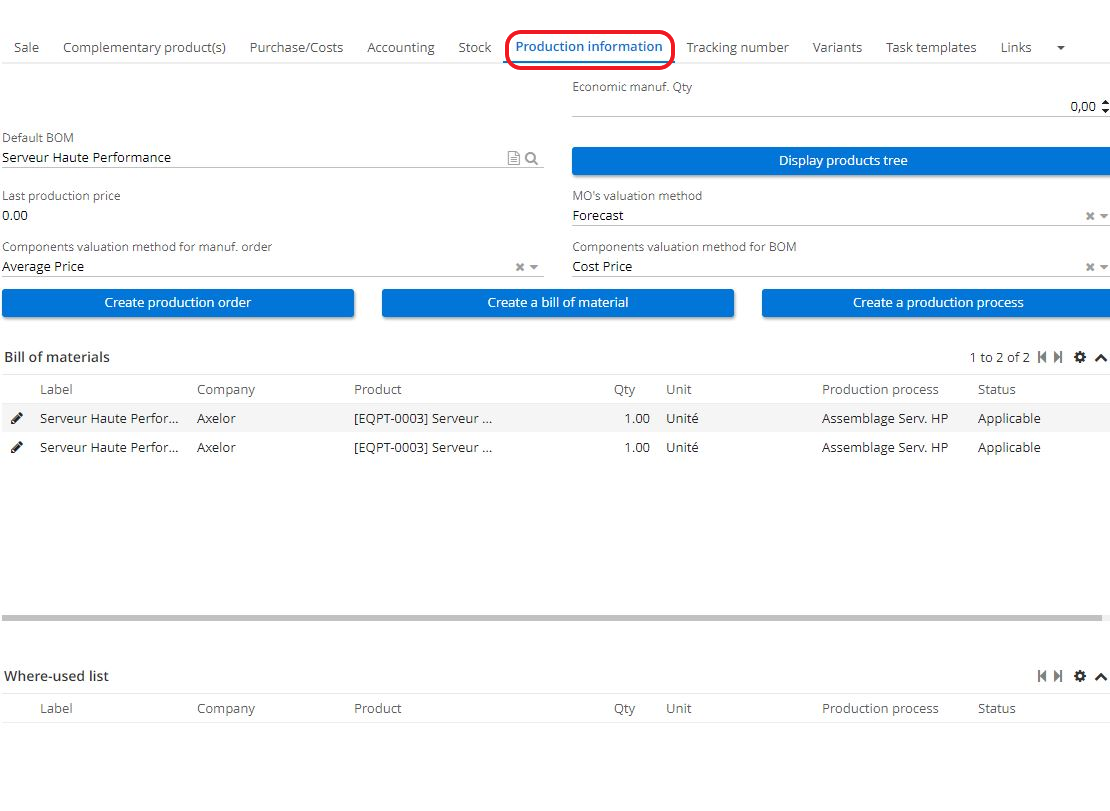
Production information tab
Contents of the production information tab depend on the product subtype and its procurement method. The Production Information tab provides more information regarding the manufacture of the product.
This tab and these functions relate to the production app. For more details, consult the production documentation.
In this tab you will find the Bill of Materials, and you can also consult the Product Tree by clicking on the button "display products tree".
Note that Bill of Materials appears in Production information tab only when the Procurement method was defined as "Produce" or "Buy and produce".
The "Where-used list" contains information on the bill of materials in which the component is used.
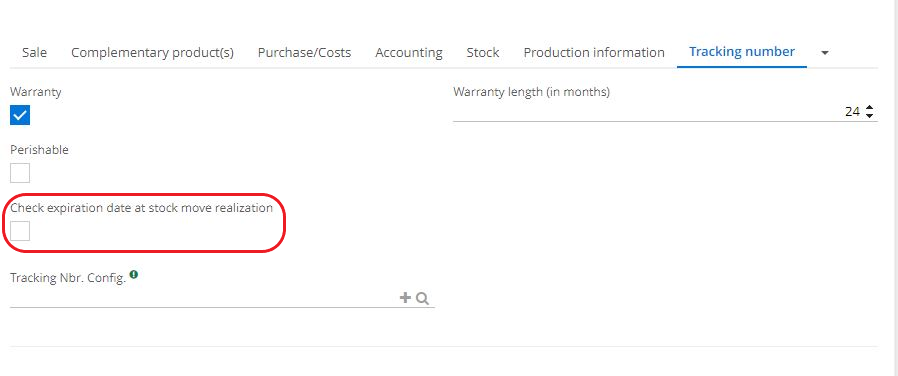
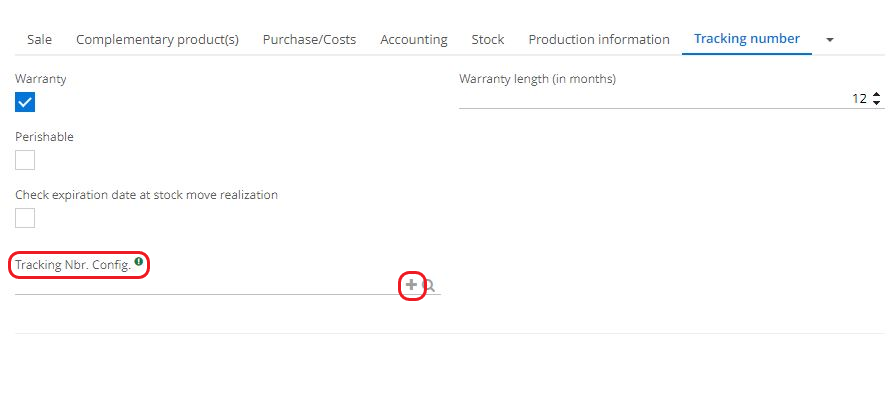
Tracking number tab
You can indicate whether this product is subject to a warranty. In this case, you will need to enter the warranty lenght (in months).
You can also indicate whether the product is perishable. If you tick the box, the "time before expiry (months)" field will appear for you to enter the period.
The "check expiration date at stock move realization" box is used to verify the fact that the product has not expired before it is dispatched to the customer.
- Tracking number configuration: allows to define a tracking/batch number. Either the number is defined when the product is received, in which case the supplier has given you the batch number.
It can also be a tracking / batch number that is used to automatically assign to the products that are produced (i.e. a batch number assigned during production).
Assigning a tracking/batch number during production can be done either in manual or automatic way. It can be a sequence that automatically assigns a tracking number.
When a company produce a product, a tracking number will be added automatically.
How to add a tracking number?
- On the product file, in the Tracking Number tab, select a Tracking Number Configuration in the dedicated field, for example, "Sales" and "Production".
You can also add a new configuration by clicking + in the "Tracking number configuration" field.
However, Tracking No. Configurations can be configured separately in : Stock management → Configuration → Tracking No. Configuration.
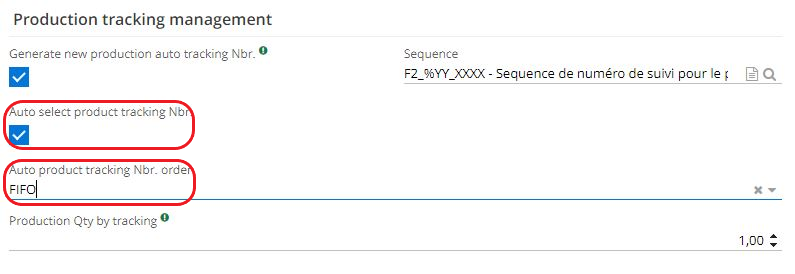
- Open a Tracking Number Configuration window either in a product file or either via Stock management → Configuration → Tracking number configuration. In order to define a Sequence, tick the "Manage purchase / production / sale tracking number " box (the name depends on a product procurement method).
Next, check the box "Generate new purchase/production/sale auto tracking number" and select a Sequence.
- If you click on a Sequence, you will be redirected to the Sequence window, however it is available in read mode only.
However, it is possible to make certain modifications to sequences from Application config → General data → Sequences.
- Check the box "Auto select sales / product tracking number" on a tracking number configuration page. This allows to select a tracking number on sale. The same choice is available for production. Note that this checkbox appears when one of the options, either "Manage production tracking number" or "Manage sale tracking number" is activated (if it's done via product file).
Activating these boxes will bring up identically named fields, in which it's possible to indicate a FIFO or LIFO (first in, first out / last in, last out) value.
See the Stock app documentation for more details.
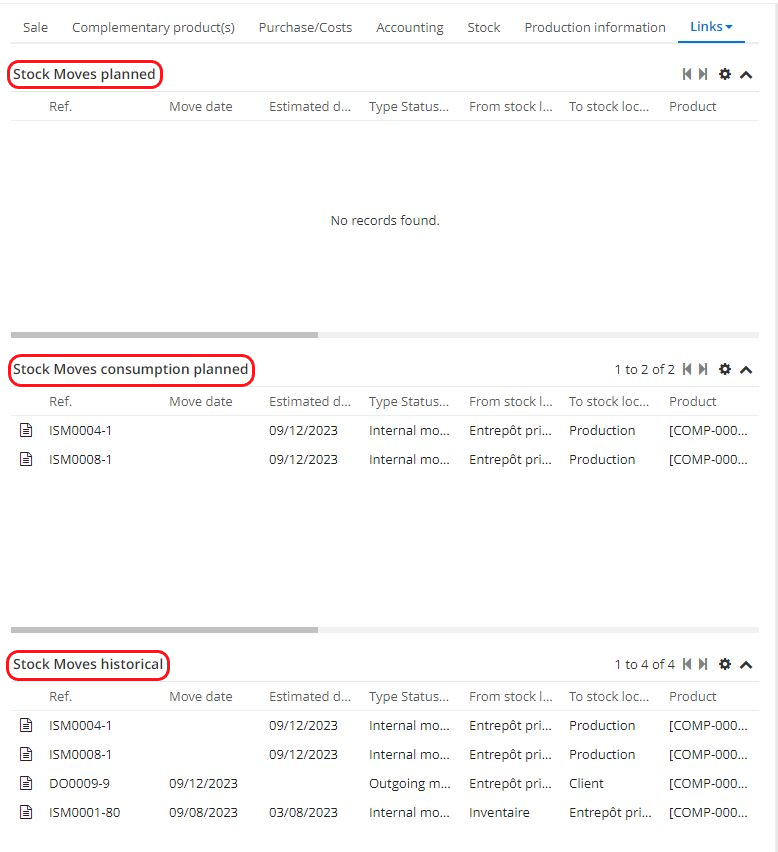
Links tab
In this tab you can see all stock moves linked to the product (planned / historical / consumption moves).
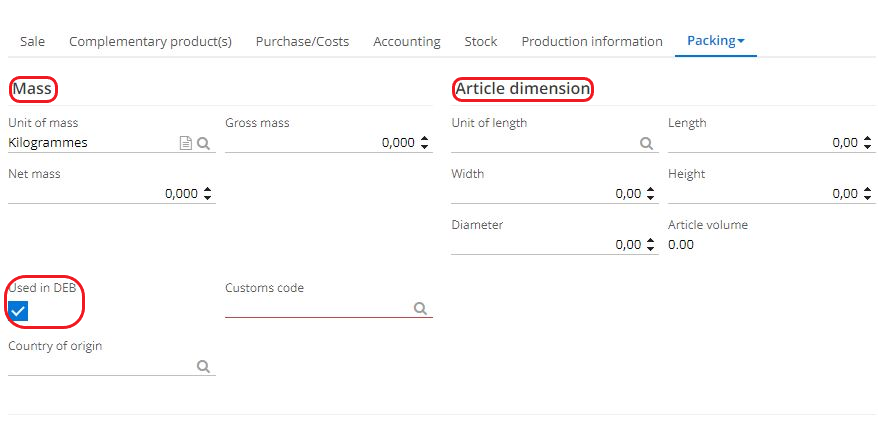
Packing tab
In this tab, you can enter the weight of a product / the dimensions of an item.
Tick the box "Used in DEB" (declaration of exchange and goods) if there is a need. If the box "Used in DEB " is ticked, the fields "Customs code" and "Country of origin " will appear.
Consult the documentation on the Stock app for more details.
Service type product
The system manages different types of items, not just products. There are :
Services (as consultant days).
Subscription-type services.
For example, a commpany sell a Licence of provision type which belongs to the Subscription accounting family.
There is no need to manage stock for services. In this case, there will be a simpler file. On the service type product file there won't be a Stock tab or a Production tab, but the logic is the same for the rest.
Nevertheless, it's still possible to enter the method of procurement (for example, whether this is a service that can be bought or subcontracted to someone).
- Find information Sale tab or Purchase/Costs tab on the form, as well as the Accounting tab.
In other words, a service will have almost the same configuration as a physical product.
At the same time, there are other services. For example, the company sells a project or an audit, so this will be a fixed-price service. It's also possible to sell project manager days / consultant days.
The product repository differs depending on the app: in sale, these are saleable products; in purchase, these are purchasable products; and in the production app, these are products used in the production.
In addition, there is a possibility to attach data sheets to the product file or either generate a product sheet or send an email.
To create a sale quotation, there is no need to define a product catalog since it's possible to enter the product name manually.
Product variants
How to activate product variants?
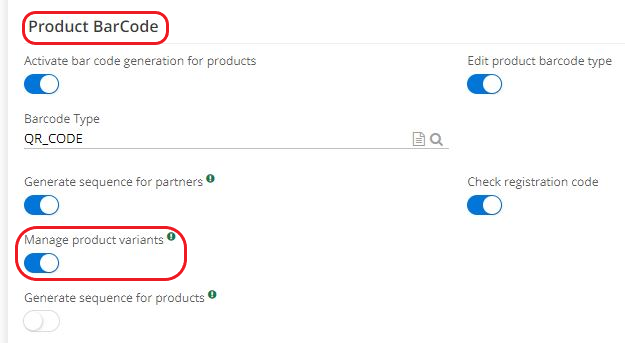
Activate product variants in the Base app (Application config → Apps management → Base, configure → on the base app page, under section ProductBarCode, check the box "Manage product variants"). Once the box is checked, refresh the browser. The variants tab should appear on a product file.
Ticking this box allows you to have a product with variants.
Simple variants have up to 5 attributes (size, colour, etc) and can be used to manage products with simple customisations.
However, if you want to make bespoke products with complex configurations and many attributes, it is better to use a product configurator.
How to configure a product variant?
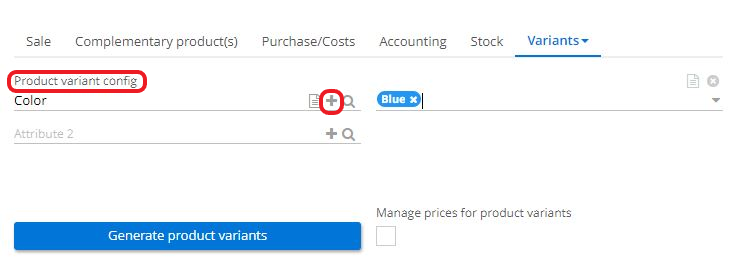
Sales app → Products & Services → click on a Product file → on the product file, click on the Variants tab which should appear once the functionality has been activated on the Base app page.
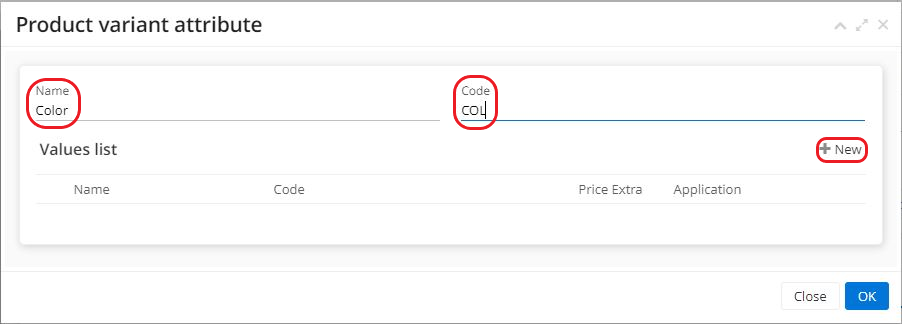
In the Product variant config" field click on + in order to creat new variant attribute. This variant attribute can be anything : it could be colour, size etc. Enter Name and Code (for example, Color and COL).
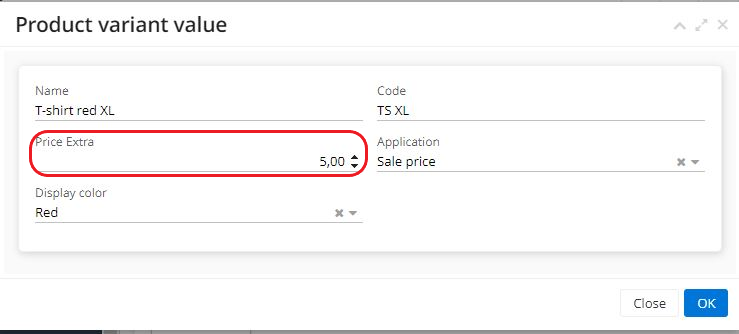
Then, add new value in a value list and click on +New in Values List section. A new window will open, the "Product variant value" window. In this window, define the value. If the variant was color, its value could be different types of color, for example "Blue".
It's equally possible to customize this value, by filling in the fields such as "Price extra" (a certain size or color could cost more) or "Application" (cost price / sale price / purchase price). Also, this setting allows to select a display color for the value that is being created.
If not all fields were filled in, it will be possible to do it later by customizing a value. In this case, click on a value that is being displayed directly in the "Values of the attribute" field next to the Product variant config field.
Note that it is advisible to create a list of values you wish to use with a certain attribute. For instance, if an attribute is a Color, then create a list of all existing shades you might use. Once created, it's impossible to add a new value to the list directly on a product file.
In order to modify values list, path Application config → Referential → Configuration → open Product variant attribute → Edit its values
Next to the Product variant config, there will be a "Values of the attribute field" on the right side. This field allows to choose from the list of values created for a specific variant attribute. For instance, if the variant attribute is Color, then it will be possible to choose from different colors (values of the attribute) that have been already created in the "Values of the attribute field" like Blue, Red, White etc.
To customise a product variant value, click on a value that has already been applied (for example, "blue" as the value, so click directly on the attribute value "blue" to path the "Product variant value" customisation tab).
Note that on the Product variant Value tab, you can also choose a display colour (this is more useful on the design side to visualise the colours applied).
If you generate a product file with the variants activated by clicking on "Generate products variants" button, the system will generate a product file for each combination of variants. For example, for a Tshirt with colour and size variants, this will generate a Tshirt L product file in red, a Tshirt XL product file in red, etc.
It's also possible to define Price Extra on the Product variant value window. For example, the colour red has an additional cost of 5 euros compared to the initial price. In addition, the surcharge can be negative, i.e. the price was entered as - 5 euros.
On the Product variant value window, in the Application field, indicate whether the price entered is the cost price / the purchase price/ or the sale price.
A product with variants can have up to 5 attributes. Therefore, there are combinations of variants.
In this case, if you click on the "Generate product variants " button, the system will produce combinations of different variants in order to create as many item files.
Manage prices for product variants: ticking this box allows you to take into account the additional costs you have indicated.
Click on "Generate product variants " where you will find all the variants you have created.
The file from which you created the variants can be viewed from the menu Application config → Products → Product models. This means that the product has become a template from which you have generated variants.
To create a customised product, you need to activate the product configurators, path: Sales → Configuration → Configurator model.
Example (see image "1.1 Variants"):
On the product file, click on the Variants tab to configure and manage product variants.
In the field "Product variant config" define which product variant attribute you wish to apply (colour / size / or create a new attribute).
Then select new product variant value by adding a new value to the Value list. If you have chosen colour as an attribute, you will need to select a specific shade (white, blue, yellow etc) in the value field. In the example, colour has been defined as "Blue".
Click directly on the selected value to open Product variant value.
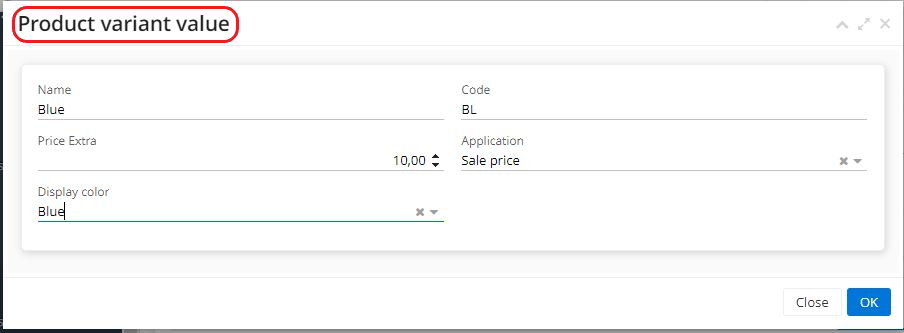
Example (see image "1.2 Price extra"):
Customise the selected attribute. Define the additional cost associated with the variant, e.g. the colour Blue may cost 10 euros more than the colour Yellow.
It is also possible to select the display colour (a visual cue that allows you to differentiate between several values).
Enter the code.
Specify Application in order to know whether the price entered is a sale price / the cost price / the purchase price.
Product packs
How to activate product packs:
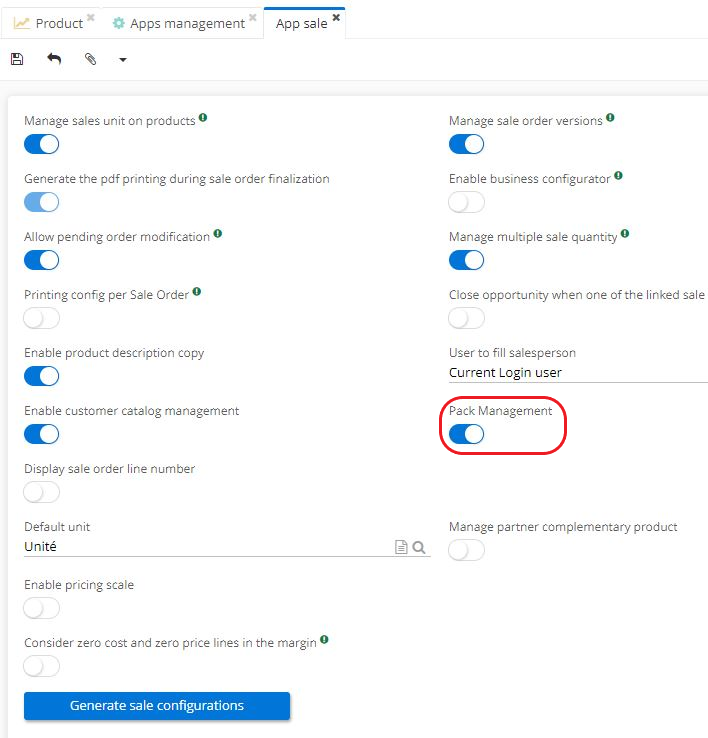
- Activate the functionality on the Sales app page (path : Application config → Apps management → Sale, configure → on the Sales app page, activate the "Pack Management" box) .
Save the changes you have made and refresh the browser.
A "Pack " menu entry will appear in the Sales app.
How to create a new pack:
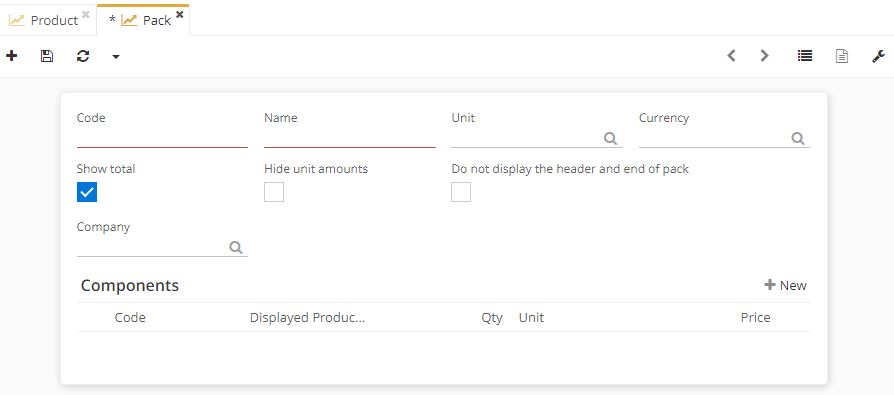
Sales → Pack → to create new pack, click on +. A pack contains several components (for example, a processor, an SSD hard disk, a Rack case). Enter the necessary information (code; name; unit; currency).
You can also activate several boxes on the pack form:
Show total: checking this box allows to display at the end of the pack the total price of the pack, which corresponds to the sum of the prices of the components in the pack.
The Hide unit amounts box appears if you activate the "Show total" box: if this box is ticked, it allows you to hide the unit price of each component on the quote; only the total of all the components will be displayed. Otherwise, the component prices will be displayed.
The box "Do not display the header and end of pack". If this box is ticked, it allows to hide the header and end of pack.
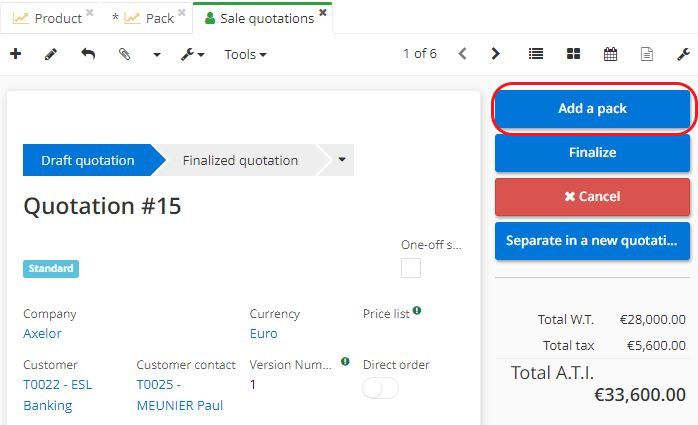
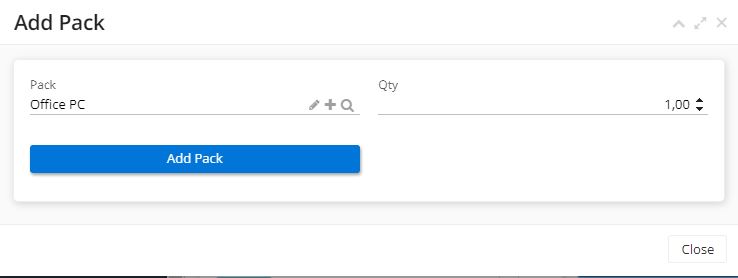
Packs can be selected from the sale quotation sheet
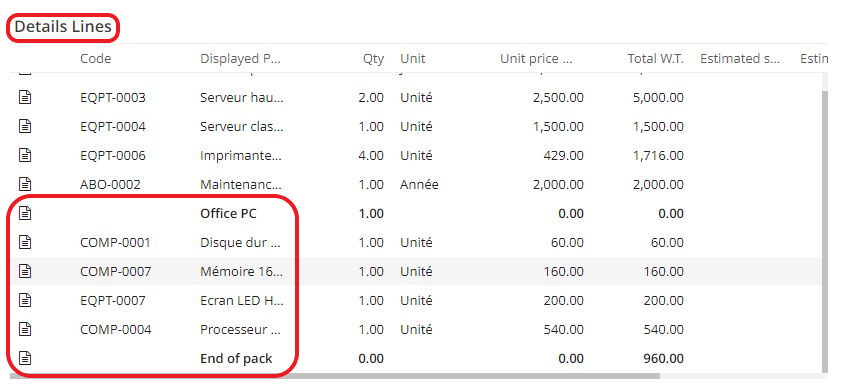
On a sale quotation form, click on the "Add a pack" button. The pack will be displayed on the sale quotation form, on the Contents tab, in the Details lines table. The total price is displayed in the "End of pack" line, visible from the Details lines table.
You can also add Title lines to classify the pack. The title lines will be visible on the quotation form.
The "Start pack " and "End pack " lines (on the Pack Line tab, Pack File) allow you to customise the start and end lines of the pack and are used to delimit where the pack begins and ends. For example, the "end of pack" line can be named "subtotal" and it will therefore be displayed on the quotation as "subtotal".