CRM
Introduction
"The CRM application allows you to manage the company’s interactions with prospects and customers. First of all, it allows you to manage prospects. The first step consists in creating leads and makes it possible to carry out a commercial and marketing follow-up of these new prospects. A lead is usually created at the beginning of the commercial relationship. This is a person/company interested in your products and services, with whom you are in the early stages of the business relationship. It can be someone who has completed a questionnaire on your website, a participant in one of your marketing events, a person you met at a trade show… The creation of leads thus makes it possible initially to avoid adding prospects to the database if they prove to be inconclusive. If the track is inconclusive, it can be closed and then deleted or set aside for later contact. If a lead is promising and the business relationship deepens, you can convert the lead to a third party (customer/prospect) or contact, then create an opportunity associated with the lead. The creation of tracks is not mandatory, you can directly create a third party of the prospect type if you wish. Opportunities allow you to accurately track your potential future or pending sales or business. You can track their progress, and close them when they are lost or won. The CRM application also allows you to create events that are commercial actions (calls, appointments, events, tasks) that can be linked to tracks, third parties or contacts. These events can be scheduled with the possibility of receiving reminders, and can be viewed on your calendars. A history is available.
- Keywords :
- Lead: This is a person/company interested in your products and services, with whom you are in the early stages of the business relationship.
- Opportunity: Opportunities are created when the prospect/track has a commercial interest in your products/services. They allow you to track your potential sales or business, coming or pending. The opportunities will allow you to have a precise vision of your sales pipeline because you can indicate for each opportunity an amount and a probability of realization.
- Event : Events are commercial actions that can be linked to third parties, contacts and tracks: calls, appointments, events, tasks. "
- Leads : This menu gives access to the list of tracks and allows you to create new ones. A lead is a prospect at the first stage of the commercial relationship.
- Customers : This menu gives access to the list of customers and allows you to create new customer records.
- Contacts: This menu gives access to the list of contacts and allows you to create new contact sheets.
- Events : List of events related to customers and prospects, contacts and leads.
- Opportunities: This menu gives access to the list of opportunities and allows you to create new ones.
- Objectives: This menu allows you to set business objectives assigned to a particular team or employee. Quantified objectives are entered such as the amount in currency to be generated on all opportunities, the number of opportunities to be created and the number of opportunities created to be won.
- Reportings: Reports dedicated to the CRM application
- Calls: Tbl. Call dashboard: Dashboards on “Call” type events;
- Opportunities: Tb Opportunities 1 : Opportunities dashboards; Tb Opportunities 2 : Opportunities dashboards; Tb Opportunities 3 : Opportunities dashboards.
- Lead: Tb Track: Dashboards on the tracks.
- Event: Tb Events : Dashboards on events.
- Objectives: User objectives dashboard: User objectives dashboards; Team objectives Tb: Dashboards on team objectives.
- Configuration : Lead Source: Displays the different sources of prospects and allows you to create new ones Event categories: Displays the different categories of events and allows you to create new ones Objectives configurations: Configure business objectives Lost reasons: Displays the different reasons for losing a lead or opportunity and allows you to create new ones.
The leads
CRM > Leads
Create a lead
A lead is a prospect at the first stage of the commercial relationship.
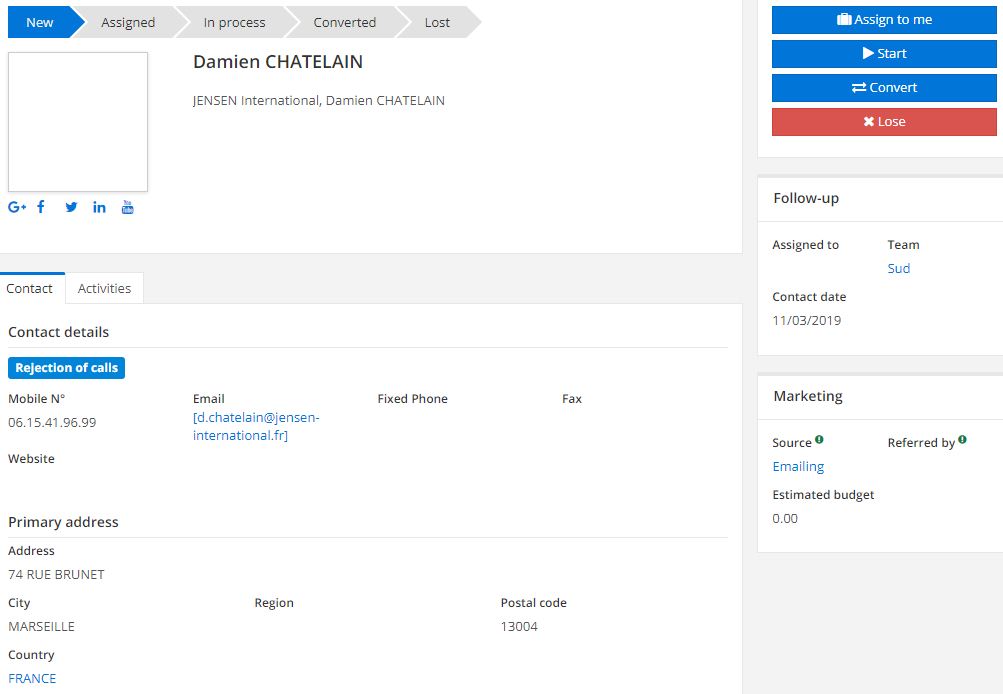
A new lead changes to the “In progress” status once started. It is automatically assigned to the connected user when it is created, but it can be manually assigned to someone else.
💡 Tip The “Reports” button allows you to print the record of a track.
Fill in the contact preferences of a lead
If necessary, you can tick the boxes “Call rejection” and/or “Email rejection”.

Supporting a lead
At the follow-up level you can select the sales representative or sales team you want to assign to the track.
💡 Tip You can also self-assign a track from the list view by clicking on the suitcase icon to the right of each line.
Monitor the evolution of the leads
The status of a lead allows you to indicate the evolution of the relationship with the prospect. You also have access on one track to all the activities related to the track: events, marketing campaigns, opportunities, emailing… etc.
📝 Note From the list view, a color code allows you to quickly view some tracks according to their status: blue corresponds to the “New” status and green corresponds to the “Converted” status.
Indicate the marketing source of a lead
Select the source, previously configured in the module configurations.
📝 Note The “Referent” field allows you to fill in the case of word of mouth, the person who referred this prospect.
Configuration Provenances are created in CRM > Configuration > Provenances of prospects
Convert a lead to a third party and/or contact
Click on the “Convert” button. You then have the choice between creating a new third party or selecting an existing third party. You can create a third party prospect or customer by checking the corresponding box. A contact will also be created. The information and contact details are automatically included in the contact or third party form.
💡 Tip A third party who is qualified as a prospect will automatically be transformed into a customer upon confirmation of his first order.
📝 Note If you have chosen to select an existing third party, you can create a new contact for that third party or select an existing contact.
Create a business opportunity from a track
Click on the “Tools” button in the taskbar and on the “Create opportunity” menu, or with the “Convert track” button, then by checking the “Create opportunity” box.

💡 Tip The “Type” field allows you to specify if this opportunity comes from a new customer, an existing customer or if it is recurring with an existing customer.
📝 Note The opportunity thus created will be automatically linked to the track.
The opportunities
CRM > Opportunities
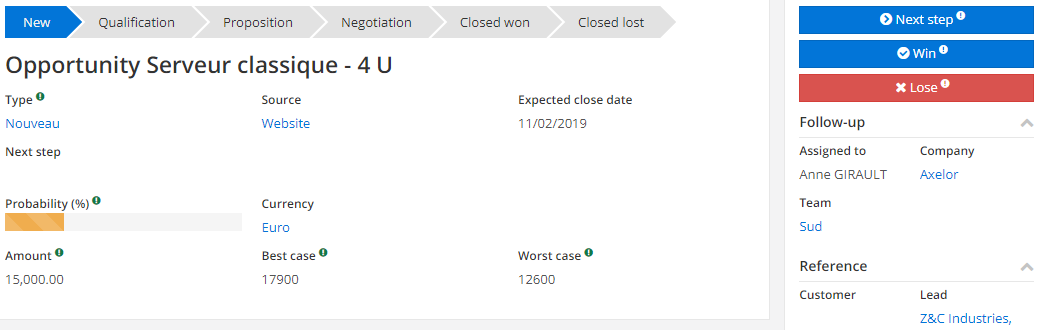
Create an opportunity
You must give a name to this opportunity. You can create a quotation/order from an opportunity.
💡 Tip Opportunities can be taken into account when managing stock replenishment, so these probabilities allow for better management of these replenishments.
📝 Note You can change the status of the opportunity: - from the buttons on the right of the list view: next step, closed won, closed lost - by a simple drag and drop from the kanban view.
From the list view of the color codes, you can follow the evolution of opportunities. When a track is created the writing font is black. If it has been created for more than 7 days, the font will turn blue. If the expected closing date is less than 15 days from now, the font is in orange, it will change to red as soon as there are only 7 days left. A lost closed track will be highlighted in red while a won closed track will be highlighted in green. From the view another color code exists: if the probability of winning the opportunity is less than or equal to 25% the left edge of the box will be colored red, if the probability is greater than or equal to 75 it will be colored green, in black if the probability is greater than or equal to 50 and finally, the edge of the box will be orange if the probability is less than or equal to 50%.
Create a quote from an opportunity
You can create a quotation opportunity by clicking on the “Create a quotation” button in the “Tools” menu of the taskbar. The relevant fields filled in in the track or customer sheet will be automatically taken over.
Close the opportunity when one of the linked orders is confirmed
Configure applicarive > Device management > Sales
This option allows you to automate the closing of a won opportunity when a related order is confirmed.
Contact management
CRM > Customers
Create and manage your file of prospects, customers and suppliers
When you create a customer file, in addition to filling in the information fields, check boxes allow you to specify the category of the contact: prospect, customer, supplier.
💡 Tip It is also possible to create new customers from the Sales module and new suppliers from the Purchasing module.
📝 Note A contact can be both a customer and a supplier.
Detect and merge duplicates
From the list view of your tracks or clients, click on the “Tools” button and select “Check duplicates”. Then choose the fields from which you want to search for duplicates (name, email address,…). Once the system has detected duplicates you can then merge them together using the dedicated button.
📝 Note This action is also possible from the list views of your customers (Sales Module) and your suppliers (Purchasing Module).
Events and tasks
Create events: calls, appointments, emails, tasks
CRM > Events
On a track, contact or third party record click on the “Tools” button in the taskbar to create a new event. A new window will then open and you will be able to define the type of event you want and fill in the necessary information.
💡 Tip You can also create a new event from one of the CRM calendars by clicking directly on the desired time slot.
Configuration You can customize calendars by going to the Applicative Settings menu > Calendars > Calendar Settings. Choose a name for the calendar, then the user or group to whom it belongs. In the “Calendars” table, select the calendars to follow. It is possible to create a new menu entry from which the calendar can be viewed. To do this, choose a parent menu, and click on the dedicated button. This menu entry will only be visible to the selected user or users belonging to the selected group. Finally, it is possible to delete this menu item.|
Commercial objectives
Define and monitor business objectives
CRM > Configuration > Configuration > Configuration of objectives
You have the option of assigning the objective to an individual or a team. The objective is defined according to business opportunities and/or events and can be calculated on a date range or frequency (daily, weekly or monthly).
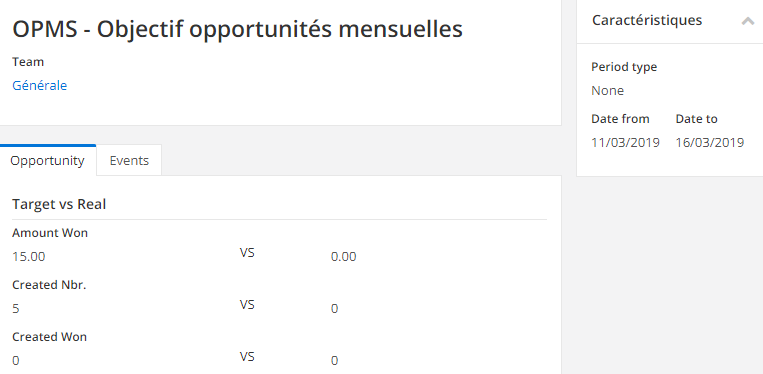
💡 Tip Via the menu entry “Configuration of objectives” (in the CRM menu configurations) you can create objectives, in the same way, but for an entire team and not by sales representative.
📝 Note You will then be able to consult the progress of the different objectives created in Reports/Objectives.
Commercial follow-up
CRM > Customers / Tracks / Contacts
Configuration It is necessary to activate email sending beforehand, in the application configurations > Base module.
Send emails to prospects and customers from the application
Once an email account is set up, you can send emails directly to prospects and customers from their records using the “Tools” button on the taskbar.
Consult interactions with prospects and customers
From a track or contact form, you have access to the history of the activities related to them as well as the programmed actions: events, marketing campaigns, opportunities, orders,…
Other features include
Manage users assignable to clients
Application configuration > App management > CRM > Configuration
It is possible to make sure that only certain user groups can be assigned to the “Clients” files.
Automatically retrieve a customer description on an opportunity
If the option “Display description of the customer in the opportunity” is activated, the description filled in the “Note” field of a customer record will be automatically retrieved from the “Customer description” tab on the opportunity.