Setup Axelor BI
Axelor BI is an enterprise module, that can be installed and used from Axelor’s nexus repository.
Nexus Configuration
settings.gradle
In settings.gradle file, inside dependencyResolutionManagement, declare a new repository to let gradle install axelor-bi module from the dedicated Nexus repository.
dependencyResolutionManagement {
  repositories {
    // keep the declaration of your other repositories there
    maven {
      name 'maven-enterprise'
      url 'https://repository.axelor.com/nexus/repository/maven-enterprise/'
      credentials {
        username axelorMavenUsername
        password axelorMavenPassword
      }
    }
  }
}Application configuration
Axelor BI depends on two other modules, Axelor BI Studio and Axelor Library. You need to add a set of parameters to configure the application.
Axelor BI Studio configuration
The configuration of Axelor BI Studio can be done in two ways:
-
License
-
Locally
License
In that case, no configuration is required. Instead, your license integrator would set up all the requirements to use BI module properly.
Local configuration
When Axelor BI module configuration is set locally, then it requires adding the following parameters to the axelor-config.properties file:
-
bi.local: should be set to true
-
bi.client.code: client code provided by axelor or any unique code for testing
-
bi.url: the url of studio server
-
bi.admin.user: studio admin username (communicated via email)
-
bi.admin.password: studio admin password (communicated via email)
Sample of axelor BI Studio configuration:
# BI settings
bi.local = true
bi.client.code = XXX
bi.url = https://axelor-bi-studio.axelor.com
bi.admin.user = admin
bi.admin.password = password
Axelor Library configuration
The configuration of Axelor Library can be done in three ways in the following priority:
-
Local configuration
-
License
Local configuration
When Axelor Library configuration is set locally, then it requires adding the following parameters to the axelor-config.properties file:
-
bi.library.url: the url of library server
-
bi.library.user: library admin username
-
bi.library.password: library admin password (request it to BI module team)
Sample of axelor library configuration:
# Library settings
bi.library.url = https://aos-library.axelor.com
bi.library.user = biUser
bi.library.password = passwordInstallation
To install axelor BI:
-
Go to the menu
Apps management -
Search for
Axelor BI -
In
BIapp card, clickInstall

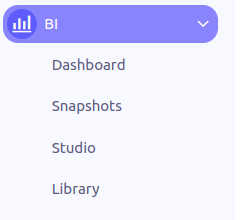
The BI module is now available on the sidebar menu with the following menus:

-
Dashboard: List all the dashboards created on studio
-
Snapshots: List all snapshots of dashboards user has access to.
-
Studio: Redirect to BI Studio server
-
Library: The library of dashboards provided by Axelor. It allows you to install dashboards from the library.