Setup Axelor BI Module
Axelor BI Module is an enterprise module, which can be installed from the nexus repository of Axelor.
Nexus Configuration
settings.gradle
In settings.gradle file, inside dependencyResolutionManagement, declare a new repository to let gradle install axelor-bi module from the dedicated Nexus repository.
dependencyResolutionManagement {
  repositories {
    // keep the declaration of your other repositories there
    maven {
      name 'maven-enterprise'
      url 'https://repository.axelor.com/nexus/repository/maven-enterprise/'
      credentials {
        username axelorMavenUsername
        password axelorMavenPassword
      }
    }
  }
}Installation
Build and deploy the updated webapp on your tomcat server.
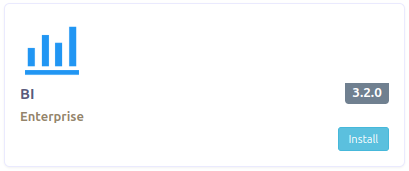
To install Axelor BI module:
-
Go to the menu
Apps management -
Search for
BI -
In
BIapp card, clickInstall
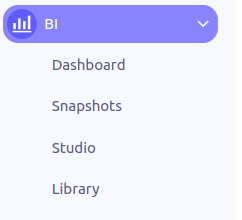
The BI module is now available on the sidebar menu with the following menus:
-
Dashboard: List all the dashboards created on studio.
-
Snapshots: List all the dashboard snapshots your user has access to.
-
Studio: Redirects to BI Studio.
-
Library: The library of dashboards provided by Axelor. It allows you to install dashboards from the library server. See Library for more details.
Application configuration
Axelor BI Module depends on two other services: Axelor BI Studio and Axelor Library. You need to add a set of parameters to configure the application.
Axelor BI Studio configuration
BI Studio configuration is managed in the configuration page of BI app and follows these steps:
-
Open the configuration page of
BIapp. -
Go to the
BI Studiotab. -
Click on
Reset DB informationbutton (only if the fields in the panelDatabaseare not already filled in). -
Fill
BI URL(only if the field is not already filled in). -
Click on
Activate Connection. -
Fill the fields on the popup window:
-
BI Admin username: The username of the admin user on your BI studio tenant. -
BI Admin password: The password of the admin user on your BI studio tenant.
-
-
Click on
OK-
If the connection is well established, a message appears:
BI tenant activated successfully. -
If it failed, a message with the encountered error appears. Check server logs for more details.
-
-
To deactivate the connection click on the button
Deactivate connection.
| The user set on the popup view needs to have the permissions to create users, roles and database connections on BI studio. |
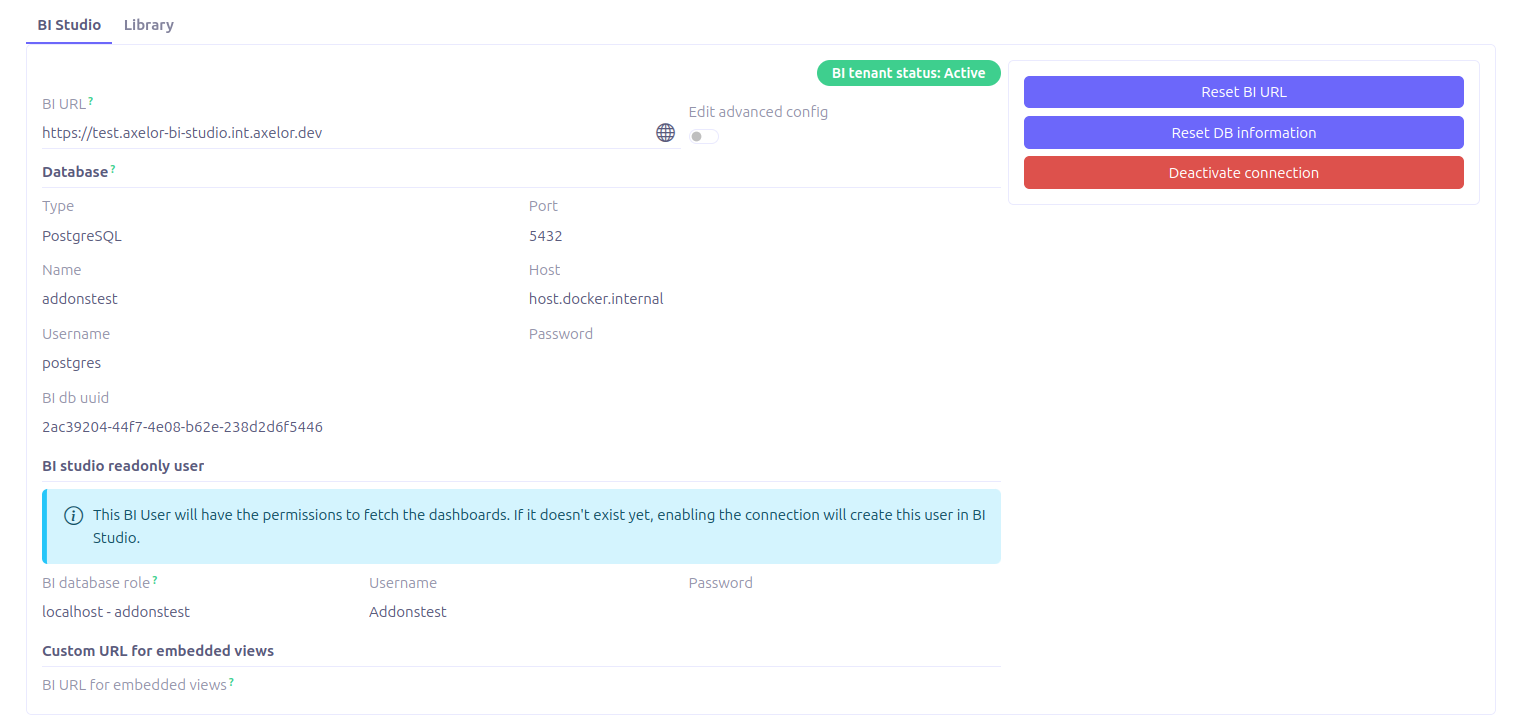
The page above in the BI Studio tab shows the following sections:
BI URL
The URL of BI Studio tenant.
| The panels Database, BI studio readonly user and Custom URL for embedded views described below are automatically computed during the first loading of the page and are considered as advanced settings. To edit them, enable the "Edit advanced config" switch. |
Status
The tag on the right side displays the current status of the communication between your app and the BI Studio tenant:
-
INACTIVE
-
ACTIVE
| No connection will be established to BI Studio when the status is INACTIVE. |
Database
This panel represents the database information used by BI Studio to connect to your ERP database:
-
DB type: MySQL, Oracle and PostgreSQL are supported.
-
DB port
-
DB name
-
DB host
-
DB username: By default, it’s the one used by the ERP, but you can use a distinct user (it requires to have been created by your database administrator).
-
DB password
-
DB connection UUID in BI: Informative and readonly field (can be useful to debug).
BI User reader
The credentials of the BI user with read-only permissions, used to fetch the dashboards from BI studio:
-
BI database role: The role dedicated to the BI reader, which grants read access on the database.
-
BI reader username: The username of the BI user dedicated to access the dashboards from this client application.
-
BI reader password: the password of the BI reader user.
Custom URL for embedded views
A URL of BI Studio that can be used to embed dashboards in views. This is an optional field and should only be filled if embedded views are served on a distinct URL than BI url.
Buttons
-
Reset DB information: Reset DB connection information from
axelor-config.propertiesfile. -
Reset URL: Reset BI URL from your license (if the metadata is present in the license).
-
Activate connection: Create User, Role and DB connection in BI Studio.
-
Deactivate connection: Deactivate the communication.
When clicking on the button Activate connection, a popup form appears to fill in the credentials of a BI Studio admin user with creation permissions.
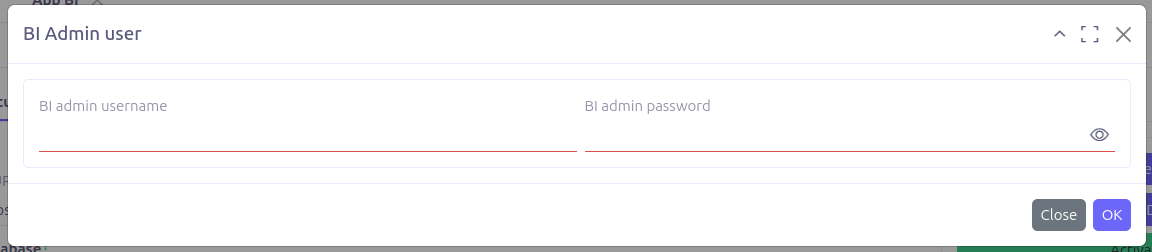
| The BI studio admin credentials are not stored in DB. |
Frequent errors
When you activate the connection, you may get an error like 'Database configuration error: status 422 - Creation failed'. A common reason for that is that BI Studio can’t access your database because the port is closed. You can find out if this is the case by creating the database connection manually in the UI of your BI studio tenant. See https://superset.apache.org/docs/using-superset/creating-your-first-dashboard/#connecting-to-a-new-database for more details. If you see an error "port is closed", you need to contact your system administrator and ask him to open your db port to let BI studio access it.
Axelor Library configuration
The configuration of Axelor Library can be done in three ways based on the following priority (the first having the higher precedence):
-
AppBi
-
Local configuration
-
License
AppBi
The configuration with higher precedence is the configuration page of the module, the library credentials defined in the configuration page will override the ones defined in axelor-config.properties and license metadata.

Local configuration
When Axelor Library configuration is done locally, it requires adding the following parameters to the axelor-config.properties file:
-
bi.library.url: The URL of the library server.
-
bi.library.user: The library user used to fetch dashboards.
-
bi.library.password: The password of the library user (request it to Axelor support team).
Sample of axelor library configuration:
# Library settings
bi.library.url = https://aos-library.axelor.com
bi.library.user = biUser
bi.library.password = password