Setup Axelor BI
Axelor BI is an enterprise module, that can be installed and used from Axelor’s nexus repository.
Nexus Configuration
settings.gradle
In settings.gradle file, inside dependencyResolutionManagement, declare a new repository to let gradle install axelor-bi module from the dedicated Nexus repository.
dependencyResolutionManagement {
  repositories {
    // keep the declaration of your other repositories there
    maven {
      name 'maven-enterprise'
      url 'https://repository.axelor.com/nexus/repository/maven-enterprise/'
      credentials {
        username axelorMavenUsername
        password axelorMavenPassword
      }
    }
  }
}Application configuration
Axelor BI depends on two other modules, Axelor BI Studio and Axelor Library. You need to add a set of parameters to configure the application.
Axelor BI Studio configuration
BI Studio configuration will be managed from AppBi config page and follows these steps:
-
Install
BIapp. -
On the configuration page, go to the
BI Studiotab. -
Add manually the Database connection or click on
Load DB infobutton. -
Add
BI URLif it is not set in the license or if it has been changed -
Click on
Activate Connection. -
Fill the fields on the popup window:
-
BI Admin username: The username of BI studio admin user. -
BI Admin password: The password of BI studio admin user. -
Click on
Activate connection -
If it is well established a message appears:
BI tenant activated successfully. -
If it is failed, the error message encountered appears.
-
To deactivate the connection click on button
Deactivate connection.
The user set on the popup view should have the permissions to create Users, Roles and Database connections on BI studio.
|

The page above in the BI Studio tab show the following sections:
BI Url
The URL of BI Studio tenant
Database
Represent the database information used for BI Studio connection:
-
DB type: MySQL, Oracle and PostgreSQL are supported.
-
DB port
-
DB name
-
DB host
-
DB username
-
DB password
BI User reader
The credentials of BI user with read-only permissions, used to fetch Dashboards from BI studio:
-
BI admin username
-
BI admin password
Buttons
-
Reset DB information: Reset DB connection information from
axelor-config.propertiesfile. -
Reset URL: Reset BI Url from license file.
-
Activate connection: It creates User, Role and DB connection in superset.
-
Deactivate connection: Deactivate the tenant.
| No connection will be established to BI Studio when the tenant is INACTIVE. |
On click on the button Activate connection, a popup form appears to set the credentials of a Studio admin user with creation permissions.
| The BI studio admin credentials are not stored in DB. |
Axelor Library configuration
The configuration of Axelor Library can be done in three ways in the following priority:
-
AppBi
-
Local configuration
-
License
AppBi
The high level priority configuration is the configuration page of the module, the library credentials defined in the configuration page will override the ones defined in axelor-config.properties and license metadata.

Local configuration
When Axelor Library configuration is set locally, then it requires adding the following parameters to the axelor-config.properties file:
-
bi.library.url: the url of library server
-
bi.library.user: library admin username
-
bi.library.password: library admin password (request it to BI module team)
Sample of axelor library configuration:
# Library settings
bi.library.url = https://aos-library.axelor.com
bi.library.user = biUser
bi.library.password = passwordInstallation
To install axelor BI:
-
Go to the menu
Apps management -
Search for
Axelor BI -
In
BIapp card, clickInstall

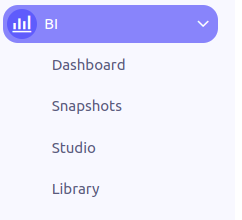
The BI module is now available on the sidebar menu with the following menus:

-
Dashboard: List all the dashboards created on studio
-
Snapshots: List all snapshots of dashboards user has access to.
-
Studio: Redirect to BI Studio server
-
Library: The library of dashboards provided by Axelor. It allows you to install dashboards from the library.