Setup Axelor Template
Axelor template is an enterprise module, that can be installed and used from Axelor’s nexus repository.
Nexus Configuration
settings.gradle
In settings.gradle file, inside dependencyResolutionManagement, declare a new repository to let gradle install axelor-template module from the dedicated Nexus repository.
dependencyResolutionManagement {
  repositories {
    // keep the declaration of your other repositories there
    maven {
      name 'maven-enterprise'
      url 'https://repository.axelor.com/nexus/repository/maven-enterprise/'
      credentials {
        username axelorMavenUsername
        password axelorMavenPassword
      }
    }
  }
}Application configuration
Working with axelor template requires adding a set of parameters as a configuration for the application as template is based on two other tools:
-
Axelor Template API (mandatory)
-
Axelor Library (not mandatory)
The configuration of Axelor Template API can be done in two ways:
-
License
-
Locally
The configuration of Axelor Library always requires a local configuration.
License
In that case, no configuration is required. Instead, your license integrator would set up all the requirements to use template module properly.
Local configuration
When template module configuration is set locally, then it requires adding the following parameters to the axelor-config.properties file:
-
template.library.url: The url of template library server
-
template.library.user: User name of the technical user
-
template.library.password: Password of the technical user
Here’s a sample of axelor template configuration:
template.library.url = https://aos-library.axelor.com
template.library.user = templateUser
template.library.password = password
Notice: Library credentials should be provided by Axelor.
Installation
To install axelor template:
-
Go to the menu
Apps management -
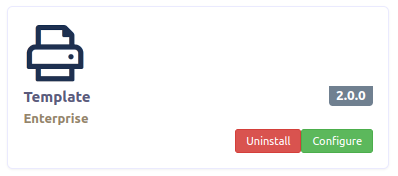
Search for
Axelor template -
In
Templateapp card, clickInstall
The template module is now available on the sidebar menu with the following menus:

-
Template print models: List all the templates present for the user for printing
-
Template settings: List all the settings present for the user for the linked to impressions are the datasets they make be combined with the models
-
Print history: List all the prints
-
Library templates: The library of templates provided by Axelor. In one click you can create a template and its settings from a template made by Axelor. A configuration is necessary in
axelor-config.properties(see Application configuration).
API Configuration
After the template application is installed, one more configuration is needed.
-
Go to the configuration of
Templateapp

-
Click on
Configure -
Config page:

In the application config of the app, two parameters are essential:
-
API URL: The URL of the Axelor Template API server, it is required to generate the documents. You can use https://template-api.saas.axelor.com/v1.
-
Download timeout (in seconds): The time limit for downloading a document. If the time of generation of your document is less than the limit then your document is directly downloaded. Otherwise, a notification informs you as soon as your document is ready and available for download.