Sales app configuration
Introduction
First, open Sales app page.
Path : Application config → Apps management → Sales, configure
Find global settings, valid for all companies on the Sales App page.
However, it's still possible to configure the settings by company in the Sales Config section, where the company files are located. Simply click on a company file to Path the company configuration page. Company configuration is useful when it's necessary to manage multiple companies.
Some configurations that may affect the Sales module, can be found in the configurations of other modules, such as Base or Supplychain modules.
Global configurations on the Sales App page
Various features are available on the Sales App page. Find out more about each feature and its impact below.
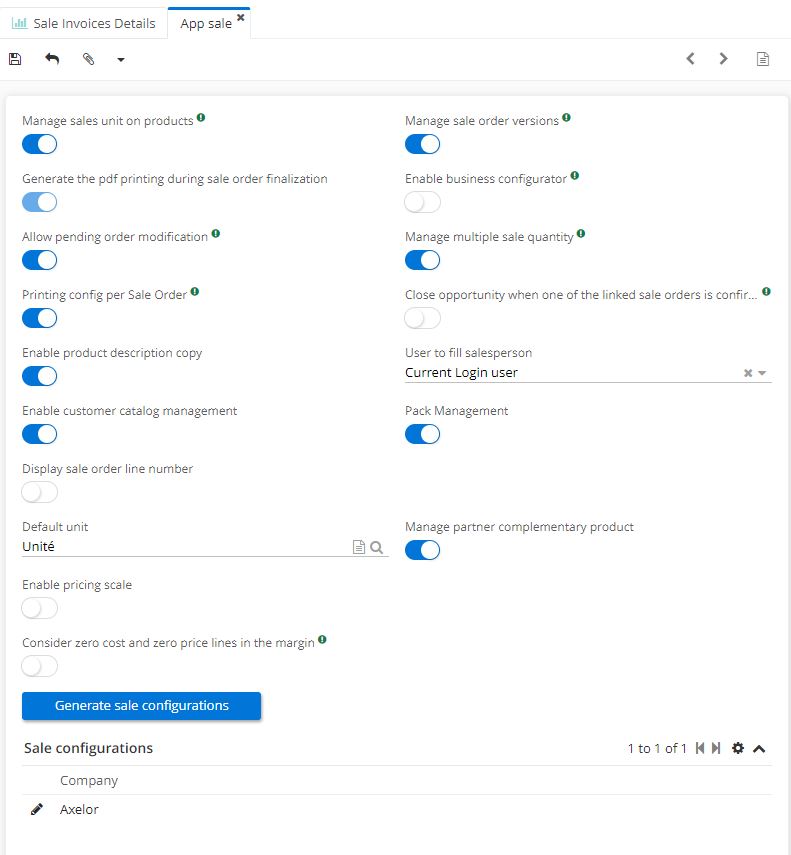
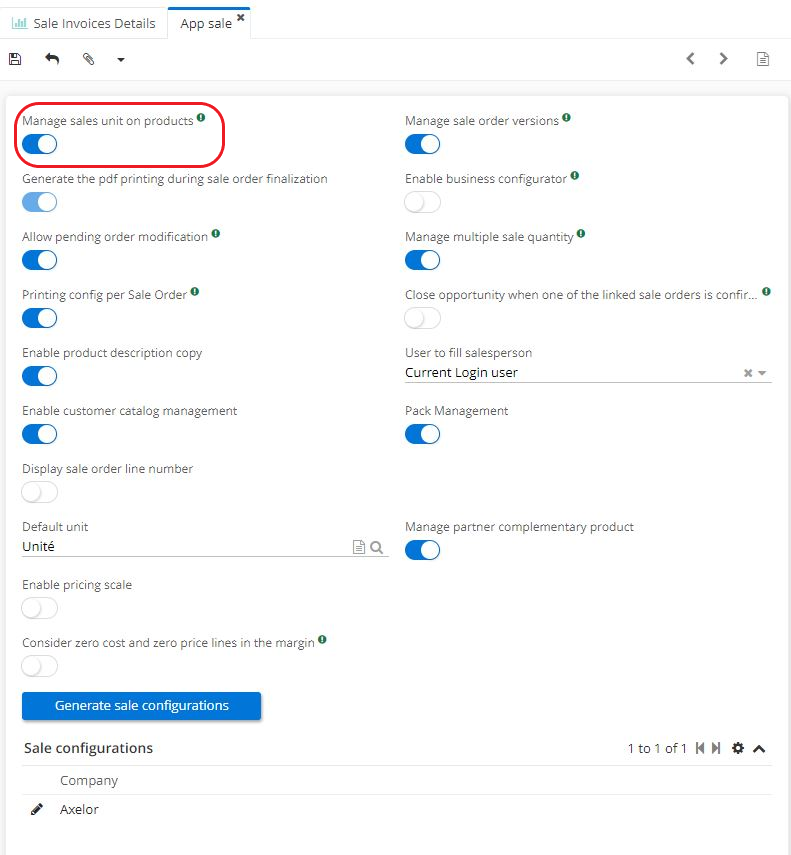
Manage sales units on products
When activating a feature, remember to click on the button Save changes. Then refresh browser to apply new settings. Pay attention to other open tabs in the AOS application, as they may be closed. If browser has not been refreshed, the changes will not be taken into account.
Path : Application Config → Apps management → Sales, configure → Activate “Manage sales units on products”
“Manage sales units on products” is a functionality that manages sales units. Sale units may differ from purchase / stock units. For example, one can buy products by the tonne and then sell them by the kilo. This way when placing an order, the selected product will be directly tied to its sales unit, thus avoiding conversion.
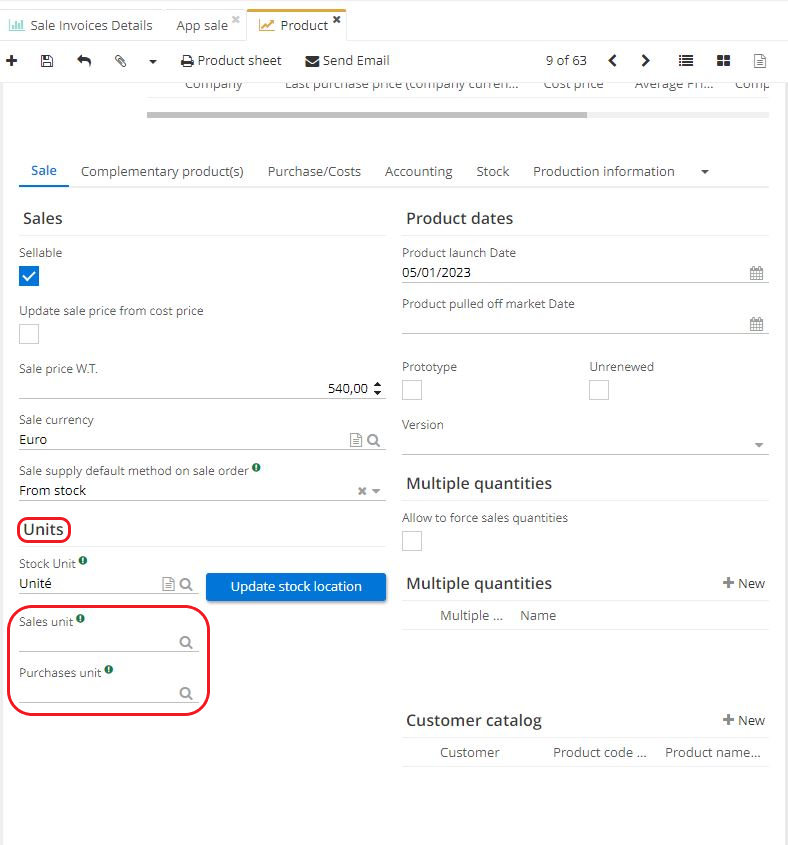
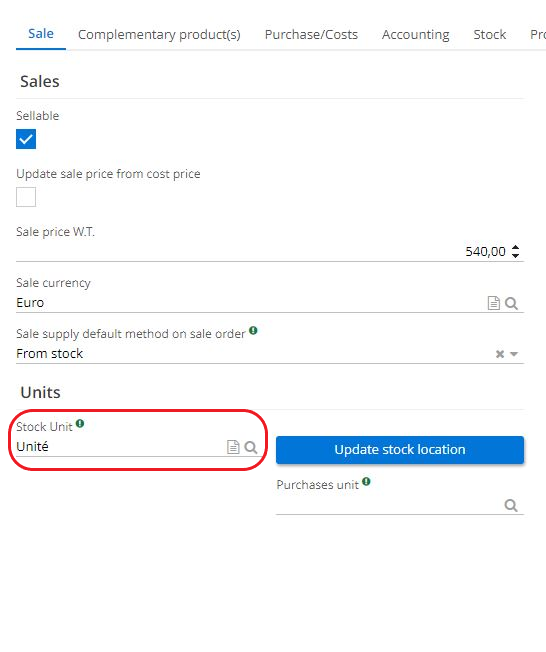
Activating this option will cause the "Sales unit" field to appear on the product file.
The stock unit is displayed by default. However, activate the functionality “Manage sales units on products” in order to display and apply sales units.
Once a sale unit is selected on a product file, it will be automatically taken into account by the system. Note that configured sale units on product files will be then automatically carried out on sale quotations and sale orders.
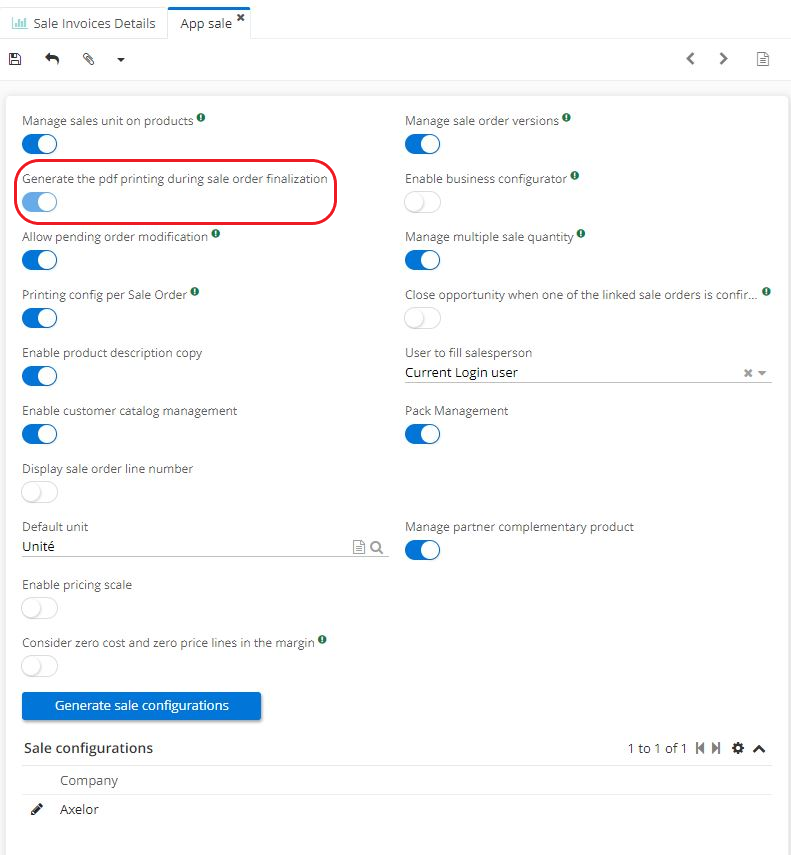
Generate the pdf printing
Path : Application Config → Apps management → Sales, configure → Activate “Generate the pdf printing during sale order finalization”
"Generate the pdf printing during sale order finalization" : when this option is activated, the system will automatically generate a pdf once a sale quotation is finalised. Pdf will be then stored in the document management system. To Path this pdf, click on the paperclip icon on the finalised sale quotation file.

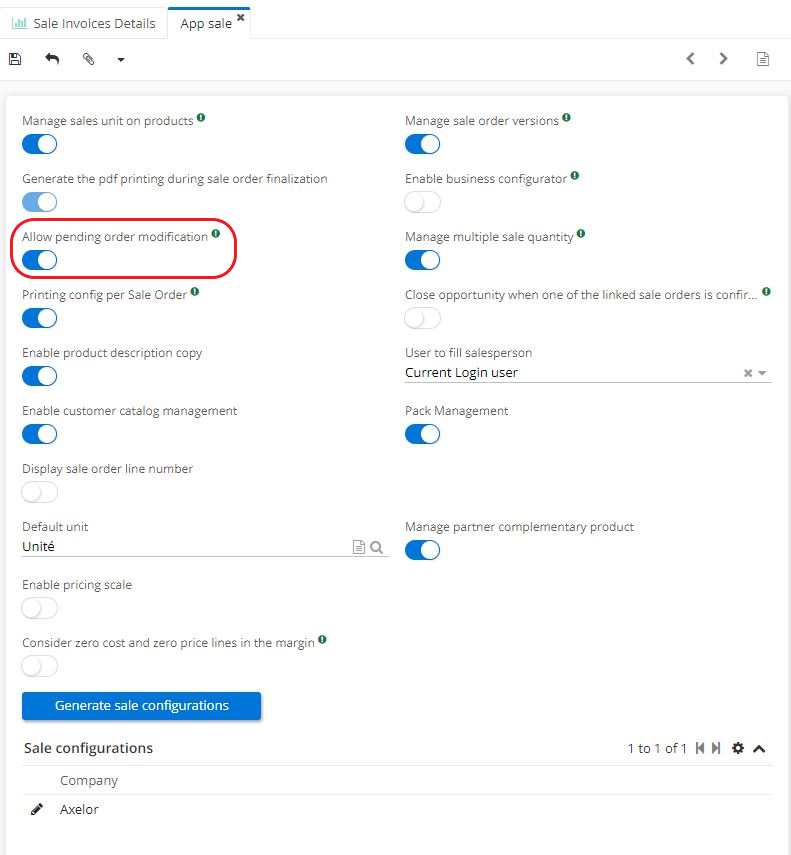
Allow pending order modification
Path : Application Config → Apps management → Sales, configure → Activate “Allow pending order modification”
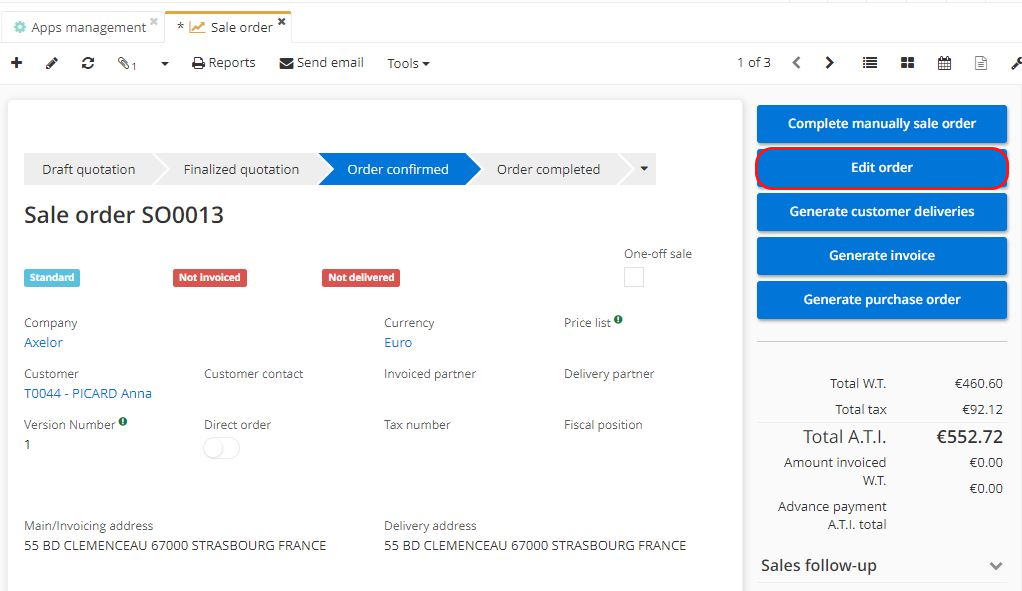
"Allow pending order modification" : this feature will allow to edit a confirmed sale order. Open a sale order file and then simply click on the "Edit order" button.
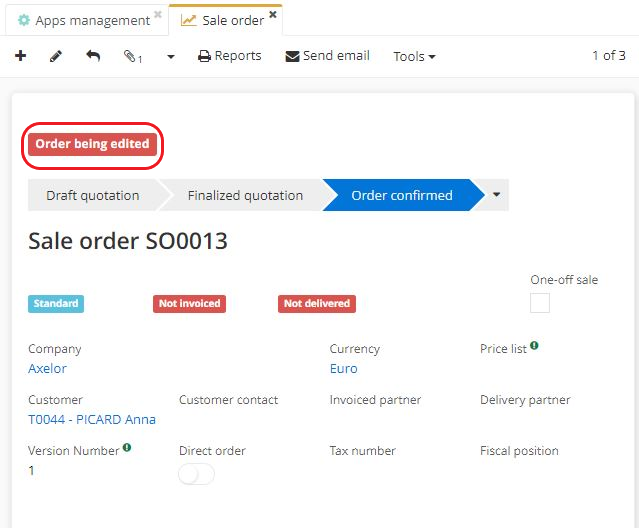
Click on the "Edit order" button, the order will be then labelled as an order being edited.
Printing config per sale order
Path : Application Config → Apps management → Sales, configure → Activate “Printing config per sale order”
If this feature is not activated, the default company settings will be applied.
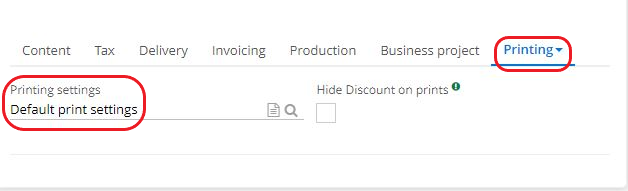
When enabled, this feature allows to configure the settings more specifically, directly on a sale quotation file / a sale order file, by using the new "Printing" tab. This tab appears on the sale quotation file / sale order file.
Then, on the sale quotation file / sale order file, click on the Printing tab and select printing settings other than default settings.
In order to be able to select these customised settings, they must be configured separately in Application Config → Technical maintenance → Printing setting. Or simply use search space and type "Printing settings".
Once the new parameters have been created, they will be selectable in the "Printing settings" field (Printing tab on a sale quotation file / sale order file).
A company's default print settings can be found in :
Application Config → Users/Company → Companies → open a company file → on the company file click on the Configurations tab.


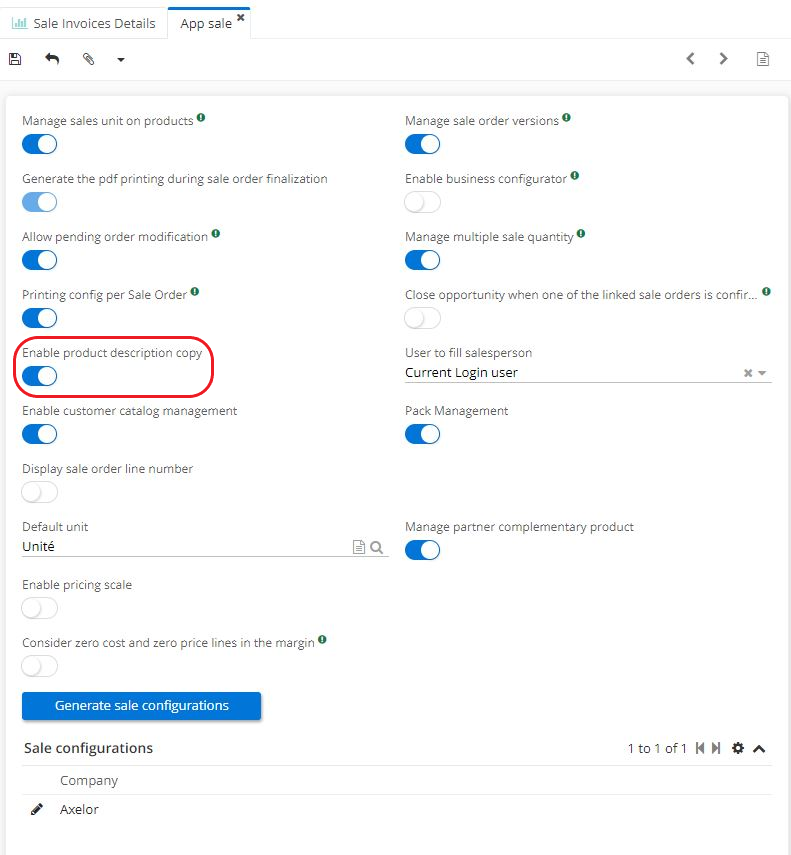
Enable product description copy
Path : Application Config → Apps management → Sales, configure → Activate “Enable product descritpion copy”
“Enable product descritpion copy” feature displays product descriptions.
"Description" and "Internal Description" can be found on a product file. These descriptions will be also displayed on a sale quotation file or a sale order file once the feature is enabled.
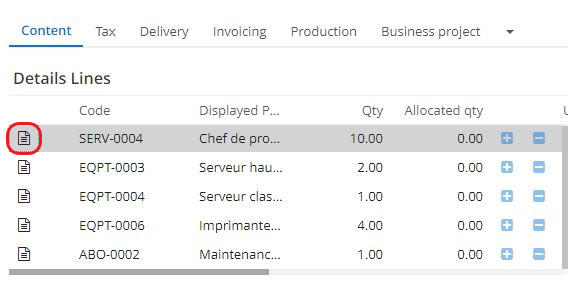
Product description will be visible on the product lines on a sale quotation / a sale order file (found in Detail Lines table, Content tab).
The product description will also appear when printing a pdf.

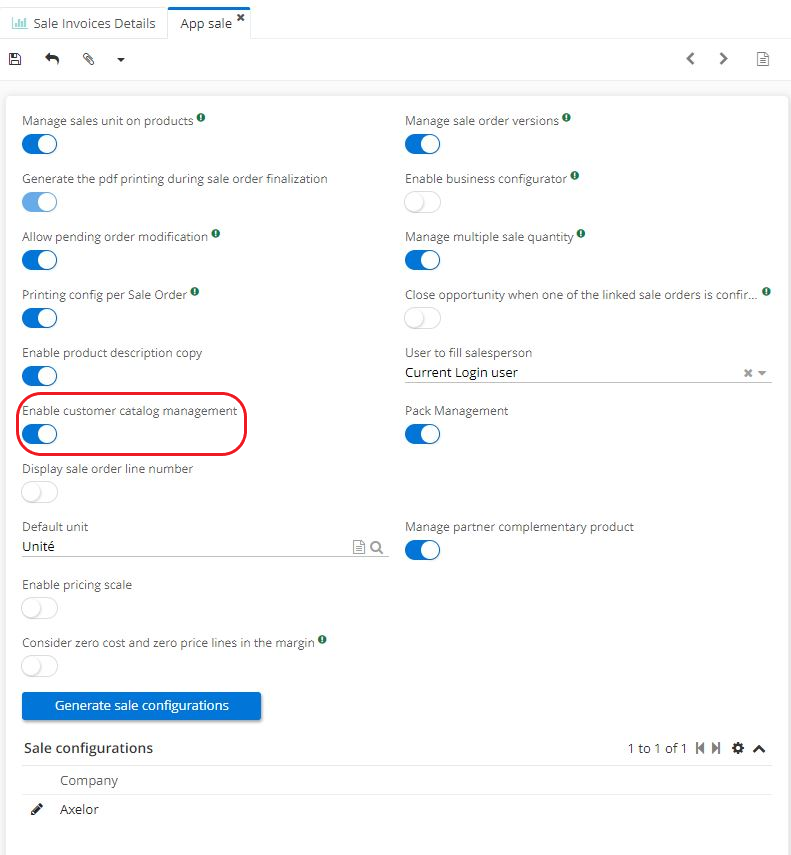
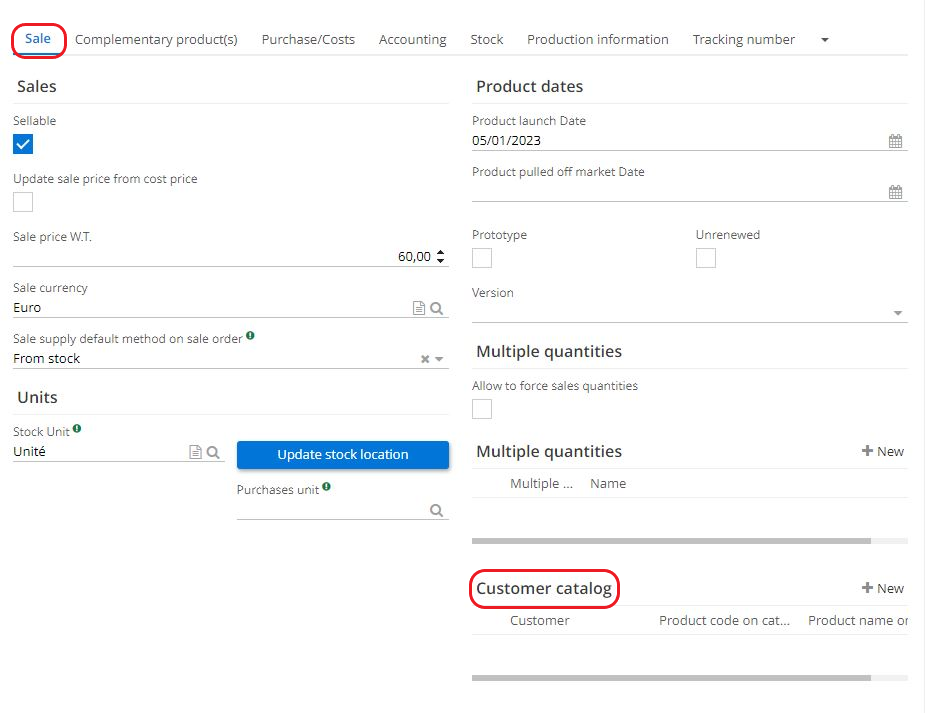
Enable customer catalog management
Path : Application Config → Apps management → Sales, configure → Activate "Enable customer catalog management"
"Enable customer catalog management" feature is used to indicate that certain products will have a different name for certain customers. This is useful when a product needs to appear on a sale quotation file with a particular name and code.
The customer catalog is visible and configurable in the Sales tab of a product file.
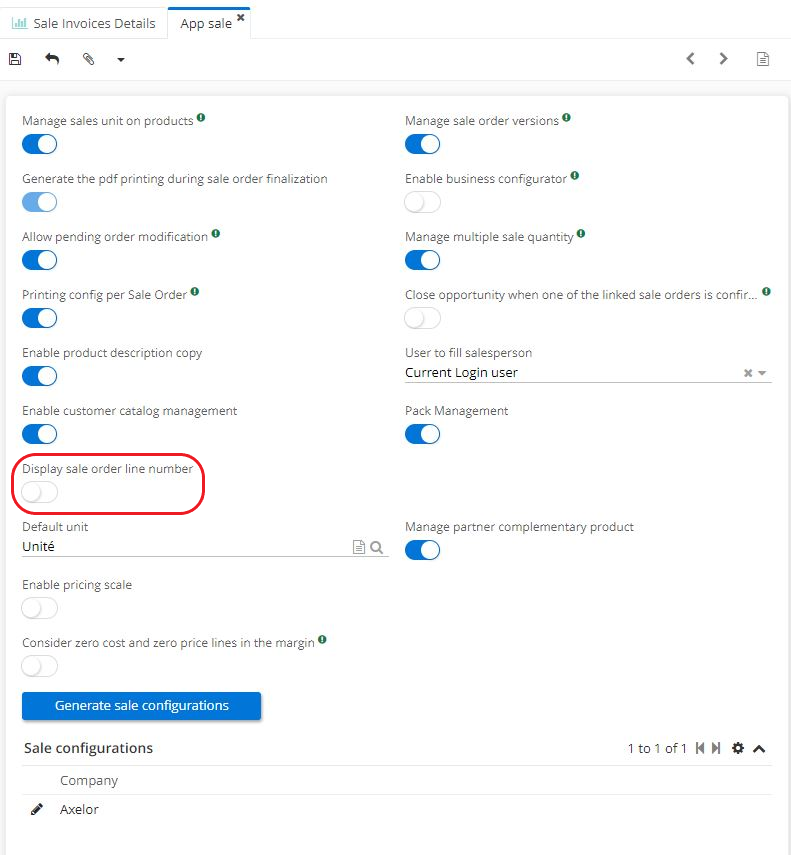
Display sale order line number
Path : Application Config → Apps management → Sales, configure → Activate "Display sale order line number"
When enabled, lines in Detail lines (Content tab) will be numbered on a sale quotation file or on a sale order file.

Default unit
Path : Application Config → Apps management → Sales, configure → fill in the field "Default unit"
Define the default sales unit. Default unit will be then displayed by default on a product file as "Stock unit".

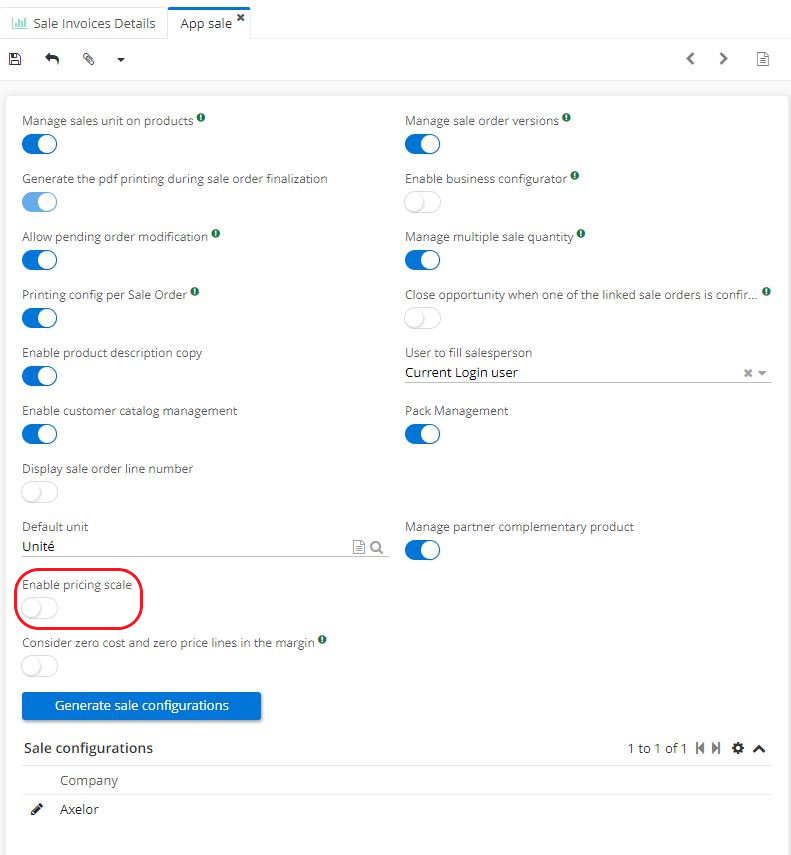
Enable pricing scale
Path : Application Config → Apps management → Sales, configure → click on "Enable pricing scale" in order to enable it
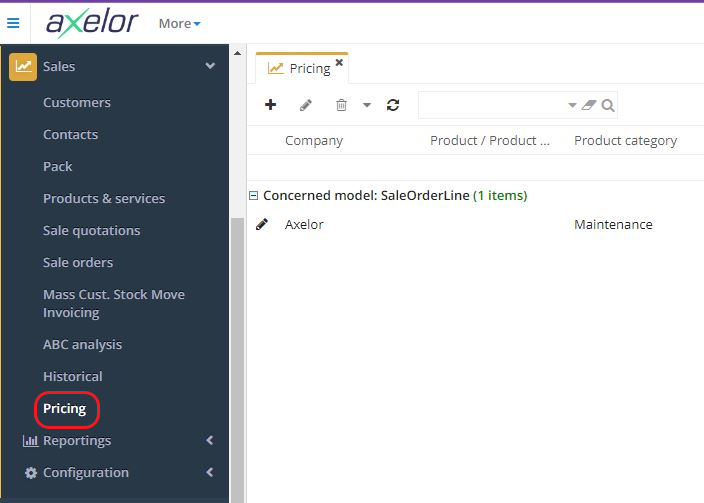
Once enabled, this feature makes appear a "Pricing" menu entry in Sales module. Pricing scale allow for calculating specific or complex pricing directly on sale quotations or sale orders.
Pricing scale perform calculations that cannot be handled by price lists.
Note that pricing scale require configuration.
Also, pricing scales manage pricing dynamically, i.e. using formulas (such as the automatic calculation of delivery costs based on the weight of the order).
Moreover, pricing scales allow for applying a mark-up rate when using certain criteria.
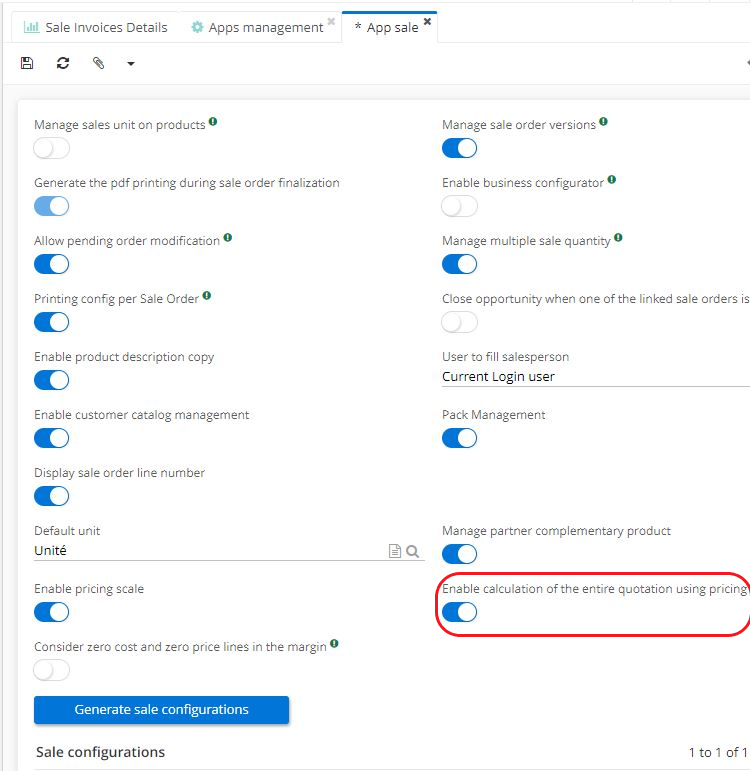
In addition, activating pricing scales will make appear the feature "Enable calculation of the entire quotation using pricing".
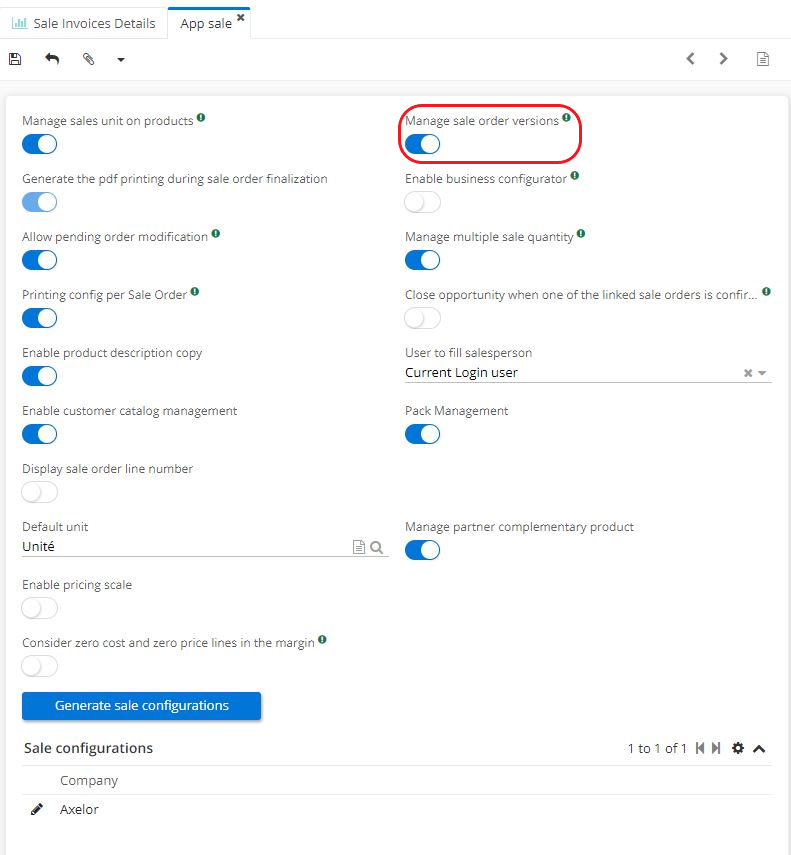
Manage sale order versions
Path : Application Config → Apps management → Sales, configure → enable "Manage sale order versions" feature
This feature is used for managing versions of sale quotations / sale orders.
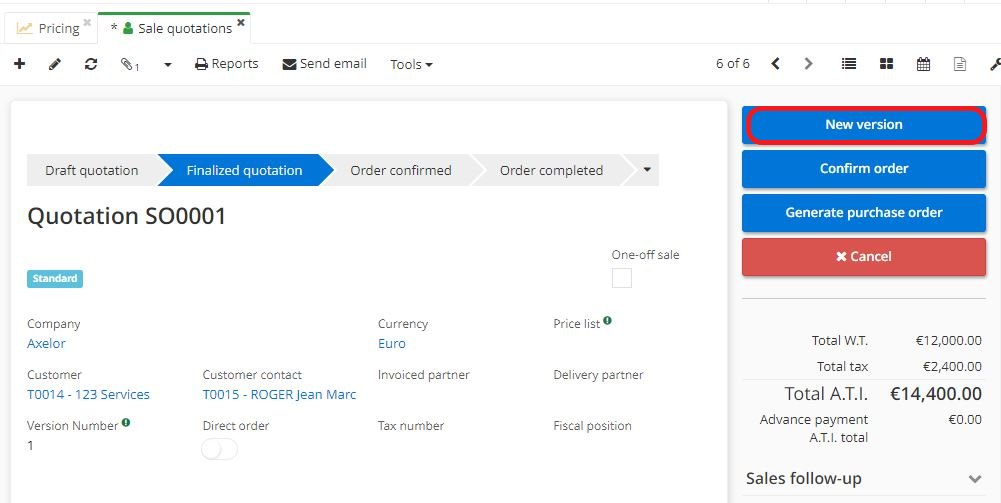
When a sale quotation or a sale order has status of "Finalized quotation", the "New version" button will appear.
-
This button allows to create different versions of a sale quotation.
-
A sale quotation file will always show a sale quotation version number.
-
On a new version, it's possible to modify the information and then finalise it as a new sale quotation.
-
The different versions are saved as pdf files. To view the versions, click on the paperclip icon containing the attached files at the top of the page.
Consult the versions for information purposes, however it's impossible to use one version rather than the other. In addition, it's impossible to re-use the versions (i.e. impossible to click on a version to automatically fill in the quotation form).

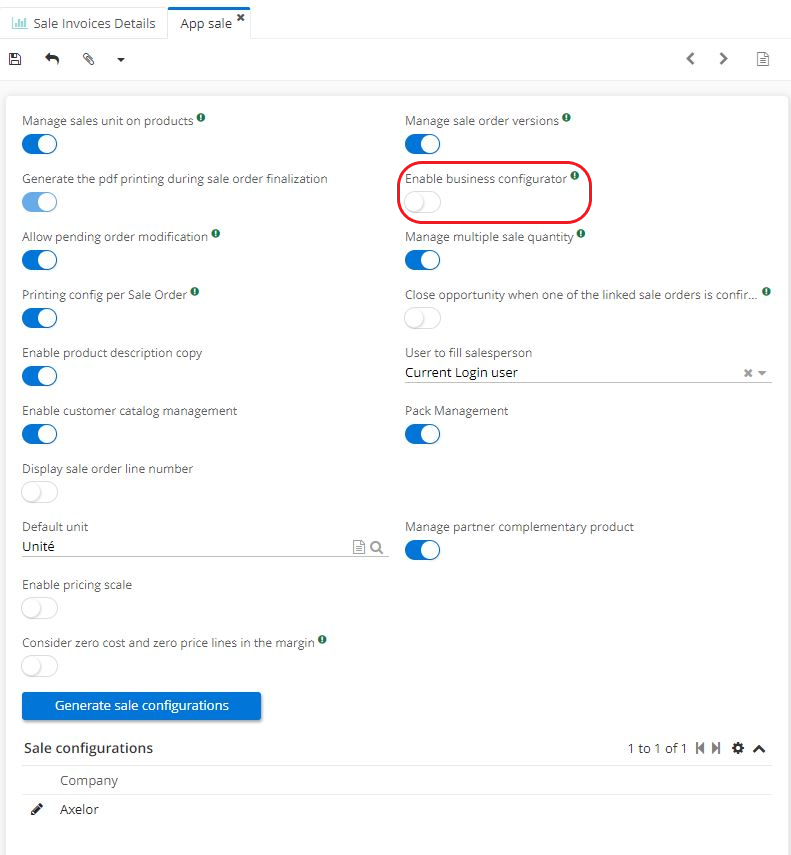
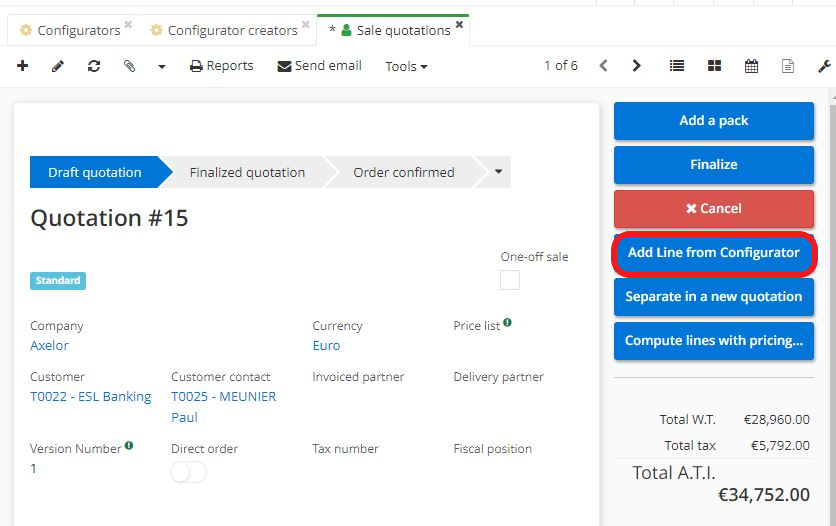
Enable business configurator
Path : Application Config → Apps management → Sales, configure → activate "Enable business configurator" feature
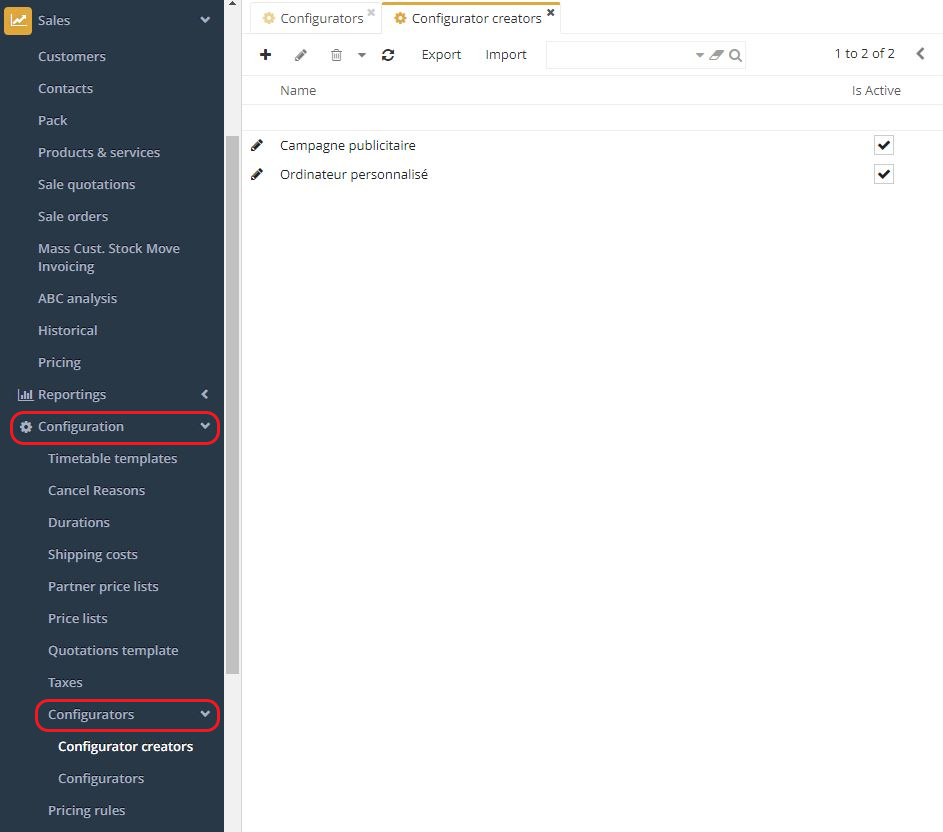
New menu entries are added, when sales configurators are activated (Sales → Configuration → Configurators → Configurator creator or Configurators).
Configurators allow sales staff to create customised products with different attributes and options.
Once a product has been created with a configurator, it becomes possible to add a line with a configurator by clicking on the "Add line from configurator" button on a sale quotation that has draft status.
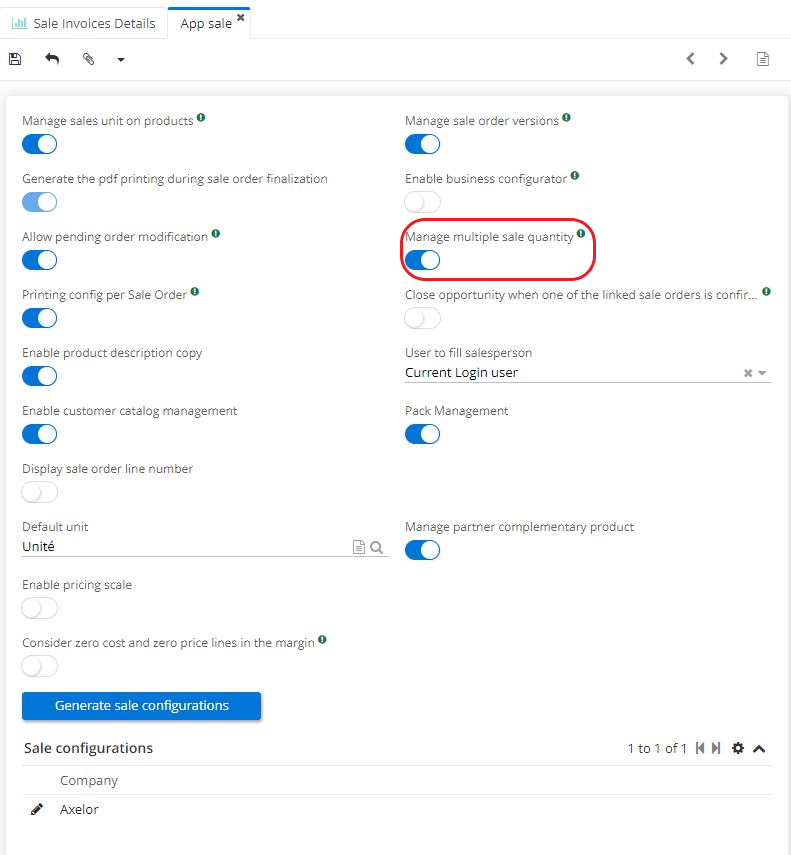
Manage multiple sales quantities
Path : Application Config → Apps management → Sales, configure → enable "Manage multiple sales quantity" feature
This feature is used for managing multiple sales quantities.
With this feature enabled, it's possible to indicate on a product file that this product can only be sold in certain multiples.
This means that if the selected quantity on a sale quotation / sale order lines is different, the line cannot be validated. As a result, the system notifies the user that the multiple quantity is not respected.
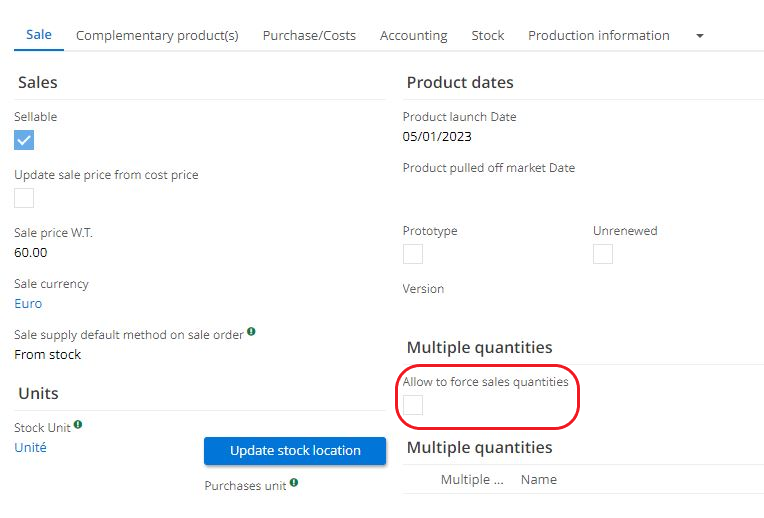
It is possible to authorise a user to force multiple quantities by ticking the "Allow to force sales quantities" box on a product file (Sale tab, Multiple quantities section).
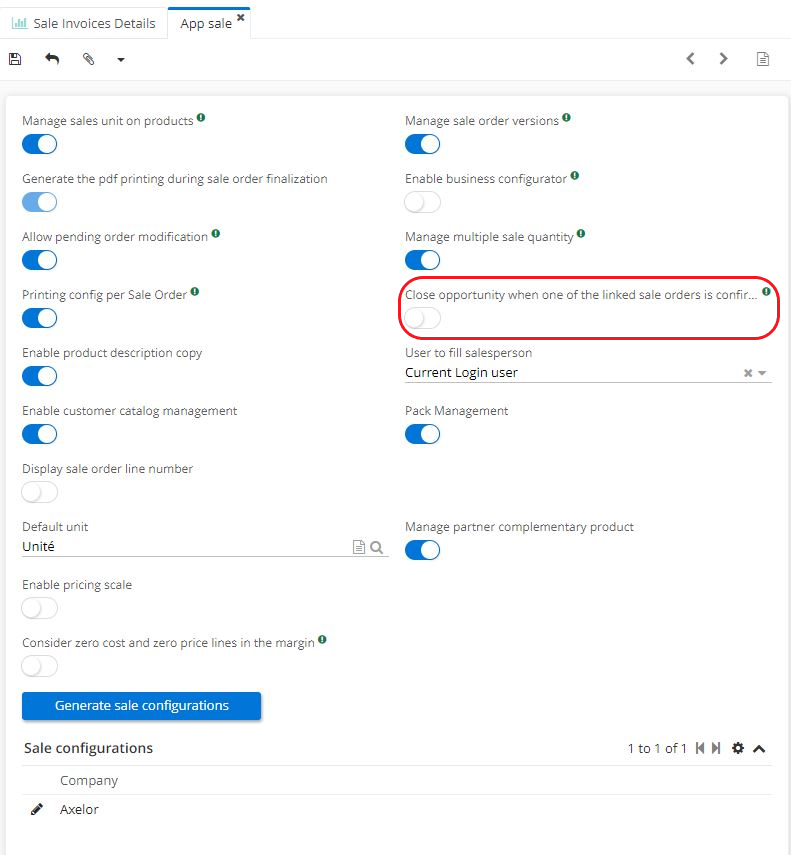
Close the opportunity when one of the linked orders is confirmed
Path : Application Config → Apps management → Sales, configure → enable "Close the opportunity when one of the linked orders is confirmed" feature
This feature allows for changing the status of the opportunity to "closed won", once the order linked to the opportunity has been confirmed.
When this feature is enabled, open CRM module and follow these steps :
-
Create a sale quotation from an opportunity (the quotation will be linked to this opportunity).
-
When this sale quotation is finalised and confirmed as a sale order, the confirmation of this order will close the opportunity.
-
Thereafter, the opportunity changes to "closed won" status.
User to fill salesperson
Path : Application Config → Apps management → Sales, configure → in the field "User to fill salesperson", select between "Current login user" or "User assigned to customer".
When creating a quotation, select who is assigned to it.
It's possible to assign a quotation to the active user (i.e. the logged-in user), or to an user who was assigned to a customer (i.e. the sales rep who is responsible for this customer and who is attached to the customer file).

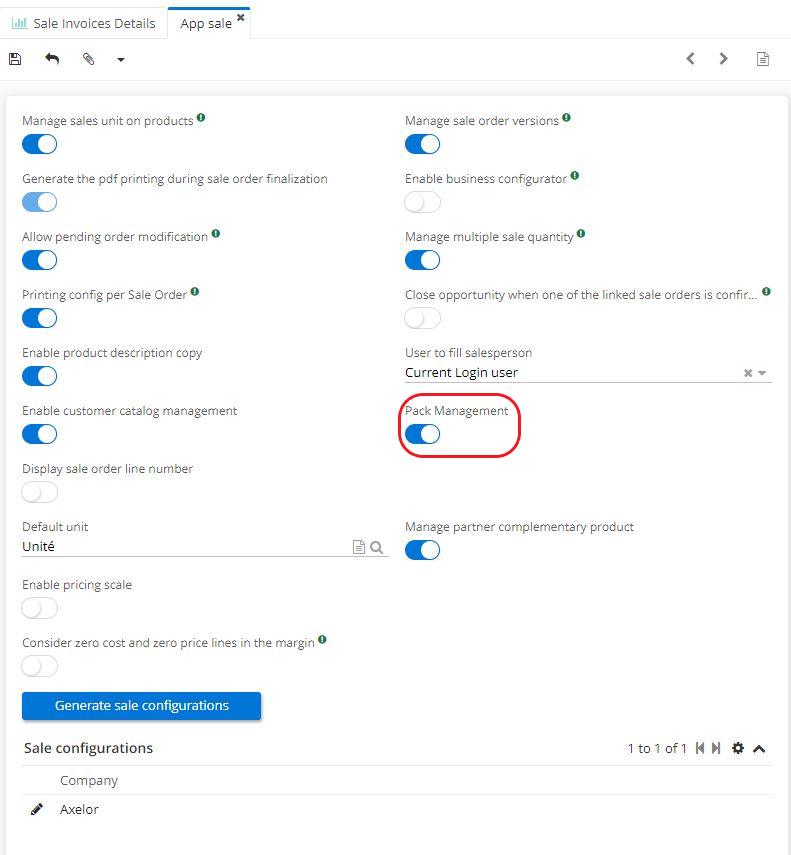
Pack Management
Path : Application Config → Apps management → Sales, configure → enable "Pack Management"
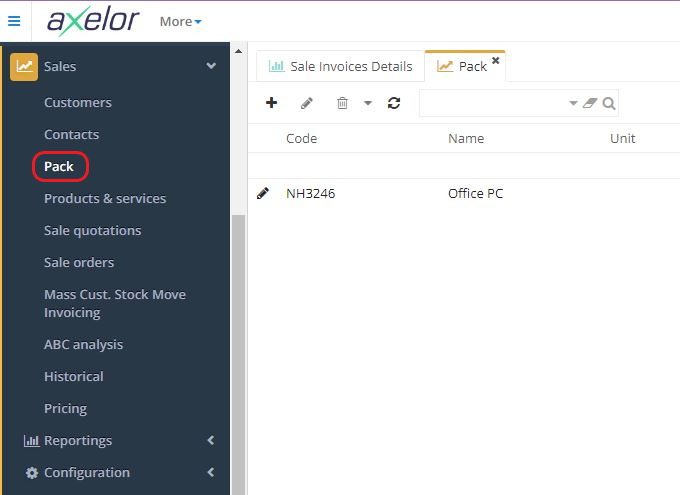
Activating pack management will add a "Pack" menu entry to the Sales module.
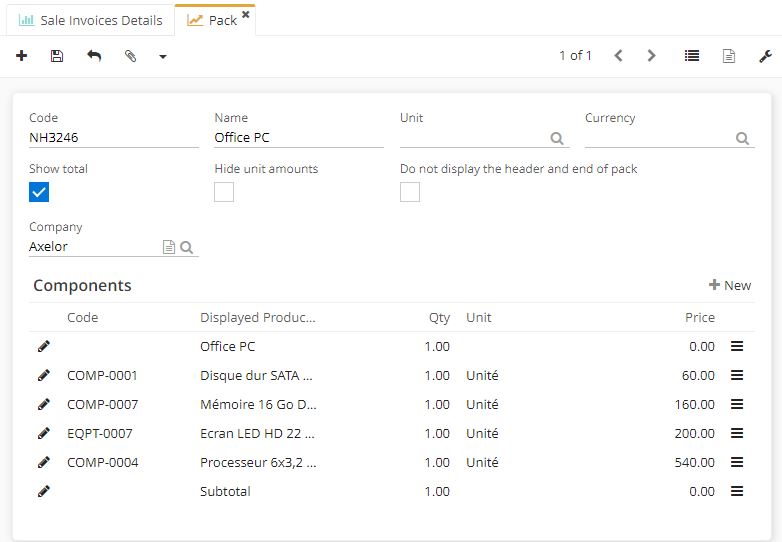
When using this feature, create product packs that contain different components.
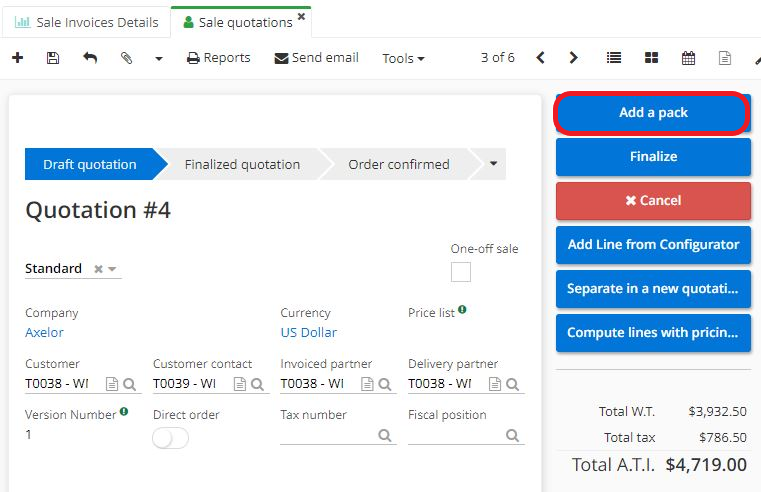
Once the packs are ready, add it on a sale quotation by clicking on the "Add a pack" button.
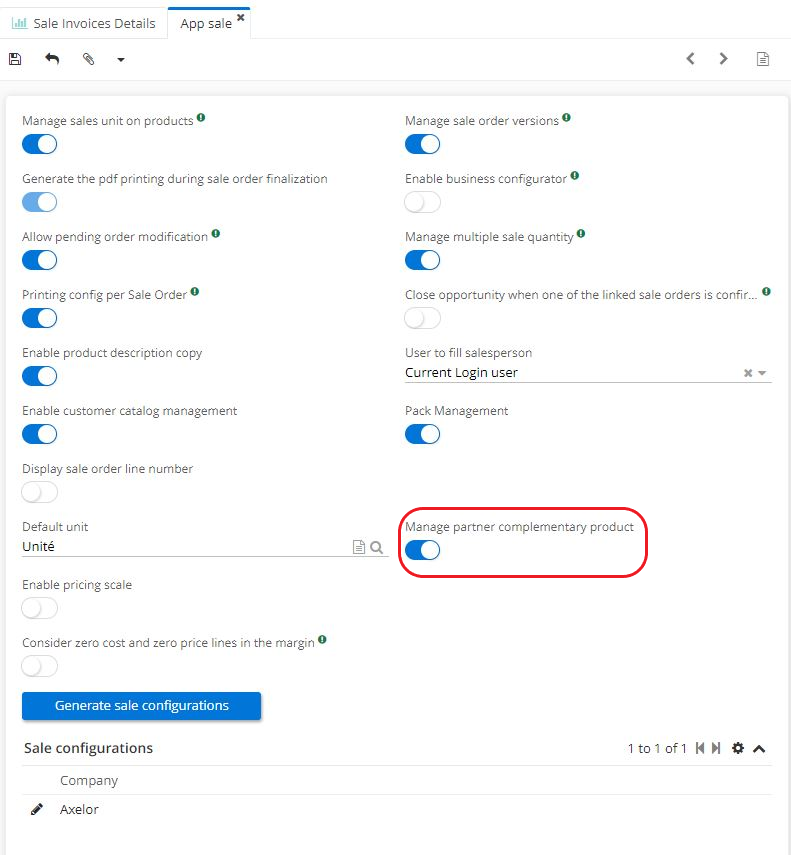
Manage partner complementary product
Path : Application Config → Apps management → Sales, configure → enable "Manage partner complementary product"
The feature "Manage partner complementary product" helps to manage complementary products by customer.
In other words, this feature helps to configure additional products only for certain customers; in addition, complementary products will be added to a sale quotation / a sale order of certain customers automatically.
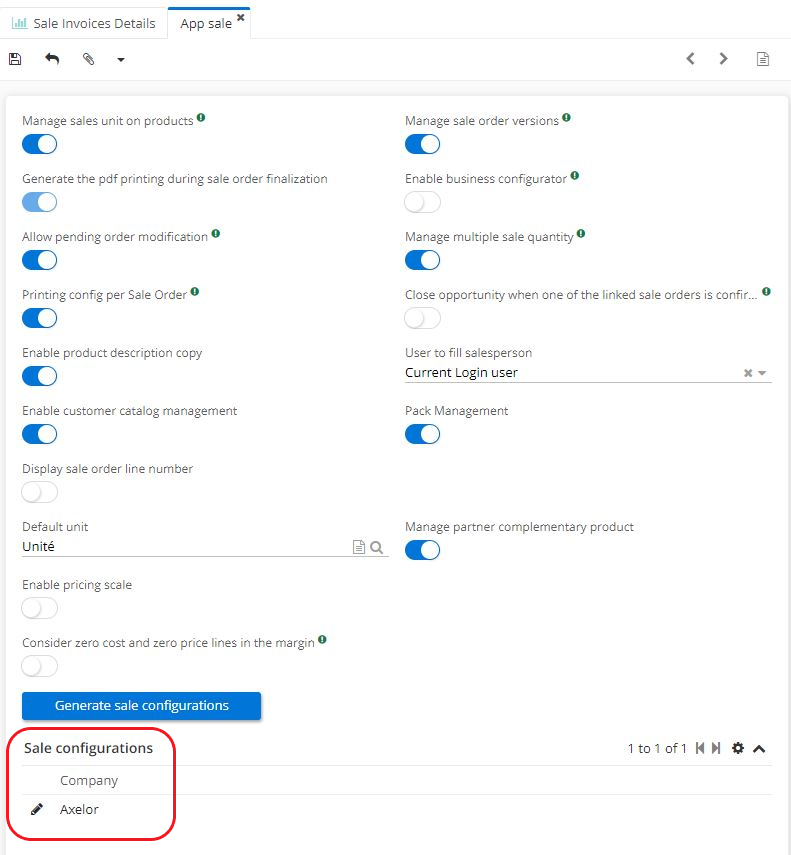
Sales configuration by company
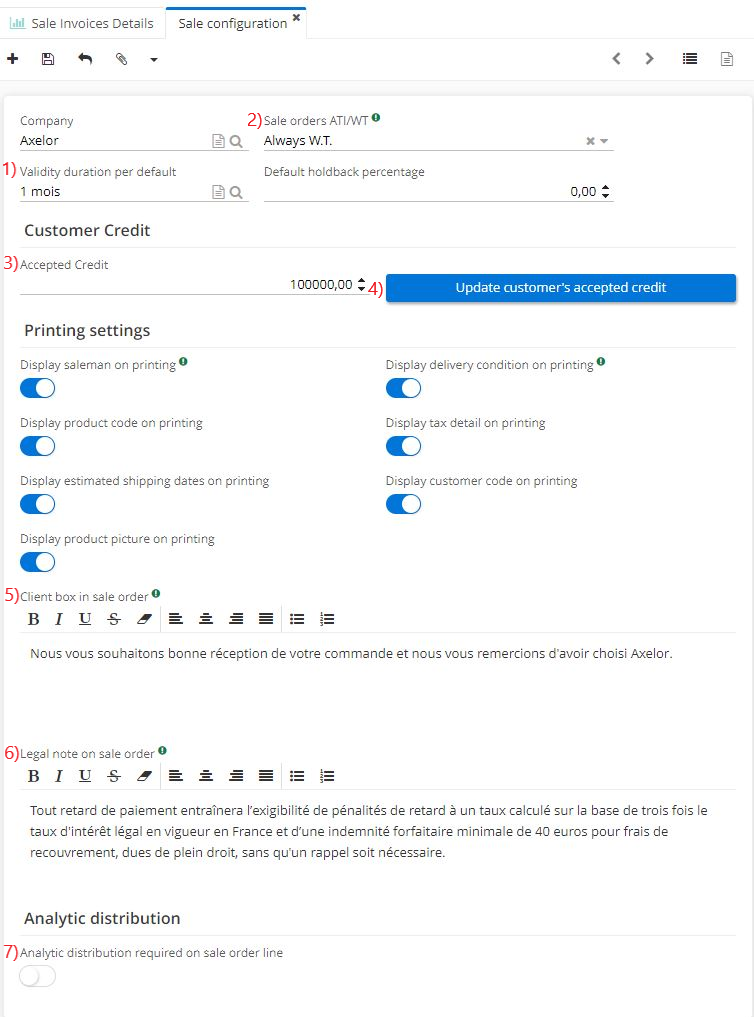
Path : Application config → Apps management → Sales, configure → on the Sales App page, in the Sales configuration section, click on the company file to Path Sales configurations page by company.
-
Field "Validity duration per default": use this field to define the default validity period for sale quotations (1 month / 15 days / 2 months / 6 months etc).
-
Field "Sale orders ATI/WT": select between "Always W.T." / "Always A.T.I." / "W.T. by default" / "A.T.I. by default"
Note that "W.T. by default" and "A.T.I. by default" options leave room for modyfing a price. It can still be modified on a case by case basis by using a checkbox.
- Customer credit and Accepted credit.
-
The amount of accepted credit is applied by default once it has been defined on Sales Configurations page by company.
-
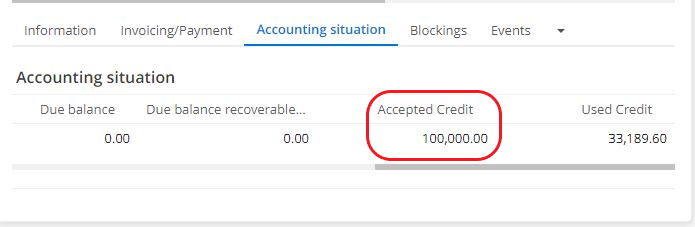
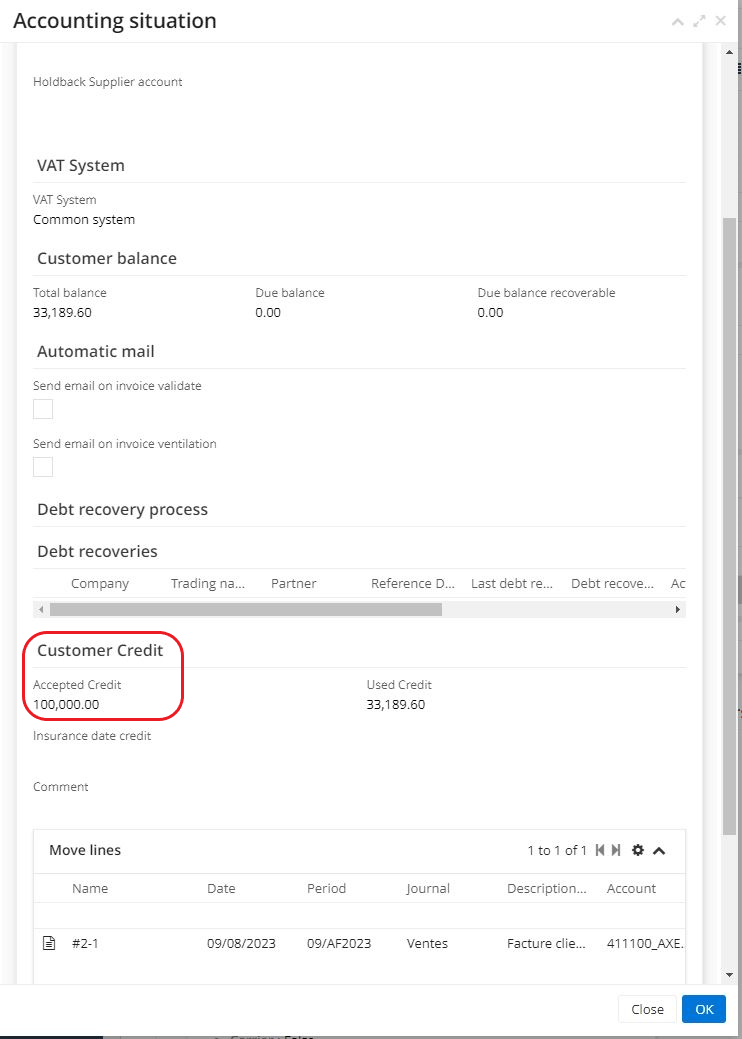
"Accepted credit" can be found on a customer file in the "Accounting situation" tab.
Open a customer file → then, click on Accounting situation tab → then click on a company file found in the table.
When clicking on the company file, it becomes possible to view all Customer credit information. Accepted credit, Used credit and Insurance date credit are visible in this section.
- On the Sales Configurations page, click on the "Update customer's accepted credit" button in order to update the amount of accepted credit on all files.
Next, still on the Sales Configuration page for a company, define the printing settings.
-
Client box in sale order : add a text that can be printed on a sale quotation or a sale order. It's equally possible to add images.
-
Legal note on sale order: add legal information that will appear at the bottom of a sale quotation / sale order.
-
Analytic distribution required on sale order line: by activating this option, the system will require a cost breakdown model (analytic distribution model) on the sale order lines.