Sale quotation
Methods of creating a quotation and a sales order
There are several ways of creating a sale quotation:
-
Create a new quotation from the Sale quotation menu;
-
Duplicate an existing quotation / order;
-
Use the quotation templates;
-
Create a quotation via CRM-Opportunities / customer file / prospect file;
-
Create a quotation via Job Costing.
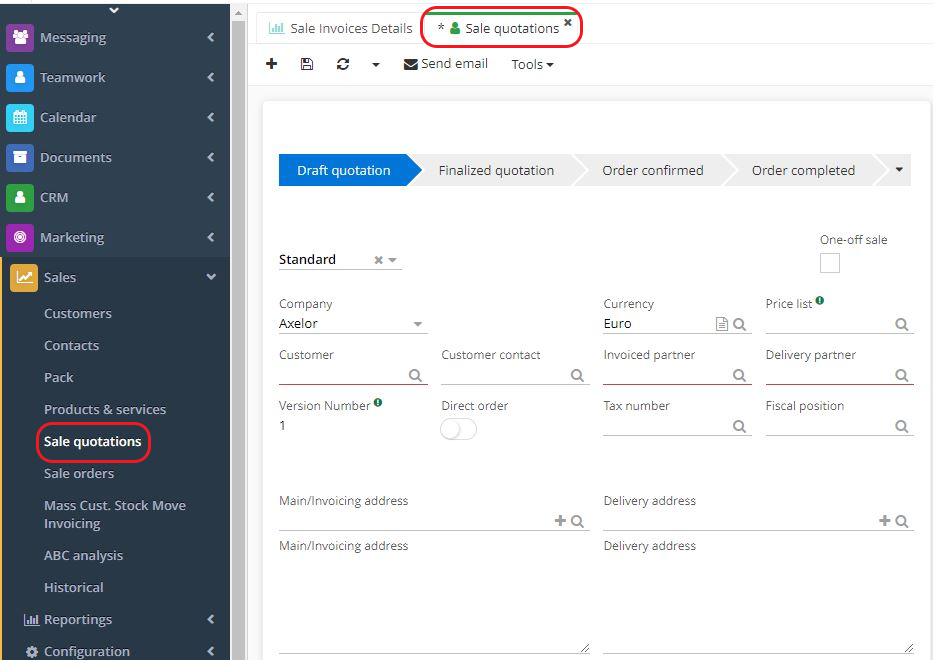
Path: Sales → Sale quotations → New
Another path : CRM → Customer follow-up → Sale quotations → New
-
Create a new quotation from the Sale quotation menu by clicking on +New.
-
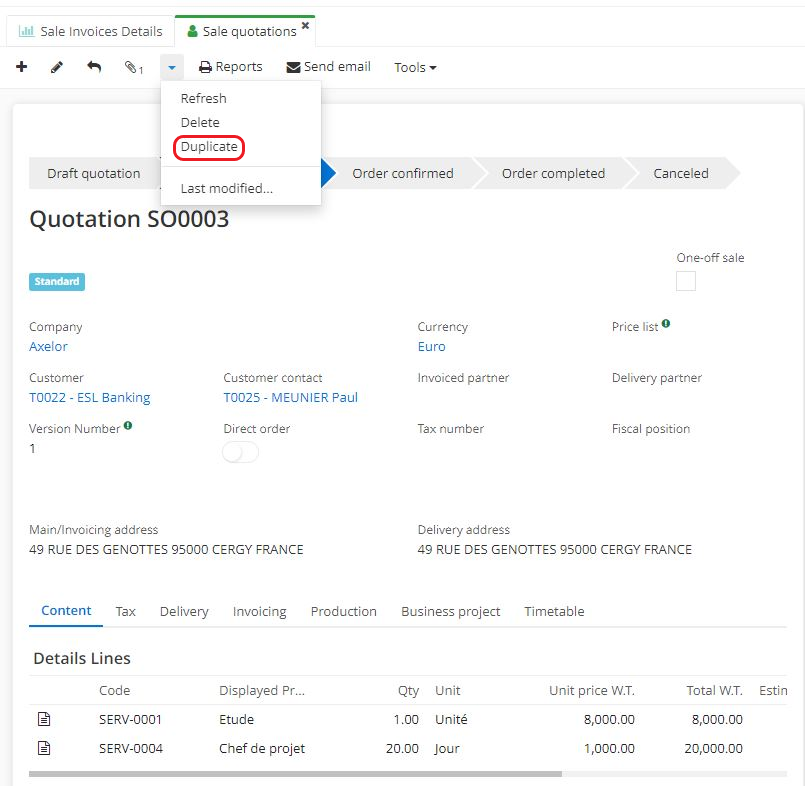
Or, duplicate a quotation: duplicate an existing sale quotation or an existing sale order.
Duplicate: open a quotation file. At the top of the page, click on the triangle icon to open the drop-down menu. Among the suggested actions, click on "Duplicate".
Duplicate sale orders in the same way.
This action will create a sale quotation in draft status which will include the information from the original sale quotation/sale order. The information on the duplicated quotation with draft status is completely editable.
Quotation templates
Path : Sales → Configuration → Quotations templates
Quotation templates are useful when you often use the same type of quotation for your customers. Information will be automatically pre-filled in according lines and fields (sale order lines included), which could be a time saver.
-
On a Template form, in the "Customer information" tab, fill in the details of the customer for whom you wish to create a quotation template. Next, fill in the other information (assigned salesperson, team, etc.) on the "Other information" tab. However, note that this information can be filled in directly on the sale quotation.
-
Next, click on the "Create order from this template" button to create a quotation.
-
Once you have clicked on the button, enter the currency and select the price list on the Estimate Creation tab.
-
The draft quotation has now been created. The content defined in the template can be modified. Add or delete lines.

Creating a quotation from an opportunity file / customer file / prospect file
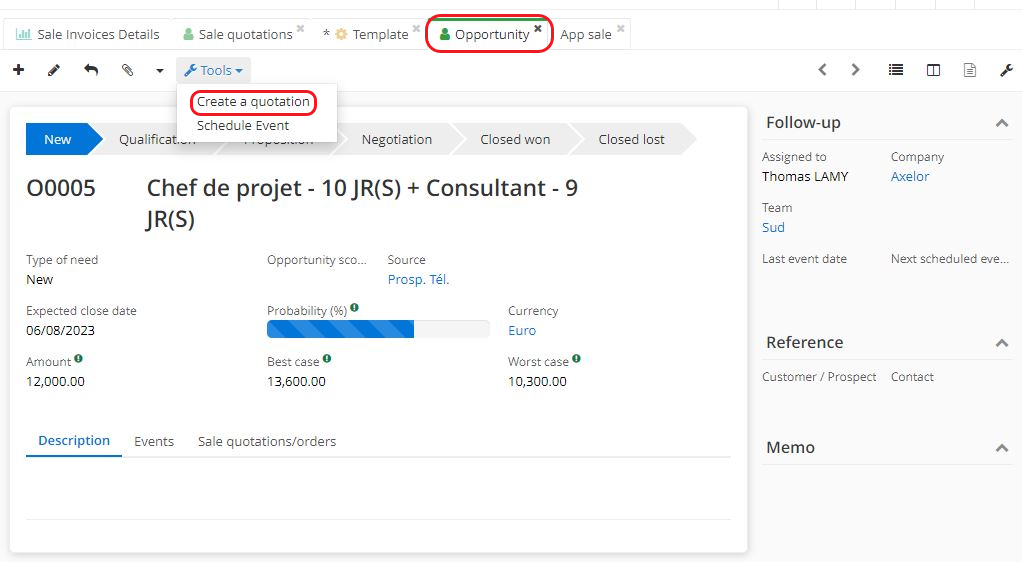
Path : CRM → Opportunities → open an Opportunity file or create a new one
-
Click on "Tools" in the toolbar at the top and click on "Create a quotation".
-
If you click on "Create a quotation", this quotation will be attached to the opportunity / customer / prospect file.
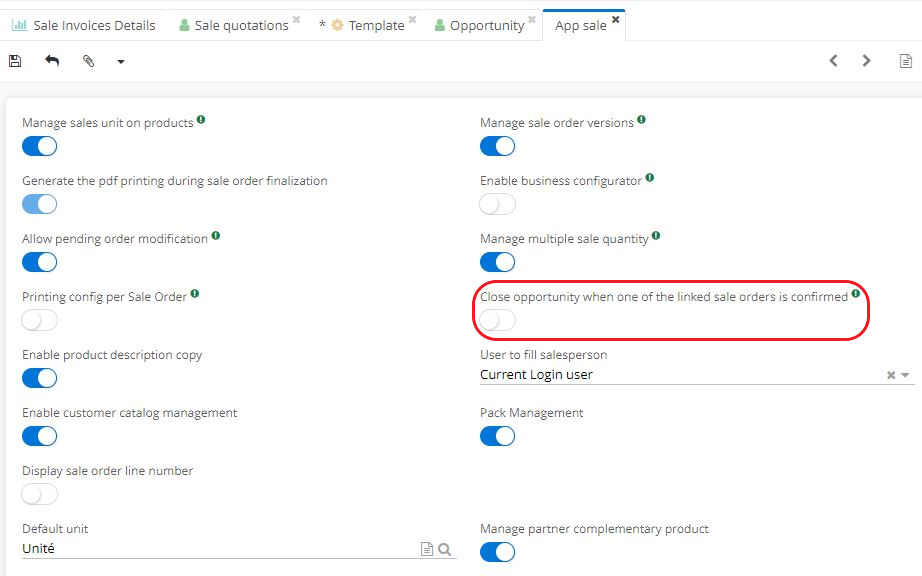
The opportunity automatically changes status to closed-won if the configuration "Close the opportunity when one of the linked sale orders is confirmed" in the Sales module configurations is activated (i.e. as soon as a quotation is attached to an opportunity and transformed into an order).
Path : Application Config → Apps management → Sales, configure → activate the feature "Close the opportunity when one of the linked sale orders is confirmed".
Customer files and prospect files can also be used to create new quotations.
Job costing
Path : Job costing → Business projects
-
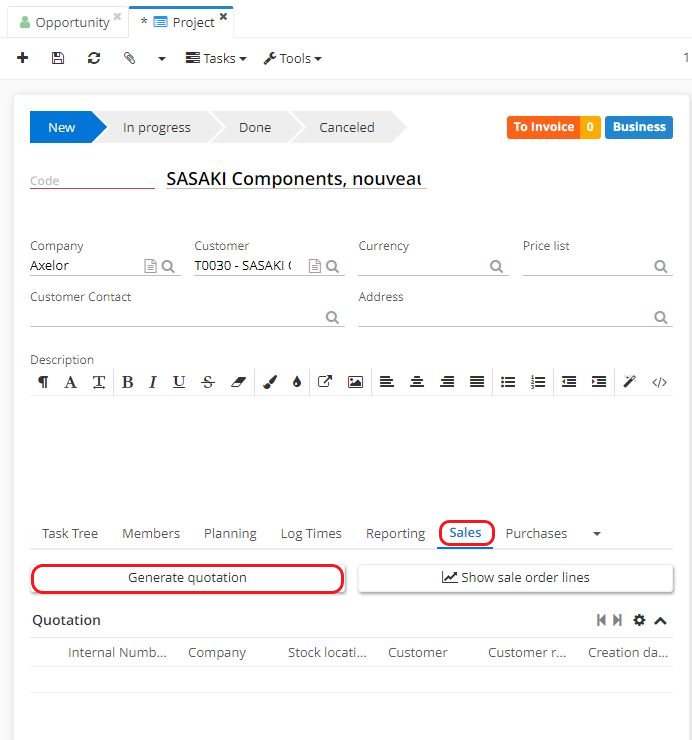
On a Business project file, click on the Sales tab.
-
On this tab, click the "Generate a quotation" button.
Creating a new Sale Quotation
Path : Sales → Sale quotations → New OR open CRM → Customer follow-up → Sale quotations
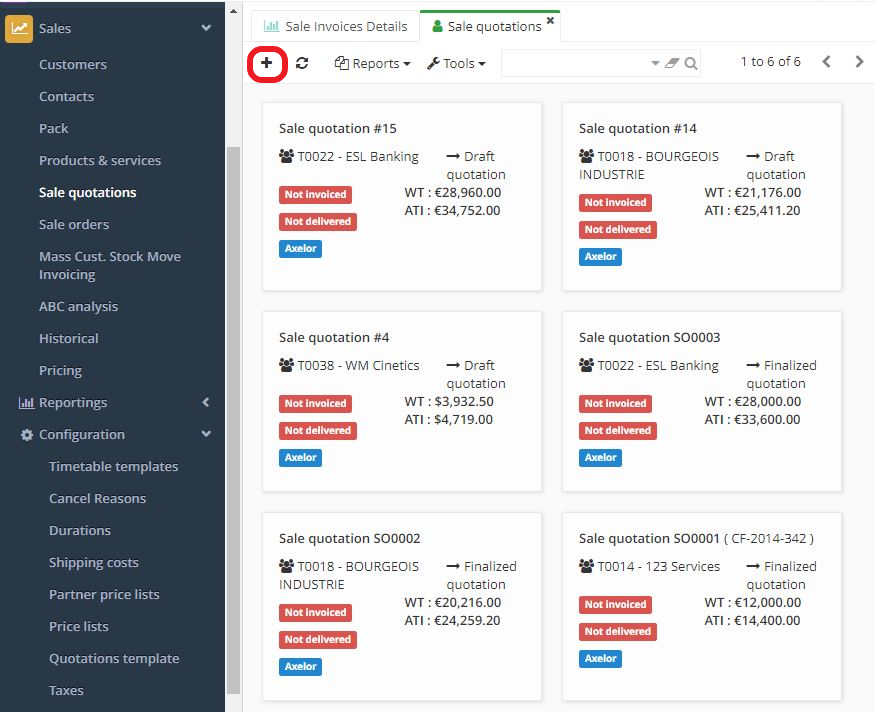
Click + to create a new sale quotation.
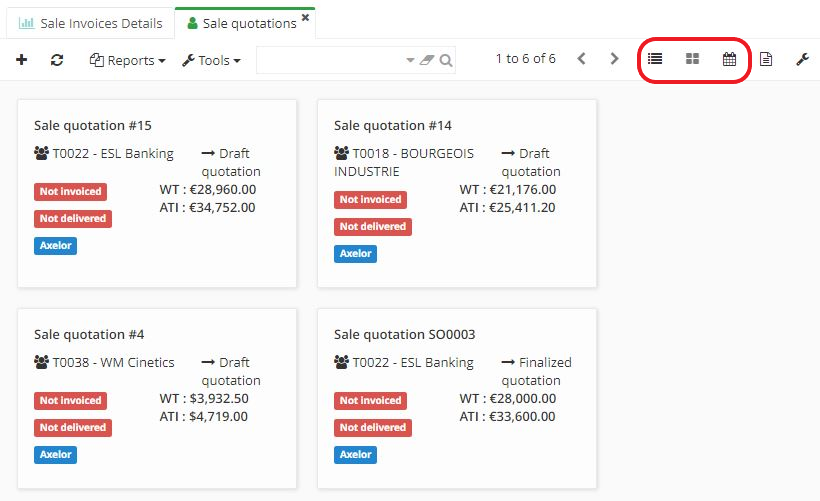
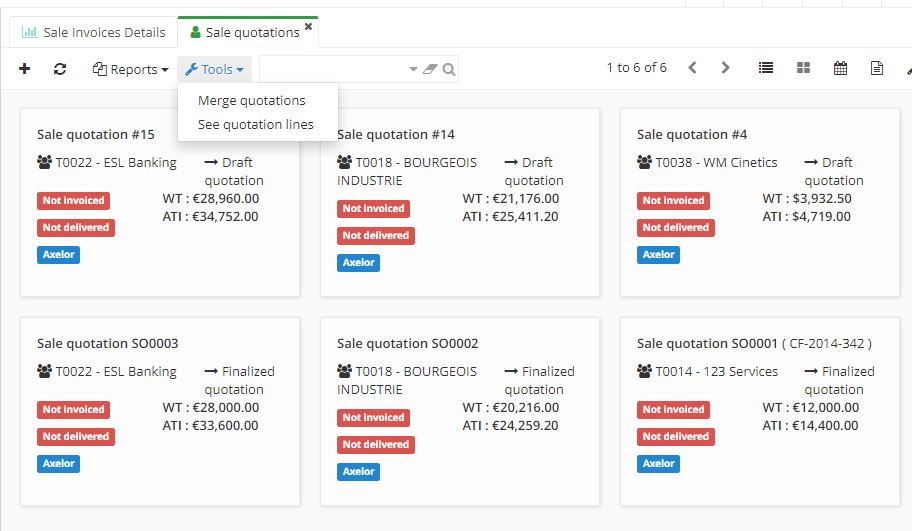
Types of view
Select between different types of view : list, card or calendar.
Please note that it's possible to customise the quotation list view. It's also possible to modify the columns and use filters or groupings to display the data you want.
Change the type of view (list, card or calendar) by clicking on a corresponding icon at the top of the page that contains the list of Sale quotations.
When using the list view, finalised quotations with a validity date that has passed, will appear in red.
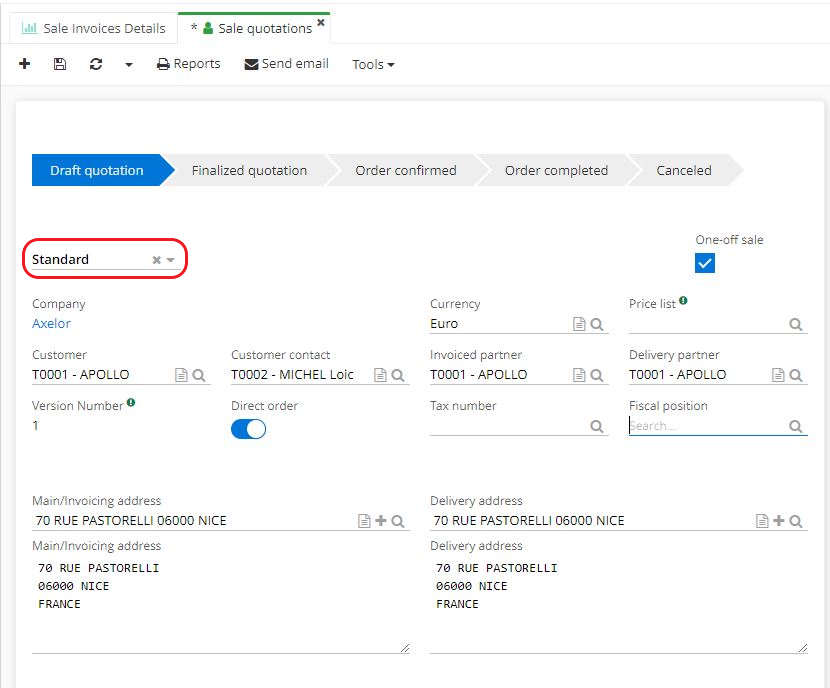
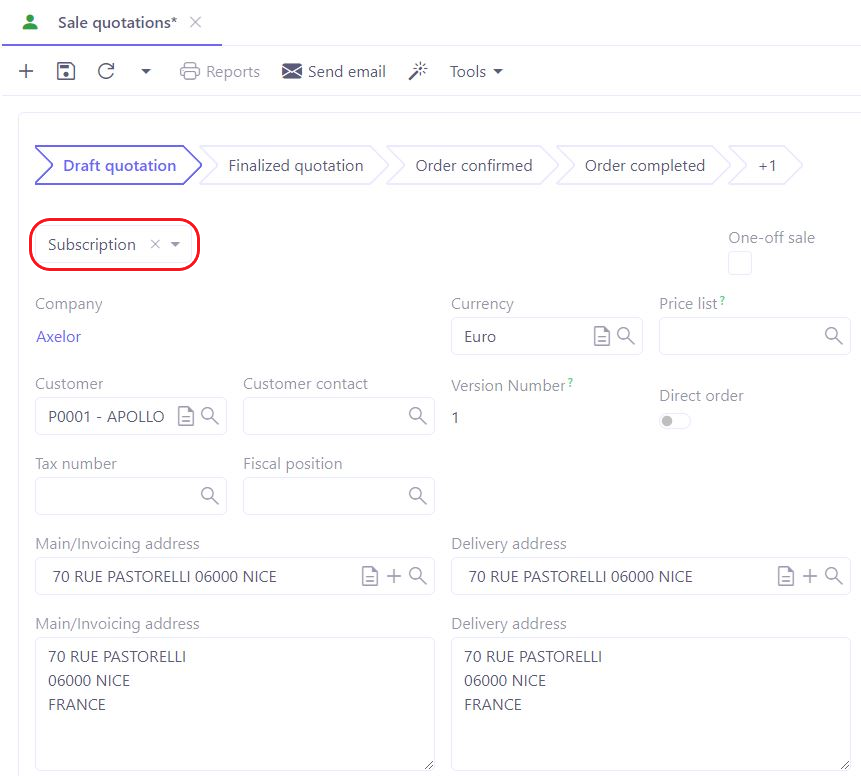
Types of quotations (standard and subscription)
- Select the type of quotation:
-
Standard quotation: for one-time services, choose a standard quotation.
-
Subscription quotation: use it for subscription-type services that require recurring invoicing.
-
Enter company details (particularly useful in the case of multiple companies). By default, the system indicates the user's active company.
-
Select a customer: when selecting a customer, the information in the customer file will be automatically retrieved in order to fill in the corresponding fields on the quotation form.
-
Customer contact: attach a contact if necessary, to the "Customer contact" field.
-
The currency is automatically retrieved from the customer file. Select a price list if there is a need to apply specific rates for this customer. If a price list is attached to the customer, it is automatically selected on the sale quotation.
-
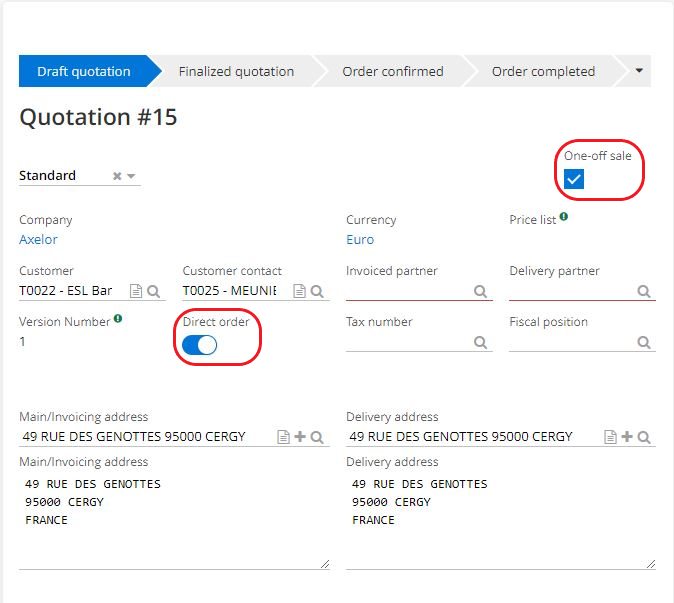
The "one-off sale" box: this box is useful when calculating requirements in order to indicate that certain sales are exceptional. It helps to prevent the requirements calculation from taking them into account. This ensures that forecasts are not distorted by exceptional sales.
-
The "Direct order" option: if enabled, this option indicates that the order will be a "Direct order". It becomes possible to ship from a stock location other than that of the company. In other words, the order can be sent to the customer directly from the supplier.
Once this option has been activated, select a stock location of the "Backorder" type in the delivery tab (it is necessary to create such stock location beforehand in Stock management → Stock Locations). It is not necessary to complete this field at the sale quotation stage, however it will be necessary once the sale order has been confirmed to generate a delivery note.
This stock location must be usable for sales and it must be defined as "countermark location" (on the stock location file).
For more information, consult the existing documentation on stocks.
Create a quotation line
-
On the Quotation form, click on the Content tab.
-
In the "Detail lines" table, click on +New to add new quotation lines.
-
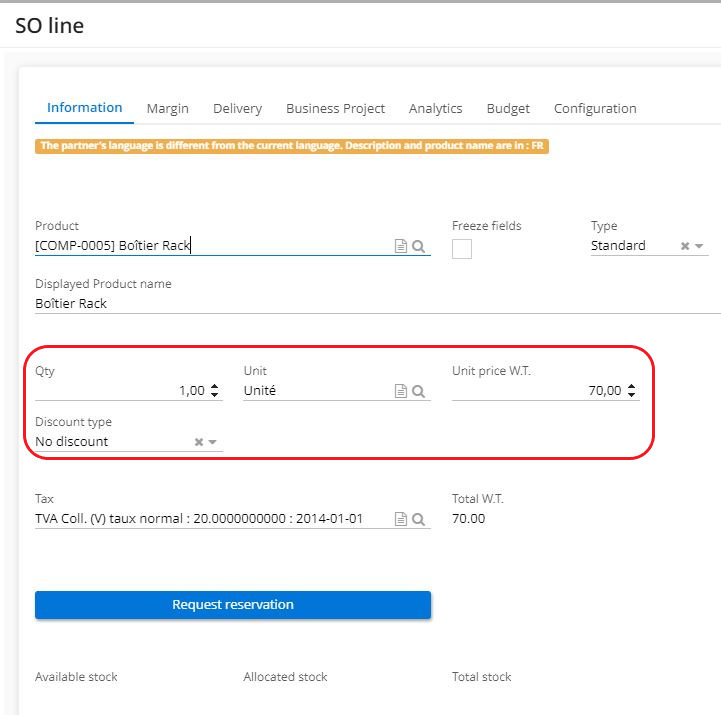
Click to add a new line. Next, a "sale order line" page will open. Multiple fields are available on the page :
-
Standard type: allows to add Products to the "Product" field.
-
Title Type: is used to create title lines in order to add titles, for example product categories ("Processor").
-
Select a product. The information on the tab will be filled in automatically.
-
If the product is attached to a price list, the prices will be filled in, taking into account the negotiated rates.
For more information, consult the documentation on price lists.
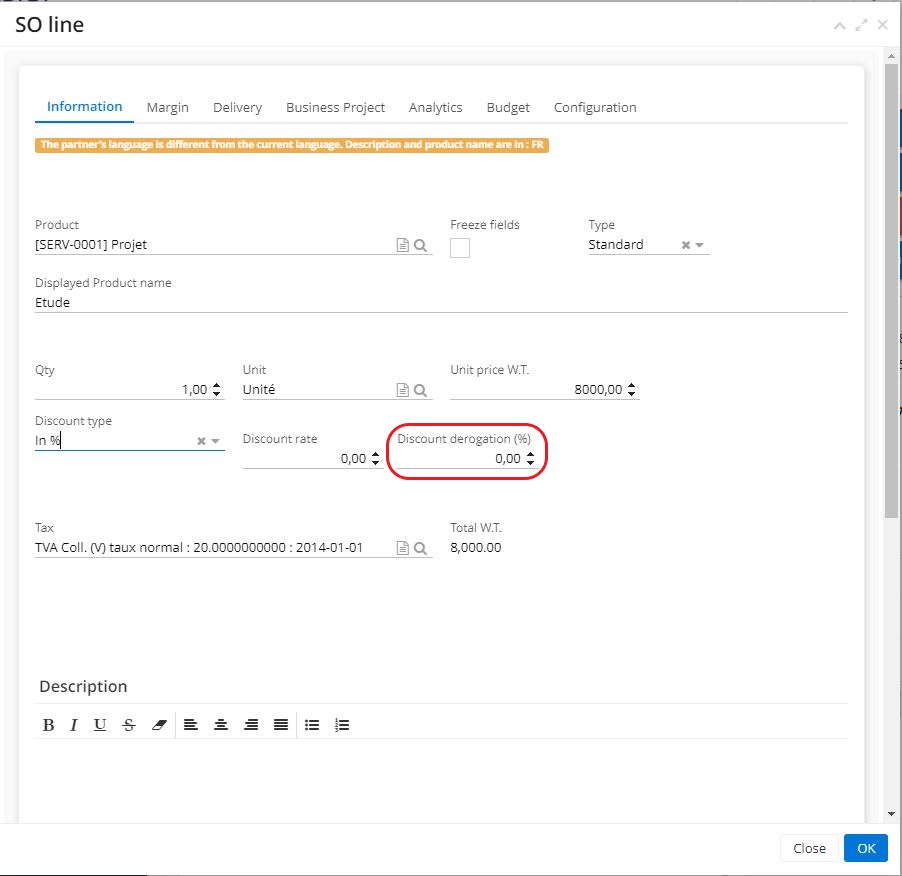
However, if there is no price list, it's still possible to enter Discount Type manually in the dedicated field.
- Discount derogation (when applying a discount): overrides the prohibition on modifying a discount (for example, it has been indicated that the price is non-negotiable; in this case it becomes possible to modify a discount anyway, if the user has the right to do so).
Other useful information when creating a sale quotation
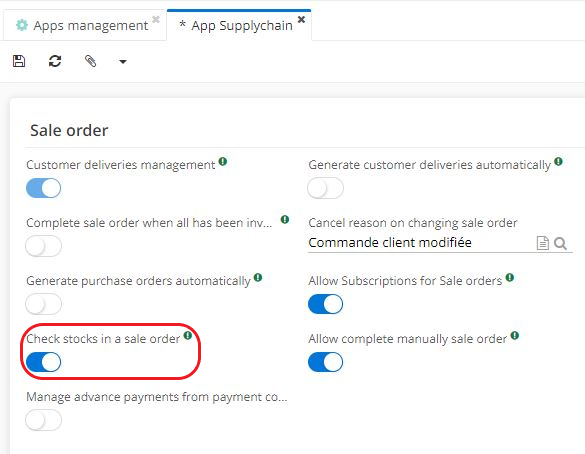
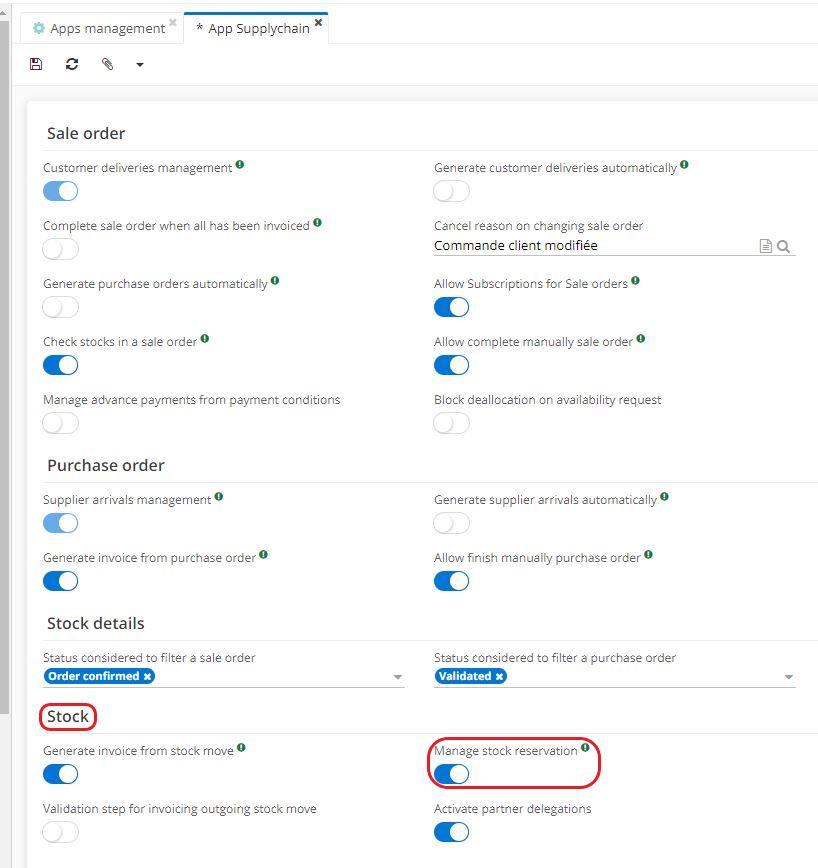
Activate certain stock-related functionalities: the "Check stocks in a sale order" option and the "Manage stock reservation" option on the Supplychain app.
- Path: Application config → Apps management → Supplychain module, configure
On the Supplychain app, activate the "Check stocks in a sale order" option. This feature allows for checking stocks on the sale quotation file.
Save the changes, and refresh the browser.
This option allows the system to check stocks. It will warn the user in case the quantities have been exceeded when they are in the process of validating a sale quotation line.
- Path : Application config → Apps management → Supplychain module, configure
When enabled, the "Manage stock reservation" feature displays available stock on the sale quotation lines, and grants the possibility of reserving stock directly from the sale quotation.
-
Activate the "Manage stock reservation" option. Save the changes and refresh the browser.
-
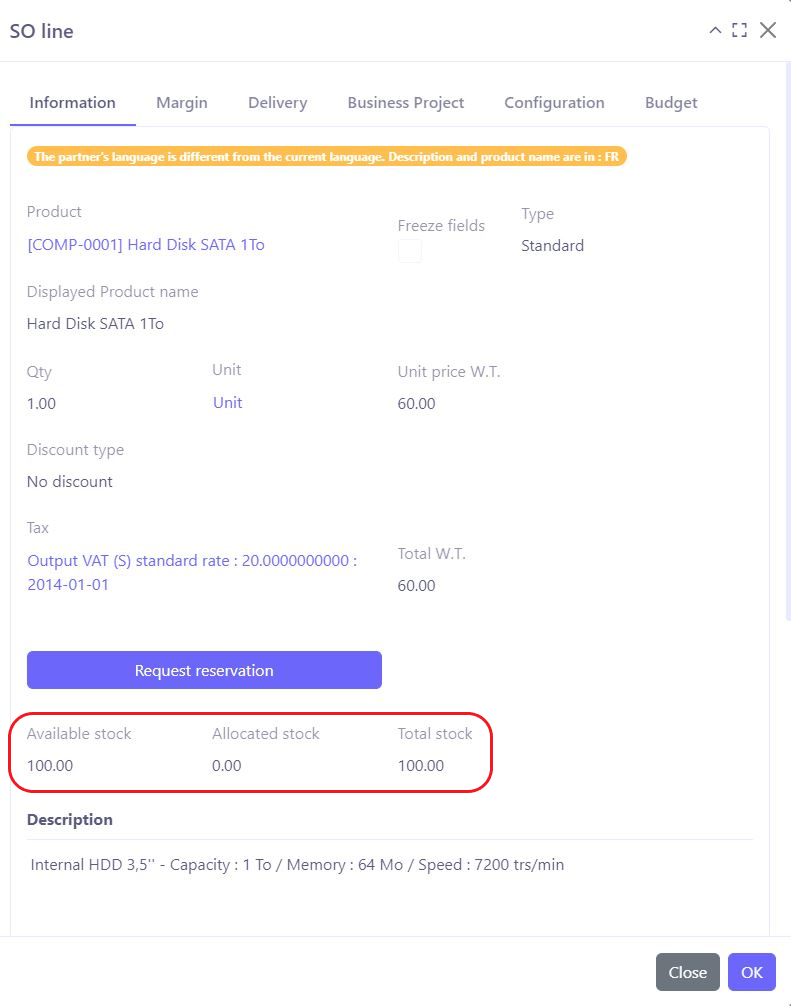
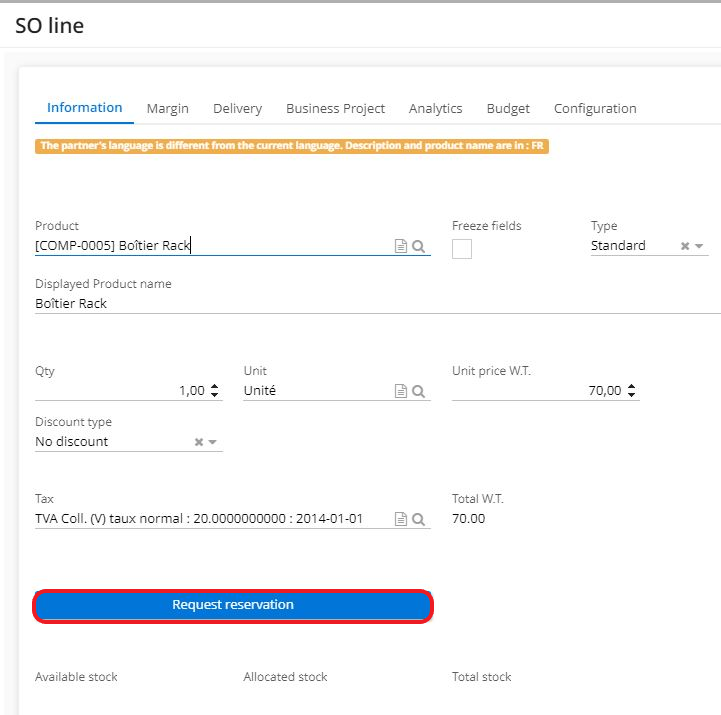
Once this option has been activated, add a new detail to the sale quotation.
It becomes possible to consult available stock with its quantities, displayed on the "Information" tab of the sale quotation line.
- Request reservation button : reserve quantities for a sale quotation / sale order. In this case, click on the "Request reservation" button.
- View all quotations lines:
Path: Sales → Sale quotations → on the list of quotations, click "Tools" → select "See quotation lines".
This action allows you to view all quotation lines; in addition, you will be able to make queries and filter the data.
Finalize a quotation
-
Finalize : finalize a quotation by clicking on the "Finalize" button.
-
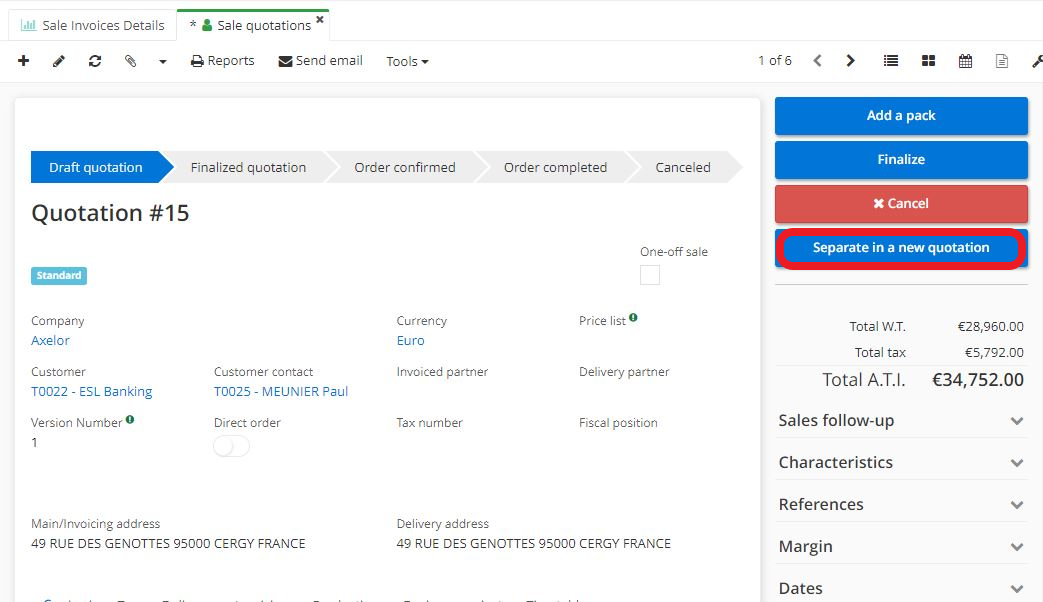
Separate in a new quotation : select the lines in the "Detail lines" table that are to integrate into a new sale quotation, and then click on "Separate in a new quotation". A new sale quotation will then be created from the selected lines.
-
Click on "Finalize". A sale quotation will become "Finalized".
-
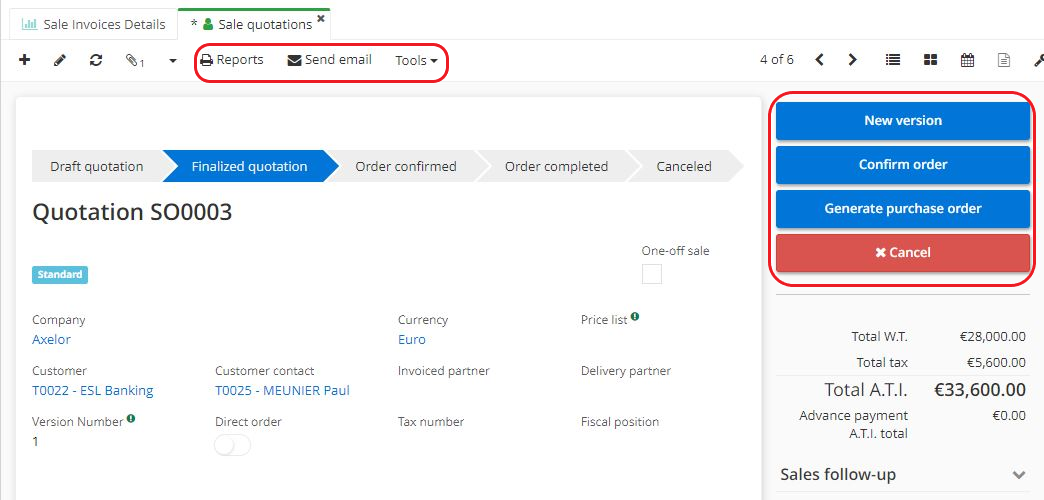
For a finalized quotation, there are several actions available in the taskbar:
-
In the "Tools" menu, click "Define as template". As a result, this sale quotation will become a salequotation template.
-
"Send an email": clicking on "Send an email" will result in opening a new window. There, select a language and template to apply. Next, a configuration page will open. This function grants a possibility to send a sale quotation in pdf format by email.
Email template is applied by default. Make sure that the template is configured beforehand (Path: Application config → Message → Template).
- The buttons on the right side of a finalized sale quotation form allow for several actions:
-
Confirm order: by clicking on this button, the finalised quotation is converted into an order. Confirmed orders are no longer visible from the sale quotation menu but appear in the Sales Orders menu.
-
Generate purchase order: by clicking on this button, select order lines and generate a supplier order for these lines.
-
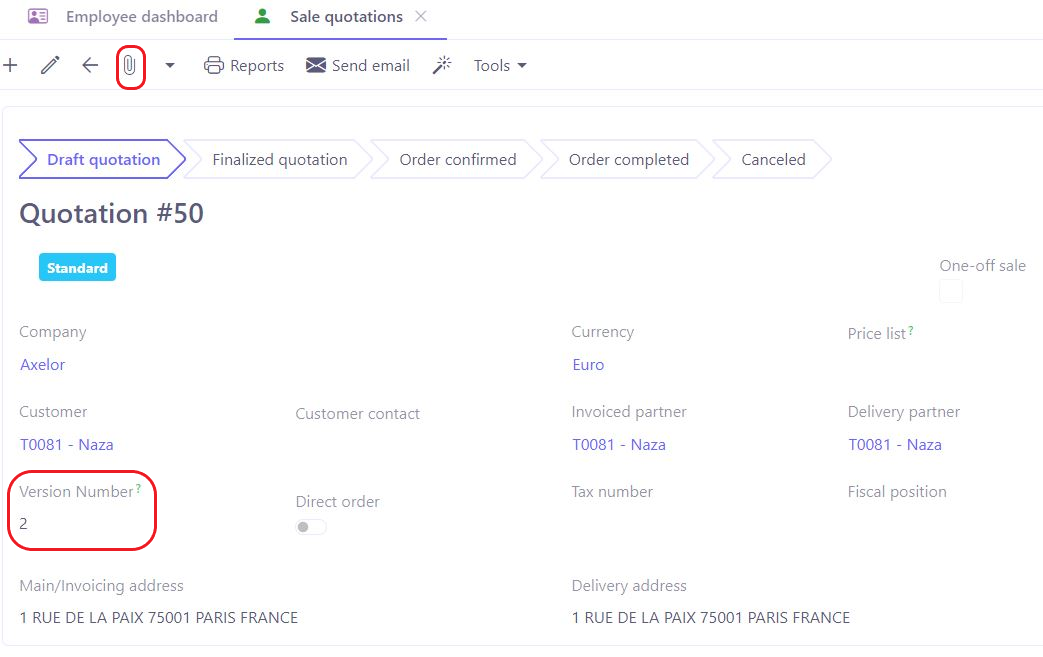
New Version: click to create a new version of the sale quotation which includes the old information (modifiable). It is always possible to consult the history if multiple versions have been created. Simply click on the paperclip icon to Path the pdf versions of the sale quotation.
-
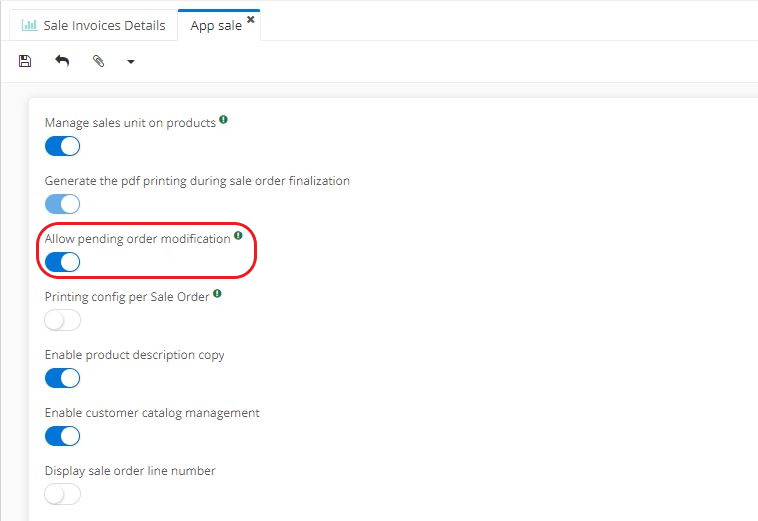
Edit order: when clicking on the "Confirm order" button, the "Edit order" button will appear.
To be able to edit an order, first activate the box "Allow pending order modification" on the Sales app page (Application config → Apps management → Sales, configure).
-
Cancel: this button is used to cancel the quotation. In the event of cancellation, a pop-up window appears allowing you to indicate a reason for cancellation. Cancel reasons can be created from the Sales → Configuration → Cancel Reasons.
-
"Complete manually sale order" button: click this button if you wish to end the order manually.
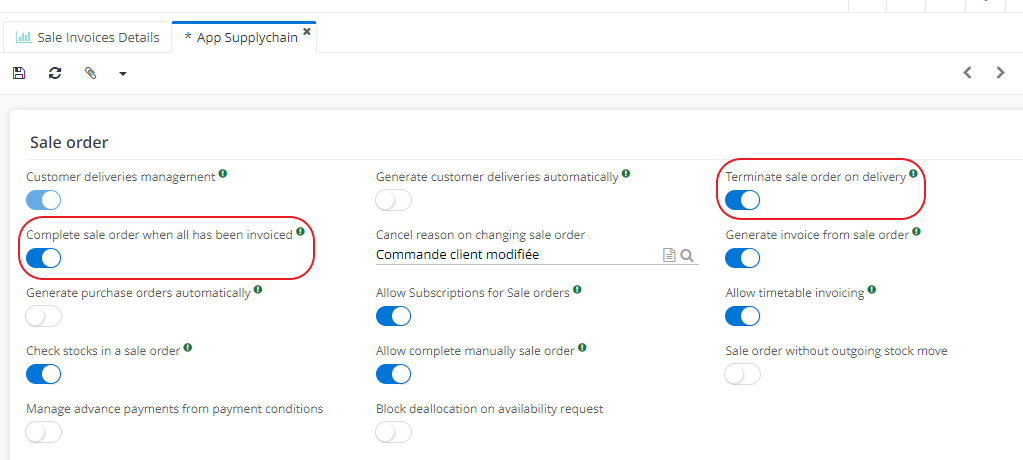
When there is a need to "Complete sale order when all has been invoiced" or "Terminate sale order on delivery" (i.e. sales orders are completed on delivery), it becomes essential to activate this option in the Supplychain app (Application config → Apps management → Supplychain, configure → activate the option "Complete sale order when all has been invoiced"/"Terminate sale order on delivery").
In this case, sale orders will automatically change to "Order completed" status when the entire order has been delivered or invoiced.
Reports on a sale quotation file
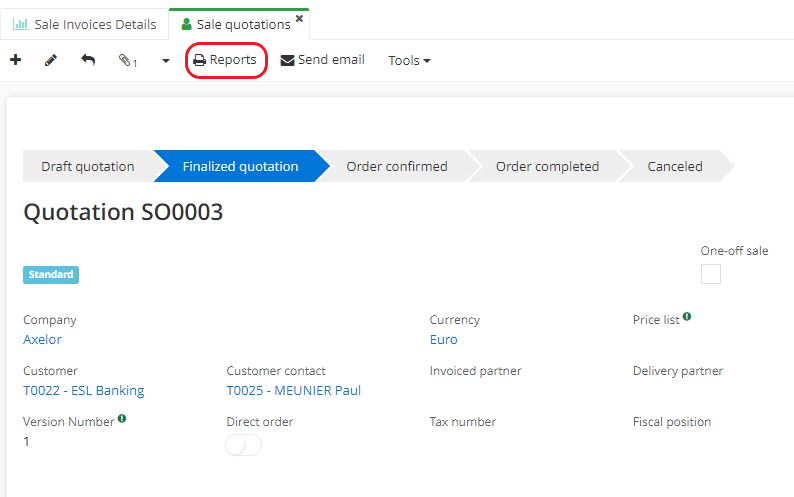
- Report types : on a sale quotation file, click on "Reports". This feature is responsible for generating the sale quotation in pdf / word / excel.
Select between the "Proforma invoice" and "Original Sales Order" report types.
Other important printing information:
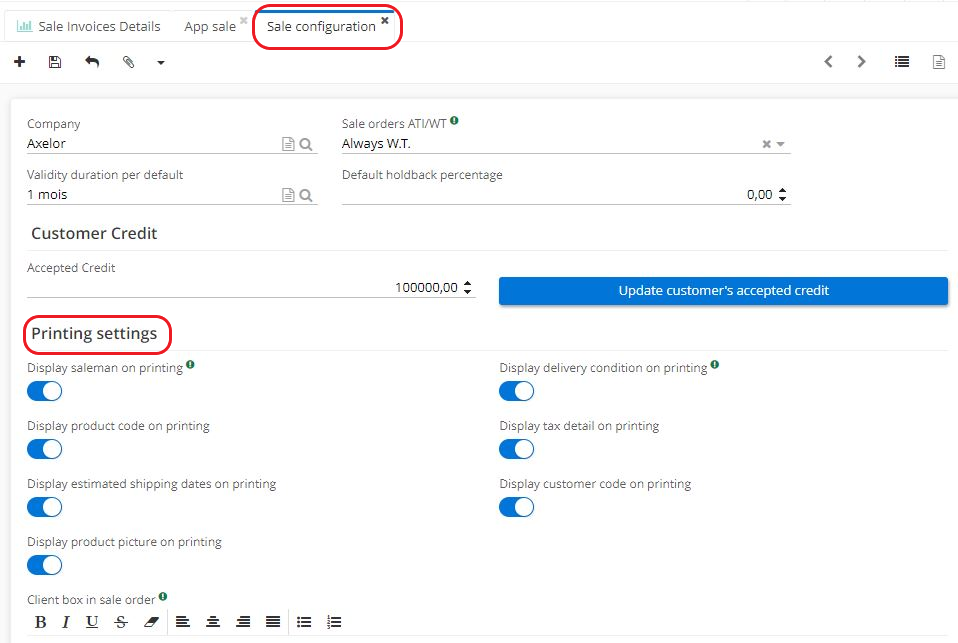
- Sales App: the information displayed on the printout has been configured beforehand in Application config → Apps management → Sales, configure → on the Sales App, click on the company record found in "Sales configurations" → set the desired parameters in the Print settings section, on the Sales configuration page.
Or, Path the Company file directly. Path: Application config → Users/Companies → Companies. On the Company file, click on the "Configurations" tab in order to complete the print configuration.
-
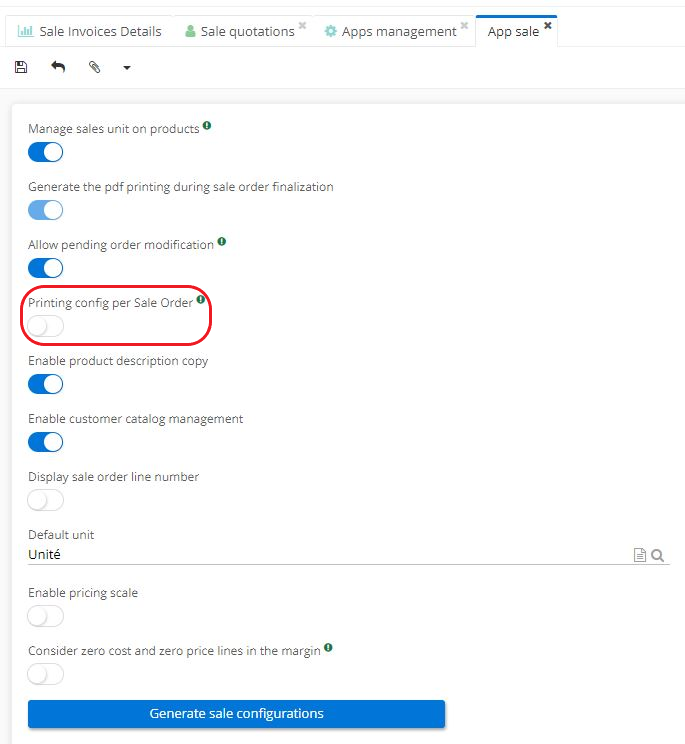
In addition, on the Sales App page, activate the "Printing config per sale order" feature. If this feature is not activated, the default sale quotation template will be applied using the initial information defined at the company level.
-
Once the "Printing config per sale order" feature is activated on the Sales App page, the "Printing" tab will appear. This tab allows to define the print parameters directly on the sale quotation file.


Merging quotations
There is another function linked to the quotation : merging.
This feature is used for merging several sale quotations into a single one, i.e. it will integrate all the lines of the sale quotations into a single sale quotation.
Path : Sales → Sale quotations → on the page which contains all existing quotations, click on "Tools" at the top of the page → then select "Merge quotations".
Next, select the sale quotations to merge.
It's only possible to merge quotations from the same customer, and only quotations in draft status.
Sale quotations of subscription type
Path : Sales → Sale quotation → New → on a sale quotation file, select the type as Subscription
-
Sale quotations and sale orders that have its type defined as "subscription", are useful for products and services that will be invoiced on a recurring basis. However, note that it's possible to use the Contracts module, which has more advanced functions.
-
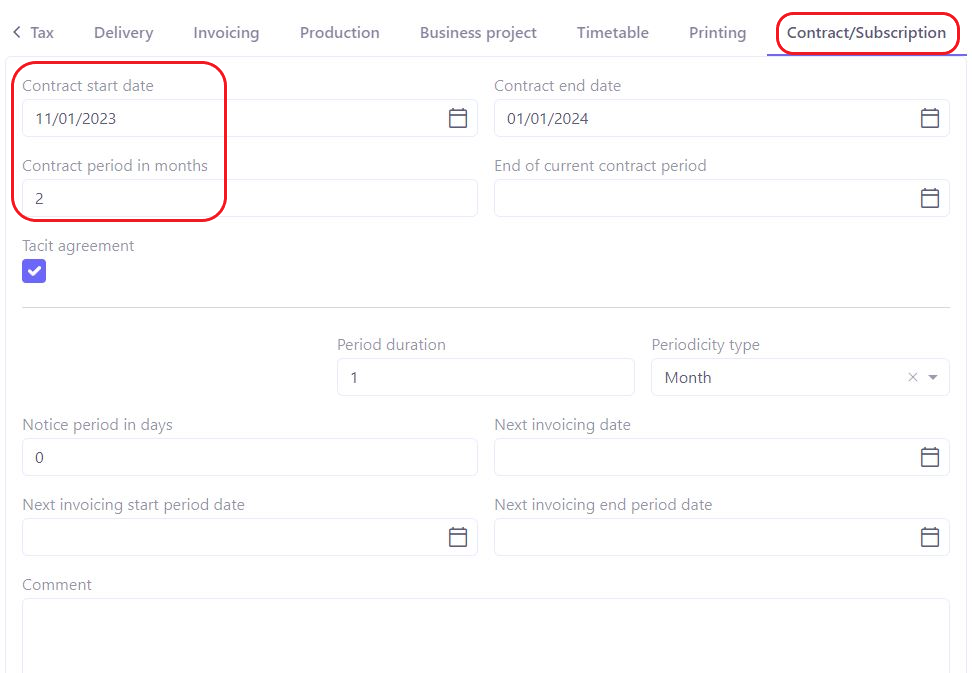
Select "Subscription" as type of a sale quotation. The configuration is the same as for Standard orders. However, Subscription sale quotations or sale orders have a new "Contract/Subscription" tab. This tab helps to manage the periodicity and contractual data.
Complete the information on the form:
-
Fill in all essential data.
-
Then, open the tab "Contract/subscription". The contract start date must be filled in. The end date can be filled in manually. By indicating the end date, it will automatically complete the "Contract duration in months" field.
-
It's necessary to indicate the length of the periods and the type of periodicity. For example, for a monthly invoice, enter 1 month. For annual billing, enter 12 months.
-
The next invoicing date and the start date of the next invoicing period must also be indicated in order to let the system know when billing is due to start.
-
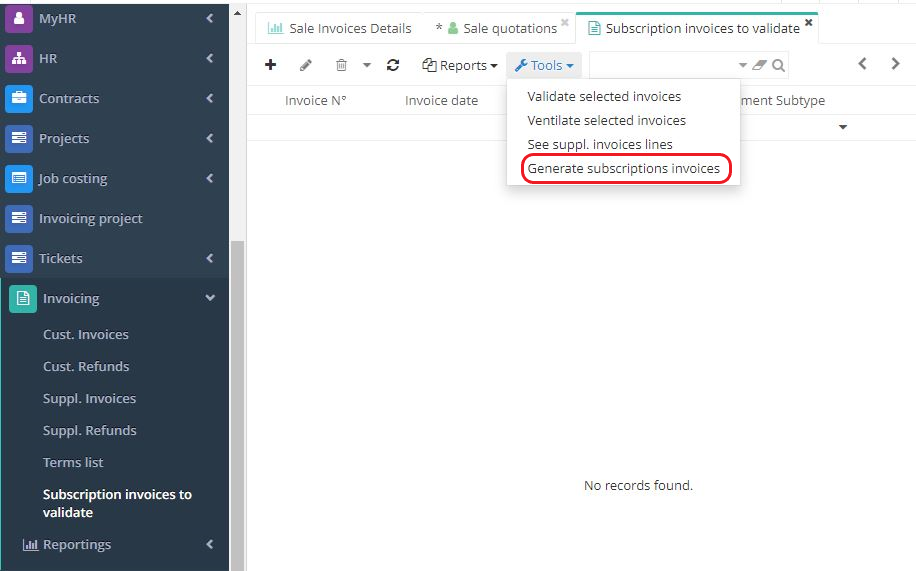
Next, in order to invoice the subscription sale orders, open the Invoicing → click on "Subscription invoices to validate" → click on Tools and select "Generate subscription invoices" → the invoices will be generated according to the periodicity and dates defined in the subscription orders.
-
It is also possible to use a batch to automate this process.