Sales configurators
Introduction
The sales configurator is a Low Code / No Code product created by Axelor since version 5.4. Its main function is to allow users to customise a sales line according to a number of criteria, or to generate a product specific to a customer's needs. This application is mainly used in the following areas:
-
Industry (for example, in metalworking: the customer can select a section, size, grade, etc.).
-
Budget management (a single order for each customer).
-
Tailor-made services (e.g. site services with labour time based on the size of the surface to be treated; painting, masonry, etc.).
The sales configurator offers functions similar to those that can be found and created manually in Excel, in instances when other Axelor functionalites are not enough.
For example, you want to carry out an audit at your customer's premises, but a lot of data affects the cost of services, namely :
-
Number of days ;
-
The qualifications of service provider (project manager, director, etc.) ;
-
Expenses ;
-
Hotel accommodations ;
-
Transports fees.
It is possible to create lines for this type of situation using classic AOS functions, nevertheless it's advised to use the configurator for complex situations.
Remember to activate the configurators in the Sales app.
Activate configurators
-
Access: Application config → Apps management → Sales, configure → activate the "Enable business configurator" option.
-
Once this feature has been activated, a new menu "Configurators" will appear. Access: Sales → Configurations → Configurators. In this menu you will find :
a. Configurator creator (create a template).
b. Configurators (list of configurators generated from sale quotations). This gives you a complete history of all configurators.

Create a configurator template
Access : Sales → Configurations → Configurators → Configurator creator
-
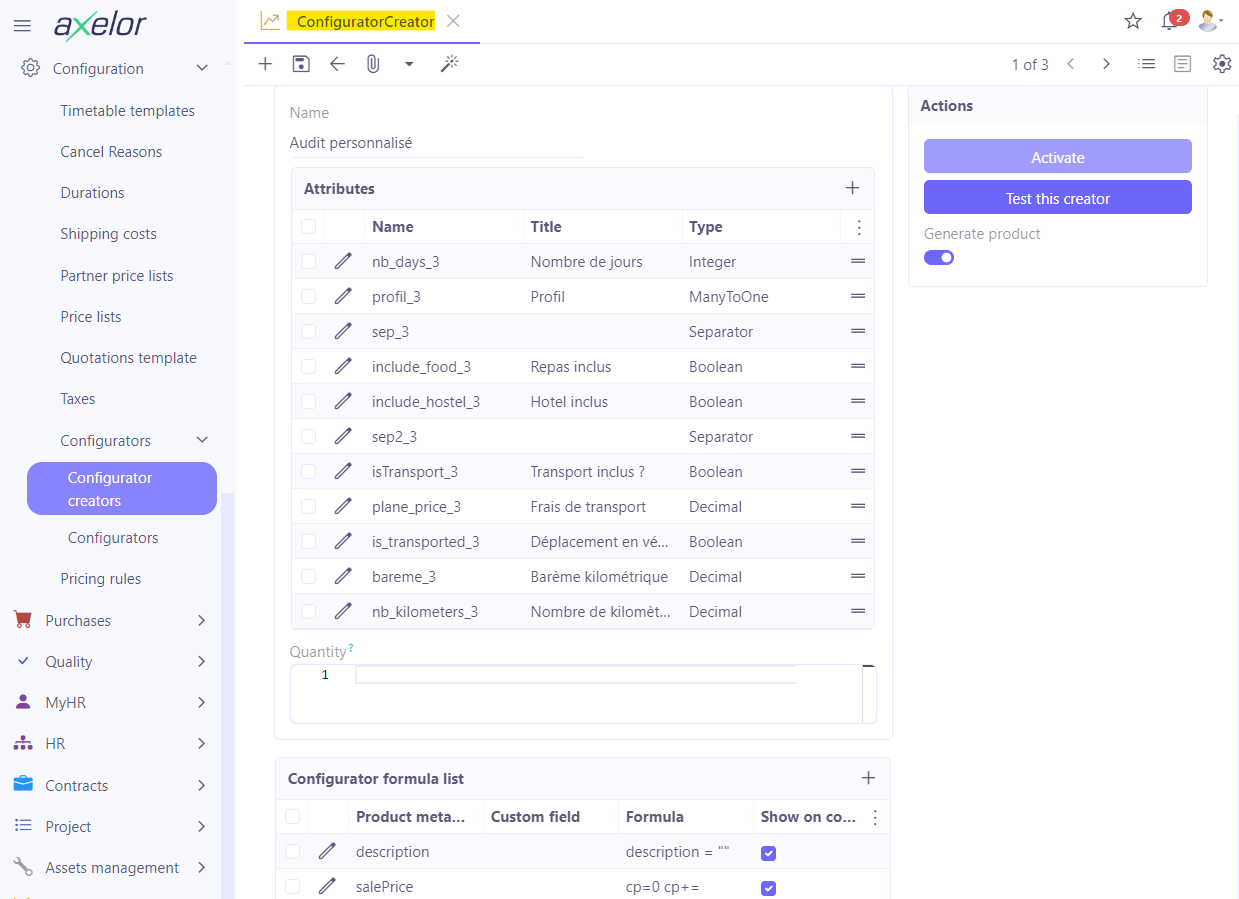
Give a name. For example, "Custom Audit".
-
Add attributes that will allow you to build your form view.
-
Add formulas that will allow you to customise the product.
-
Generate product: tick the "Generate the product" box if necessary.
-
Activate: click on this button to activate the configurator.
-
Test this creator: if you need to, you can also test it.
Generate product: when on a sale quotation template, remember to tick the "Generate product" option if you want the configurator to generate a custom product. In this case, be careful in the Formula section, as some fields will be mandatory.
- Quantity: when this requirement is applied, specify the batch quantity. In some cases, you will want to define the quantity per user, and you will not need to fill in this field. However, this field also allows you to define a default quantity.

Managing attributes and formulas
The attributes in the Sales Configurator enable you to build a form view (what will be seen by a user). The formulas allow you to create and customise an attributes based product.
In other words:
-
Form view: in the form view, add fields, set separators and completely configure the form that users will be able to see by applying attributes.
-
Formulas: formulas allow you to create and customise your product based on attributes. They can also be used to perform complex operations in order to obtain a complete configurator, for example :
-
Is your product an item or a service?
-
What is the unit of your product?
-
What will its selling price be?
-
What description will it bear?
Attribute management
To create an attribute, you need to fill in several fields (not all are mandatory):
-
Name: technical name of the field. For example, "Profile".
-
Name to use in scripts: it's a unique variable created by the configurator (followed by the configurator number "_x"). For example, "Profile_5".
Please note that the "Name to use in scripts" must be used in your formulas, as indicated by its name.
-
Type : Integer, Decimal, Text etc...
-
Title: this title will be visible to the user. For example, "Profile".
-
Default Value: this is the default value for the field. For example, for a number of days, you could enter 1 as default value.
-
Help: this field allows you to add a tooltip to the form field for users.
-
Sequence: allows you to set the order in the configurator (i.e. the order in which the menu will appear). Normally, you do not need to fill in this field manually, as the sequence will be created automatically.
-
Options (top right) :
a.Required: if the field is required, the user must fill in this field and will not be able to go any further without having filled it in.
b.Hidden: this option is used to hide a field.
c.Visible in grid: this option is not currently available to the user.
- Widget attributes: here you can add ergonomic elements that are found in the help. (example: field width etc, define a panel...).
Use the existing documentation on widgets to configure them.
You'll also find help in the Help tab.
Options tabs
Add precision in the Options and Conditions tabs. In the Options tab, you'll find :
- Selection: retrieve an existing selection from the tool (e.g. the type of product, or the status of a delivery).
The Administration documentation goes into more detail about the application of selections.
- Widget: customise the field with different attributes (3 checkbox styles...).
Widgets are dedicated to fields only.
- On change: you can add an action that will take place when the field is modified.
Additional fields may appear.
-
If you have selected ManyToOne as type, the Target Model field becomes available. It is necessary to enter the target model. For example, it could be the product database.
-
If you select Decimal as type, other fields will appear.
-
For example, the Min and Max fields. These fields are used to enter minimum/maximum values.
-
Precision: this is the total precision (number of decimal places that will appear) and the maximum precision (number of decimal places that will be used in the calculation).
Conditions tab
In the Conditions tab (development in JPQL), you will find :
-
Show if: show the field only if.
-
Hide if: hide the field only if.
-
Required if: the field is required only if.
-
Read only if: impossible to modify only if.
Formula management
A formula is an operation used to obtain the final result.
To manage formulas, see how to use formulas in simple examples (no calculations required).
-
Product field: select the product. In this example, the product type (productTypeSelect) will be "Service".
-
Select whether or not to display the formula at the bottom of the form (in case it's necessary for the user).
-
Groovy: the script must be written in Groovy.
-
Display on generator: this option allows the user to see the final results on the form view (at the bottom of the page). It is not necessary to activate this option every time, but it may be desirable for certain fields (such as the sale price).
-
Check script: you can check the script using the "Check script" button.
Please note that some fields in the product sheet are mandatory, so you need to be careful to fill them all in the formulas (productTypeSelect, code, name and productFamily).
Sales configurator : Groovy + Configurator activation
Information: Groovy is the name of an object-oriented programming language for the Java platform. It is a replacement for the Java language for this platform. Groovy uses a syntax with braces, very similar to Java.
In Groovy, you can perform following calculations:
-
Define the number of hotel nights for a service provider (e.g. 1 day = 0 nights, 2 days = 1 night) and have the system automatically multiply the number of nights by the flat rate.
-
If the diameter is greater than 50 mm (metallurgy) on a tube, it would be a good idea to only show products whose dimension field is greater than 50.
Case study - Calculating the selling price
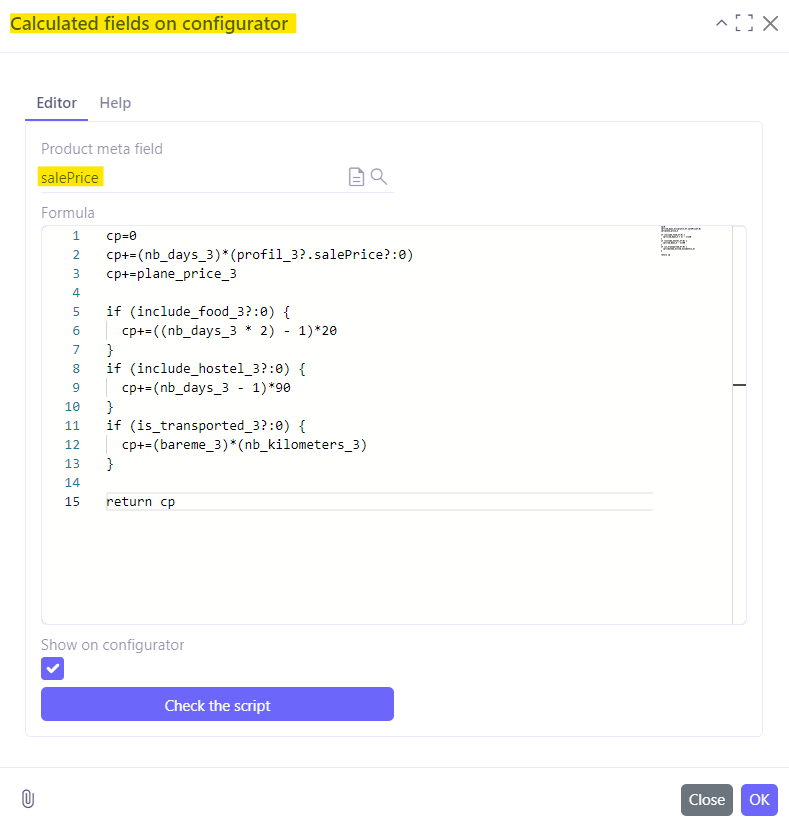
For example, you want to calculate the selling price based on the cost of your consultant and the number of hotel nights.
In this example we have defined :
-
A product field variable (cp). Here, it is the sale price (salePrice).
-
The value is incremented according to a specific criteria:
-
cp = 0
-
If the hotel is included :cp+ = (nb of days - 1) * price per night (can be a configuration)
-
Otherwise cp remains unchanged.
-
cp+ = (Selling price of my profile) * nb of days
-
Return the value of cp.
Here, the information shown is as follows:
-
You initialise the selling price (cp=0).
-
cp+ =(nb_days_5) * (profil_5?.salePrice?:0) adds the number of days times the profile has been sold to the sale price. cp+=transport_price_5
Then add the transport price.
- if (include_food_5?:0) { cp+((nb_days_5*2) - 1) * 20 }
If food is included in the price, the price will also be calculated (3 meals per day, hence 5*2 -1) *20: is the flat rate for meals, but it can also be entered in the configuration.
-
if (include_hostel_5?:0) { cp+=(nb_days_5 - 1) * 90 }
-
if (istransported_5?:0) { cp+=(bareme_5)*(nb_kilometers 5) }
Check the script: click this button to check the script.

Once the configurator is ready, you can perform the following actions:
-
Activate: activate the configurator (otherwise it will not be updated). The configurator must be activated before it can be used.
-
Test: test the configurator directly from the view.
-
Add the configurator line on a sale quotation. Once this has been done, you will be able to create products and quotations that are 100% customised to your customers' requirements.
-
Access: Sales → Sale Quotation. Add line from configurator: on a sale quotation, you can add a line with a configurator. Simply click on the "Add line from configurator" button.
-
Configurator model: then select a configurator model from the drop-down list (particularly if you have several configurator models). In the example, it is "Custom Audit".
-
Generate: click on "Generate" button to generate a configurator.
-
The Generate configurator window will open. Here you can add the necessary information.
-
Number of days: enter the number of days.
-
Profile: select the profile. For example, Consultant.
-
Fill in the rest of the information available in the configurator. For example, you can indicate "Meals included - yes or no", "Hotel included - yes or no", etc.
-
Validate and generate the line: this button allows you to validate and generate the line.
Reports: when you print the reports, the lines that were added using the configurator, will be included.