Supplier price list
Introduction
Access : Purchases → Configuration → Price lists or Partner price lists
Supplier price List: is used to reference supplier-specific prices. There are exclusive price rates for certain suppliers, and there are common price rates for different types of suppliers.
Price list targets contracts with negotiated rates or discount periods. Simple discounts are partially managed by price-lists. In AOS, simple discounts can be triggered by quantities in a sale order.
If there is a need to manage more complex pricing and discounts, it's possible to go much further with the price list functionality.
The price list concept is common to both the Sales Module and the Purchases Module.
The documentation below explains how price lists work in the Purchases module, however the price lists work in the same way in the Sales module.
How to configure a price list
-
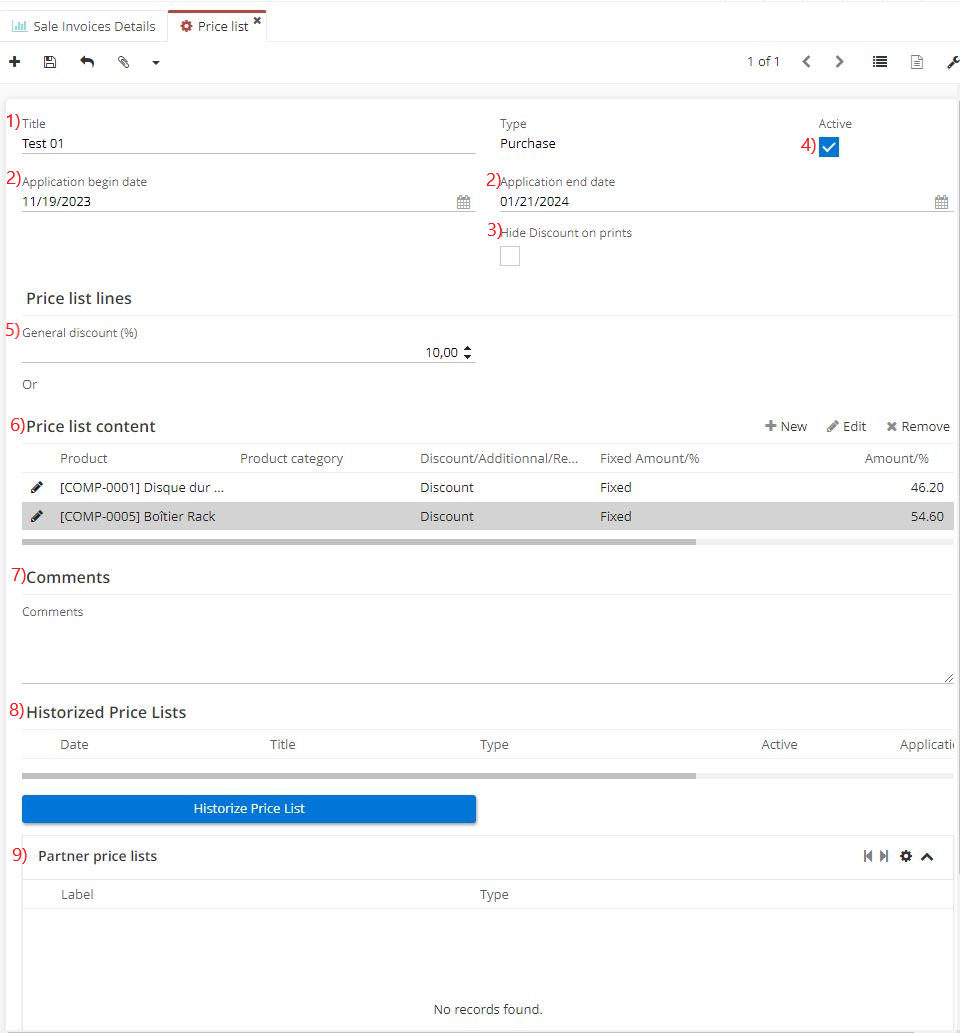
Give the price list a title (for example, "123 Services supplier price list" for a particular supplier). It’s equally possible to create a global price list for several suppliers (e.g. "France supplier price list" for French suppliers).
-
Price lists have application start dates / application end dates. If these fields have been left blank, the price list will be applicable at any given moment, and can be used continuously.
On the other hand, if the dates have been specified, the list will only apply for a certain period of time.
Applying specific dates can be useful when negotiating rates with a supplier for a specific period of time, or for setting up promotional periods.
-
Note that the checkbox "Non-negotiable price list" is absent from the supplier price list since it's up to the supplier to decide whether these prices are non-negotiable, or there could be an additional discount.
-
Tick box "Hide discount on prints": when creating a purchase quotation and adding a price list, the discounts will be hidden on the printout of the purchase quotation and the purchase order form.
-
Tick box "Active". This box is ticked by default when a price list is created. It is important to leave it ticked. Why is this important? The "Active" box specifies that the price list will be automatically used for purchase orders that can trigger it (i.e. the price list will be taken into account).
-
General discount %: a general discount will be applied with this price list to all products/services. For example, if the general discount is at 5%, the 5% discount will be applied systematically to all products.
-
"Price list content" table allows for applying more specific discounts to certain products or categories.
-
Comments : leave comments in this section.
-
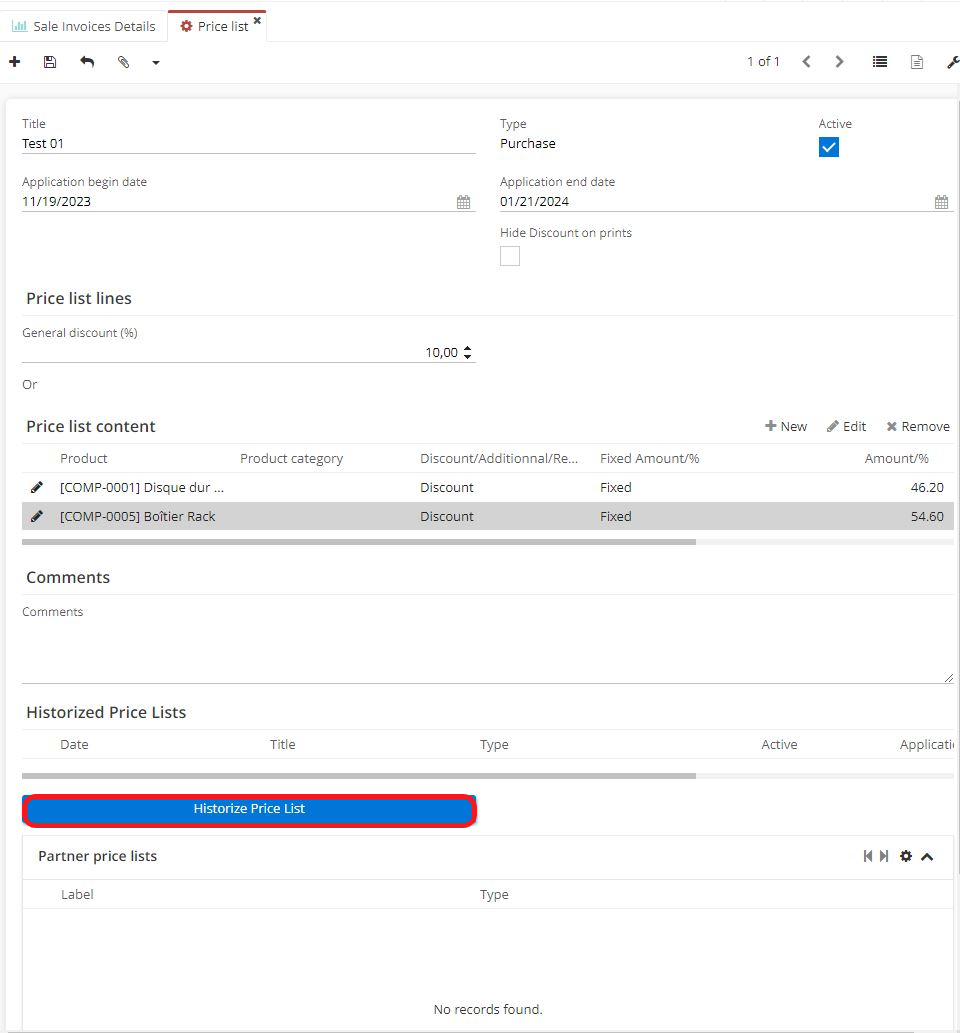
Historized price lists: once a price list has been created, historize (i.e. archive) it by clicking on the "Historize price list" button.
Note that this button appears once the price list, the partner price list and the partner file attached to it, have been created.
As a result, the prices in a historized price list will no longer be applicable, but this feature helps to view previously applied prices.
-
Partner price lists: displays the partner price lists which use a particular price list.
-
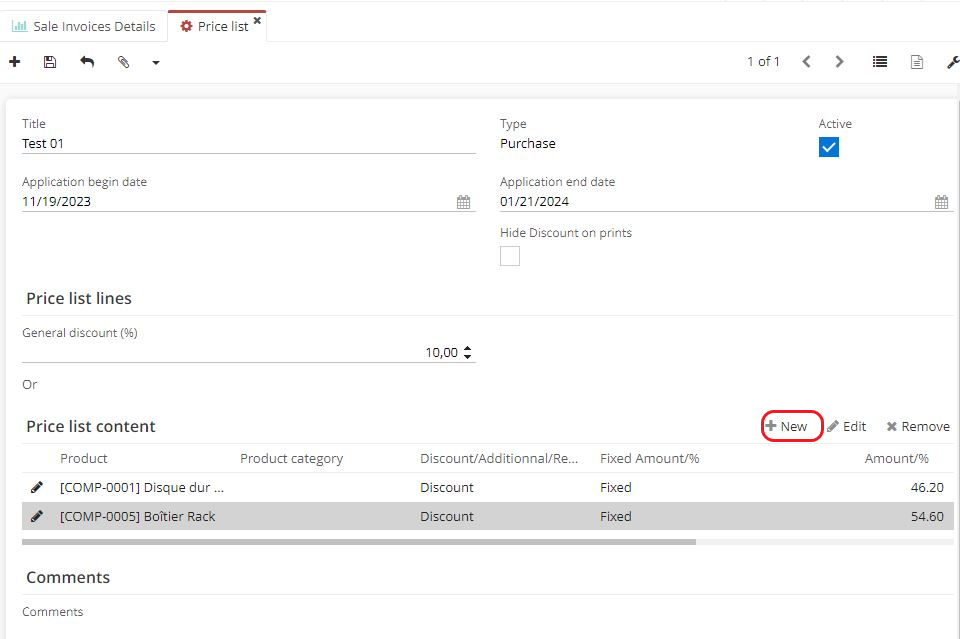
To add a new Price List Line, click +New in the Price List Content table on the Price list form.
Price list line
Add a new Price List Line by clicking +New in the Price List Content table on the form. A new window will open, the Price list line.
-
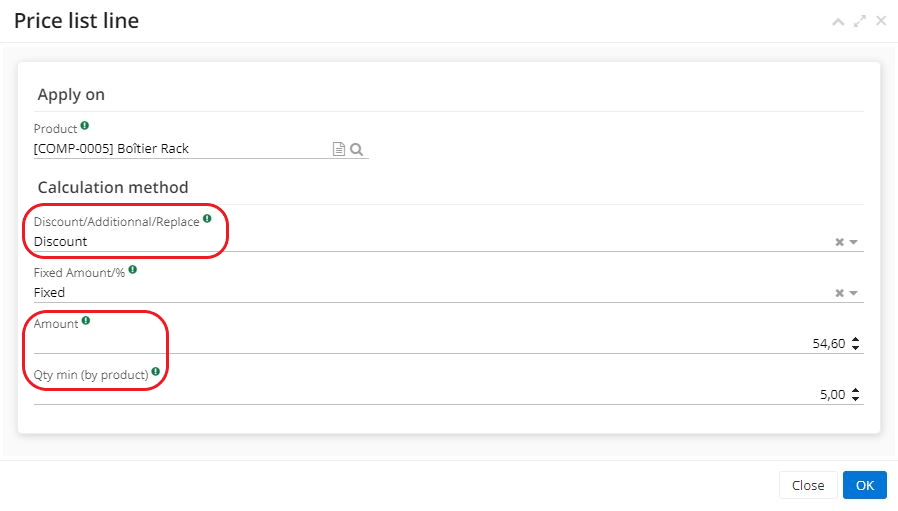
Select a product or a product category. A category includes several products at several prices.
-
Define the calculation method for a product.
In the "Discount / Additional / Replace" field, define whether it’s a Discount, an Additional price or a Replace. In certain situations, select an "Addition" in order to increase the catalogue prices.
When selecting a product instead of a category, it becomes possible to select "Replace" in the "Discount/Additional/Replace" field. Selecting "Replace" will replace the pre-configured price on the product file. In other words, this choice replace one price with another.
- In the "Fixed amount%" field, select from "No discount" / "In %" / "Fixed".
When selectiong a fixed amount, the discount will be a fixed amount of company's currency (for example, the fixed discount is 10, which means that the discount will be €10).
Selecting a % amount means that the discount will be calculated as a percentage.
- In the "Quantity minimum" field, enter the minimum quantities to be purchased. Purchasing a certain quantity will trigger discounts or price replacements.
Order quantities can trigger discounts. For example, if the customer buys 20 items of a product, the price will drop from €60 to €50.
- Once the price list has been configured, create a price list for partners.
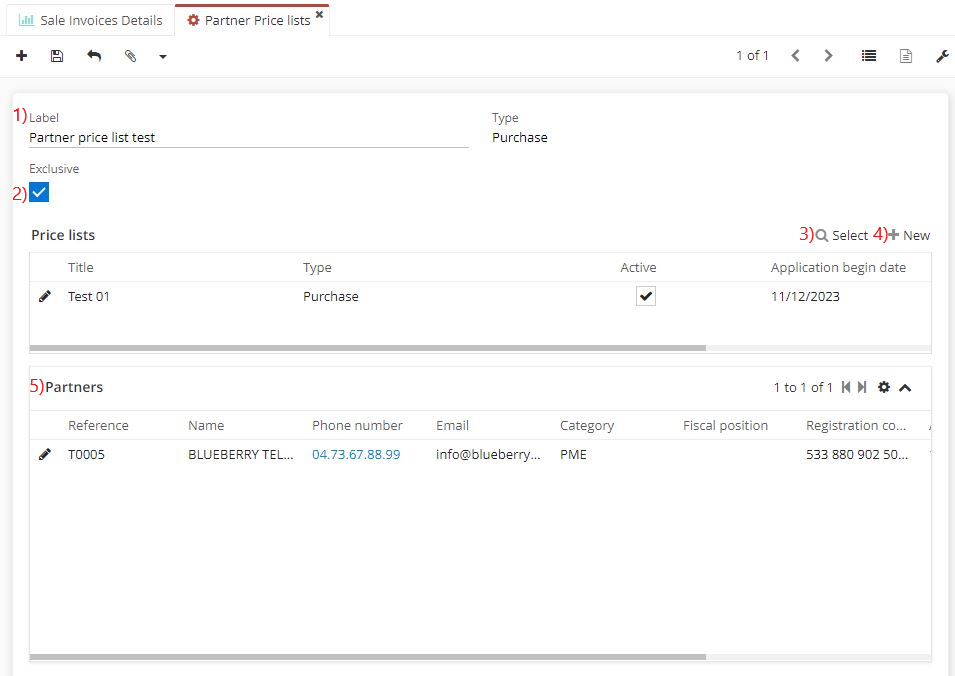
Partner price list
Access : Sales → Configuration → Partner price lists
- First, create a price list in the Price list or directly from Partner price lists.
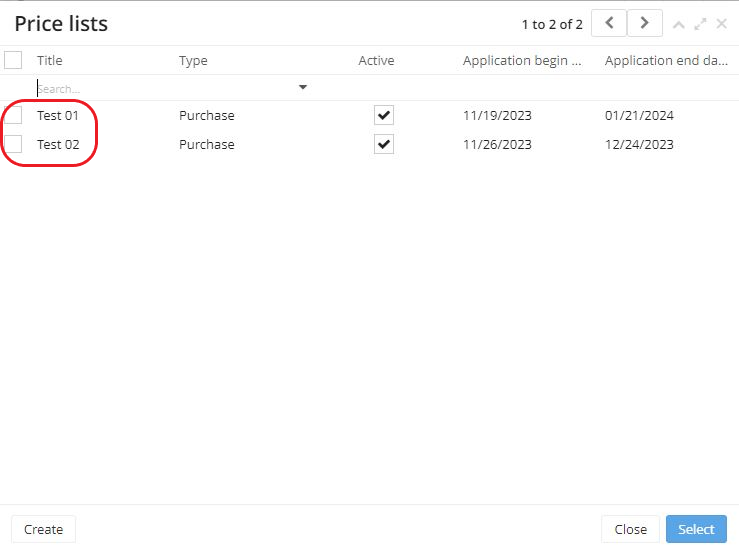
When creating a new Partner price list, there is a possibility to either select from existing price lists, or create a new one.
- Then, apply this price list on a Supplier file.
In order to do this, open a Supplier file → click on the Supplier tab → select a price list in the Purchase price list field.
Partner price lists are used for grouping together several price lists. These partner price lists that can be applied to partners files.
In AOS the term “partner” indicates a third party. It could mean any third party, whether it’s a Supplier or a Customer. The term "partner" is applied in further documentation.
The next steps are :
-
Open Partner price lists. On the Price Lists table, either create a new price list for a partner by clicking on +New, or select from existing Price lists configured beforehand in Price lists.
-
On the partner price list, it’s possible to attach several price lists to a partner (or several partners if the price list is shared). This functionality therefore allows several price lists to be grouped together.
-
“Exclusive" checkbox: if this box is ticked, the price list will be exclusive for a selected partner. In other words, once this partner price list has been attached to a partner file, it cannot be used for another partner.
The price list applied to a selected partner with an active "Exclusive" check box will equally disappear from available price list selection.
Uncheck the box if you wish to use this price list for other partners.
- On the "Partner Price List" file, if there is a need to consult an associated Partner file, follow these steps :
-
open a Supplier file ;
-
click on the supplier tab;
-
in this tab, select a partner price list in the "Purchase price list" field.
- Save the changes.
Remember to apply a partner price list to the supplier file since the configured partner price list is not automatically applied.


Purchase quotation and price lists
Access : Purchases → Purchase quotations → New
How to create a sale quotation for a customer with a partner price list?
First, check if price lists / partner price lists were created beforehand.
Also, be sure to attach a price list to a supplier file. Open a supplier file, then click on the Supplier tab and select a price list in the dedicated field.
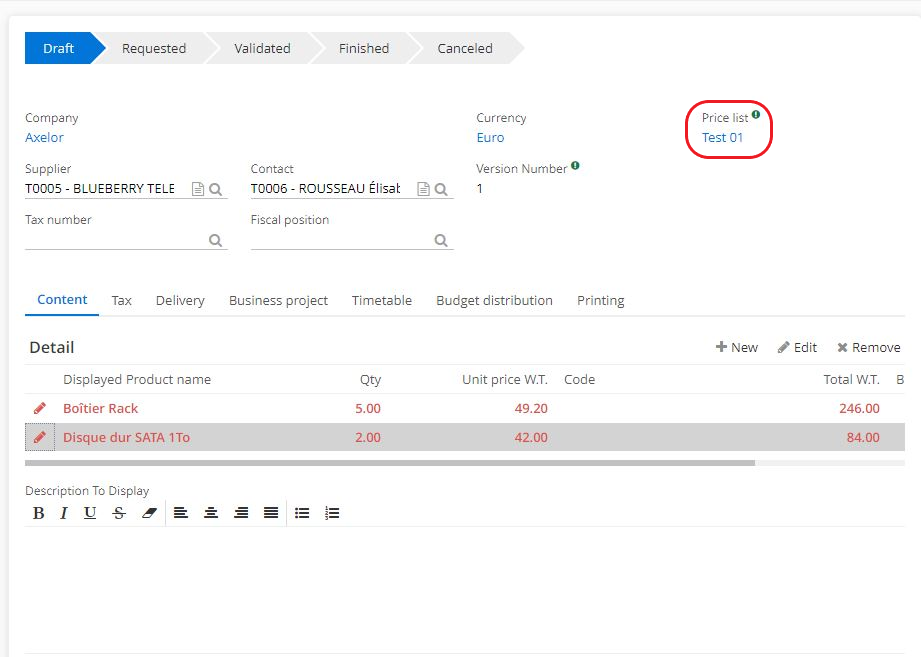
- Open a Purchase quotation. In the "Supplier" field, select the supplier.
As the list has already been attached to the customer file, it will automatically appear in the "Price list" field on the purchase quotation file.
However, if several price lists are attached to the Partner price list file, it will be possible to select from several lists when creating a purchase quotation.
-
As a result, the prices indicated on the price list will be applied directly.
-
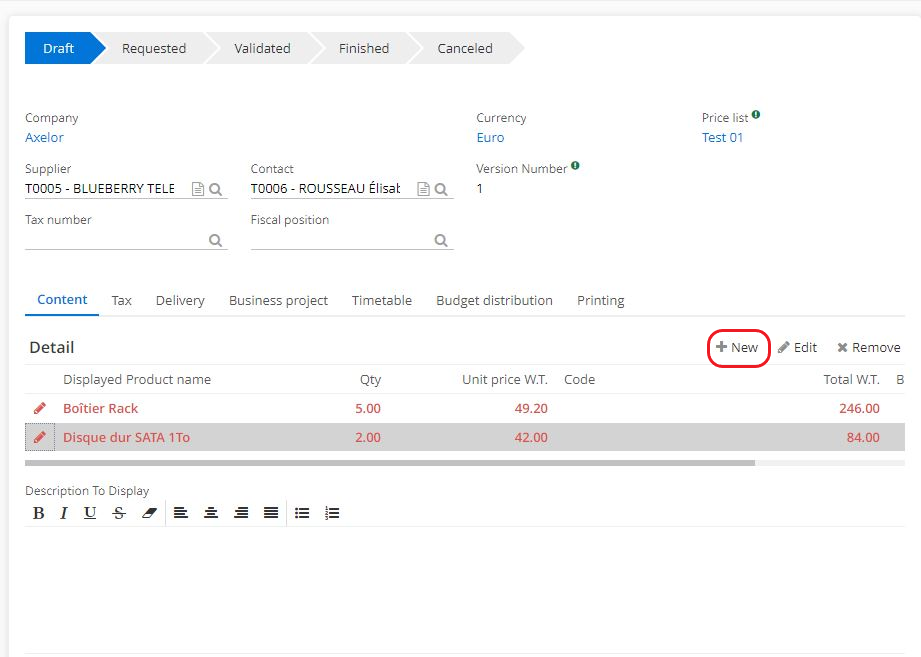
Add new products to the "Detail lines" table by clicking on "New".
-
On the Purchase Order Line tab, select the product in the "Product" field. If this product or service is part of the price list, the price and discounts linked to this item will be automatically taken into account.
-
Complete the purchase quotation configuration as required and click on the "Finalize" button.
Historize Price List
-
Open a Price list. On the Price list file, click on the "Historize price list" button (i.e. archive this price list).
-
Once the existing list has been historized, it becomes possible to modify prices on the same file in order to create a new version.
-
If there is a need to consult the historized list and to view the old prices, click on the record in the "Historized price lists" table.