GDPR
Introduction
GDPR stands for EU general data protection regulation. According to European Council, GDPR is the strongest privacy and security law in the world. When working in EU space, companies are obliged to respect and follow GDPR rules.
According to law, an individual has the right to find out what data an organisation is holding on this individual. Therefore, anyone can exercise their right to ask for data erasure by various means.
In order to respect GDPR rules and allow companies to pseudonymize or anonymize data when requested, Axelor created GDPR module.
The GDPR module comprises 2 distinct things: pseudonymization and the GDPR module itself, which uses pseudonymization.
Pseudonymization becomes available when the basic module is installed, and GDPR is activated when the GDPR module is installed.
The GDPR module
The GDPR module helps to manage :
1. Access rights:
This right allows you to find out what data an organisation holds on you. You can ask an organisation if it holds any data about you (website, shop, bank, etc.) and request that it disclose it to you in order to check its content." Source : CNIL
2. The right to be forgotten or otherwise known as the right to erasure:
You can exercise your right to erasure by various means: electronically (form, e-mail address, download button, etc.) or by post, for example. It is very important to indicate precisely what data you wish to delete." Source : CNIL
When a person makes a request, the right to be forgotten allows any record linked to the person who made the request to be pseudonymised.
It is also possible for users to have recourse to processing registers. Processing registers are automatic registers that either archive data or archive data with pseudonymisation. The data is no longer visible in the ERP.
Pseudonymization
Pseudonymization is a tool that aims to create pseudonymized databases.
Pseudonymization makes it possible to take a production database and convert it into a database of fake but consistent data.
Thanks to pseudonymisation, when a person asks for their account to be deleted, their name (or other information) will no longer be visible in the system.
However, the object will still exist, and any links it may have with other objects such as invoices/orders, will also remain.
Following pseudonymization, the surname and first name are removed and replaced by dummy values.
Relationship anonymizer is added to GDPR module in version 7.1. It becomes possible to break the links between certains objects. New documentation on this functionality will be released soon.
Configuring pseudonymization
In AOS, pseudonymization replaces data with dummy data.
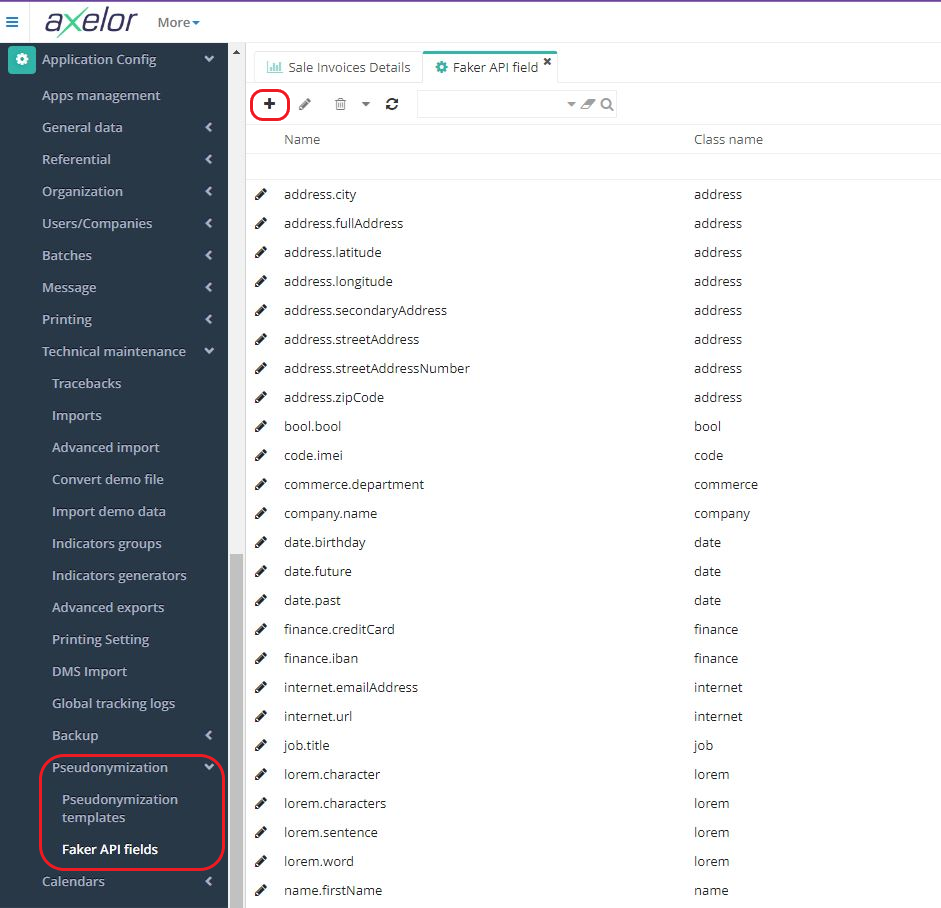
There are two menu entries for pseudonymization, Pseudonymization templates and Fields for Faker API :
-
Access: Application Config → Technical maintenance → Pseudonymization → Pseudonymization templates.
-
Access : Application Config → Technical maintenance → Pseudonymization → Faker API fields.
The fields for the Faker API are used in the pseudonymization templates.
Configuring fields for the Faker API
The Axelor solution offers a list of pre-configured fields, however it is always possible to create new fields.
-
In the Faker API Fields menu click +New.
-
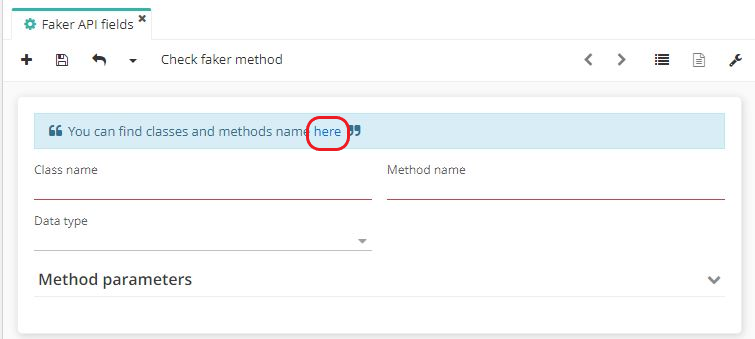
To create a new Field, you need to enter Class name and Method name (you can consult the class and method in the Faker Java library).
-
Next, open the Java library (Java Faker). This library can be used to generate fake data. Click on the link hidden in the word "here" which will take you to the Java Faker technical documentation site.
-
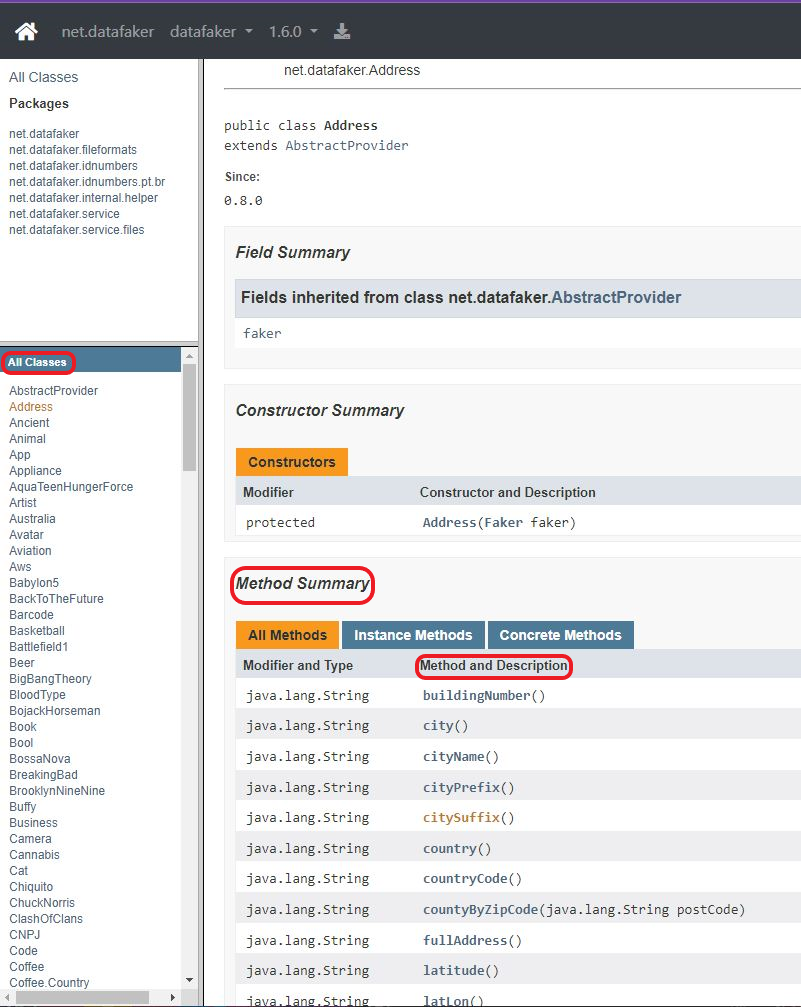
On Java Faker, find the Class (for example, Address), and then the Method (for example, City).
-
Then click on a Class to access a Method. Copy and paste the Class and Method you are interested in onto the Fields form for the Faker API.
Once the fields have been configured to generate false data, it is possible to generate pseudonymization templates.
Configuring pseudonymization templates
The pseudonymization templates are used to create the dummy database and are useful for GDPR requests.
A list of pseudonymization templates is available by default, however it is always possible to create a new one.

- In the Pseudonymization Templates entry menu, click + to create a new template or click on an existing template to modify it.
Access : Application Config → Technical maintenance → Pseudonymization → Pseudonymization templates.
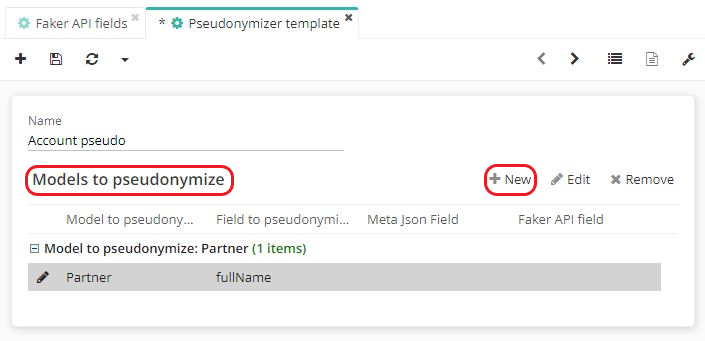
- On the Pseudonymization Template form, define the template that the user wishes to pseudonymize (for example, partner / user / email address / address).
Each template has a different pseudonymization field for which you will need to create false data.
Please note that if there is a need to pseudonymize the partner's first and last names using this pseudonymization template, don't forget to add fields to be pseudonymized such as "name", "Firstname", "fullName" and so on.
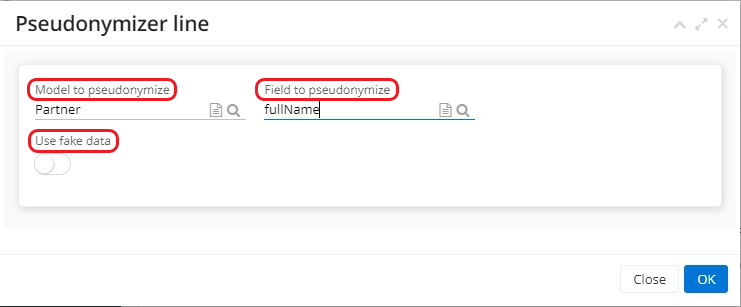
- To create a new pseudonymization line, click +New on the form. A new window called "Pseudonymization line" will appear. On this window, select the model to be pseudonymized and then select the field to be pseudonymized.
For example, select "Partner" as model, and then select "full name" as the field to pseudonymize.
The checkbox "Use fake data" is used to create consistent fake data.
For instance: if the user has selected a date as the field to be pseudonymised and has not activated the box, the date will be created randomly by default (for example, 1 January 1910). On the other hand, if the box is ticked, the date will be false but consistent.
- Following the activation of the "Use fake data" box, a new field named "Field for Faker API " will appear.
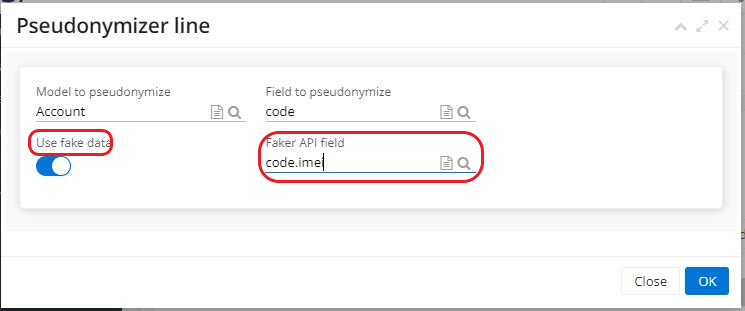
Sometimes the user simply wants to apply the GDPR and consistency is of little importance to them. In this case, the "Use fake data" box will remain unchecked.
To create a new pseudonymization template, the elements must be configured one by one, but once the template has been generated, it will be reused as is (unless the user decides to modify it).
Configuring the pseudonymization template has no immediate impact in itself.
Application of the GDPR module
The GDPR module includes several functions:
-The processing register ;
-The access request (GDPR request) ;
-The deletion request (GDPR request).
To be able to use the GDPR functions, install the module first and then configure it.
Configuring the GDPR module
Access : Application Config → Apps management → GDPR, configure.
-
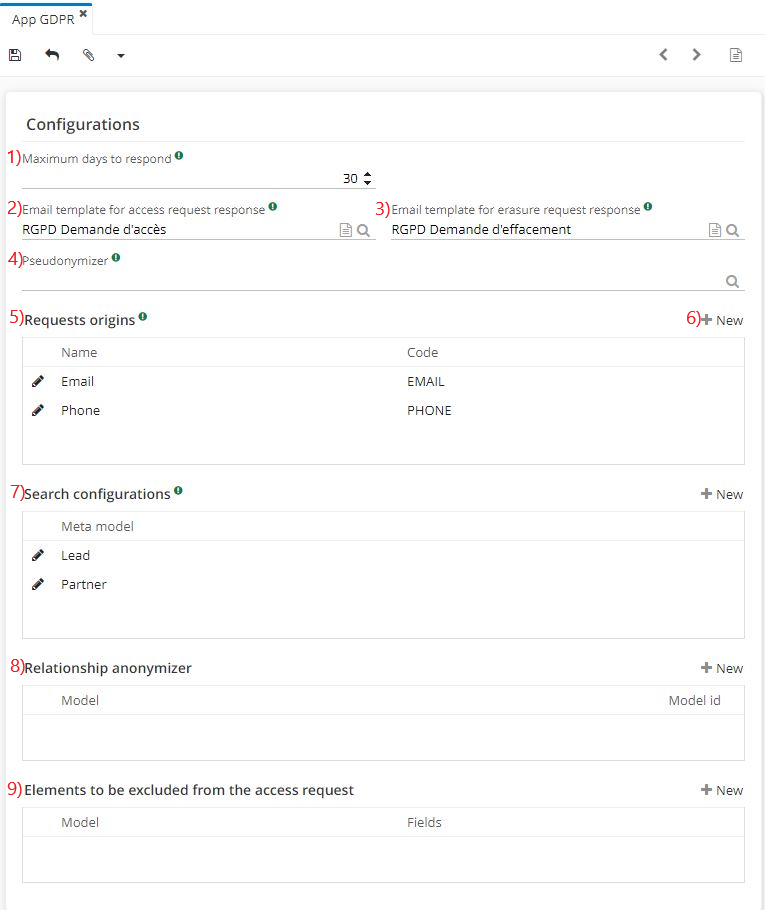
Field "Maximum days to respond": this field is used as an indication. In other words, once the request has been made, the user will know that he or she must respond within the specified timeframe. The person who submitted the request will know how long it will take to process it.
-
Field "Email template for access request response": select the response template once the data has been extracted. The email template can be configured in Application Config → Message → Template.
-
Field "Email template for erasure request response": select the response template once the data has been erased. The email template can be configured in Application Config → Message → Template.
-
Field "Pseudonymizer": select the template for the purpose of pseudonymizing the data when an erasure request has been made (for example, Pseudonymization base).
-
Table "Request origins" : the table shows the different origins of requests. By default, two origins are entered, "email" and "phone". It is possible to add other origins by clicking on "New".
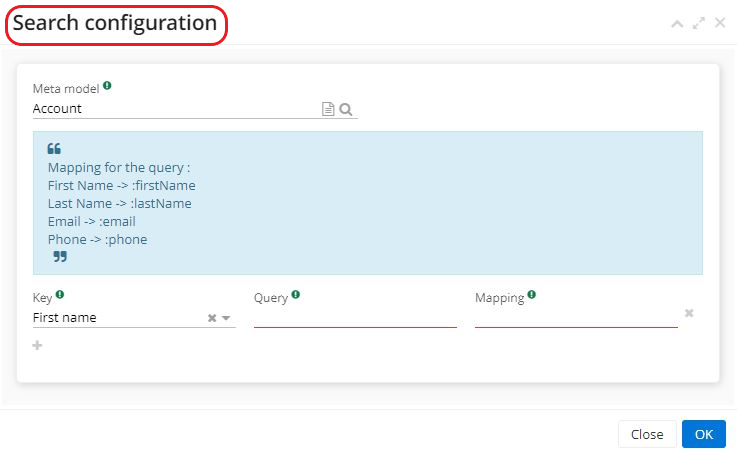
Search configuration
When configuring GDPR on the application page, add other objects in the "Search configuration" section by clicking on "+New". Clicking on "New" will result in opening a new "Search configuration" window, where it's possible to add other objects.
For a better understanding of how this works, here's an example :
What happens when the user receives a deletion request from Mr X? Mr X, who has just made a GDPR request, may be present in several ERP records.
In order to find the different people in the existing records, configure the GDPR Module search. On the GDPR application page, in the "Search configuration" section, the default objects are "Lead " and "Partner ". It is also possible to add other objects by clicking on "+New".
When clicking on "+New", a new window "Search configuration" will appear. In this window, new fields can be added as you go along (for example, it's possible to have several keys / queries / matches such as Address, Email, Last Name, First Name etc).
Key - name of the key for the search engine;
Query - JPQL filter to add to the query;
Match - field displayed in the query result.
In total there are four search keys (Email / Phone / Last Name / First Name).
The configuration elements for the search will be found in the GDPR query.
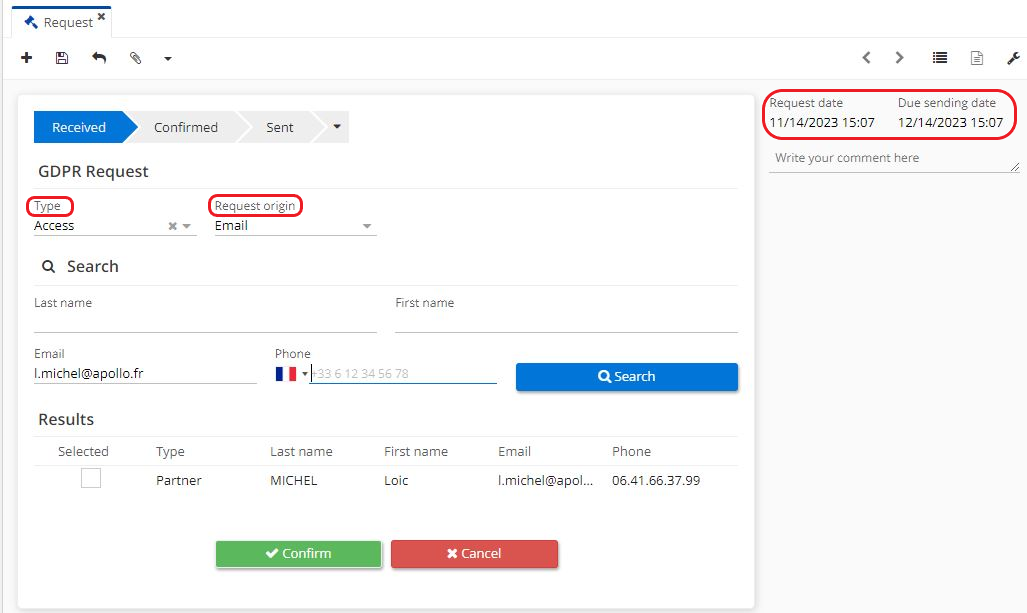
GDPR request: the access request
If a customer has requested access to personal data, create a GDPR request file.
Access : GDPR → Request → New
On the request page there are four keys that were configured beforehand on the GDPR application page.
-
Select the type of request (for example, Access).
-
On the request form, indicate the last name / first name / email / phone number of the person in question.
-
Enter the origin of the request (for example, email).
-
Click on "Search".
-
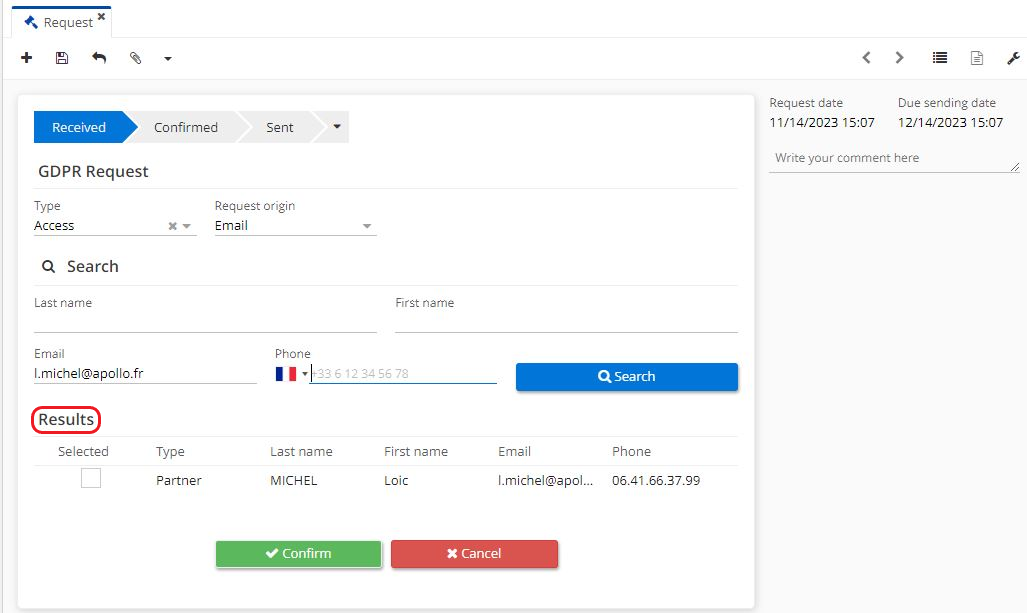
Consult the results in the results section.
Note that the Request date and Due sending date (i.e. deadline) are indicated on the GDPR request form. The dates can be configured on the GDPR application page (for example, here the deadline is 30 days).
-
Select one of the results displayed in the list.
-
Click on "Confirm".
-
A file with all the data concerning this person will be created.
-
Click on "send response". This reply will be sent to the email address, the one from the "reply email address" field. This email address is the one on the contact record of a person who made a request.
It's possible to download the file with the data, open it and decide which data is to send or to keep.

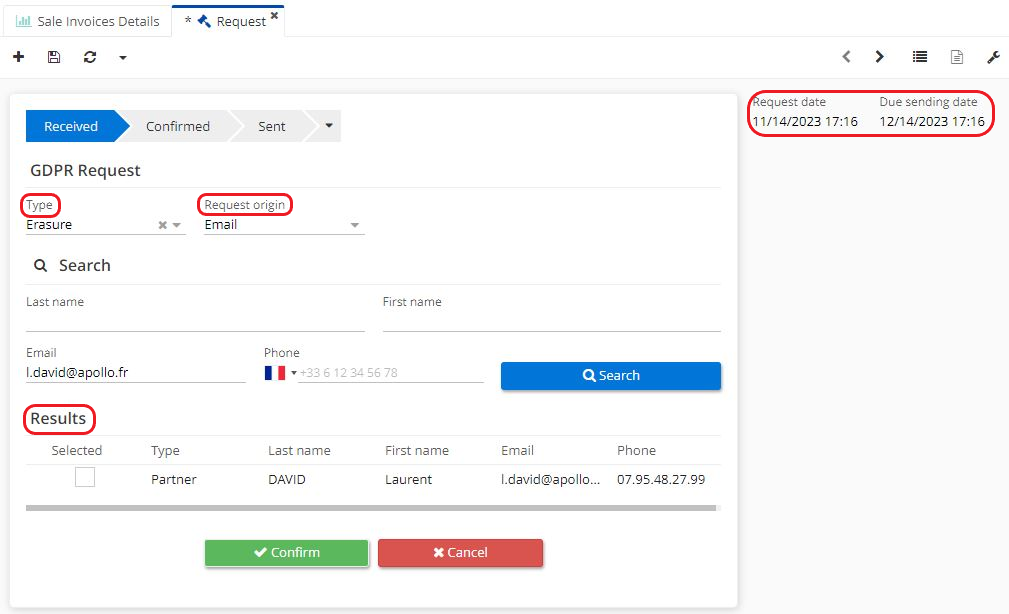
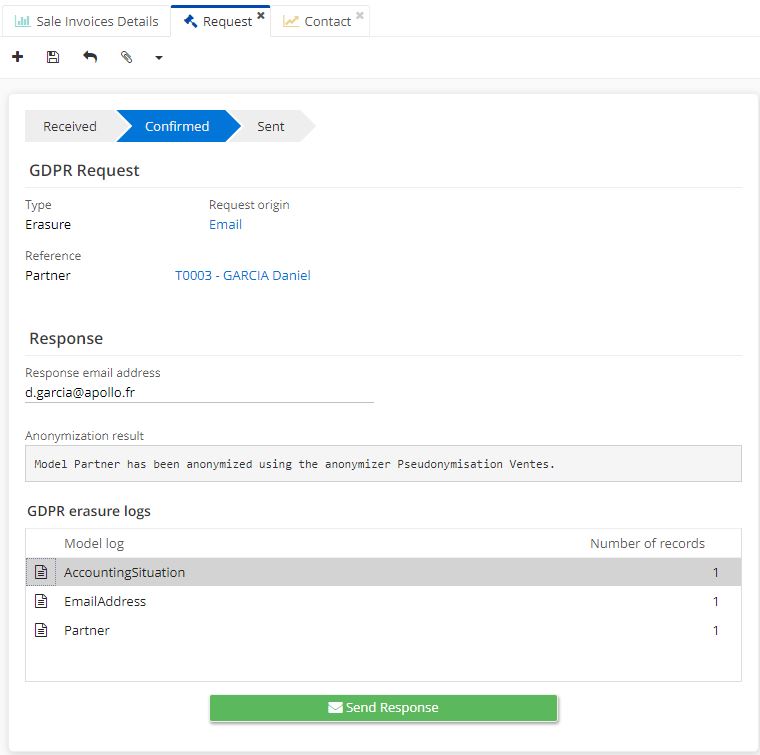
GDPR request: request for erasure
If a customer has requested the deletion of personal data, create a GDPR request file.
Access: GDPR → Request → New.
On the request file find the four keys that have been configured beforehand on the GDPR application page.
-
Select the type of request (for example, Erasure).
-
On the request file, enter the last name / first name / email / phone number of the person concerned.
-
Enter the request origin (for example, email).
-
Click on "Search".
-
Consult the results in the results section.
Note that the date of the request and the deadline for submission are indicated on the GDPR request file. The dates can be configured on the RGPD application page (for example, here the deadline is 30 days).
-
Select one of the results displayed in the list.
-
Click on "Confirm".
-
Following this action, the GDPR request changes status to "Confirmed". Consult the GDPR erasure logs which contain all the items to be deleted. Note that the third party name will be encrypted.
-
Click on "Send a response". This reply will be sent to the email address (the one from the "reply email address" field). This email address is the one on the contact record of a person who made a request.
Please note that it's possible to download the file with the data, open it and check which data is to send or to keep. Not valid for deletion requests.
The fake data created by the pseudonymisation model will destroy the old data and then replace it.
Axelor currently offers data pseudonymisation, not total data destruction.
Please note, when someone is requesting the data erasure, the company still has the right to keep invoices / delivery notes / accounting records or other documents that are required by law.
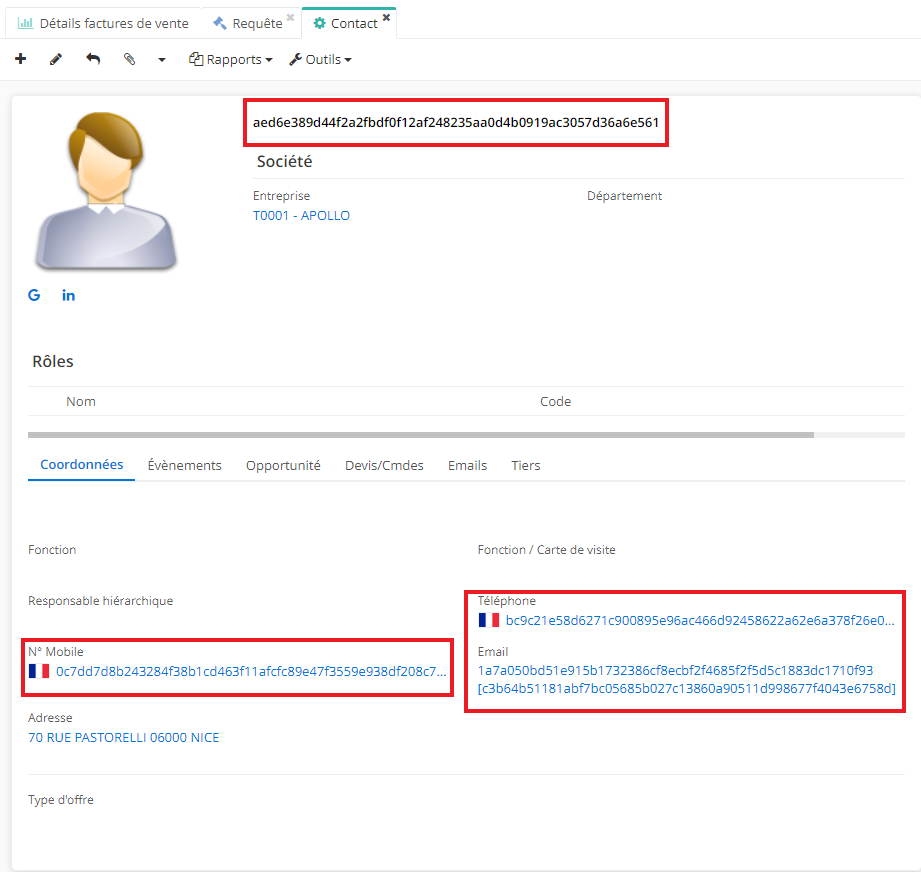
- Once the erasure request has been made on the GDPR request form, it will be impossible to find this person's file in Contacts (Application config → Referential → Contact).
The pseudonymization template must be configured correctly so that the person becomes impossible to find in the system. If certain elements are not pseudonymized, they will be used as a search key.
For instance: if in the pseudonymization template the "full name" and / or the email address are not configured and therefore are not pseudonymized, these elements will make it possible to find the contact in AOS.
Deleted contact information is displayed on certain documents
The data on the deleted contact becomes illegible on an invoice that contains it (the name will be replaced by symbols).
However, when it becomes necessary to print this invoice, the last name and first name of the deleted person will be still present on the printed invoice.
The invoice is an item that may be requested by the authorities, and it is compulsory for it to include the person's first and last names.
Other documents such as bank orders or accounting entries may show data that has been deleted, when printed.
The difference between pseudonymisation and anonymisation is that when anonymization is applied, the links between the person and other objects such as an invoice or delivery note will be destroyed, which is not the case when pseudonymisation is applied.
With pseudonymization it is no longer possible to find the person in the system with the key information (last name, first name, email, telephone number), however certain legal elements when printed will display the 'deleted' information of the person in question.
Axelor currently only offers the pseudonymization function.
Processing register
Access : GDPR → Processing register → New
The Processing Register serves a purpose of archiving data.
Example: a company may receive a lot of external data, such as invoices. The company has a legal obligation to keep invoices for ten years. However, when using ERP, the user may not want to view all the invoices for the last ten years. In this case, you need to use the processing register.
The processing register can be used with many objects, not just invoices.
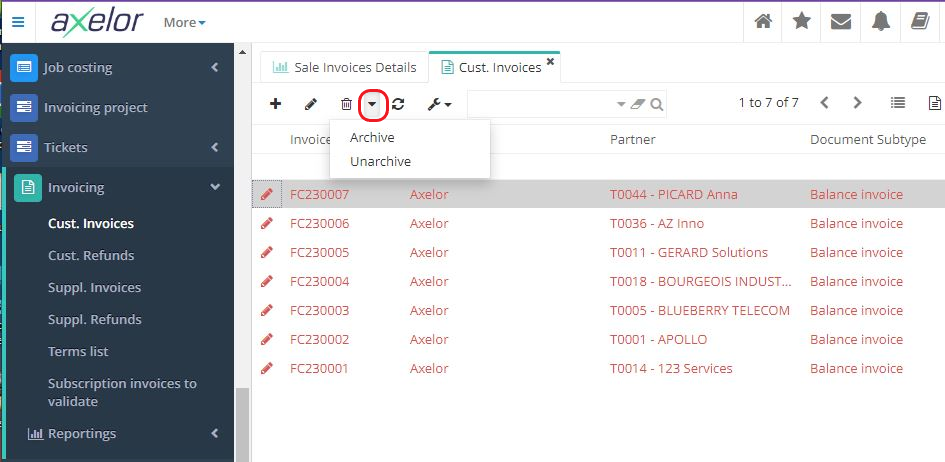
It is possible to archive an invoice manually, but the processing register offers mass archiving.
How to manually archive an invoice : in the list of invoices select an invoice and then click on "Archive" (this action is available by clicking on the triangle button at the top of the page).
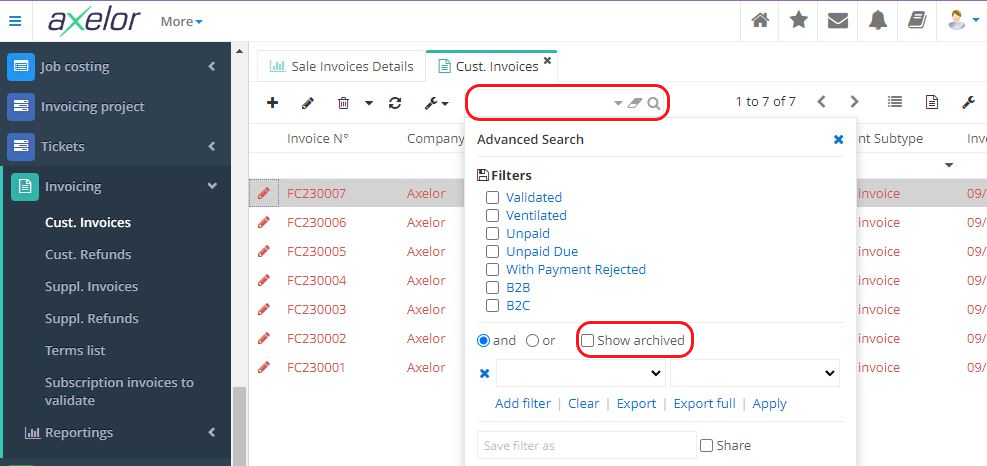
In addition, it is always possible to find an archived invoice (or any other object) using the advanced search filters (click on "Show archive").
The processing register
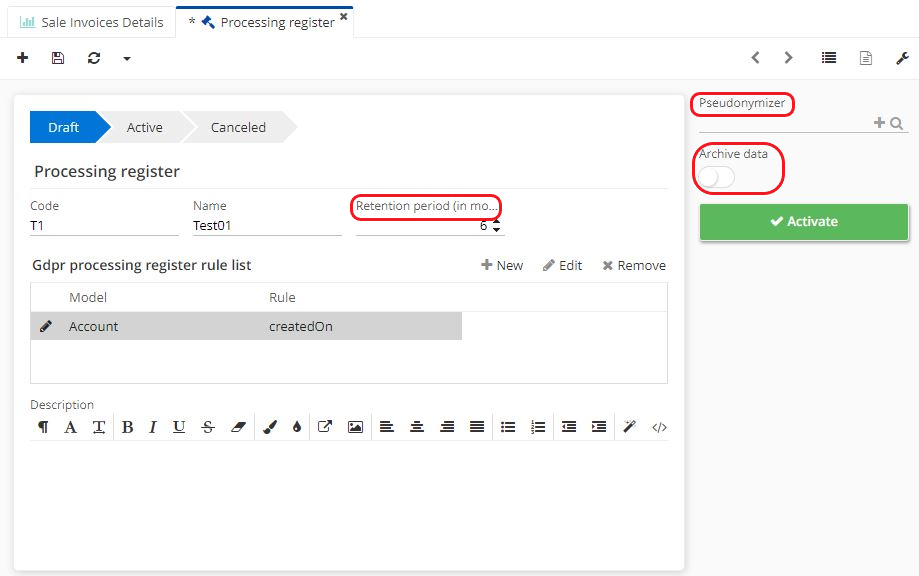
Access : GDPR → Processing register → New
-
On the Processing Register form, complete the necessary information.
-
Indicate the length of the retention period (in months).
-
Click on "New" to add a new item to the "GDPR processing register rule list" table.
-
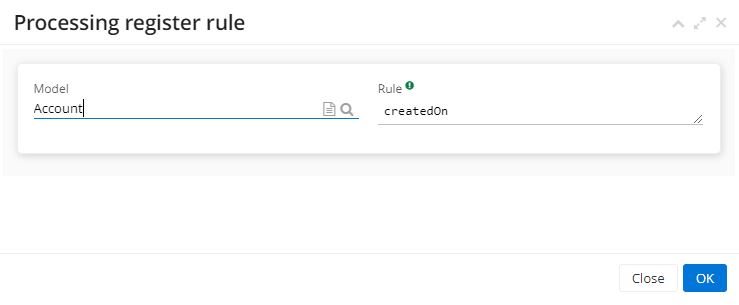
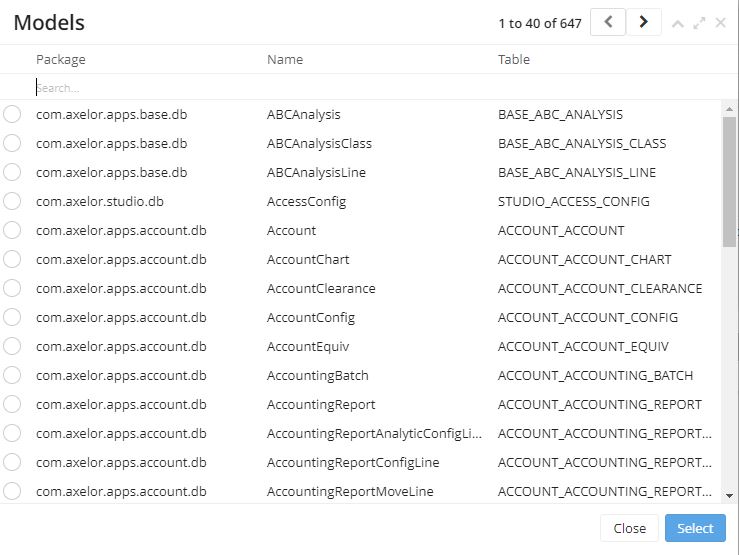
Following this action, a new tab "Processing Register Rule" will open. Select the model you wish to process (for example, Account).
-
Define the rule (for example, createdOn).
-
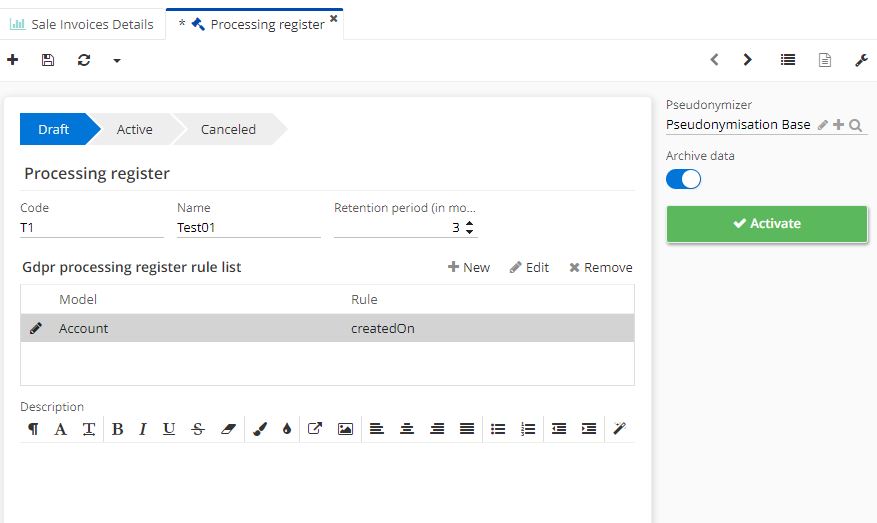
It is also possible to add a pseudonymization model in the "Pseudonymizer" field.
-
Click on "Archive data".
-
Click on "Activate".
-
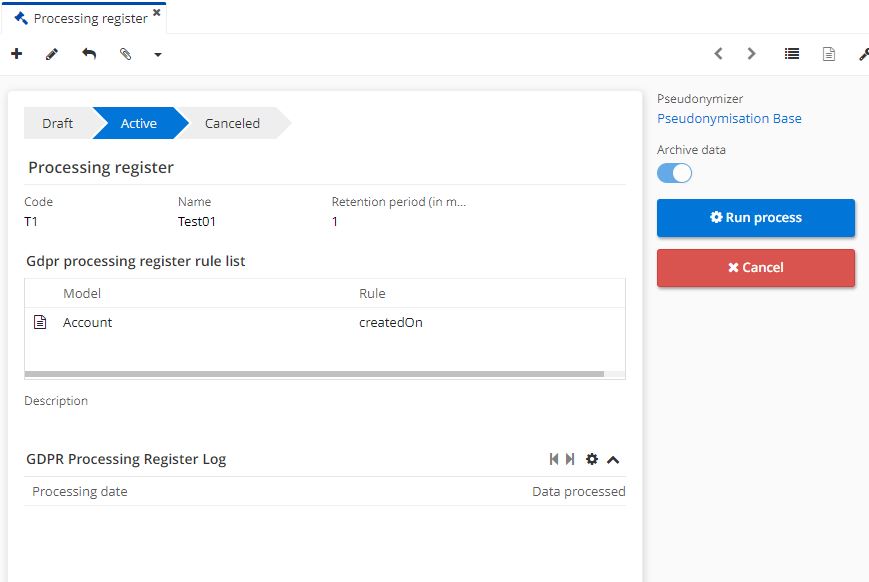
Click on "Run process".
-
The "GDPR Processing Register Log" displays the data that has been processed.
It is always possible to find an archived object using the advanced search filters (click on "View archives").