Stock
We are excited to inform you that we are working on an updated documentation which will be released soon. In the meantime, you are welcome to use the current version as it remains completely valid for your needs.
Introduction
This application allows you to manage stocks and stock movements. Here you will find customer deliveries, supplier receipts and internal movements. The application manages backorders, returns and re-shipments. Deliveries can also be split. Stock management is multi-warehouse and tree-based. The application manages inventories and minimum stock rules. You can also start the CBN (net requirements calculation). Depending on the current stock situation, open orders, production requirements and established forecasts, the requirements calculation will generate purchase and/or production proposals that you can decide whether or not to approve.
- Keywords :
- CBN: The net requirements calculation allows you to generate purchase and/or production proposals based on the current stock situation, open orders, production requirements and established forecasts, which you can decide whether or not to approve.
- Remainder: if the quantities actually shipped/received differ from the planned quantities, a purchase order of the residual type will be automatically generated when the goods movement is carried out.
- FIFO: it is a stock management rule that consists in picking goods from stock in chronological order of arrival.
- LIFO: This is a stock management rule that consists of picking goods from stock that arrived last.
- Stock rule: Allows you to define specific stock management rules, allowing you to automatically generate alerts, purchase orders or production orders when a minimum stock quantity is reached.
- Goods movements :
- Customer deliveries: Displays all scheduled, current and completed customer deliveries. And allows you to plan new deliveries.
- Customer returns: Displays all scheduled, current and completed customer returns. And allows you to plan new returns.
- Supplier Receipts: Displays all scheduled, ongoing and completed supplier receipts. And allows you to plan new receptions.
- Supplier Returns: Displays all scheduled, current and completed supplier returns. And allows you to plan new returns.
- Internal movements: Displays all scheduled, current and completed internal goods movements. And allows you to plan new movements.
- Mvt Stock Lines: Displays all lines of goods movements.
- Tracking number search: Allows you to search by tracking number for products and their stock location.
- Forecasts : Forecasts of the various goods movements:
- Mvt. of production requirements: Forecasts of goods movements concerning production requirements (movements whose destination location is the production location).
- Mvt. Production forecasts/ : Forecasts of planned production stock movements (movements whose source location is the production location).
- Supplier receipts: Forecasts of supplier receipts.
- Supplier returns: Supplier returns forecasts.
- Customer deliveries: Forecasts of customer deliveries.
- Customer returns: Forecasts of customer returns
- Inventories: Allows you to perform inventories by stock location.
- ABC Classification: Allows you to create and view ABC classifications for products, families or product categories.
- Product availability: Allows you to know the availability of products in stock on a stock location for a chosen period.
- Products: Allows access to the product repository.
- Logistics sheets: Allows you to create logistics sheets.
- CBN : Requirements Calculation Menu :
- Requirements calculation: Allows you to start a requirements calculation on a selected stock/production bin.
- Forecasts : Allows you to create stock movement forecasts that will be taken into account in the calculation of requirements.
- Configuration: Work in process types: Allows you to create work in process types that will be displayed in the results of the requirements calculation.
- Stock locations: Displays the different stock locations and allows you to create new ones.
- Storage bin tree: Displays a tree view of the different storage bins.
- Reports :
- General: General reports from the inventory management application.
- Deliveries: Reports on customer deliveries.
- Configuration: Incoterms: Allows you to manage Incoterms / Stock rules: Allows you to create stock management rules / Tracking number: Displays all tracking numbers/lots / Transporter: Displays the different carriers used and allows you to create new ones / Transporter mode: Displays the different modes of carriers used and allows you to create new ones / Delivery mode : Displays the different delivery modes used and allows you to create new ones / Tracking No. configuration: Allows you to configure tracking numbers/lots / Customs nomenclature code: Displays the customs nomenclature code / Reason for cancellation: Allows you to create cancellation reasons for deliveries
Stock storage bins
Create a storage bin / warehouse
Stocks > Stock locations
Give a name to your location, then define a type: internal, external (supplier, customer) or virtual. The advantage of a virtual location is that it can have negative stocks. In the “Configuration” tab you can define if this stock will be usable for sales and/or purchases, and/or production, allowing you to automatically transfer information such as contact details, on sales, purchases and production documents. The “Countdown storage bin” option allows you to manage, from a sales order, a delivery from a storage bin that does not belong to you, for example that of a subsidiary of your group. If you activate the option “Include products without stock” this allows you to display products whose stock is at zero
Initially, when creating a stock, everything is put into a virtual stock and transferred to a physical stock. Virtual stocks have the possibility to have a negative stock.
You can define as many locations as you want and nest them together. You can then view a tree view of your storage bins via the submenu “Tree structure of stock holdings”.
In the application config > Stocks > Company settings, you can define virtual storage bins.
Manage warehouse stock movements
Stocks > Goods movements > Internal movements
Choose your source and destination locations and then select the product(s) concerned on the internal mvt lines. To plan the movement click on the corresponding button. You can then perform the movement. By default, the “Estimated Date” is set to the current date but can be modified.
View the contents of a location
On the card of a stock location you can consult the content of the concerned stock, at 2 different levels: the general content by product (tab “Contents of the location”), the content by product and by tracking number (tab “Details of stocks”). In these 2 views you have the possibility to search by product name, locker, tracking number etc.
Print / export a stock status report
On a stock bin card, the “Print” button allows you to generate a stock report, either in Excel format or in PDF format. This is presented by product family and is valued (sales value, cash value, PMP value)
Correct quantities on a storage bin line
You can manually correct the quantities of a product on a bin line either from the bin master record or from the “Stock correction” menu entry. On the tabs “storage bin content” and “stock details” of a storage bin, the blue button at the end of each line opens a stock correction form, the same as the one generated via the menu entry “Stock correction”. You can specify a reason for the change. The reasons are to be configured in advance in the configurations of the “Stocks” menu.
Define methods of supply for a product
Product sheet > “Sales” tab
The mode of supply of a product can be configured in the product sheet, in the “Method of supply” field. This is the default stock replenishment method. The replenishment mode indicated on the stock rule is the one that will be taken into account when calculating requirements, thus making it possible to generate purchase or production proposals for a product.
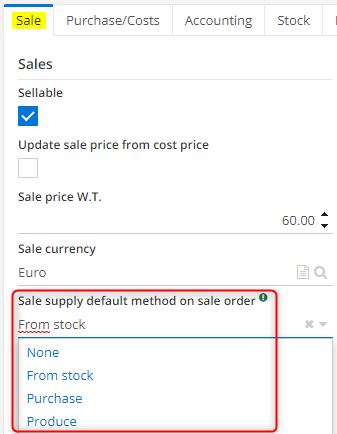
Do not confuse the method of supply with the field “Default method of supply on sales orders” in the “Sales” tab. This field will indicate whether during a customer order the product will be deducted from existing stock, purchased or produced.
By default, the “Replenishment mode” field of the stock rule automatically includes the supply method indicated on the product sheet.
Reserve/allocate stocks on orders
In the application configurations of the Supply Chain module you must activate the option “Manage stock reservation”.
The reservation of a product’s stock is made even if it has no stock, while the allocation reserves the available stock.
There are two ways to reserve stocks: automatically or not. To book automatically, you must activate the option “Auto request quantity for booking” in the configurations of the Supply chain app by company: the quantity booked will be equal to the quantity on the order line, but you can cancel the booking request manually. If this option is not activated, you will have to click on the “Request Reservation” button to make the reserved stock equal to the order line.
If you activate the option “Automatically allocate stock upon receipt”, in the application configurations of the supply chain module, by company, this makes it possible to automatically allocate quantities of one or more products on the next supplier receipts.
The “Automatically allocate stock to other movements” option allows you to allocate the remaining quantity to other movements after allocating a stock movement.
Stock > Stock locations
The “Automatically allocate stock to other movements” option allows you to allocate the remaining quantity to other movements after allocating a stock movement.
Valuing a stock
Stock > Stock locations
The valuation of a stock is automatically calculated by the system according to the cost calculation method indicated on each product sheet (Purchasing/Cost tab). The stock value can be viewed from the card of a stock storage bin. The stock valuation is updated in real time.
Manage delivery modes and carriers
Stocks > Configuration > Transport mode / Delivery mode
A delivery mode can include one or more carrier modes, which in turn include carriers.
Manage delivery modes and carriers
You must first create carriers, either by creating a third party and typing it “Carrier”, or from the corresponding sub-menu in the configurations of the module “Stocks”. Then, you can create carrier modes and assign carriers to them. You must also create delivery methods and link them. This information must be entered on a customer’s form in the “Delivery” tab and will be included on the quotation/order and then on the BL.
Generate a BL from a purchase order
In the configurations of the Supply Chain application, you can activate the “BL Management” option which will allow you to generate BLs from sales orders. Also, BLs can be generated automatically when the order is confirmed if the corresponding option has been activated.
From an order with the status “Order confirmed”, you can generate the delivery note by clicking on the button “Generate BL”. In the case of “non-stock” products, the source location will be by default the one chosen in the “Default shipping location” field within the application configurations of the Stock module by company. Concerning services, there is no need to generate a BL, but for an order comprising a product and a service, the BL will only be generated for the products. Your BL is then created. You can indicate whether the goods are in conformity or not, and you can enter information related to the carrier. It is possible to schedule the sending of an automatic email when planning and/or carrying out the goods movement.
On a delivery note, you can view the delivery route by clicking on the “View Route” button.
In the application configuration > Stocks > Company settings you can enter your account number linked to each of your carriers so that it can be displayed on the transport documents.
From the configurations of the Supply Chain application, you can activate the option “Generate BLs automatically”. These will then be generated as soon as a sales order is placed in the confirmed status. Another option that can be activated: “Finish customer cmdes on delivery”: customer orders automatically change to “Completed” status when deliveries for these orders have been completed (when the BL(s) change to “Completed” status).
Calculate the net weight on each BL line
It is necessary to have previously filled in a net mass on the product sheet. On a BL line, you can find the net mass of the product in question and by double clicking on this line, you can find the total net mass according to the quantity.
Edit a preparation form
From a customer delivery note, you can edit a preparation note by clicking on the “Reports” button.
In the application configurations of the Stock module, you can activate the option “Detailed preparation form”.
Create a logistics sheet
Stocks > Logistics sheets
This is a packing list
It is mandatory to select the customer to be delivered. Then you can specify a stock location, pick-up date, carrier and/or freight forwarder. In the “Lines” tab, select the relevant goods movements and then click on “Add”: packing lines appear. Once you have chosen your carrier, click on the “Validated carrier” button. Finally, once the goods have been picked up, click on the corresponding button.
You will find your logistics sheet in the tab of the same name within a BL.
In the application configuration > Stocks > Company settings you can activate the option “Perform BL when packages/pallets are picked up”, i. e. when the logistics form changes to the status picked up.
Indicate delivery conditions
On a sales order, you can enter delivery instructions in the “Delivery” tab that will be included on the preparation form.
Manage partial deliveries
From a receipt slip in planned status, by clicking on the “Tools” button, you have the possibility to split this delivery into two distinct movements by choosing on the movement line to split the quantity to be put in each movement
It is also possible to automatically generate a residual BL simply by indicating the quantities received on the BL. If these are different from the planned quantities and the “manage balances” box is activated, then a BL for the remaining quantities will be generated when the BL is created.
For a finer split, it is possible to use the “Split by unit” or “Specific split” buttons beforehand, which make it possible to split a movement line into several lines within the same movement.
Manage returns
If you wish to plan a return, you must start from a customer delivery or supplier receipt, click on the “Generate return slip” button. A new reverse goods movement will then be generated in the planned status. Once the products have been returned, you can switch the movement to the status achieved by clicking on the corresponding button.
From a customer or supplier return made you can generate a credit note directly by clicking on the dedicated button.
Invoice BLs en masse
Sales > Mass invoicing of BL
If you want to generate a single invoice for several BLs, it must be for the same customer. However, for one invoice per BL, you can select several BLs without distinction of the customer concerned.

Manage the customs nomenclature
The customs nomenclature is a system of description and coding of goods used as a reference to determine the rate of customs duties applicable to international shipments.
Customs nomenclature codes have been imported and are located in the configurations of the Stock module. You can directly select a code on a product subject to the Declaration of Exchange of Goods (practiced in the EU) - “Packing” tab of the product sheet.
A service is also subject to a Declaration of Exchange of Services (DES) in the context of an intra-EU sale.
The customs nomenclature is updated annually by customs. A script allows you to retrieve the latest version to easily integrate it into the tool.
Generate an invoice from a BL
You must first activate the “Generate invoice from BR/BL” option in the configurations of the Supply Chain application.
On a BL, you can adjust the quantity actually delivered before the BL is made. From the actual BL, you can generate the invoice that will include the actual quantities and adjust the price accordingly.
Enable product description copy
Application configuration > App management > Inventories
If you want the description to be included in the printouts of the delivery documents (BL, BR, preparation slip) you must activate the option “Enable product description copy” in the application configurations of the Inventories module.
The receptions
Generate a BR from a purchase order
Purchasing > Supplier orders
From a supplier order, click on the “Generate BR” button. Receipt slips are visible in the “Supplier Receipts” menu of the Inventories module. Once the products have been received, you must confirm the goods movement by clicking on the “Completed” button.
From the configurations of the Supply Chain application, you can activate the option “Generate BRs automatically”. These will then be generated as soon as a supplier order is placed in the confirmed status. Another option that can be activated: “Complete supplier cmdes upon receipt”: supplier orders automatically change to “Completed” status when deliveries for these orders have been completed (when the BR(s) change to “Completed” status).
Option that can be activated from the configurations of the Supply Chain application (Application Config): “Finish supplier cmdes upon receipt”: supplier orders automatically change to “Completed” status when the receipts for these orders have been completed (when the BR(s) change to “Completed” status).
Manage partial receipts
From a receipt slip in planned status, by clicking on the “Tools” button, you have the possibility to split this receipt into two distinct movements by choosing on the movement line to split the quantity to be put in each movement.
It is also possible to automatically generate a residual LRB simply by indicating the quantities received on the LRB. If these are different from the planned quantities and the “manage balances” box is activated, then an BR for the remaining quantities will be generated when the BR is completed.
For a finer split, it is possible to use the “Split by unit” or “Specific split” buttons beforehand, which make it possible to split a movement line into several lines within the same movement.
Manage returns
If you wish to schedule a return, you must click on the “Resend” button from the supplier reception. A new goods movement of type receipt will then be generated, in the planned status. Once the products have been returned, you can switch the movement to the status achieved by clicking on the corresponding button.
From a supplier return made you can generate a credit note directly by clicking on the dedicated button.
Invoice BRs en masse
Purchasing > Mass invoicing of BR
If you want to generate a single invoice for several BRs, it must be for the same supplier. However, for one invoice per BR, you can select several BRs without distinction of the supplier concerned.
In the BR selection list view, on an BR line, the “Origin” field allows you to know from which supplier order the BR came from. You also have other filters that allow you to sort.
Check compliance upon receipt
You must first activate the option “Require compliance information for typed products”Control on receipt’" in Application Config > App Management > Inventory.
This option makes it mandatory to check the conformity of products whose “Control on receipt” box is ticked in the “Stock” tab.
Check the stock upon receipt
You can create an internal stock location called “quality control” through which your goods purchased from your suppliers will transit for quality control before reaching its storage location. In your company’s Stock configurations, you can select your previously created location in the “Quality Control Location” field. On the sheet of products subject to quality control, tick the box “Receipt control” in the Stock tab. Finally, on your BR, select as the delivery location your location dedicated to quality control in order to generate the ch
If an order contains a product without quality control and another product requiring control, then two BRs will be generated.
Fill in the supplier reference on the BRs
On an BR, a field is dedicated to the supplier reference, and you can make it mandatory to fill it in with the option “BL supplier number mandatory upon receipt” in Application Config > App Management > Inventory.
The inventories
Inventories > Inventories
The inventories
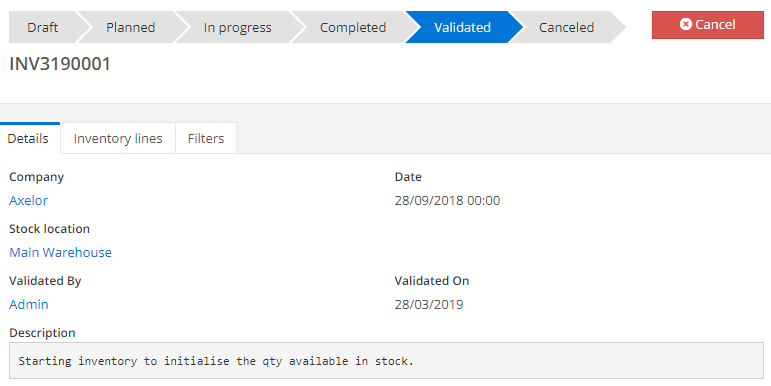
You must inform the company code and the stock location concerned. Then enter a date and possibly a description. An inventory can be carried out according to a certain product family, or product category or a particular product. The inventory can also be carried out on a particular locker square. Finally, click on the “Complete the inventory” button, a “Inventory lines” tab then appears. You can then plan the inventory. At this stage, the inventory lines will be exportable in PDF, Excel or CSV format. If you export in CSV format, you can perform your stock core functions in this file, then reimport it to be able to modify the stock in the system, provided that the inventory is at the current or completed stage.
::: tip
You can also generate an inventory from the file of a stock location by clicking on the dedicated button located in the taskbar. :::
When an inventory is in progress, no goods movement can be taken into account in the system.
The “Exclude products without stock” checkbox is used to exclude products with zero stock from the inventory lines. The actual quantities are entered in the “planned” stage of the inventory. Once the inventory has been validated, the stock quantities are updated according to the actual quantities indicated during the inventory.
The calculation of requirements
Stocks > CBN
The net requirements calculation allows you to generate purchase and/or production proposals based on the current stock situation, open orders, production requirements and established forecasts, which you can decide whether or not to approve.
Start a requirements calculation
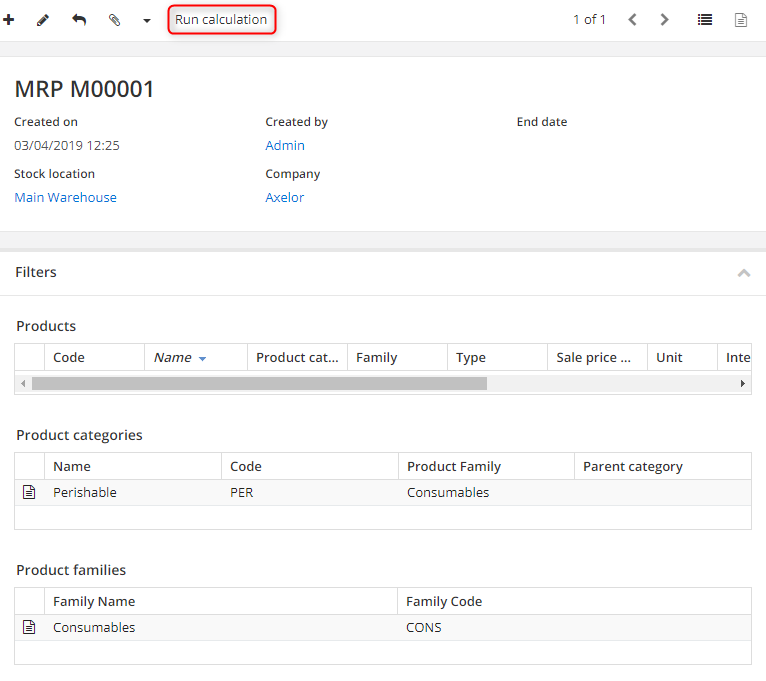
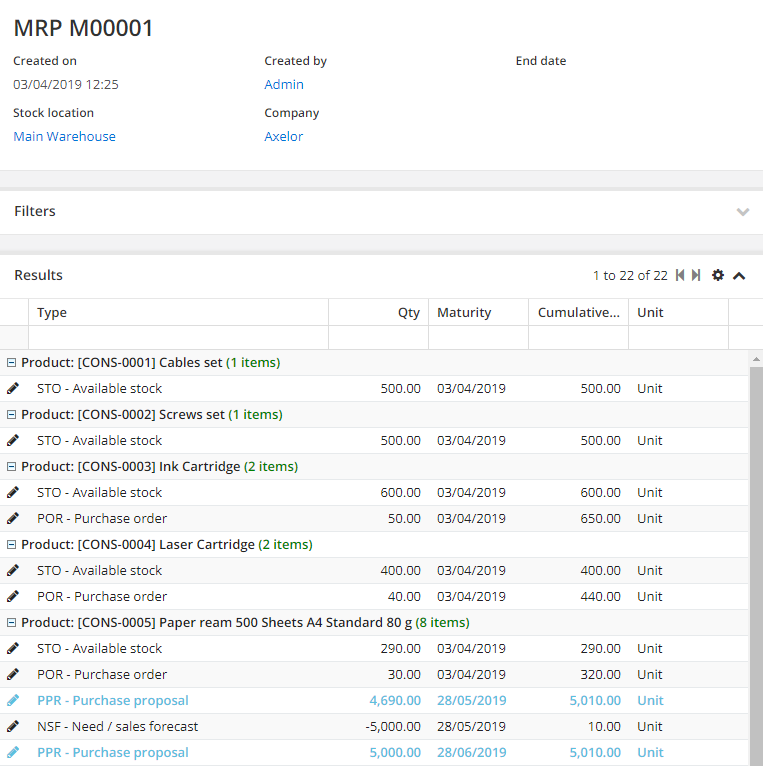
Choose the location where the calculation will be performed and a period end date. You can then choose to perform the calculation according to different criteria, by selecting only certain products, product families, orders… Once you have selected the elements on which you want to perform the calculation, you must launch it by clicking on the “Start calculation” button in the taskbar.
Consolidate proposals by period�
In a product sheet, in the “Stock” tab you can enter a CBN family previously created. This will allow, during the generation of the CBN, to consolidate the lines by product family.
Generate replenishments from CBN
Stocks > CBN > Requirements calculation
Once the CBN has been generated, replenishment proposals are generated, according to the defined stock rules. These will be taken into account for the proposals generated by the calculation. If the selected re-approval mode is supplier quotation/cm, the requirements calculation will generate supplier quotations with draft status. If it is a production order, the system will generate production orders in draft status. And if you select alert, no proposal will be generated but alerts will be created if there is insufficient stock.
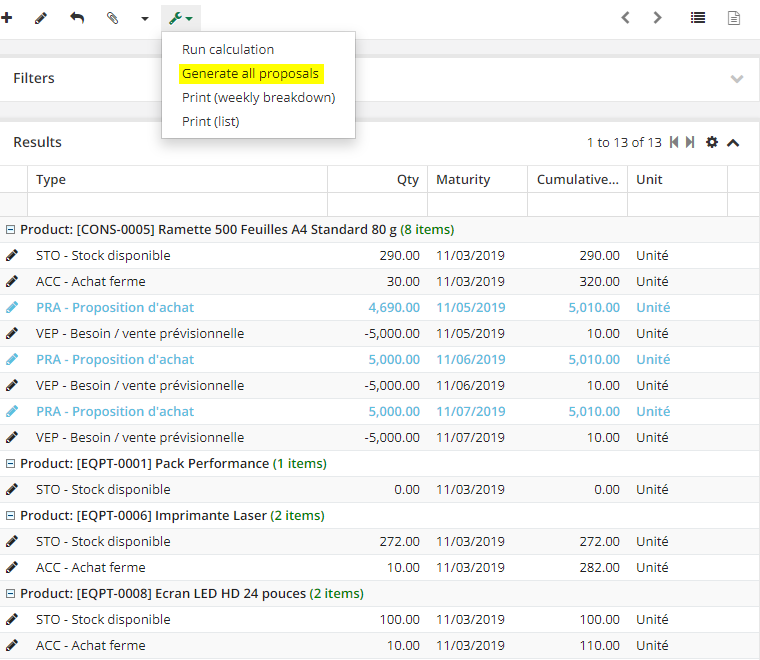
The exclusion of a product from the CBN calculation is done in the product sheet, in the Stock tab, by checking the box “Exclude from CBN”.
You can generate all replenishment proposals from the “generate all proposals” button or individually by clicking on each proposal.
The stock types are available in the CBN submenu configurations, where new ones can be created.
Integrate undated events
Events without dates correspond to vendor and customer orders without a delivery date and production orders without a planning date. In this case, the system will use the CBN launch date (current date). To enable this option, the dedicated box must be checked in the stock type record (CBN> Configuration > Stock types).
Possibility to choose for each type of stock to which status you want the requirements calculation to apply.
Within an asset type master record, it is possible to determine which statuses will be taken into account for the calculation of requirements: draft or finalized estimate, confirmed or completed order,…).
Traceability
Stocks > CBN > Configuration > Type of work in progress
Manage tracking numbers / batches
To generate tracking numbers, you must first have created sequences (Application Config > General Data > Sequences) by selecting “Product tracking number” for the document concerned. Then create a “Tracking No. Configuration” in the Stock module configurations and configure it according to whether you want to use it for purchases and/or sales and/or production. When you choose to use it for production or sale, check the box “Automatic selection of a tracking number…”. A drop-down menu appears and allows you to choose between FIFO and LIFO. Once this configuration has been made, select it on the sheet of the product concerned in the “Tracking number” tab.
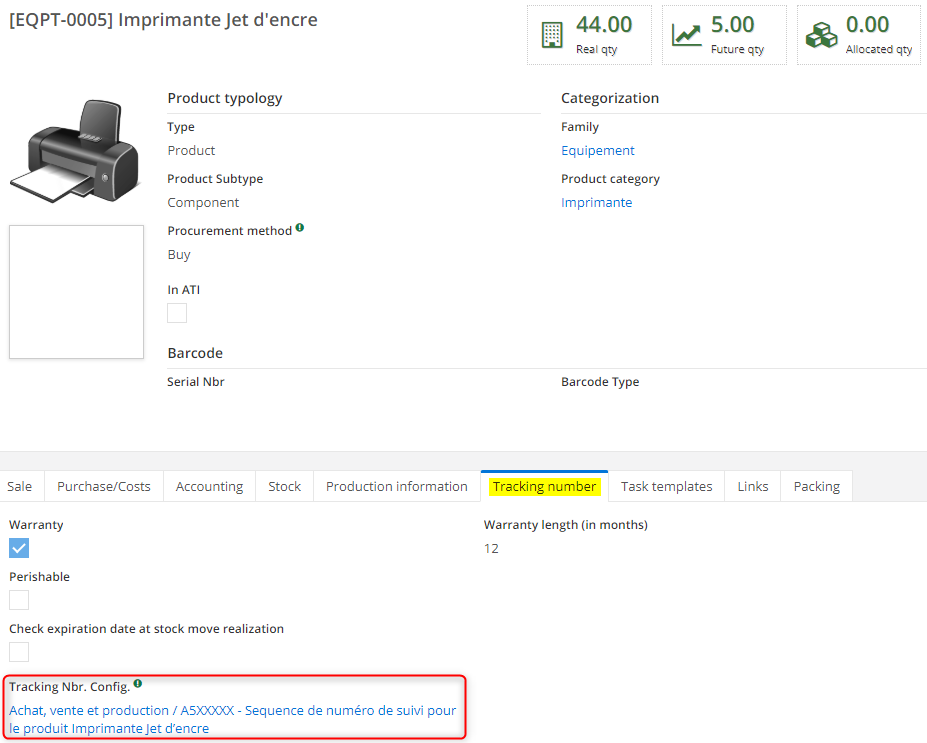
You can configure a tracking number either automatically from a sequence or manually if you do not check the box “Automatic selection of a tracking number…”.
Select tracking numbers for a shipment
This feature allows you to distribute an ordered product in multiple quantities over several tracking numbers/batch.
From the lines of a delivery note, it is possible to send products with a chosen tracking number, by clicking on the blue pictogram at the end of the line.
Generate barcodes
The generation of barcodes on products is activated from the configurations of the “Base” module. You must check the box “Enable barcode generation for a product” and choose the default barcode type that will be the same for all products. If you activate the “Change product barcode type” checkbox, you will be able to change the barcode type on each product sheet." The barcodes are then used to print the manufacturing operations, as well as the delivery and receipt notes. The system works natively with keypad emulator handhelds, and can work with smart handhelds, but this requires a connector.
Barcodes can be displayed on preparation slips provided that you have enabled the option in the application config > Inventories > Company Settings. The system works natively with keypad emulator handhelds, and can work with smart handhelds, but this requires a connector.
The different types of barcodes must be configured in the application config > General data > Configuration barcode type
Search for tracking numbers
Stocks > Search for tracking numbers
You can manually enter a tracking number in the corresponding field, and filter the search on a particular product. In the table, all goods movements, storage bins and production orders with the required tracking number appear.
You can filter your search only on one of the objects, that is, only on storage bins, goods movements or production orders.
In the Application Configurations > Device Management > Stock: The Boolean “Separate sending operations” must be enabled
Separate sending options
The sales representative, depending on availability, requests that the goods be sent to the shipping department. The operator prepares and loads the goods.
First, on the goods movement, the sales representative must tick the Boolean “Request for availability”. (which is automatically dated) to notify the operator that the order can be processed, then the operator edits the preparation form by clicking on the corresponding button at the top of the breadcrumb, which automatically tick the Boolean “Prep Pack edited” and dates the action; this means that the order is loaded and ready to be delivered.
Other functionalities
Set up the printouts
Application configuration > Stock > Company
In the application configurations of the Stock module, you have access to different print parameters such as the display of the customer code, line details, or third-party reference.
Set up automatic email sending
In the application configurations of the Stock module, you can request the automatic sending of emails when planning or performing the goods movement, provided you have configured an SMTP account beforehand.