Customer file
You will find the list of all customers and prospects in the Customers menu.
Path : Sales → Customer → click on + to create a new file or click on an existing file.
-
Each customer file has an automatically generated reference number.
-
On the file, you can find the debit / credit balance.
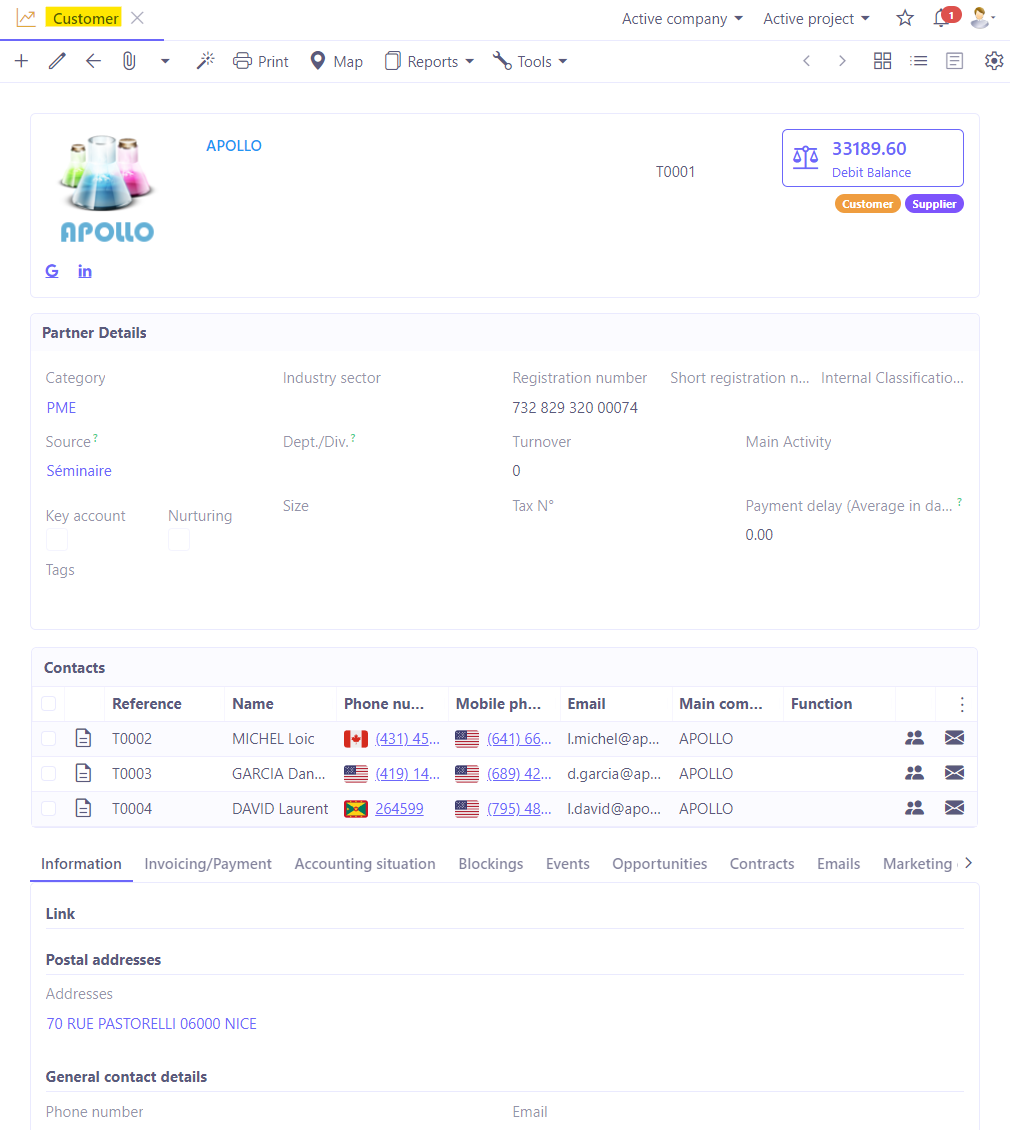
Create or modify a customer file
-
Click on the pencil icon to edit / add information to the customer file.
-
In the Properties section, define whether the customer is a customer or a partner.
Warning: once the customer already has orders/invoices in progress or other accounting type elements linked to their account in the application, it will be impossible to change the partner (third party) category.
The system will display the error message ‘This partner is categorised as a Customer due to existing records in the database. This category cannot be removed’.
Since version 8, it is no longer possible to create a prospect file from the Sales module. To create a prospect, open the CRM module → Prospect → +New.
-
Fill in the essential information.
-
Mother company : in the ‘Mother company’ field, fill in the parent company if there is one. Tick the ‘Key account’ box if it is a key account or the ‘Nurturing’ box if it is a nurturing account.
Key Account: key account is used to identify important and strategic accounts from a commercial point of view, for example a large company that the user would like to have as a customer. In this case, this option makes it easy to do research by quickly visualising key accounts. From a marketing point of view, these are the accounts that will be given priority.
Nurturing: means that this account is the result of nurturing. In other words, the lead has been fed marketing content / and this lead has not necessarily been very active in the buying cycle / their buying project could be on hold / or they were in advanced prospecting / it's also possible that there were no sales actions to be carried out by the sales team. As a result, the Nurturing lead is most often followed up by Marketing (for example, it would be possible to send this lead white papers or webinar invitations) before being converted into a customer.
- Customer contacts: add customer contacts that will later be used when entering quotations or invoices.
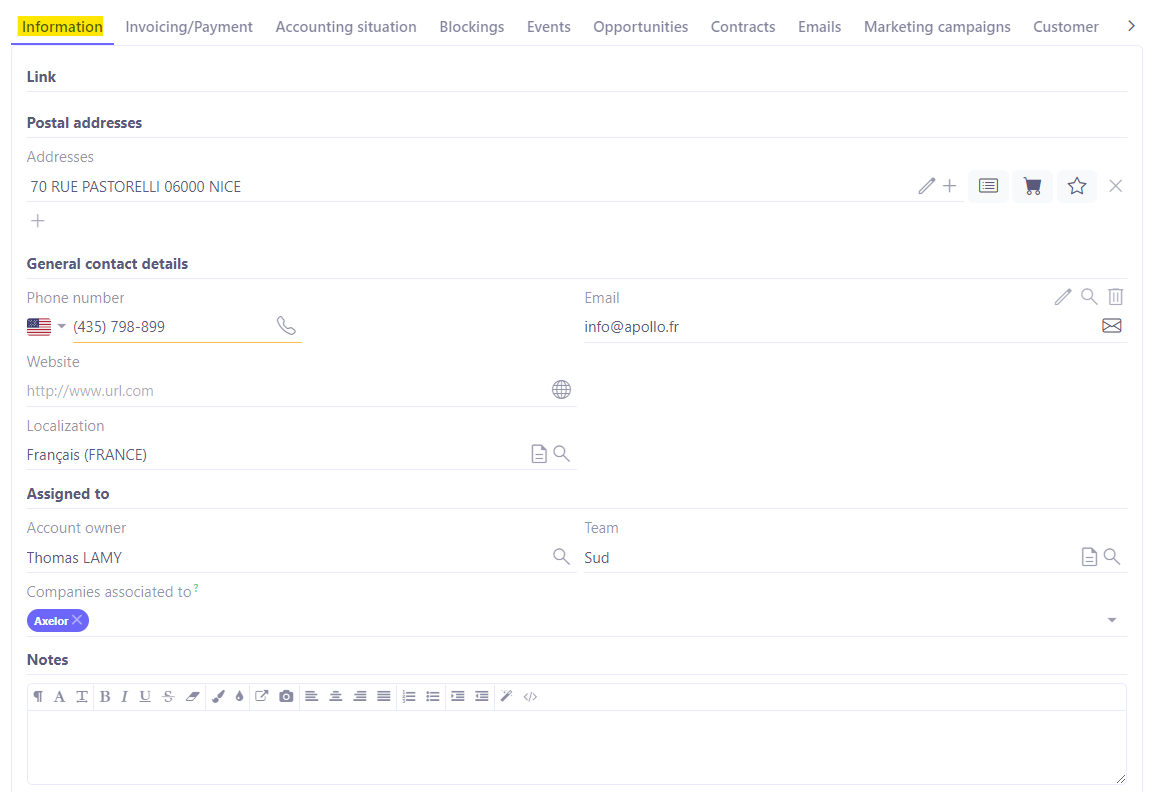
Information tab
You will find the list of addresses in this tab.
-
As with the contact form, you can enter general information on the prospect form and add contacts.
-
In the Information tab, enter the address. Depending on the type of address, you can assign a type to an address by clicking on one of the icons in the ‘Addresses’ field.
-
Invoice icon: define the address as an invoice address ;
-
The caddy icon: define the address as a delivery address ;
-
Star icon: set this address as the default address. You should always enter a default address because this address will be used automatically when filling in the third party on quotations.
If you want to enter a default billing address, tick both icons: the billing icon and the default address icon.
-
In the ‘Address’ section, click on the + button to add a new address line. In the field itself, on the right next to the icons which allow you to define the nature of the address, click on another + to open the address configuration window. Fill in the details.
-
Assigned to: this field lets you know which member of staff is the owner/referrer of this account, or which team is responsible for this account. If you work in a multi-company environment, assign a company in the Company field to this client so that you can share the repository.
-
Notes: leave notes in the dedicated space.
-
Save the changes you have made.
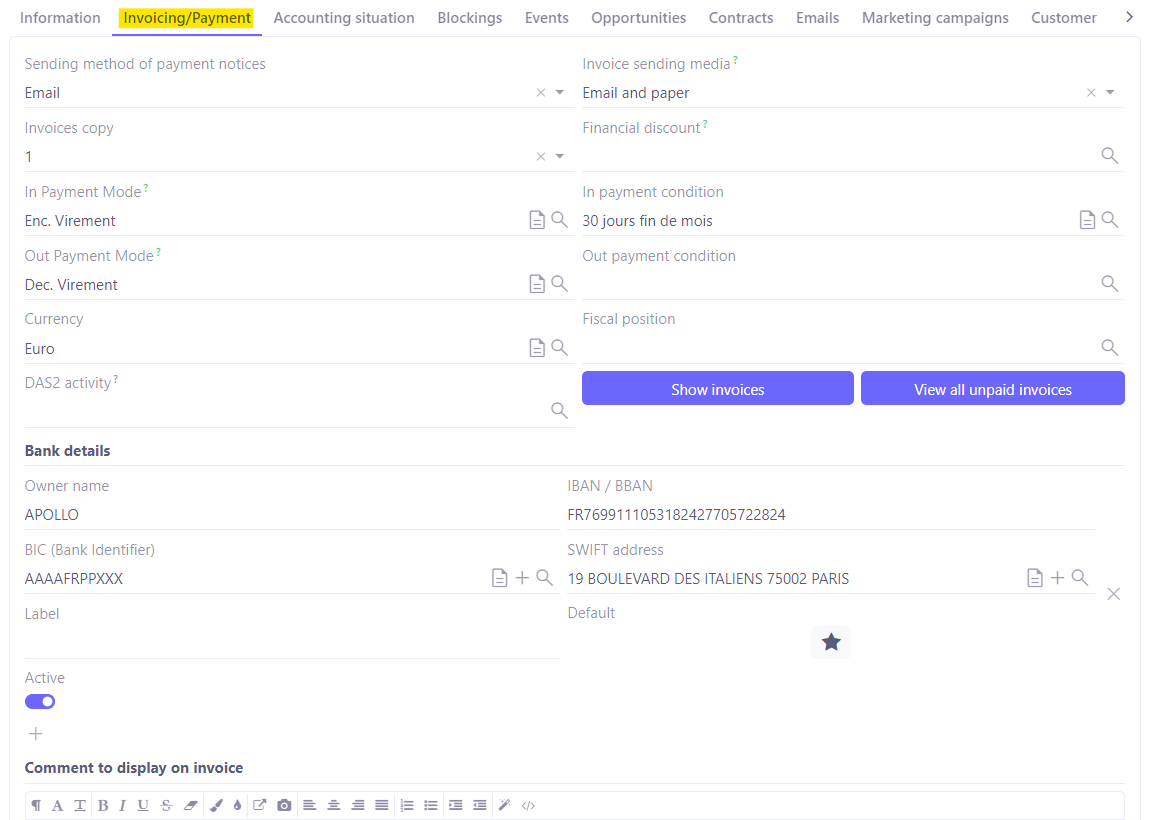
Invoicing / Payment tab
Here you will find information about payment methods.
-
Sending method payment notices: define the method of sending payment notices. Either by email or no payment advice (‘none’).
-
Invoices sending media: select between email / paper / email and paper.
-
Invoices copy: set the number of copies.
-
In payment mode: select an incoming payemnt method, for example, bank transfer. The incoming payment method can be defined on a case-by-case basis.
-
Out payment mode: select an outgoing payment method, for example, bank transfer. The outgoing payment method can be defined on a case-by-case basis.
-
Define the rest of the invoicing / payment information.
-
From this tab you can consult the customer's RIB, as well as view associated / unpaid invoices.
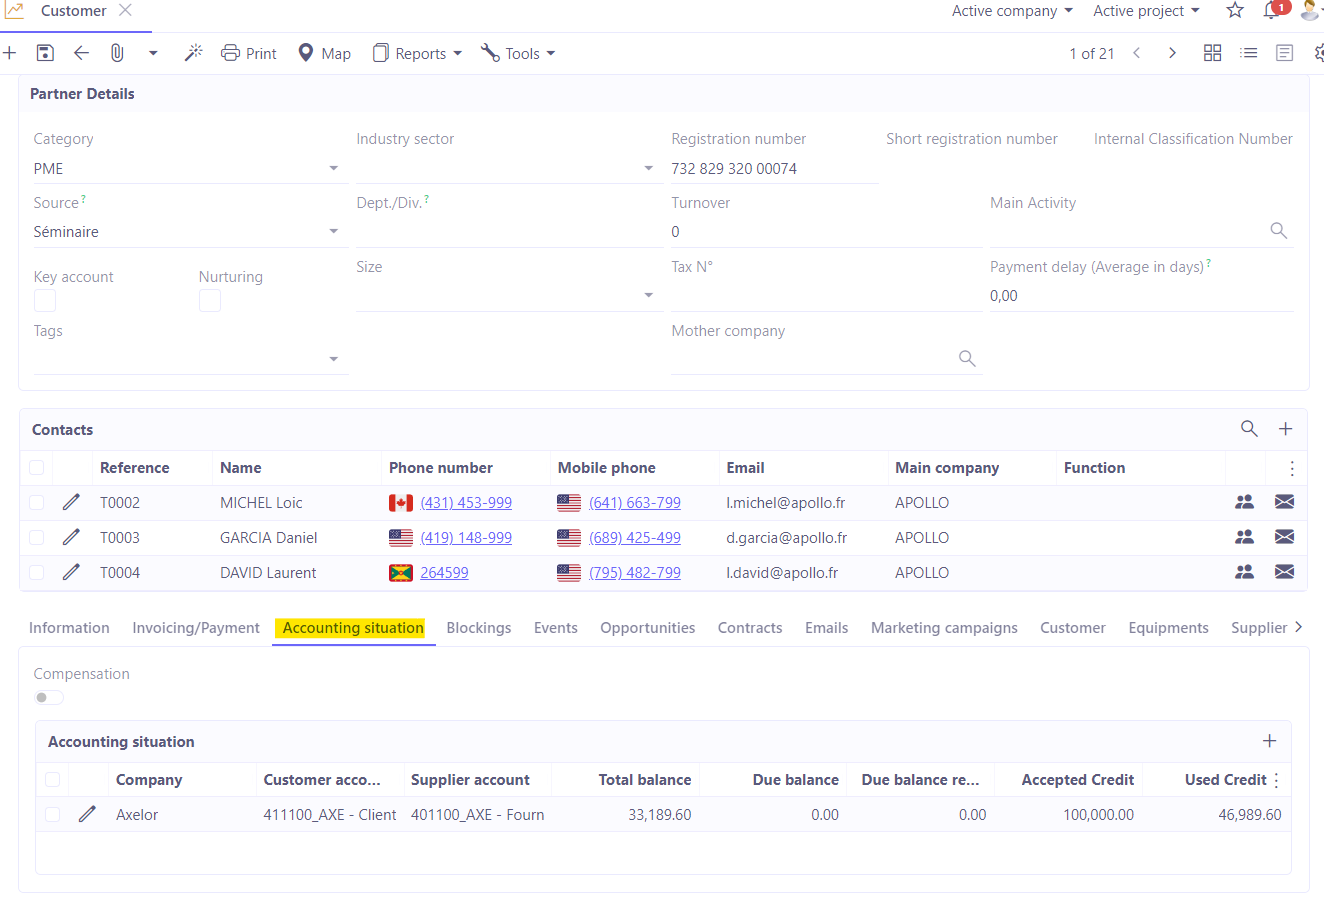
Accounting situation tab
-
The information from this tab will define the accounting configurations for each of your companies for this customer. They are generated automatically when the customer is saved, as soon as the first save is made for each company entered in the ‘Information’ tab.
-
Here you will find the default customer account and supplier account for this customer, which has been taken over from the generic customer account by default and which can be specified to have a customer account defined by default.
-
In the ‘Accounting information’ table, you will find "Accepted credit".
Accepted credit is defined in Application configuration → Apps management → Sales, configure → Click on a company to access the configurations by company → in the Accepted credit section, enter the amount of accepted credit.
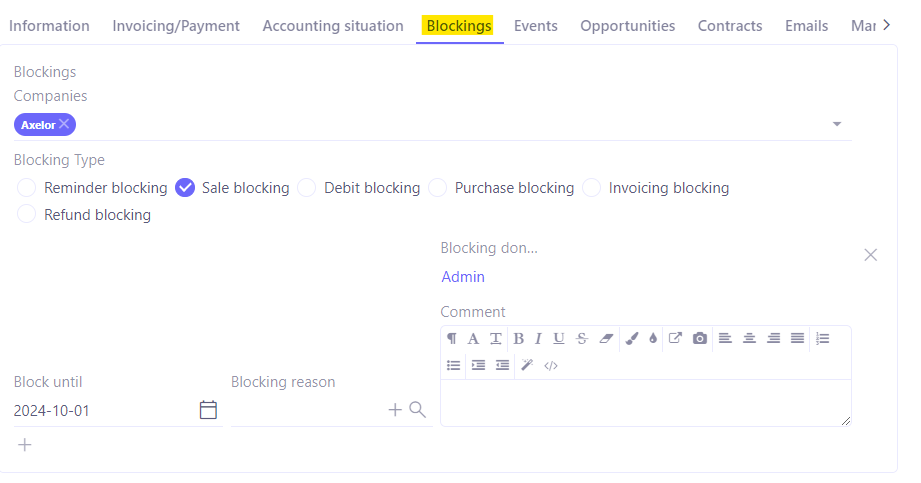
Blocking tab
-
Add a block by clicking on +.
-
Select the type of block: reminder blocking / sale blocking / debit blocking / purchase blocking / invoicing blocking / refund blocking. Blocks can be managed by company, accompanied by a comment and an end date.
-
Add a reason for the block which could be used for statistical purposes.
For example, if a payment is delayed, the sale blocking will block the entry of a sales order for this customer.
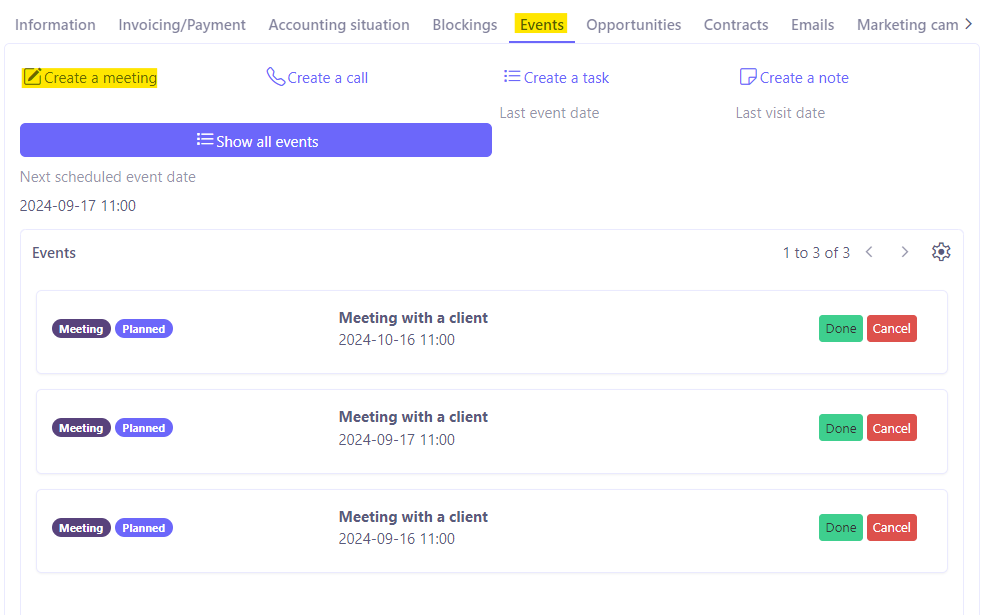
Events tab
Track all events related to a client from the Events tab. You can also create new events from this tab.
- Create an appointment
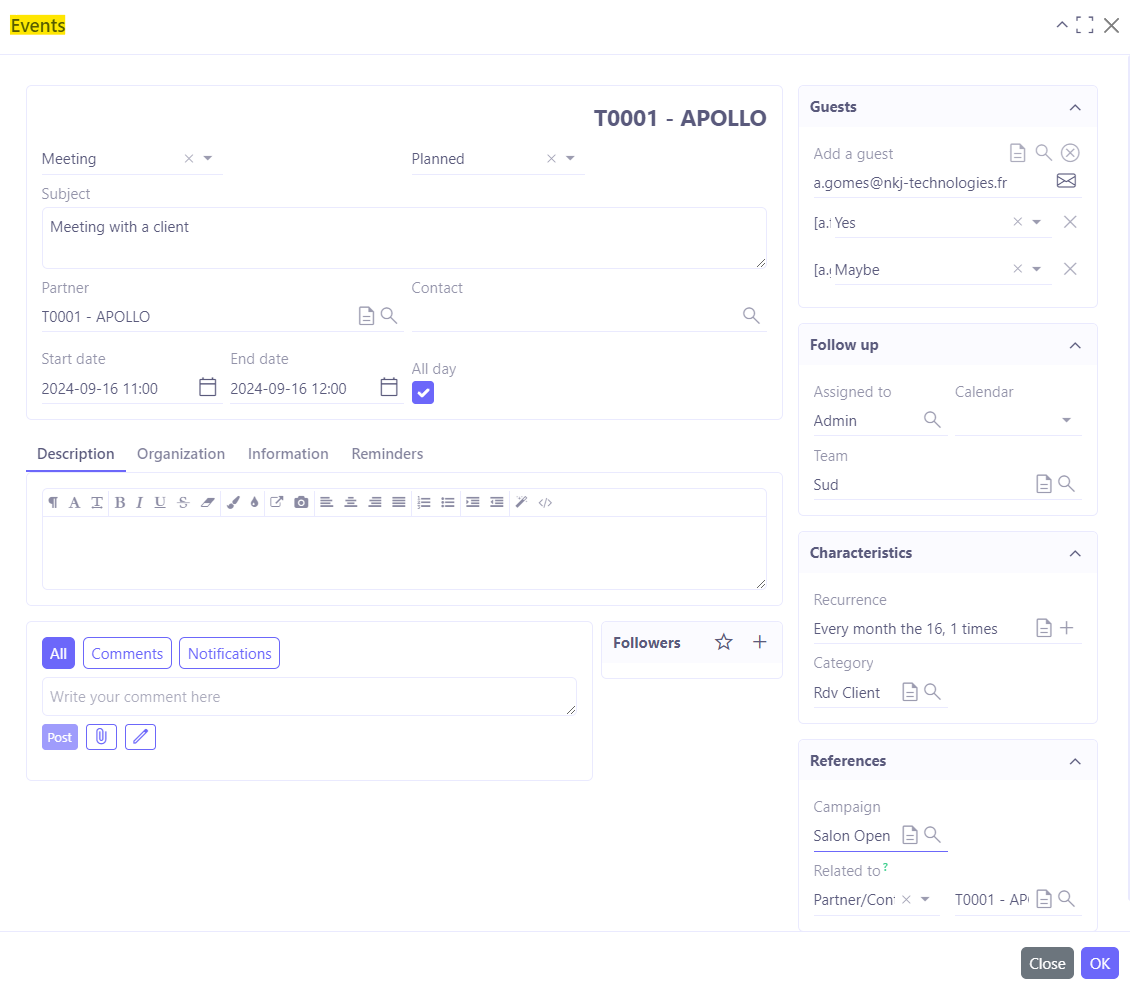
In order to create an event on a file, you need to fill in the ‘Customers/Prospects’ and ‘Contact’ fields.
-
Open a customer file, then click on the ‘Events’ tab.
-
Then click on ‘Create a meeting’.
-
An ‘Events’ configuration window will open.
-
Enter the subject.
-
Event type : select an event type : Meeting / Call / Note / Task.
-
Select start and end dates.
-
Status : for certain events, it will be possible to define a status : Planned / Realized (i.e. completed) / Cancelled.
-
The ‘Partner’ and ‘Contact’ fields will be filled in automatically, as they are based on the information entered on the form.
-
Assigned to : in the ‘Follow-up’ section, the ‘Assigned to’ field will be filled in automatically, but it is still possible to change the person assigned.
-
This category allows you to sort the events. For example, for a Meeting, you can select from Events / Training / Customer meetings / Supplier meetings / Internal meetings.
-
Recurrence: add a recurrence if this is a recurring event.
-
Description tab: add a description.
-
Organisation tab: this is for geographical information.
-
Information tab: fill in the information concerning visibility, similar to that for diaries.
-
Guests : in the ‘Guests’ section, add a guest. You can then enter the status to define whether the guests will be present or not. Select from : Yes / No / Maybe. In the case of synchronisation with a personal diary (google or Microsoft 365), this information will be retrieved automatically.
-
Campaigns : if the Marketing app has been installed, a field Campaigns become active. It is therefore possible to attach a marketing campaigns (you will find the campaign field in the References column on your right).
-
Related to: in this field, you can link an event to another file (Third Party / Contact, but also a Quotation or an Order, or even another Event).
-
You can also create a reminder. See ‘Creating a reminder’ and ‘Configuring email templates for reminders’.
With the Google and Office 365 Connector, it will be possible to synchronise calendar data and thus migrate event data to AOS.
Existing and past events can be viewed in the ‘Events’ tab.
For an existing event, you can click on the ‘Done’ or ‘Cancel’ button.
This changes the status of the event on the event configuration page. For example, the status can be changed from ‘Planned’ to ‘Cancelled’ or ‘Realized’ (completed) status.
Opportunities tab
This tab lists all the opportunities linked to this customer.

Emails tab
Create emails from this tab. View the history of sent emails.
Marketing campaigns
This tab contains the history of marketing campaigns.
The Marketing app must be installed for this tab to appear.
Customer tab
-
Label to be displayed on orders: add a label that will be displayed on orders when you select a third party on a quote. It can be used as an indication for the person completing the quote if there is something in particular that needs to be specified for an order for a particular customer.
-
Sales price list: select a sales price list.
-
Customer catalogue: fill in the customer catalogue. The customer catalogue allows you to give specific names to each product for this particular customer (for a customer catalogue to appear, activate the feature "Enable customer catalog management" in the Sales app settings. Path : Application config → Apps management → Sales, configure → activate the feature "Enable customer catalog management".).
-
Comment to be displayed on the sales order: this comment will be printed for this particular customer. For example: enter the VAT number for a foreign account.
-
Sales details by product: here you will find the total quantity sold of each product / the average selling price / as well as the total price.
-
Create sale quotation: click this button if you want to create a quotation for this customer directly.
-
Sale orders: here you'll find the full history of all quotations and orders linked to this customer.
