Accounting
Introduction
Introduction
The accounting application automatically generates accounting entries from accounting documents and pre-configured templates, and allows you to record various transactions in a manually assisted manner. The accounting module allows you to manage analytical postings, and to benefit natively from a management of analytical distribution by third parties, by products, etc. Real-time accounting reports are at your disposal in a few clicks: general ledger, balance, discount slip, newspapers, VAT... The management of accounting periods can be configured per company code, as well as the management of logs and the chart of accounts. In addition to automatic tax management, you can also benefit from customized tax position settings based on transactions. The application also manages recovery and factors. From a banking point of view, the bank reconciliation between the lines of your bank statements and your accounting entries is automatic. The processing of SEPA direct debits and credit transfers is fully automated, and includes the processing of bank or cheque rejections. Axelor manages the EBICS TS banking communication protocol.
- Writings :
- Postings: Displays the different accounting postings.
- Writing lines: Displays the different writing lines.
- Template entries: Allows you to generate entries from a template.
- Payments :
- Payment wizard : Allows you to search by third party and payment method for invoices and payment plans.
- Supplier invoice to pay: Displays the supplier invoices to pay.
- Periodic processing:
- Reconciliations: Displays the different reconciliations and allows you to create new ones.
- Lettering: Allows you to let lines be read manually.
- Clearing of overpayments: Allows you to manage overpayments.
- Passage in irrecoverable: Allows to recover invoices and deadlines to pass in irrecoverable.
- Cheque rejects: Validates cheque rejects and displays previous rejects.
- Declaration of exchanges: Allows to carry out the DEB (Declaration of Exchanges of Goods) or the DES (Declaration of Exchanges of Services).
- Recovery:
- Recovery: Allows to carry out a recovery process.
- Recovery history: Displays the history of customer reminders and allows you to create new reminders.
- Factoring: Subrogation receipts: Management of subrogation receipts / Notifications: Factor notifications when payment is received.
- Configuration: Recovery methods : Allows you to create dunning methods with different levels. The methods can be configured (message, standard deadline, minimum amount…) / Recovery levels : Allows you to create different dunning levels with a label / Factor: Allows you to create factors.
- Bank statement:
- Bank statement: Allows you to import bank statements and display bank statement lines.
- Exports/Accounting reports :
- Refunds : Creating Refunds
- Cheque remittance slips: Creating cheque remittance slips
- Accounting reports: Creation of accounting reports
- Accounting exports: Creation of accounting exports
- Budget preparation:
- My budgets: Displays the budgets for which the active user is responsible and allows you to create new ones.
- All budgets: Displays all budgets and allows you to create new ones.
- Bank orders :
- Transfers: SEPA Credit Transfers: Making SEPA Credit Transfers / International Credit Transfers: Making International Credit Transfers
- Bank to bank transfers: Domestic cash transfers / Cash transfers International
- Sending a bank order: Sending bank orders
- Bank orders awaiting signature: Displays bank orders awaiting signature.
- Bank reconciliations:
- Bank reconciliations: Perform bank reconciliations
- Bank Reconciliation Line: Displays the bank reconciliation lines.
- Report :
- Accounting: Displays accounting dashboards.
- Configuration :
- Financial: Tax positions / Tax years / Accounting periods / Logs: Display accounting logs / Log types: Allows you to create accounting log types / Accounting accounts: Displays accounting accounts / Accounting plan: Displays accounting plan / Accounting account settings / Accounting account types / Taxes : Displays the different taxes and allows you to create new ones and configure the rates and periods of application.
- Analytics : Analytical journals : Displays analytical journals / Analytical journal types : Displays analytical journal types / Analytical accounts : Allows you to create analytical accounts / Analytical chart of accounts : Displays the analytical chart of accounts / Analytical axis : Allows you to create analytical axes / Written lines. Analytics: Displays analytical writing lines / Analytical distribution model: Allows you to create analytical distribution models.
- Payment: Payment methods: Displays the different payment methods and allows you to create new ones / Paybox : Access to Paybox / Payment terms : Displays the different payment terms and allows you to create new ones.
- Reports/Exports: Interbank codes: Creation of interbank codes
- Writing template: Writing template: Allows you to create accounting writing templates / Writing template types: Allows you to create accounting writing template types.
- Bank order: File formats of bank orders / Economic reasons (bank order)
Importing an accounting plan
Importing an accounting plan
The chart of accounts is pre-filled, it is advisable to import it by following the procedure: “Application configuration” module > Users/Companies > Companies > Companies > Edit company > Accounting accounts configuration button on the right > Choose a chart of accounts > Import a chart of accounts If you wish to modify it beforehand before re-importing it, you can do so from the application configurations by company in Accounting, select the France account plan, then click on the pencil icon. Then download the Zip file from the window that opened and modify it as you wish. You can then re-import it from the same place.
Accounting accounts
Create an accounting account
Accounting > Configuration > Financial > Accounting accounts
Define a name and a code (specific code of the customer account). Fill in the account type, and indicate the parent account (ex general customer code). You can also check “readable” (to reconcile accounting entries) when it comes to third-party accounts. If you tick the box “Usable for third party balances”, the entries related to this accounting account will be used to calculate the balance that appears on a third party’s record.
Setting up a company code in accounting terms
Accounting information" tab of a third party record of the company
First method
Edit to create a new line. You have the possibility to add a third party account and a supplier account.
It is not necessary to fill in the employee account, which is only set up if the third party is an employee.
Application configuration > Application management > Accounting > Configure > Accounting configurations
Second method
You must double click on the company. You can then define the accounting accounts, by default for third parties, which will be filled automatically each time a new third party is created.
Set up account types
Accounting > Configuration > Financial > Account types
You can set up account types, at the module configuration level, allowing you to perform filtered searches or cost accounting.
The newspapers
Configuring log types
Accounting > Configuration > Financial > Log types
You can set up log types, in the module configurations, allowing you to perform filtered searches or cost accounting.
Create an accounting journal
Accounting > Configuration > Financial > Logs > Configurations
Define a name, a code and select a type.
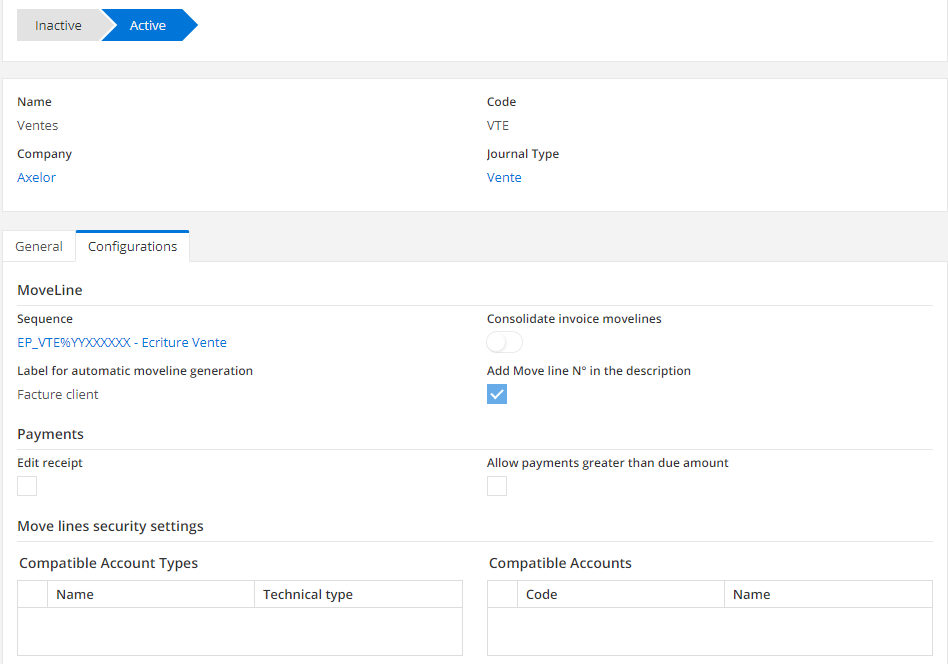
The types are configured in the 'Log types' menu entry in the configurations of the Accounting module.
Choose a sequence, an automatic label that will be included in the description field of each posting line related to the journal concerned. If you check the “Add part number to description” box, this number will automatically increase following the description. There are also options for payments: you can edit a receipt or authorize payments in excess of the amounts due. It is possible to determine account types and accounting accounts that will be selectable according to the associated journal.
The sequences are configured in the Application Config > General Data > Sequences
In “Posting line control settings”, compatible accounting accounts can be associated with the journal, which can then be used to create entries on this journal.
Each log has a status: it is inactive when you create it, you can then pass it active thanks to the corresponding button.
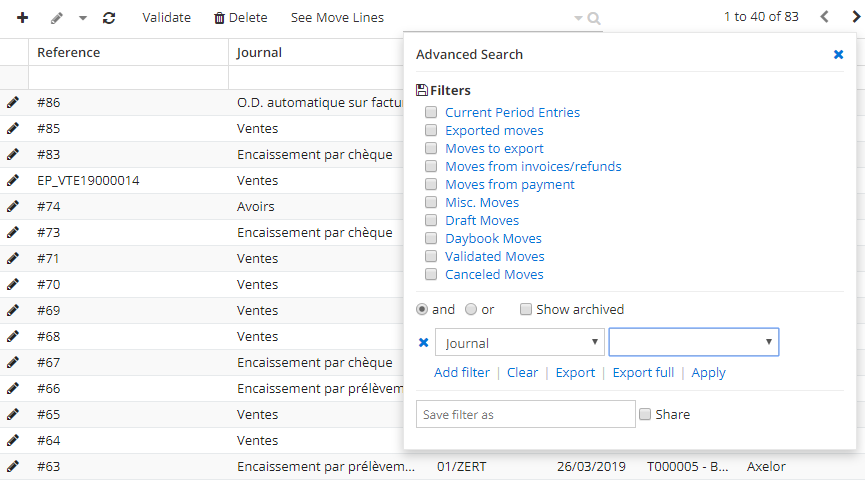
Sort entries by journal
Accounting > Entries
Make one filter per journal in the list view of the entries.
Current operations
Create Various Operations
Accounting > Configuration > Financial > Newspapers
This involves creating accounting entries manually and will be automatically assigned to the manual O.D. journal.
You must first create a logbook dedicated to the various manual operations. You will then assign it to the accounting application configuration level, by company code, under the 'Logs' tab in the 'Manual O.D. Log' field.
Accounting > Entries > Entries > Entries
Set a date, choose log,… You can then create posting lines (debit/credit) by entering various information such as the accounting account, amount, third party.
You can only release the posting if the debit and credit amounts are the same.
If you tick the option 'Retrieve the data from the 1st line' Take over; at each line after the first one, some of the information from the first one, namely the third party and the description, will be included. The date will be repeated even if this box is not ticked.
Create a writing template
Accounting > Configuration > Writing template > Type of writing template
This makes it possible to automatically reproduce recurring entries.
You must first create a template type, you can choose between amount (when the amount is always the same) or percentage (this then indicates a distribution of the amount of the entry on the different accounts). Then, in the template, enter a name, a type and a log. Then create the lines that will make up your writings. For statistical purposes you can associate the posting lines with an analytical distribution model and/or a product.
You can define a default type of cost distribution at the level of the application configurations of the Accounting module, either free, or by third party, or by product / product family.
Generate a writing from a template
Accounting > Transactions > Transactions > Transactions from a template
Select a type and model, then choose a movement date. Then generate the entries using the corresponding button.
Set up tax positions according to transactions
Accounting > Configuration > Financial > Tax positions
It is sometimes necessary to manage the equivalence of taxes, especially in the case of export sales.
It is mandatory to enter a name and a code. Then select the accounts and/or taxes you wish to replace and their equivalents. The specific mention will be included in the customer file when you assign this tax position to it; this mention can be modified on each customer file.
It is also possible to add specific information per tax by entering the tax lines.
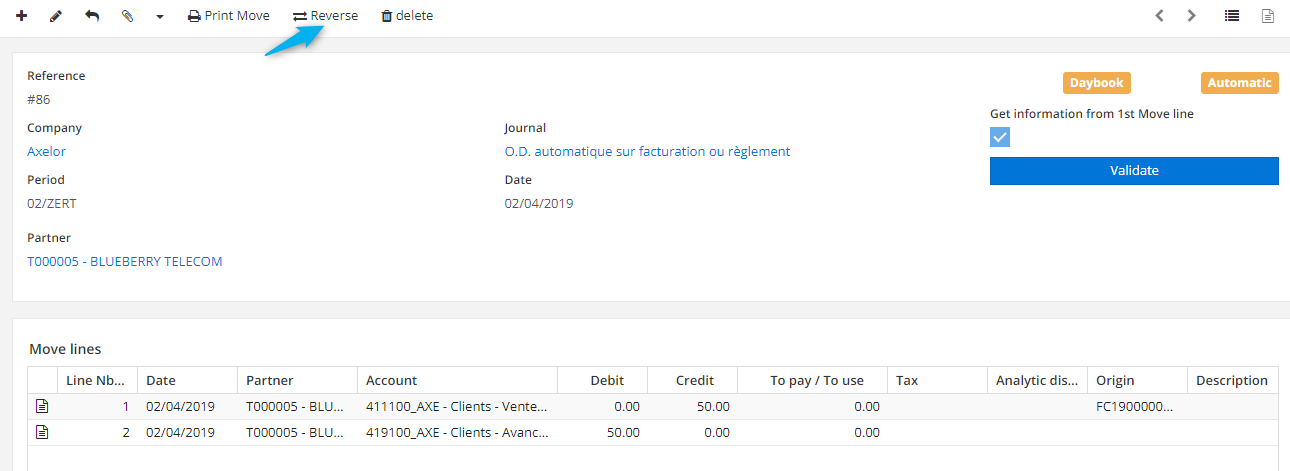
Extract a writing (with assistant)
To reverse a validated entry, click on the "Revert" button in the taskbar. The reversal is made on the current date and not on the date of the document for a posting made in fog mode.
Export accounting entries
Accounting > Accounting reports / exports > Accounting exports
Choose a print format, fiscal year and possibly period. All the requested lines according to the requested criteria are displayed when you search for them, and you can export them.
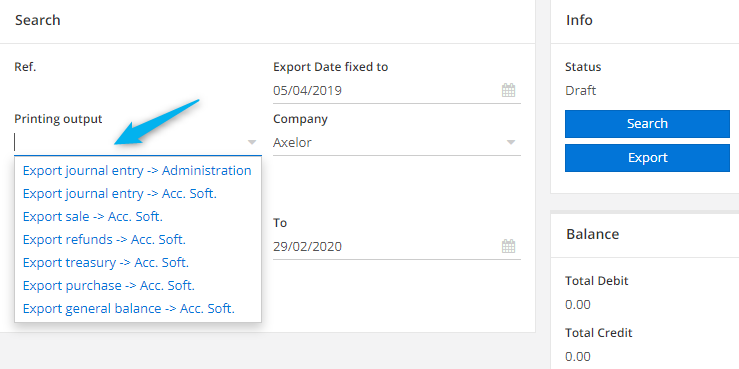
The FEC export to the Administration can only be carried out once in a given period.
Enable automatic lettering
Application configuration > Append management > Accounting > Company settings
You can check one or both boxes depending on whether you want to perform automatic lettering against invoices, payments or both. If one or both boxes are checked, the lettering will be done automatically at the part validation stage.

If automatic lettering is not enabled, sales and purchase invoices will still be automatically read once they have been broken down. In this case, the lettering is done only if all the debit and credit lines
Perform manual lettering
Manual lettering can be partial or final.
From the list of entries view select the lines you want to read and click on the “Read parts” button. If the lettering is final, a capital letter will appear on the lines and if the lettering is partial it will appear in lower case.
Detecting entries.
In order to delist an entry, you must open it and go to the “List of credit reconciliations” tab. Double-click in the line and then click on the “Disconnect” button in the right panel.
Perform the accounting cut-off: NPF and FEF
Application Configuration > Bachs > Supply Chain Batchs
The accounting cut-off corresponds to the closing of a financial year. In the software, it is an automatic processing to be configured.
Click on the “+” to create a new batch and select “Accounting cut-off” as the action. You can then choose two types: NPF (Invoices not received) or FEA (Invoices to be issued).
Manage fog mode
Application configuration > Append management > Accounting > Company settings
The fog lists all accounting entries awaiting validation.
Activate the fog mode by checking the corresponding button.
Manage overpayment clearances by the client
Accounting > Periodic processing > Reconciliation of overpayments
You can manage overpayment settlements according to minimum threshold rules. Select a maximum amount to be cleared and set the deadline for copying overpayments. Then click on the “Recover overpayments” button.
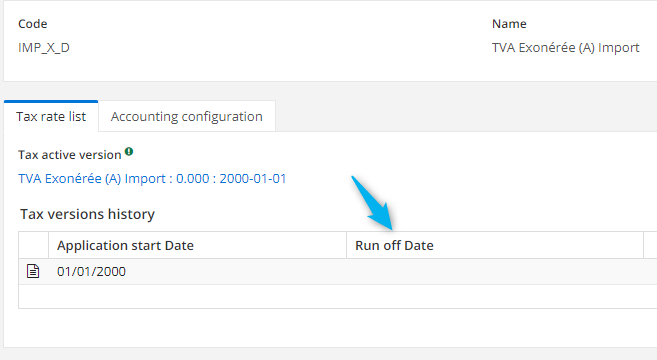
Create VAT rates
Accounting > Configuration > Financial > Taxes
The rate must be given a code and a name, and the tax rate must be filled in with an application start date (do not fill in an application end date at creation). The type of tax (debit or collection) will be used for the VAT return.
Don’t forget to enter an accounting configuration in the dedicated tab.
To change this rate, you must fill in the end date of application on the rate that had been created, and create a new line to define a new rate, by filling in the new start date of application (leaving the end date empty)
Manage VAT rates for intra-EU orders
There are 3 different cases to consider:
- A customer order for a third of the EU (outside France): In this case, an exempt VAT will be applied instead of the VAT defined on the product. On the invoice, we will see an exempt VAT line (amount = 0), and no VAT accounting line. In addition, the specific mention of this exemption must also be given on the tax equivalence of the tax position. It must appear on the invoice printout.
- A supplier order for a third party from the EU (outside France): In this case it is necessary to indicate on the tax equivalence of the tax position of the third party that it is a VAT reversal and to choose the intra-Community VAT. EX: VAT Dedicated (A) standard rate and VAT Due Intracom. (A) normal tx. On the invoice we will therefore have two tax lines, the second cancelling the first. We will have two accounting entry lines (Ded VAT on the debit side and Intra VAT on the credit side) for the same amount but on different accounts. Indeed, in the case of intra-EU purchase/sale, it is the recipient country that declares the VAT. It is not invoiced by the seller. To know the amount of the flow, it is therefore necessary to have a double set of entries.
- A customer order without VAT (case of exemption granted by the DGFPDGE for example) In this case, a tax position can also be used to manage the tax exemption, but it will be necessary to indicate on the tax position that a specific mention per customer will be managed, and to indicate the exemption authorization on the third party.
Manage the reverse VAT validation
Accounting > Configuration > Financial > Tax positions
To have a tax self-liquidated, tick the corresponding box in the tax position form.
Accounting reports and exports
Edit accounting reports
Accounting > Accounting reports / exports > Accounting reports
Choose the printing format. If necessary, enter a specific period or start and end dates. You can also filter by accounting accounts and by third parties.
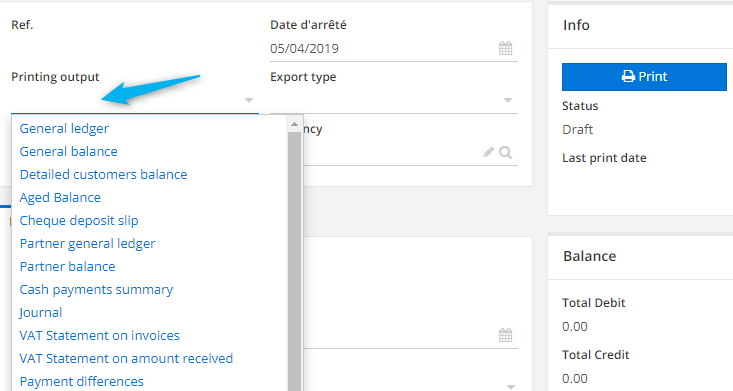
If you create a log, you can filter by log, payment methods and cash registers.
The accounting records file (FEC) must be submitted to the tax authorities in the event of an accounting audit.
VAT declaration assistance
It is possible to generate 2 VAT reports: on debits and receipts. In both cases, select a fiscal year. For VAT on incoming payments you can sort by accounting account and/or by third party.
subledger general ledger
Define a period. You can choose different logs and payment methods and sort by accounting accounts and/or third parties. You can choose between general printing or subtotals by date ( “Print Information” tab).
analytical balance
Define a period. You can choose different journals and analytical journals and payment methods. You can choose between general printing or subtotals by date ( “Print Information” tab).
FEC file
The system can generate two types of FEC files. One for the Tax Administration, which can only be generated once per fiscal year, the other for sending to a third party accounting software that can be exported several times. Define a period and click on “Search”. Your file is then ready to be exported.
Overall balance to ETAFI
ETAFI is the EDI partner of the Cegid software
The exported document corresponds to the standard required by the CEGID accounting software.
The recovery
Stop the recovery
It is possible to stop the collection, for a customer in general, for a particular invoice, for a particular posting or for a particular debit due date.
Create a collection method for a particular category of third parties
Choose a name and code, and create your method by selecting the dunning levels. You can request manual validation of certain steps.
In the company’s accounting configurations under the “Debt Collection” tab, you can associate a method with a category of third parties.
Create a payment plan
Invoicing > Timelines > Timelines
After selecting the “Monthly payment” type, select the third party concerned. The payment mode, my RIB and the currency are automatically filled in but can still be changed manually. Enter the amount due and the number of terms. By clicking on the “Create schedule lines” button, as many lines as terms are generated. The information can be modified.
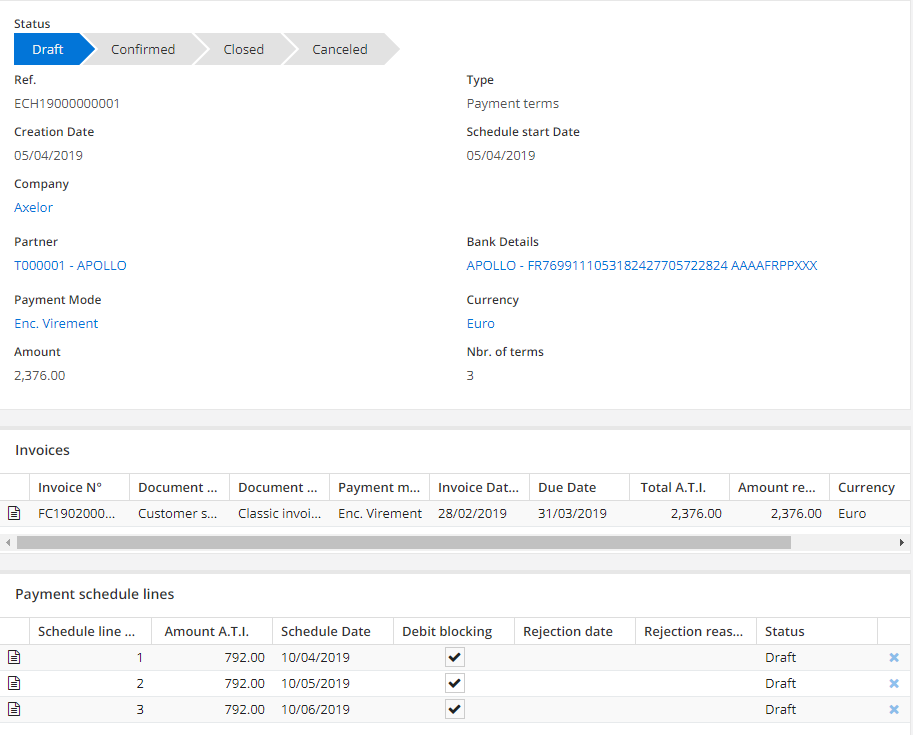
From a schedule you can ask for uncollectibility and indicate rejections of withdrawals.
Passing an invoice as a doubtful debt
At the level of the company’s accounting configurations, in the “Doubtful Receivables” tab, you can set the terms of the change to doubtful receivables. This will automate the process and create entries based on the doubtful receivables account set up in the “Accounting” tab. Then start the accounting batch “Suspicious customers” in order to perform mass processing. For unitary processing, there is a “Passage to irrecoverable” button on the Accounting tab" of an invoice. You will need to select a previously configured pattern
Factoring
Accounting > Collection > Factoring
Manage factors
Accounting > Collection > Configuration > Factor
The “Manage factors” option must first be activated within the application configurations of the “Accounting” module.
A factor is a third party type “Factor” its record is created in the same way as for another third party. In your company’s accounting configurations, under the “Debt Collection” tab, select your factor.
A company can only have one active factor at a time.
Your company cannot benefit from factoring services if your customers are private individuals.
Create and track a subrogation receipt
Application configuration > Users/Companies > Company > Company > Accounting account configuration
You must first assign a debit/credit factor account.
Accounting > Collection > Factoring > Subrogation receipts
When you create a new receipt you have 2 options: you can directly retrieve invoices from factorized customers by clicking on the corresponding button or add invoices manually. You can then post your receipt or cancel it. Accounting entries will be generated automatically based on the accounts you have previously configured. You can later change the status to “Receipt paid”.
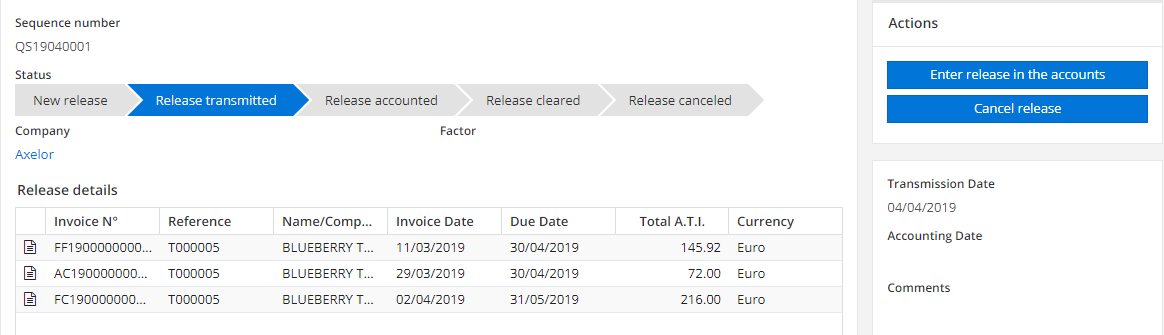
You can print the receipt or export it in CSV format.
Register a notification
Accounting > Collection > Factoring > Notifications
When you create a new notification, specify a payment date, select the receipt concerned and then the paid invoices. Finally, click on “Validate”, and the accounting entries will be automatically generated according to the accounts you have previously configured.
The budgets
Bank payment management has its own configuration in application management.
Create a budget
Accounting > Budget preparation > My budgets / All budgets
The fields Name and Code are mandatory. You must then indicate over which period you want this budget to be active. Once this is done, budget lines must be created.
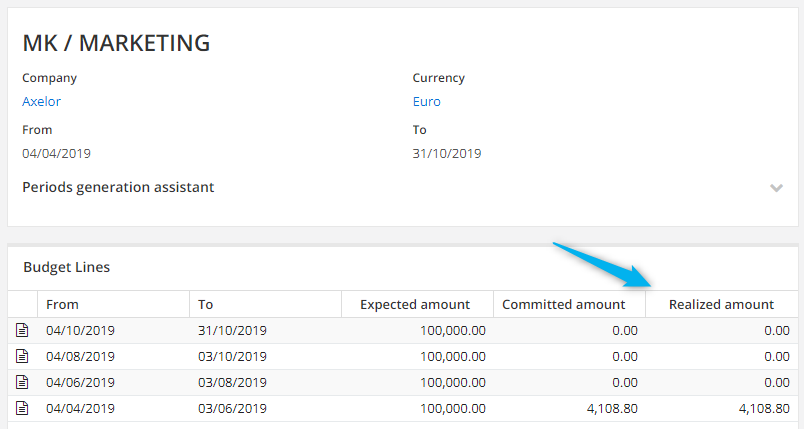
If you have several lines to create, you can use the wizard which will take into account the global dates of your budget and will create lines according to the duration of the period you choose. You must indicate the amount planned for each line (each line will be created with this amount, you will then be able to modify this amount manually by line), then click on "Generate periods". This will automatically create lines.
Once you have created your budget(s), you can attach purchase orders or purchase order lines to these budgets. On each command line, in the 'Budget' tab, you can make a budget distribution, by selecting one or more budgets and indicating which amount of the command line should be attached. You can also allocate your entire order to a budget from the 'Budget allocation' tab, by selecting a budget and clicking on “Apply to all”. All order lines will be charged to this budget, for the total amount of the line.
Monitor your budgets
You can follow the evolution of a budget by going to it. On each line, an amount is considered by default committed when the purchase order is in the status "Completed". An amount is considered to have been realized when the invoice associated with the purchase order has been broken down
When you attach a purchase order or purchase order line to a budget, the amounts will automatically be charged to the budget lines, respecting the defined period.
You can change the status for which an amount is considered committed in the budget application configurations Application Config > Application Management > Application Management > Budget App, or specify several statuses. Within the Budget app, you have access to different configurations: Check the available budget: when this option is activated, the system informs you of a message when selecting a budget on a purchase order or purchase order line when the total amount of the selected budget has been exceeded. Manage multi-budget on lines: allows you to select several budgets on a command line. Status taken into account for the calculation of the committed amount: this is the order status from which the amount is considered as committed in the budget. You can select several statuses.
Cost accounting
Accounting > Configuration > Analytics
To use cost accounting, you must first activate the corresponding option in the configurations of the Accounting application.
From Application Configuration > Application Management > Accounting you can activate different options related to cost accounting.
Create analytical axes
Accounting > Configuration > Analytics > Analytics > Analytical axis
An axis consists of a code and a name and must be associated with an analytical account.

Create analytical accounts
Accounting > Configuration > Analytics > Analytical > Analytical accounts
An analytical account consists of a code and a name, and must be associated with an analytical axis.

An analytical account can have a parent account. In the 'Analytical Chart of Accounts' menu, you can view the different analytical accounts and their tree structure.
Create analytical journals
Logs are created from Accounting > Configuration > Analytics > Analytical logs.
You will need to create analytical logs, which will be used to configure your analytical distribution models. This will allow you to specify in which journal the analytical entries will be generated.
A log consists of a name and a type (which can be created from the Analytical Log Types menu).

A journal must be attached to a company.
Create analytical distribution models
Accounting > Configuration > Analytics > Analytical > Analytical distribution model
Once you have given a name to the model, you must add distribution lines. A line consists of an axis, an analytical account on which the allocation will be made, and the journal in which the postings will be generated. Once your analytical distribution models are created, you can assign them to third parties, or to product/product families.
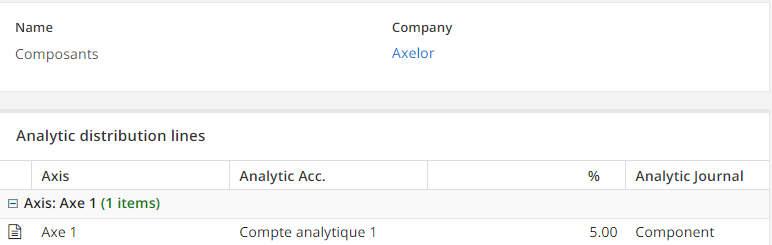
The total for an axis must be 100% for all its lines.
If you want to process product cost distribution, you can select a default cost distribution model on a product master record that will be associated with it. If you opt for third-party analytical processing, you can associate a default analytical distribution model with a third party. On the third party record, you must go to the Billing/Payment tab, and you can therefore select the default analytical distribution model that will apply for this third party in the corresponding field. If you choose the free type, you can freely perform analytical distribution by command line.
The regulations
Manage manual incoming payments
Allocation of multi-invoice payments (this is a comment on the payment assistant or on the automatic lettering.)
Manage settlement discrepancies
Application configuration > Users/Companies > Company > Company > Accounting account configuration
In the "Accounting" tab, choose a range of authorized payment amounts (which will be used in negative and positive) and select the accounts dedicated to the payment difference. For payments affected by these differences, postings will be generated automatically.
Use the payment creation wizard
Accounting > Payments > Payments Assistant
Here you have access to all purchase and sale invoices that are not yet settled.
Pay mass invoices manually
It is possible to pay invoices manually in bulk on invoices, in bulk from payment assistants, in bulk from the list view, with or without generating a bank order. Once the generation of the bank order has been done, you must make the link to another feature that explains how to manage bank orders.
Capital asset management
Configure asset categories and types
Accounting > Fixed assets
You must first create asset types: just enter a name and a code. Then you can create asset classes. You must give a name and select a type. You can ensure that postings generated from a purchase invoice for an asset are automatically validated by checking the corresponding button. In the "Accounting information" tab you must enter a journal, an expense account and a depreciation account.
Configure fair products in fixed assets
On a product master record, on the Accounting tab, select an asset category and enter an associated accounting account.
Other functionalities
Import a bank statement
Accounting > Bank statement
From the "Bank statement" menu entry you can manually import a statement file by selecting the file format and manually initiate a bank reconciliation.
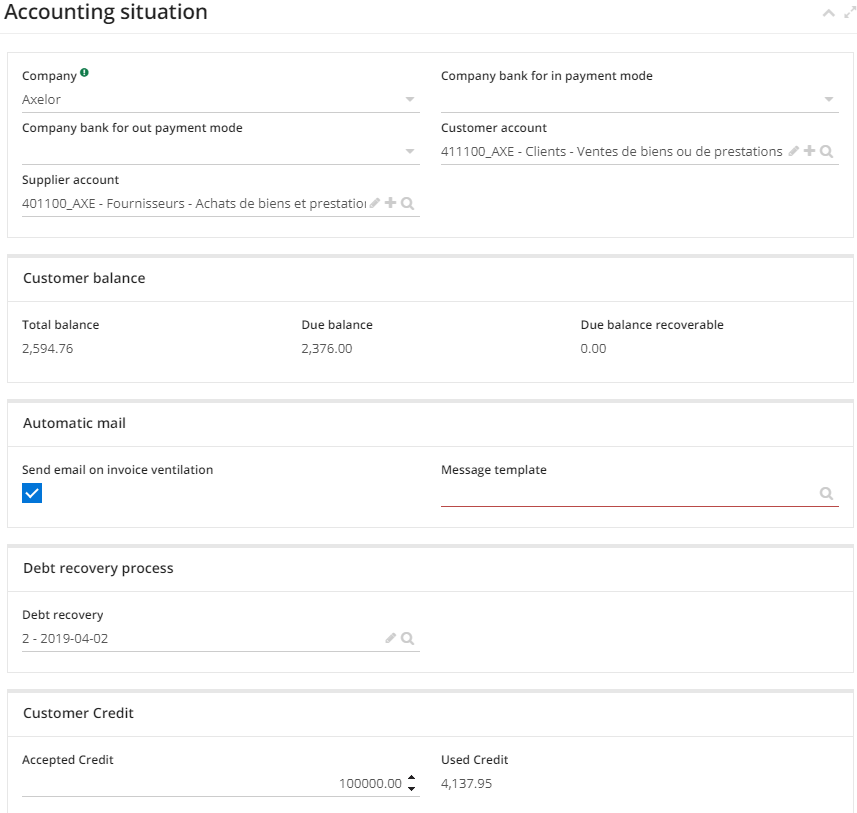
Manage customer receivables
Application configuration > Call management > Accounting
If you activate the Manage customer receivables option in the application configurations of the Accounting module, you can manage the customer receivables level and set a maximum amount. A default maximum amount of receivable accepted for all customers can be set by default in the sales configurations by company code. The accepted amount of work in process can also be configured per customer in the accounting information in the customer master records. You will also be able to view the amount currently used by each customer.
Manage down payments in the form of an invoice
Application configuration > Call management > Accounting
As long as this option is not activated, you will find, on your invoice, the button "Save a deposit" which will allow you to save the payment of a deposit. If the option is enabled, to save a down payment, you will first have to click on “Generate invoice" and then choose "Invoice down payment" as the operation choice.
Configure reasons and rejection codes
These fields allow you to parse the reasons and rejection codes for exchanging with your bank.