HR
Introduction
This application allows you to manage the company’s human resources. It consists of different sub-applications covering a broad spectrum of human resources. It allows you to manage: Employee management including employment contracts, payroll preparation, meal and bonus voucher management, leave requests, expense reports, timesheets, overtime, recruitment, training, evaluations. You can choose whether or not to enable the different sub-applications.
- Keywords :
- Payroll preparation: the application allows you to take charge of all payroll preparation upstream, gathering all the information necessary for its processing. This preparation must then be exported to certified payroll software (according to the legislation in force in the country).
- Time sheet: A time sheet allows employees to indicate the time they have spent on tasks and/or projects. This function is often used in project management.
- Employee Management: Human Resources Management Application :
- Employee List: Displays the list of employees and allows you to create employee records.
- Employment contracts: Allows you to create employment contracts for employees.
- Payroll Preparation: Menu to manage the preparation of employee payroll.
- Management of restaurant vouchers: Allows you to manage meal vouchers.
- Bonus management: Allows you to manage employee bonuses.
- Configuration: Activities: Allows you to create product-type activities (Project manager, project, audit…) that can be performed by employees and invoiced to customers / Reasons for termination of contract: Allows you to create reasons for termination of employment contract / Models of employment contract: Allows you to create employment contract templates / Types of bonuses : Allows you to create bonus types for employees / Employment contract types: Allows you to create employment contract types / Payroll years: Allows you to create payroll years / Payroll period: Allows you to create payroll periods / Tax positions: Displays tax positions / Schedules : Manages employee schedules (Event schedules: Allows you to create event schedules for employees (e. g. public holiday schedule) / Weekly schedule: Allows you to create weekly schedules for employees).
- Recruitment: Recruitment management application:
- Job opportunities: Allows you to create and manage job opportunities.
- Job History: Displays the history of all job offers.
- All current applications: Displays all current applications.
- Application: Displays all applications and allows you to create new ones.
- Configuration: Diploma level: Allows you to create diploma levels / Recruitment step: Allows you to create recruitment steps / Provenance : Allows you to create sources to indicate the origin of an application / Skills : Allows you to create professional skills titles
- Training: Training management application:
- My training courses: Displays the courses of the active user.
- Staff training. Displays the trainings of the team of the active user (profile manager).
- All training courses : Displays all courses.
- Training dashboard: Training dashboards.
- Configuration: Categories : Allows you to create training categories / Training courses : Allows you to create training courses / Training sessions: Allows you to create training sessions.
- Evaluations : Internal evaluation management application:
- My evaluations: Displays the evaluations of the active user.
- My Team Evaluations: Displays the evaluations of the active user’s team (for a manager or HR profile).
- Evaluations : Displays all evaluations.
- Configuration: Evaluation templates : Allows you to create evaluation templates / Types of evaluations : Allows you to create evaluation types.
- Requests for leave: Application for managing leave requests:
- Complete my leave request: Allows you to complete and send a leave request.
- All my requests for leave: Displays all leave requests from the active user.
- Leave requests to be validated: Displays the leave requests that are to be validated (for a manager profile).
- Team leave request history: Calendar displaying the leave requests of the active user and his team if he has the status of manager.
- Absence schedule: Allows you to create leave requests after the fact in the event of an unforeseen absence that the employee will have to justify.
- Absence to justify: Allows a superior or HR manager to create an absence to justify for an employee
- Configuration: Absence type: Allows you to create absence reasons.
- Expense report: Application for managing expense reports :
- Complete my expense report: Allows you to complete and send an expense report.
- All my expense reports: Displays all expense reports of the active user.
- NdeF to be validated: Displays the expense reports that are to be validated (for a manager or HR profile).
- Ndef to be broken down: Displays all expense reports that need to be broken down.
- Multi-collaborator NDF: Allows you to manage expense reports that are multi-collaborators
- Team Expense History: Displays the history of the team’s expense reports
- Configuration: Expense type: Allows you to create expense report types / Tax powers: Allows you to create vehicle tax powers.
- Timesheet: Timesheet management application :
- Complete my timesheet: Allows you to complete and send a timesheet.
- All my timesheets: Displays all timesheets of the active user.
- Time sheets to be validated: Displays the timesheets to be validated (for a manager or HR profile).
- Team timesheet history: Displays the history of a team’s timesheets.
- Stopwatch : Allows to launch a stopwatch to calculate the time on the timesheets
- Overtime: Overtime management application:
- Enter overtime hours: Allows you to enter and send overtime hours.
- All my overtime hours: Displays all overtime hours for the active user.
- Overtime to be validated: Displays the overtime hours that are to be validated (for a manager or HR profile).
- Overtime history: Overtime history.
- Dashboards: Human resources application dashboards:
- HR Manager: HR dashboards for managers
- User HR: HR dashboards of the active user.
Dedicated mobile application
Dedicated mobile application
From the mobile application (downloadable under Android and iOs), you have access to certain features of the HR module: leave requests, timesheets and expense reports.
You have the possibility to use the application in “Offline” mode.
The employees
HR > Employee Management
Manage the list of employees, employment contracts, payroll preparation, restaurant vouchers, bonuses
The application allows you to take charge of all payroll preparation upstream, gathering all the information necessary for its processing. This preparation must then be exported to certified payroll software (according to the legislation in force in the country).
You can choose whether or not to activate the various sub-applications such as “Expense reports”, “Time sheets”, “Recruitment”,… The “Configuration” tab allows you to configure weekly schedules and public holiday schedules.
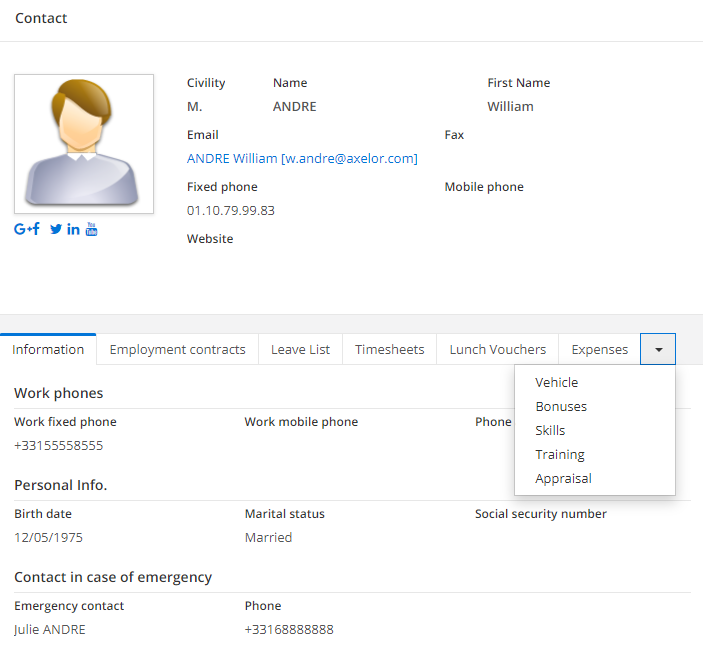
Create an employee record
HR > Employee Management
The employee record contains basic information: contact details, employment contract, holiday counter, etc. The creation of an employee record is done step by step. As long as the process is not finished, you always have the possibility to go back to the previous steps. You must necessarily fill in a weekly schedule and a schedule of public holidays. At the employment contract level there is a checkbox to indicate whether the employee benefits from the incentive bonus. If within the application configurations of the HR Module/Holiday Management you have activated the option “Allow negative values for employee leave”, the corresponding box will be checked by default, at the employee record level, on the Leave and Timesheets tab, however you can uncheck it. If the employee is subject to an entry of his working time, tick the corresponding box. Before completing the creation process of the master record you must create the user corresponding to the employee. You can attach it to an existing user or create a new one. If this is the case, you must create an identifier and associate a group of rights to it. You can also enter an application period.
You can create a new employee record from the “Recruitment” menu entry as soon as you pass a candidate for hiring status, or from a user record (Application Config > Users / Companies > Users).
In the Application Configurations > App Management > Employee Management, you can enter a number of daily working hours that will be included on the default employee records.
Public holiday schedules and weekly schedules must be configured in advance in the HR configurations by company (Application configuration).
Determine the HR manager
On an employee record, a checkbox allows you to indicate if the employee is the HR manager. The status of HR Manager provides access to all human resources information and history.
Inform a line manager
On an employee form you can fill in a line manager, in which case he will receive notifications (provided he has set up an email account in advance) when requesting leave, overtime or expenses.
Fill in the employee’s vehicle
In order for an employee to be able to calculate our mileage costs, it is necessary to set up his vehicle on his “Employee” form.
Once the process of creating an “Employee” form is complete, you can, in the “Vehicle” tab, enter all the information concerning his vehicle, and even import his registration card.
On an “Employee” form, under the “Skills” tab, you can enter skills that can be classified by type: training skills, professional skills and others.
If you are planning training and adding skills, once the employee has attended the training session, the skills will be recorded on the employee form under the “Skills” tab in the “Training Skills” category.
Prepare the payroll
HR > Employee Management > Payroll Preparation
You must first activate the “Payroll Preparation” option in the Application Configurations > App Management > Employee Management.
Select the company concerned, the employee, the contract concerned and the period. A “Refresh” button is used to update the information. It is possible to add lines on payroll preparation for specific cases.
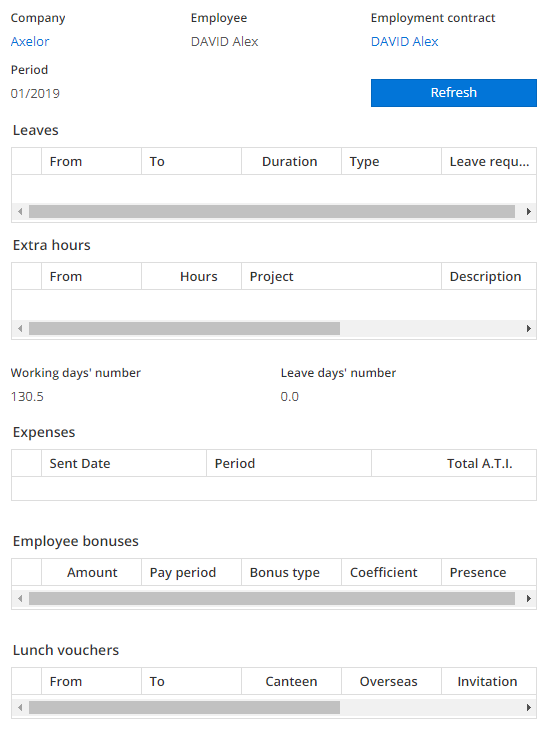
It is possible to generate the payroll preparation elements from the personnel assignment.
The gross annual salary is recovered from the contract but the net salary and expenses are to be entered manually.
Manage employment contracts
HR > Employee Management > Employment Contracts
The contract makes it possible to determine various elements such as the function, remuneration and duration of the trial period. An employment contract can have 3 distinct statuses: “on probation”, “active”, “closed”.
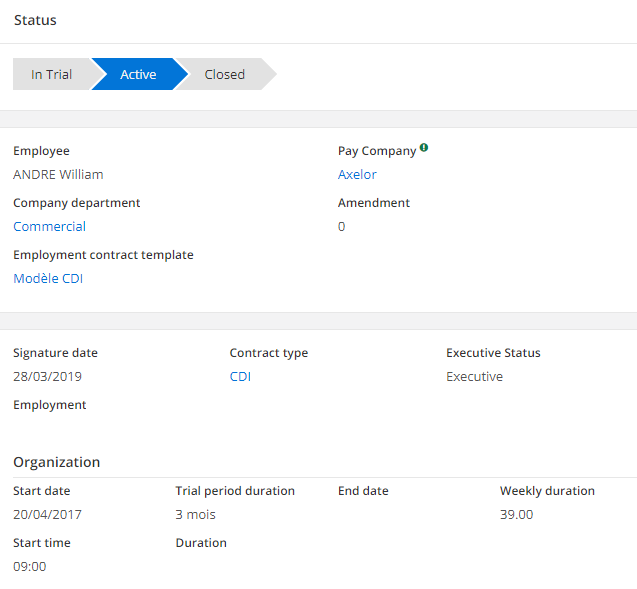
You can create a work contract directly from an employee record, in the “Work contracts” tab.
Remember to fill in the employment contract linked to an employee, in the employee’s file, tab “Employment contracts”.
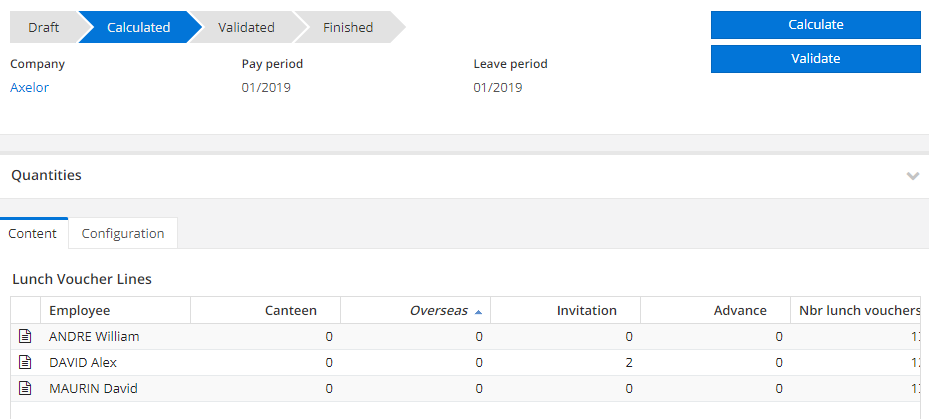
Manage meal vouchers
HR > Employee management > Lunch voucher management
You must first activate the “Restaurant Ticket” option in the application configurations of the Employee Management module. You must also configure the salary share and the employer share in the application configurations of the Employee Management by Company module, in the “Restaurant Tickets” tab. In the same tab you can define the default title format used in your company (paper or electronic), you can also define the elements that will allow you to manage the replenishment orders for your titles (minimum stock, available stock, suppliers).
Select the company code concerned, as well as the periods taken into account for payroll and absences and start the calculation. After that you can manually enter the number of tickets to be deducted depending on the situation (passage to the canteen, days spent abroad, or even an invitation to lunch).
A link is made to the expense reports. Indeed, when you enter overhead costs, depending on the types of costs, you can automatically deduct one or more meal tickets (see “Setting up cost types”).
Manage restaurant voucher advances
On an “Employee” form, in the “Restaurant tickets” tab click on the “Add an advance” button, enter the date of distribution and the number of tickets given. This information will be included in the preparation elements.
Manage premiums
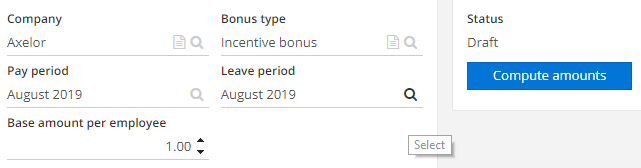
HR > Employee Management > Bonus Management
The “Bonus” option must first be activated in Application Config > App Management > Employee Management.
The types of bonuses granted to employees can be configured beforehand in the configurations of the Employee Management menu. It is necessary to enter application conditions and set up a calculation formula. If you want a bonus to be included in the payroll preparation elements, you must check the box “Present in payroll preparation exports”. Select the company code concerned, the type of bonus, the periods taken into account for payroll and absences, the basis for calculating the bonus and start the calculation.
On an employee form, in the employment contract tab you can enter a coefficient for calculating premiums. If an employee is eligible for the incentive bonus, you must tick the corresponding box.
Time sheets
HR > Time sheets
Time sheets
A time sheet allows an employee to indicate the time spent on the tasks he or she has performed.
Pre-configurations
At the application configuration level there are several options: - Billing type for time spent: this option allows you to choose whether the timesheets will be billed according to the activity used on the timesheet lines, or according to the activity defined by default on the employee form.
- Consolidate timesheet lines for invoices
- Stopwatch: allows you to use an integrated stopwatch on your timesheets to accurately calculate the time spent on an activity.
- Keep the project on the stopwatch: the project that was used when the stopwatch was last used is automatically resumed when you restart the stopwatch again.
- Edit stopwatch: if the option is not activated, once the stopwatch has stopped, the timesheet line created is read-only and you cannot change it. If you enable this option, you can edit the line to modify it.
- Timesheet editor: this option allows you to activate a “graphical” editor on the timesheets that will allow you to enter your times directly on a schedule.
- Time sheet template: allows you to define if by default the end date of a time sheet will automatically be at the end of the week or at the end of the month. If necessary, go to the HR configuration of the user’s active company (Application Configuration > Users/Companies > Companies > Companies > HR Configuration) then in the “Timesheet Templates” box, activate “Timesheet Notification Mail”.
Create and manage a timesheet
Add lines manually and indicate for each of them a project, a task, a date, an activity, the time spent. If this task is billable, check the corresponding box. You can add any comments you may have. It is possible to generate mass lines in 2 ways:
- activate the editor and select a project and an activity
- from the tools, use the line generation wizard.
At the end of the entry, click on “Confirm”, the timesheet will then be waiting for validation by a superior.
It is possible to directly enter the time spent on projects from the “Time spent” tab of a project. On the other hand, do not forget to retrieve the time spent on the project from a timesheet, by clicking on the “Retrieve time spent on projects” button, from the “Tools” button.
If another timesheet is already open in draft status, you must confirm it in order to open a new one.
If a manager is absent, the manager of this manager can consult the timesheets he has to validate during his absence by clicking on the button “View time sheets to be validated by my subordinates” located in the taskbar.
Use the timesheet editor
This option allows you to activate a “graphical” editor on the timesheets that will allow you to enter your times directly on a schedule.
In the application config you can define if by default the end date of a timesheet will automatically be at the end of the week or at the end of the month.
To use the timesheet editor, activate the option in the application configurations of the “Timesheets” module beforehand.
On a timesheet check the “Editor” button. To add a project to your schedule click on the “New” button and select the project concerned. Then you can enter the time spent, by project and by day.
A new overtime sheet only opens if no other overtime sheet is in progress, in draft status. An error message will be displayed if this is the case and the value will automatically change to the number of daily working hours indicated on the employee.
Recover time on tasks
Click on the “Tools” button on the taskbar, you can retrieve timelines, either forecasted or completed. Timelines are automatically filled from the schedules, however they can be modified manually.
Generate lines automatically
You can generate lines automatically, over a given period of time. To do this from the “Tools” button click on “Line generation wizard”. Select a project and an activity as well as a working time per day. Then generate the lines.
Validate a time sheet
HR > Timesheets > Timesheets to validate
As a line manager, you can view each timesheet and decide whether to approve or reject it. If you refuse a timesheet, it returns to the person who created it in the status “refused”. The latter then has the option of cancelling it or changing it back to draft status to modify it.
If a manager is absent, the manager of this manager can consult the timesheets he has to validate during his absence by clicking on the Tools button then “See the time sheets to be validated by my subordinates”.
Invoice time sheets
Timesheet lines can be invoiced, especially in the context of a business deal. You have the choice in the options of the “Timesheets” sub-application between two types of invoicing: use line activity or use employee activity. If you use the line activity, you will be able to invoice the different timesheet lines of an employee, with potentially different activities per timesheet line. While having detailed times and activities can be useful for an employer, you don’t necessarily need as much detail when billing a client for time on a business or project, for example. In this case, you can use the employee activity for timesheet billing. In an employee file, in the timesheet tab, you can define by default an activity for an employee, in the field “Product for time spent”.
If the option “Consolidate timesheet lines for invoices” is activated, the timesheet lines will be grouped by activity type on the invoices. At the application configuration level you can define a billing type for default time spent, either line activity or employee activity.
Send notification emails
It is possible to receive an e-mail for each new time sheet to be validated, validated and refused. To do this, simply go to the HR configuration of the user’s active company (Application Configuration > Users > Companies > HR Configuration) then in the “Timesheet Templates” box, activate “Timesheet Notification Mail”, which will allow you to configure e-mail sending templates for sent, validated and rejected timesheets.
Using the stopwatch
HR > Timesheets > Stopwatch
You must first activate the option in the application configurations of the Timesheets sub-module.
In order to enter times automatically and accurately, it is possible to use the stopwatch. By clicking on “Start”, the stopwatch starts. When it is finished you click on “Stop” and a timesheet line is automatically created. You have the possibility to pause and restart the stopwatch whenever you wish. The timesheet will then be created when the stopwatch has been definitively stopped.
If you activate the “Keep project on stopwatch” option, in the application configurations of the Timesheets sub-module, the project that was used when the stopwatch was last used is automatically resumed when you restart the stopwatch again. If you activate the “Edit stopwatch when stopped” option, the timesheet line created is read-only. If you enable this option, you can edit the line to modify it.
Overtime hours
HR > Overtime
Create and manage overtime
You must first activate the “Overtime management” option in Application configuration > Call management > Leave requests.
Manually add overtime lines. For each line indicate a date, a number of hours and possibly a description.
Overtime lines can be associated with a project.
The number of hours may not exceed the number of daily working hours indicated on the employee attached to the user.
Validate overtime hours
HR > Overtime > Overtime to be validated
As a line manager you can view each overtime report and decide whether to approve or reject it. If you reject an overtime report, it goes to the employee who created it in the status “rejected”. The latter then has the option of cancelling it or changing it back to draft status to modify it.
If a manager is absent, the manager of this manager can view the overtime hours he has to validate during his absence by going to the “Overtime to be validated by my subordinates” menu located in the taskbar.
Send notification emails
It is possible to receive an e-mail for each additional hour to be validated, validated and refused. To do this, simply go to the HR configuration of the user’s active company (Application Configuration > Users > Company > HR Configuration) and then in the “Overtime templates” box, activate “Overtime notification mail”, which will allow you to configure the email sending templates for sent, validated and rejected overtime
The recruitment process
HR > Recruitment
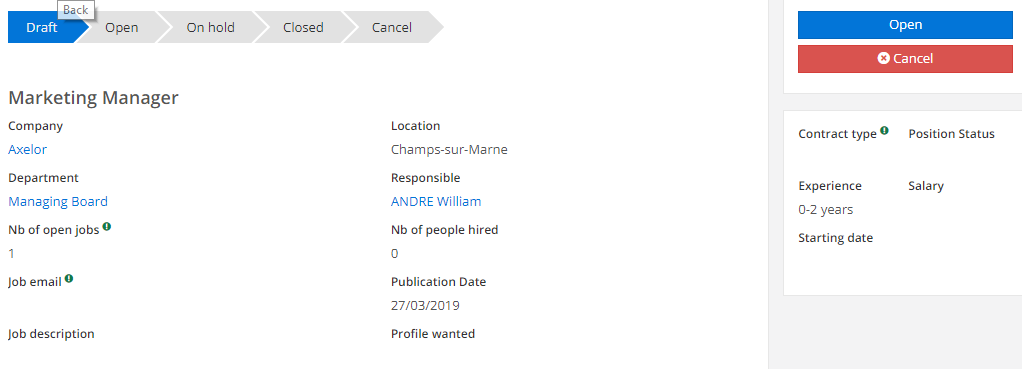
Create and track job offers
HR > Recruitment > Job opportunities
Job offers are created from the “Job offers” menu. Once the different fields of an offer have been filled in, you can click on the status “Open” when you want to indicate that the offer is in progress.
You have access to a history of your HR job offers > Recruitment > Job offers history
Record and track applications received
HR > Recruitment > All applications HR > Recruitment > All current applications
You can manually create new applications from the “All Applications” menu or from a job offer by clicking on the “Create an Application” button. An application can have 4 distinct statuses: “open”, “hired”, “rejected”, “cancelled”.
The creation of applications can be automated by filling in the “Job offer reply email” field. Each email sent to this address will create a new application. If you use a single address for several offers, you will simply have to link the application to the relevant offer (“Job offer” field).
The email account(s) related to the recruitment must have been configured in advance. You can customize the different steps of an application in the configurations.
Employee training
HR > Training
Create a training course
Training courses are created from the “Configuration” submenu. Fill in all the information related to the course you have created and save. You can register for training courses from the “Training” menu. You must choose your training and session and click on “Accept/plan”. Once the training is completed, you must click on the “Training completed” button and give a note to the training.
You can make training mandatory. To do this, tick the corresponding box.
When creating a training course, you can freely add skills (in the “Skills” field) in the form of tags. You can then find them on each form used in the “Skills” tab.
It is necessary to configure training categories, training descriptions and training sessions (see submenu Configuration)
Create training sessions
Training sessions are created from the Configuration menu > Training Sessions. You must select the business event for which you want to create the session, dates and number of hours, and save. Once the session is over, you can click on the “Logout” button.
Manage registrations for a training session
You can register for training courses from the “Training” menu. You must choose your training and session and click on “Accept/plan”. If you want the training dates to appear on a calendar, select a calendar and once the training is completed, click on the “Training completed” button and give a note to the training.
On each session, you can find the list of those registered for that session, which is automatically updated.
Validate a training request
As a line manager, you have access to your employees’ training requests via the “Staff training” submenu. You can then validate them.
Manage the skills acquired during training
When creating a training course, you can freely add skills (in the “Skills” field) in the form of tags. These will be skills that will be acquired during the training. These skills will automatically be associated with the employees who will participate in the training.
You can find them on each form used in the “Skills” tab.
Internal employee evaluation
HR > Evaluations
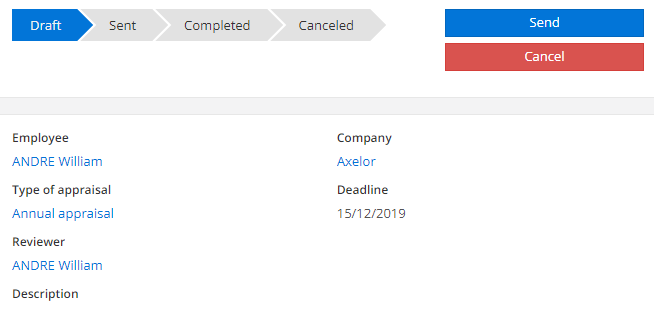
Create and manage internal evaluation processes
You can create new evaluations from different menus: my evaluations, my team’s evaluations and evaluations. Enter the name of the employee, the person responsible for the evaluation, the type of evaluation and, if necessary, add a description. Clicking on the “Send” button is purely informative.
You have access to the evaluation history on each employee record.
Generate evaluations from a model
An appraisal model must be linked to an appraisal type that has already been created. Enter a due date and the name of the person responsible for the training. You can possibly enter a description. Then click on the “Create evaluations” button. Select the employees concerned. Clicking on the “Send” button is purely informative.
Leave of absence
HR > Leave requests
Configuring types of leave
In the configurations of the “Leave requests” sub-menu, you must create types of leave (e.g.: Absence to justify, paid leave, etc.). For each type of absence you have access to different options: you can create a counter (in this case you can, or not, authorize the injection), you can authorize negative values by type of leave. You can fill in operating instructions. If you tick the box “Selection by HR department only”, this type of leave can only be selected by the person identified as HR Manager. If you want certain types of leave to be included in the preparation elements, you must check the box “Present in payroll preparation exports”.
Create leave requests
By clicking on “Complete my leave request”, you open a new leave request, if no other is in progress, in draft status. You must fill in a reason and dates. This menu allows you to create a leave request after the date of the request, which is not possible with a traditional leave request. A reason is required to validate or record the leave request. In the “Actions” tab on the right, click on “Request sent leave” to send it.
A reason is required to validate or record the leave request.
On the employee form, in the “Holiday counters” tab, add lines by choosing the type of absence the employee will be able to select. You must create one line per type of absence that you want to allow the employee to select
It is possible to allow negative values for holidays from application configurations. In addition, it is necessary to define the types of absences that will then be selectable by employees. If necessary, activate “Notification mail for leave request” in the HR configuration of the company concerned. The holiday reasons are configured in the Configuration submenu.
Validate leave requests
HR > Leave requests > Leave requests to be validated
As the line manager, you will find all the leave requests to be validated in the “Leave requests to be validated” menu.
If a manager is absent, the manager of this manager can consult the leave requests he has to validate during his absence by going to the “Leave requests to validate” menu, then by clicking on the “View leave requests to validate by my subordinates” button located in the top bar.
Allow negative values
Allowing negative values for leave means that you allow an employee to take leave even if their balance is 0.
You must activate the option in the company’s HR configurations, by clicking on “Allow negative values for employee leave”. From now on, each time a new employee record is created, the option will be automatically activated, but can be modified manually. The authorization of negative values can also be managed by absence type (checkbox on the form).

You can disable it on a case-by-case basis if necessary on the employee form.
Manage unjustified absences
If an employee is absent and it is an unforeseen absence, i.e. he or she was unable to request leave before his or her absence, this menu allows you to create a request for leave a posteriori.
Send notification emails
It is possible to receive an e-mail for each new leave request to be validated, validated and refused. To do this, simply go to the HR configuration of the user’s active company and then to the “Holiday templates” box, activate “Holiday request notification mail”, which will allow you to configure the e-mail sending templates for sent, validated and rejected holiday requests.
Expense reports
HR > Expense reports
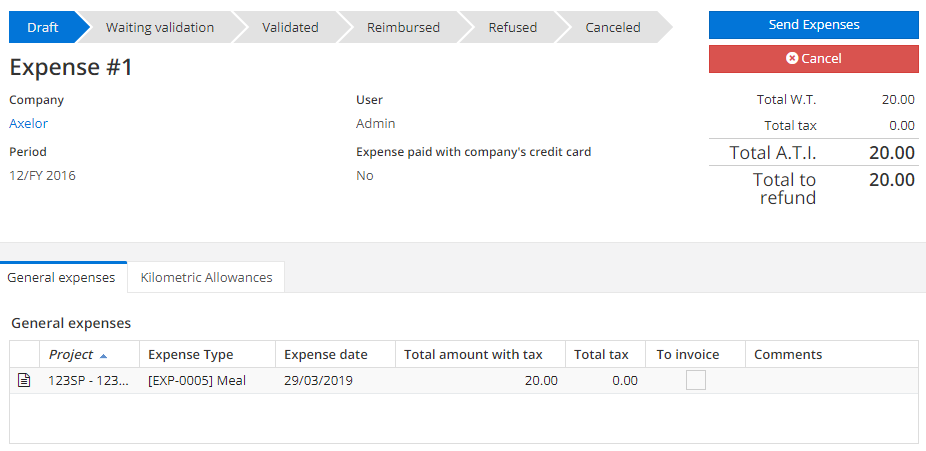
Create and manage an expense report
You can create an expense report from the sub-menu" “Complete my expense report”". Enter the project related to the expense; the type of expense, the date of the expense, the amount. A checkbox allows you to specify if this expense is re-billable to a customer. A distinction is made between overheads and mileage costs. The fees may have been paid with a business credit card or it may be a cash withdrawal with a business card as well.
The posting date is automatically filled in at the time of distribution.
You cannot open a new expense report if there is no other expense report in draft status.
A tax period is present on the expense report. By default, this is the current period. It can only be modified by an earlier period.
In the company’s accounting configurations, accessible from Application Config > Company, then by double-clicking on your company and then on the “Accounting Account Configurations” button, you must indicate a log of expense reports, as well as a tax account. The fee types are created at the configuration submenu level.
Manage mileage costs
The expense report contains a “Kilometre costs” tab. Indicate the project related to this trip, the date, the tax power of the vehicle used, whether it is a one-way or round trip, the distance travelled, the departure and arrival cities and any comments.
Tax powers are created in the configuration submenu. In the application configurations of the expense module, the “Calculate distance with a Web service” option allows the number of kilometers between the departure address and the arrival address to be automatically calculated using a web service that connects to Google map or Open Street map.
Manage multi-collaborator expense reports
From the corresponding sub-menu, create your expense report; adding one line per employee associated with the expense.
Manage NDF advances (one-time or permanent)
On an “Employee” form, under the “Expense Report” tab, it is possible to request an advance, whether it is a one-time or permanent advance. Enter an amount and a payment method, and click on “OK” to send the request.
Validate an expense report
HR > Expenses > Expenses to be validated
As a line manager, you can view each expense report and decide whether to approve or reject it. If you reject an expense report, it goes to the person who created it in the status “rejected”. The latter then has the option of cancelling it or changing it back to draft status to modify it.
If a manager is absent, the manager of this manager can consult the expense reports he has to validate during his absence by going to the menu “Expense reports. to validate by my subordinates” located in the task bar.
To allocate an expense report, go to the “NdeF to be allocated” menu or directly to a validated expense report.
Breakdown of an expense report
From an expense report with validated status click on the “Breakdown” button. An accounting entry is then generated, provided that the accounting information related to expense reports has been previously configured in the company code application configurations of the Accounting module.
You can do the same operation from the submenu ��“NdeF to be ventilated”.
Reimburse an expense report
Depending on the options enabled, recording an expense payment in the system may only be informative.
To save a payment you must select a payment method that you have previously configured in the bank order settings. If it is a transfer, you can, in the “Config bank orders” tab, check the “Generate” bank orders box. In this case, recording the payment of an expense report will automatically generate a bank order.
From an expense report with validated status click on the “Save payment” button. All you have to do is enter the payment method. The expense report will be considered as fully paid and will change to “Reimbursed” status. This is purely informative, you will have to manage the payment itself elsewhere.
Send notification emails
It is also possible to receive an e-mail for each expense report to be validated, validated and rejected. To do this, simply go to the HR configuration of the user’s active company (Application Configuration > Users > Companies > HR Configuration) and then in the “Expense note templates” box, activate “Expense note notification email”, which will allow you to configure the email sending templates for sent, validated and rejected expense notes.