Auxiliary accounting
Customer accounting
Recording an incoming payment
Cheque remittance
Introduction
Cheque deposit: a payment method (configurable in the solution) that enables you to deposit cheques in the bank.
Configuration
Access:Application config - Application management - Accounting, Configure
In the Accounting app, activate the :
-
Payment vouchers on customer invoice
-
Payment vouchers on supplier invoice
-
Save your changes.
In Payment modes:
Access: Accounting - Configuration - Payment - Payment modes
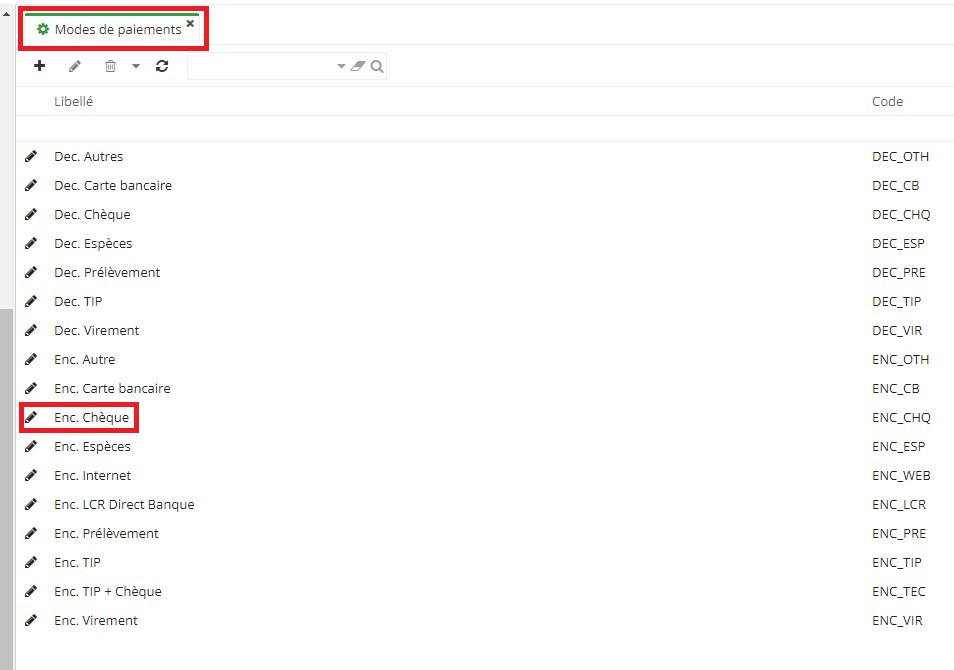
1) Open the check cashing form.
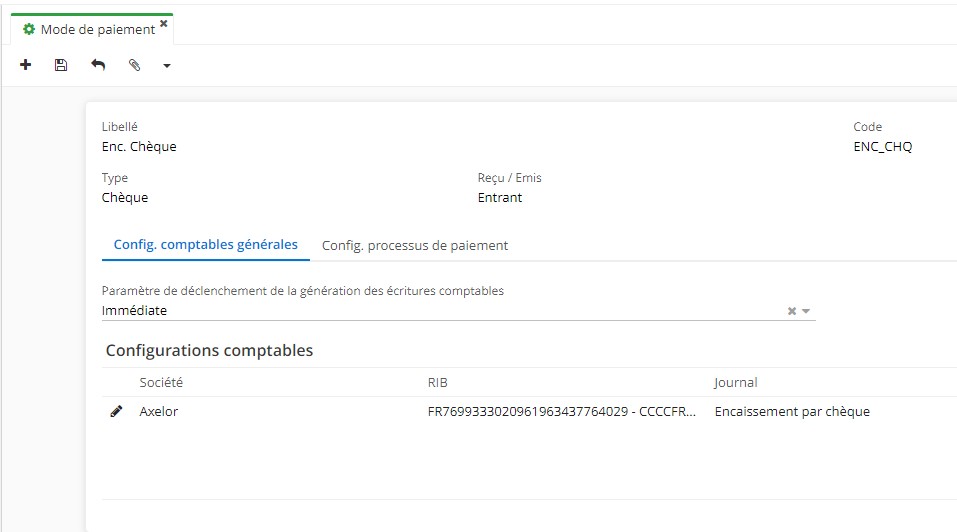
2) In the "General accounting config" tab, you'll find the "Move generation trigger settings" field. In this field you can select from two choices: "value for collection" or "immediate".
3) "Value for Collection ": in this case, you'll have a configurable intermediary account which will allow you to say that a cheque has been deposited.The cashing value is used to generate an intermediate entry between the customer's account and the bank's account for future remittance.
Cheque cashing: a special journal is required for cheque cashing.
- On the Accounting App page, activate the "Payment vouchers on supplier invoice / on customer invoice" checkboxes.
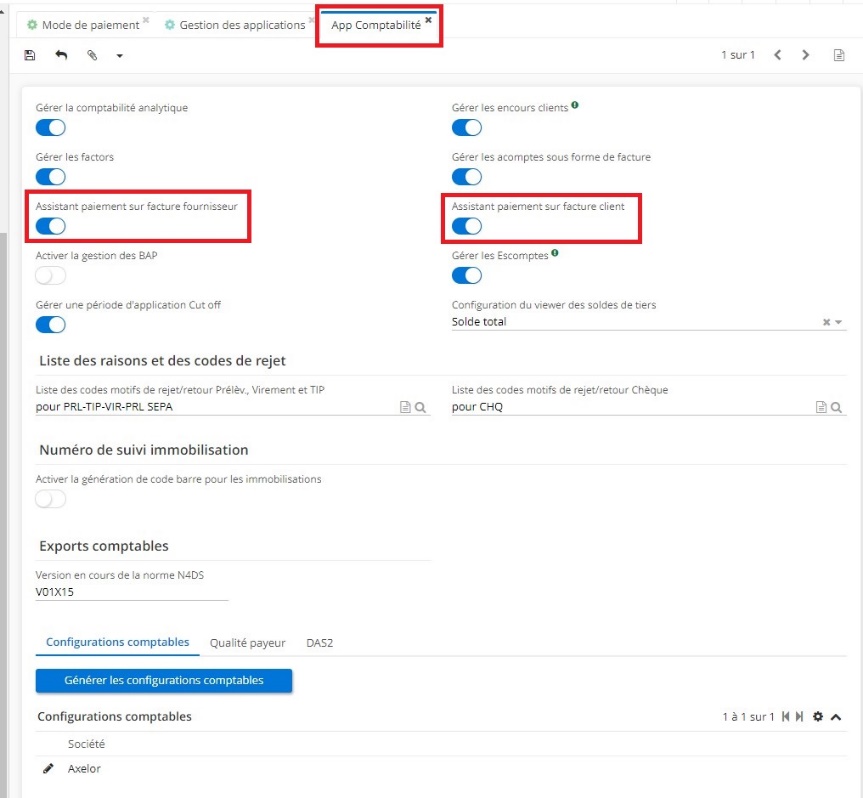
1.1. Payment modes and the "Cheque cashing" form.
1.2 The "Cheque Cashing " payment mode form In the "General accounting settings" tab, you'll find the "Move generation trigger settings" field.
An example of payment:
Access: Invoicing - Customer invoices
-
Fill in the necessary information on the form.
-
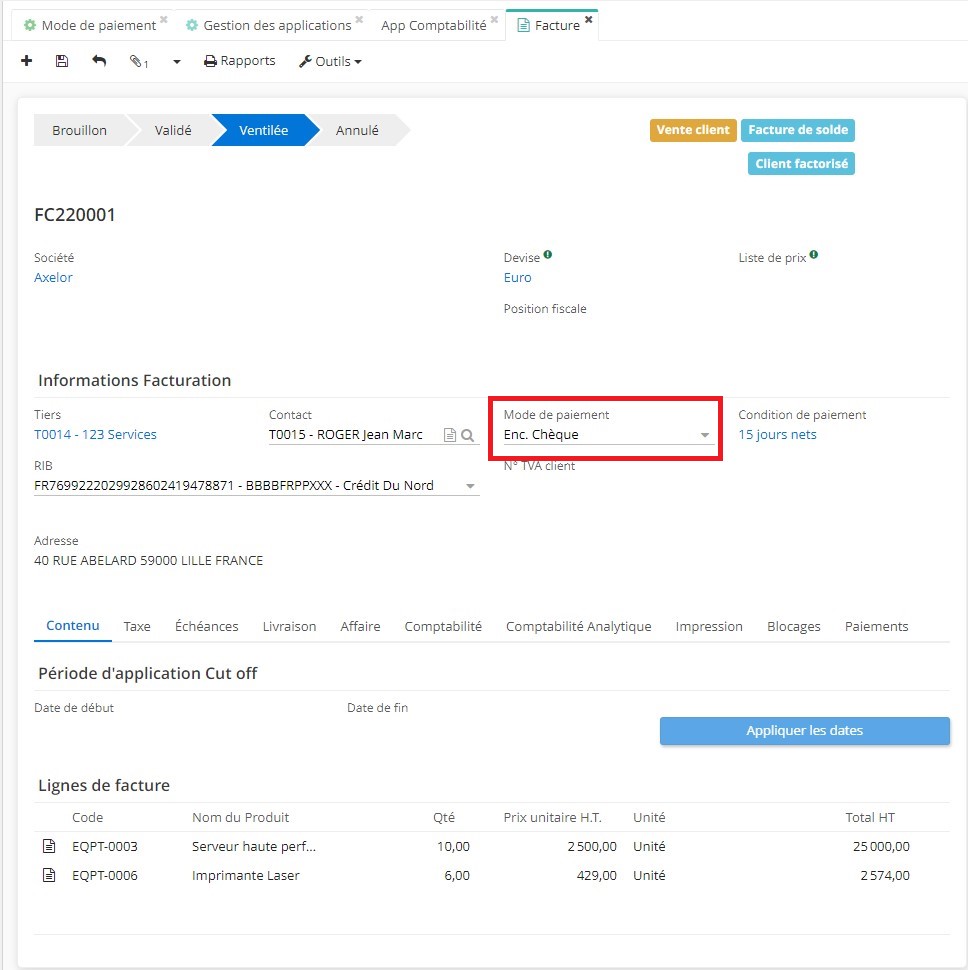
In the "Payment mode" field, enter "Cheque cashing".
-
Click on "Validate" and then click on "Ventilate".
-
Register your payment.
-
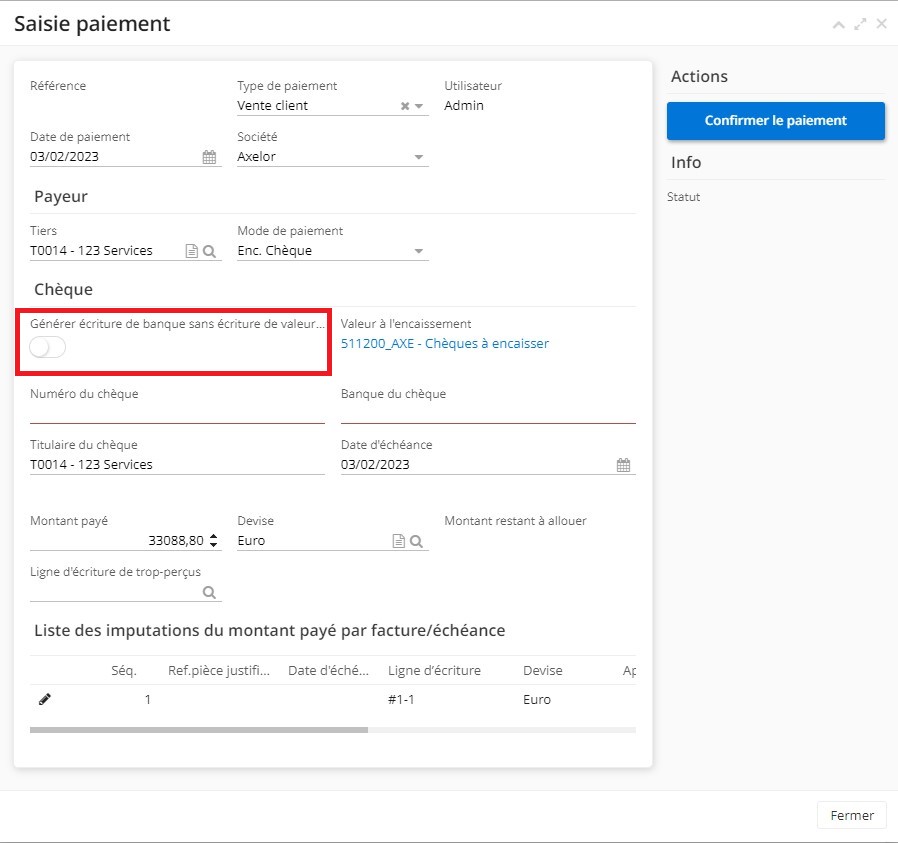
Once you have clicked on "Register payment", the Payment voucher window will open.
On the Payment voucher window :
- You will find the boolean "Generation of bank entry without value entry on collection".
-By enabling the boolean, the user will have a standard entry with accounts 411 and 512.
- When the checkbox is deactivated, a value for collection move is generated.
- You can view the moves generated in the same window, in the space on the right.
1.3. On the invoice form, select "Cheque Cashing" as the Payment Mode.
1.4. On the invoice form, when you click on "Register payment", a new "Payment voucher" window is opened. On this form, you can activate the "Generation of bank entry without value entry on collection" boolean. The moves generated will be visible in the same window, in the space on the right.
Deposit slips:
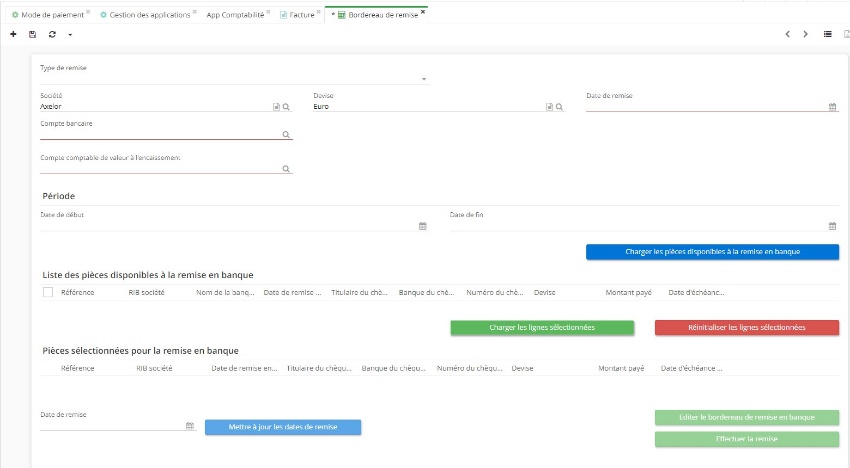
Access: Accounting - Payments - Deposit slips
-
Complete the information
-
Click on the "Load available payment vouchers for bank deposit" button.
-
Then, in the "Available payment vouchers for deposit slip" table, select the lines and click on the "Load selected lines" button.
-
Click on "Publish deposit slip".
-
To view the deposit slip, click on the paper clip icon at the top (attached files).
-
Click on "Validate deposit slip". Once you've clicked on this button, the "Bank deposit move generated" box will be automatically ticked to show that the move has been created.
This entry will be visible in the list of entries (Accounting - Moves - Moves).
1.5. The deposit slip form.
Debt recovery
General introduction
Configuration
Access: Application config - Apps Management - Accounting - click on "Configure".
On the Accounting App page, in the Account configurations tab, click on the Company. The new Account configuration window will open.
In Account configuration:
- Click on the "Receivables recovery" tab. You'll also find the Debt recovery configuration table.
There is a choice to be made regarding the partner category on the partner form (the category can be found in the partner details). For example, Apollo's category is "Small and Medium Enterprises".
- This category is used to configure reminder methods (on the Accounting Configuration page, accessible via the Accounting app by clicking on the company).
The reminder (debt recovery) method can be identical for all cases, or it can be differentiated according to the category of partner (e.g. individual or SME).
.
Debt recovery method / Reminder method
Recovery method, access : Accounting - Debt recovery - Configuration - Debt recovery methods.
It is possible to create debt recovery methods for debt recovery.
Next, open a debt recovery method form (e.g. reminder individual customers).
On the debt recovery method form, you'll find a structure to fill in (the "Debt recovery method lines").
1.1. The debt recovery method form and the "Debt recovery method lines" table.

The order you see in the debt recovery method table is the order of the steps to be taken (for example, start with Email, then proceed to a simple letter, then it's the registered letter's turn).
You will also notice that the table contains the column "standard trigger delay (days)". When the debt is due, and you are about to initiate a debt recovery step, a trigger delay will be applied.
Behind this, there is another delay, the mail routing delay, which is not indicated in the table.
How can I modify the values entered in the debt recovery method table?
By clicking on "Edit" for a line in the table, you can adapt the values to suit your needs.
-
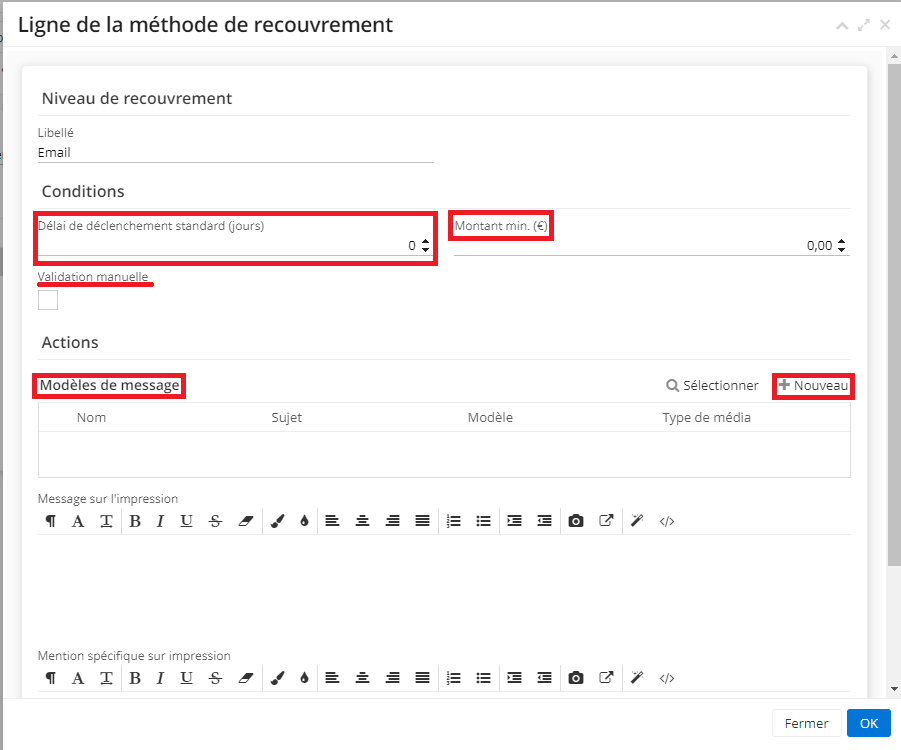
Standard trigger delay (days): click on the "Edit" button (the pencil icon on the left) and enter the number of days.
-
Minimum amount Set the trigger threshold (e.g. minimum 50 euros).
-
Manual validation: this step indicates whether an e-mail or letter needs manual validation before being sent. Click on "Edit" to define whether the step requires manual validation and tick the box.
1.2. The debt recovery method line window and the "Standard trigger delay (days)" field. Here you'll find other configuration fields such as "Minimum amount", the"Manual validation" checkbox, and the "Message models" table.
Email sending configuration:
There are several notions in the table, such as the notion of Email. It can be configured.
Click on "Edit" to open the "debt recovery method line" window.
First, fill in the necessary information.
-
Enter the label
-
Set the trigger delay
-
Check the "manual validation" box if the step requires manual validation.
-
Complete the "Actions" field.
-
Next, configure the email template by adding "new" to the message template table.
Message templates can also be configured in Application config - Message - Template.
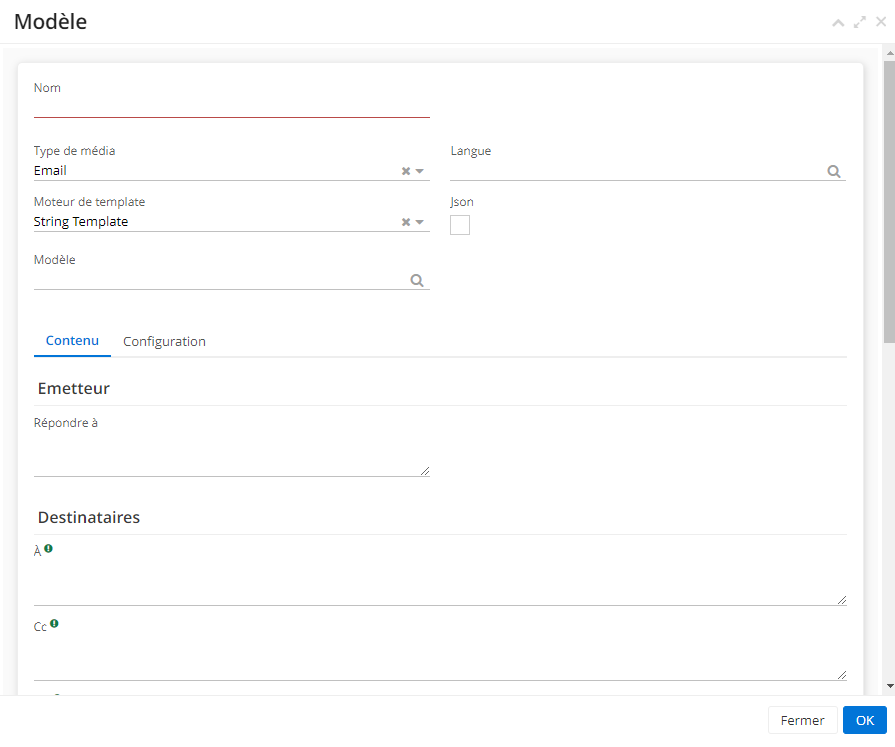
- Message templat: configure the message template by clicking on "New" in the "Debt recovery method line" window.
A new "template" tab opens. Define name, language, media type (mail, email, sms etc).
In the debt recovery method frame, select the template "DebtRecoveryHistory" in the template field.
Important: theDebtrecoveryhistory template must be selected for the debt recovery method to work correctly.
In the message template, write the message content. Specify the recipient (for example, "$DebtRecovery.partner.emailAddress.address$" ).
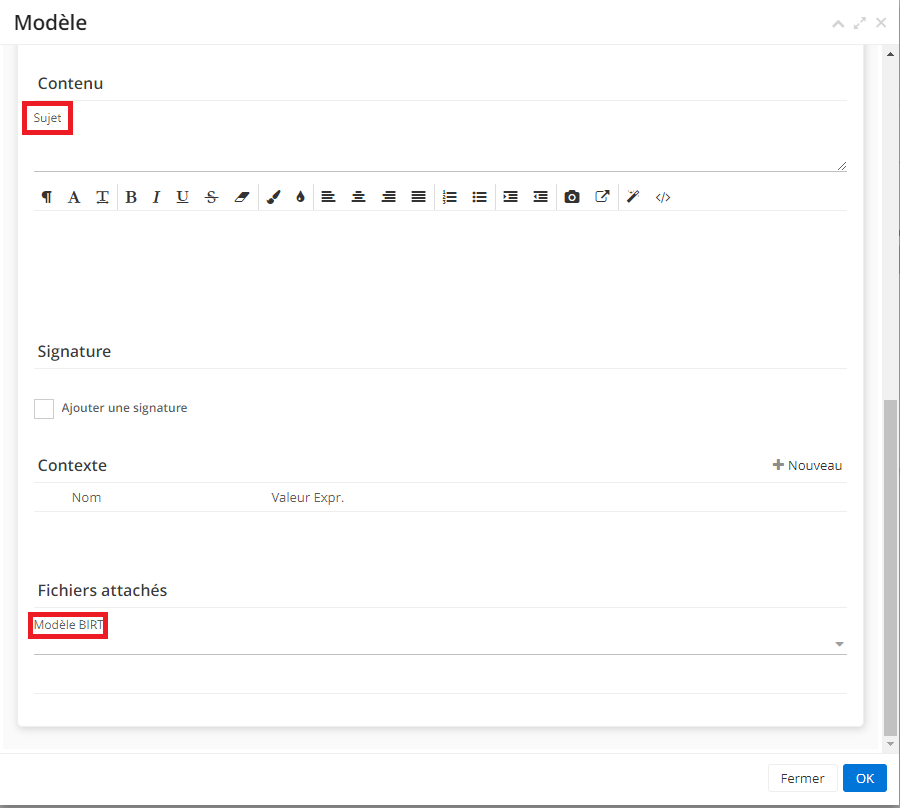
1) in the "Content" field, enter the subject (for example, debt recovery $debtRecovery.partner.name$ on unpaid invoices).
2) With the help of a developer, the context field can be used, for example, to attach a list of invoices / debt recovery tables to the message, using code to tag the necessary elements.
3) Attached files: you can also attach a "Debt recovery" BIRT template.
When the "debt recovery" accounting batch is launched, the results will be displayed in the debt recovery history (Accounting - Debt recovery - Debt recovery history).
In addition, don't forget to configure the user form and specify an associated email address for this user (i.e., the user who is linked to the debt reecovery and who will send the debt recovery email).
1.3. The message template configuration tab (click on "New" in the "Message Templates" table in the "Debt recovery method line" window).
SMTP:
Note: the email account can be used to configure the message template for debt recovery (access Application config - Message - Email Accounts).
If you haven't set up an email account, you can do so here. Here's a brief description of email account configuration.
-
On the email account page, click on "+New".
-
Specify as host an email engine that can retrieve emails sent and received by you.
-
Select SSL or STARTTLS.
-
Fill in the rest of the information, such as port, from email address, from email name, login(from your email engine), and password (which is provided by the email engine).
-
Check "Default account".
-
Click on "Test connection".
Then open Messages (Access: Application config - Messages - All messages - New).
On the new message form (Email), complete the necessary information:
-
Media type: Email.
-
Mail account (e.g. SMTP configured by default, cf Application config > Message > Email Accounts).
-
In the "Reply to" field, enter an email address (note that the email address must be associated with an existing record, such as an employee's). A CORRIGER EN FR ET EN
-
Enter a text in the "Content" field.
-
Click on "Send" at the top of the page if you wish to send the message.
-
Thanks to the email sending engine, you'll know if the email was sent successfully.
In accounting batches:
What is a debt recovery method?
A debt recovery method is also a batch. .
Access: Application config - Batches - Accounting batches
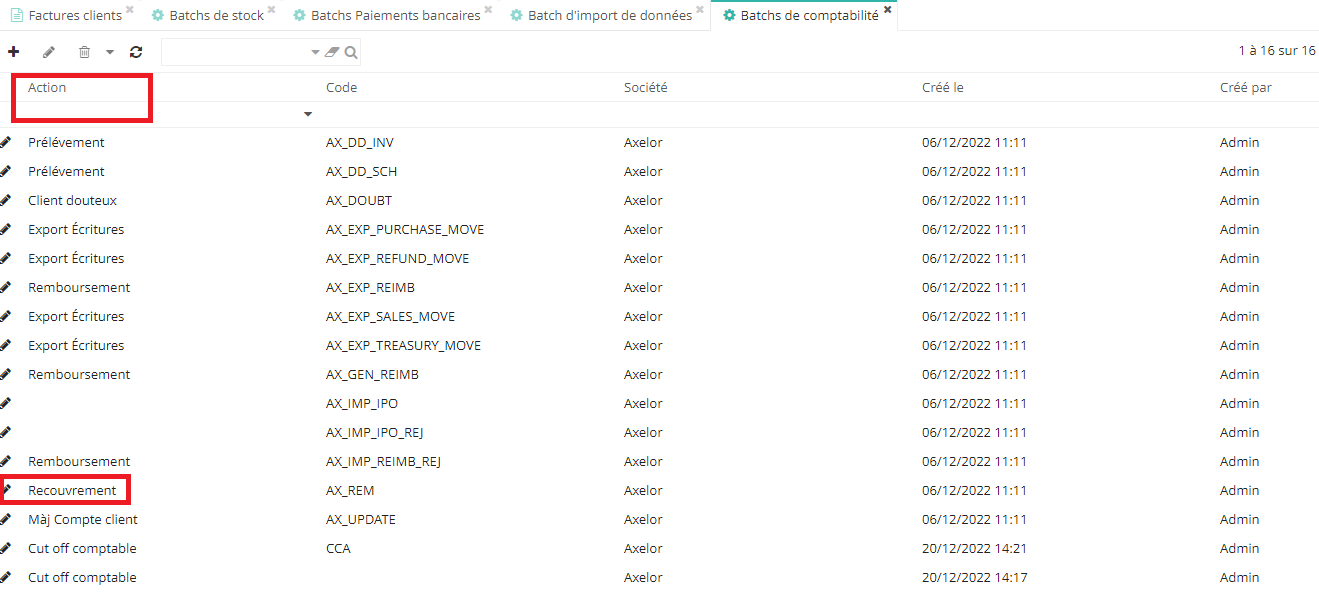
In the accounting batch repository, you'll find the "debt recovery" batch.
INFO
when the "debt recovery" accounting batch is launched, the results will be displayed in the debt recovery history (Accounting - Debt recovery - Debt recovery history).
1.4. You can sort the list by entering the keyword "Debt recovery" in the "Action" field and then pressing "Enter".
Once everything has been configured:
Access: Invoicing - Cust. invoices
Once everything is set up, you can proceed with invoicing.
-
On the Customer Invoices form, you can sort invoices by displaying only unpaid invoices. To display them, indicate in the "Amount remaining" field >0
-
All unpaid invoices are highlighted in red.
-
Next, run the batch. Open the "debt recovery" accounting batch page (access: Application config - Batches - Accounting batches).
-
On the batch debt recovery form, click on the "Actions - Debt recovery Batch" button.
-
If for any reason you are unable to complete the batch, please check the bugs and correct them.
On the batch debt recovery form (the open tab of "Accounting Batch"), click on the "Information" tab. In the "Batches" table on this tab, click on the file contained there. A new "Batch" window will open and you can click on the "Anomalies" button. If there are any anomalies, they will be displayed in a new window.
1.5. Customer invoices. You can sort the list to find unpaid invoices by entering ">0" in the "Amount remaining" field.

Factoring
-
Factor management
-
Invoice issue
-
Subrogation release
-
Payment notification
General introduction
- Factoring: the possibility of receiving payment from a factor, usually a bank or other financial institution. A factor will pay invoices directly.
In this situation, the factor is responsible for recovering the debt from the customer.
Once the factor has paid the company, it sends a notification. It is therefore the registration of this notification that will cancel the claim and indicate that the customer has made payment.
Configuration
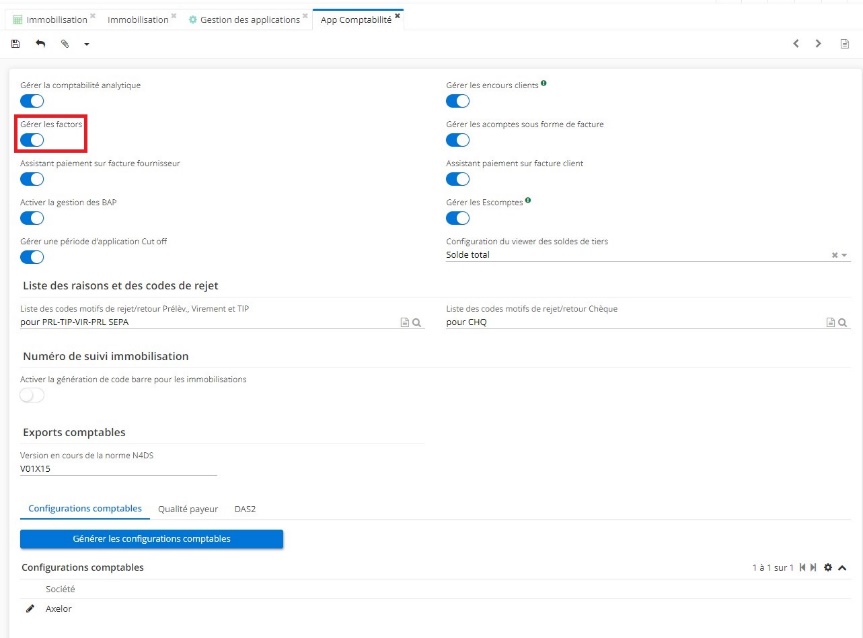
Configuration: Application Config → Apps management → Accounting → Config → Tick "Manage factors"
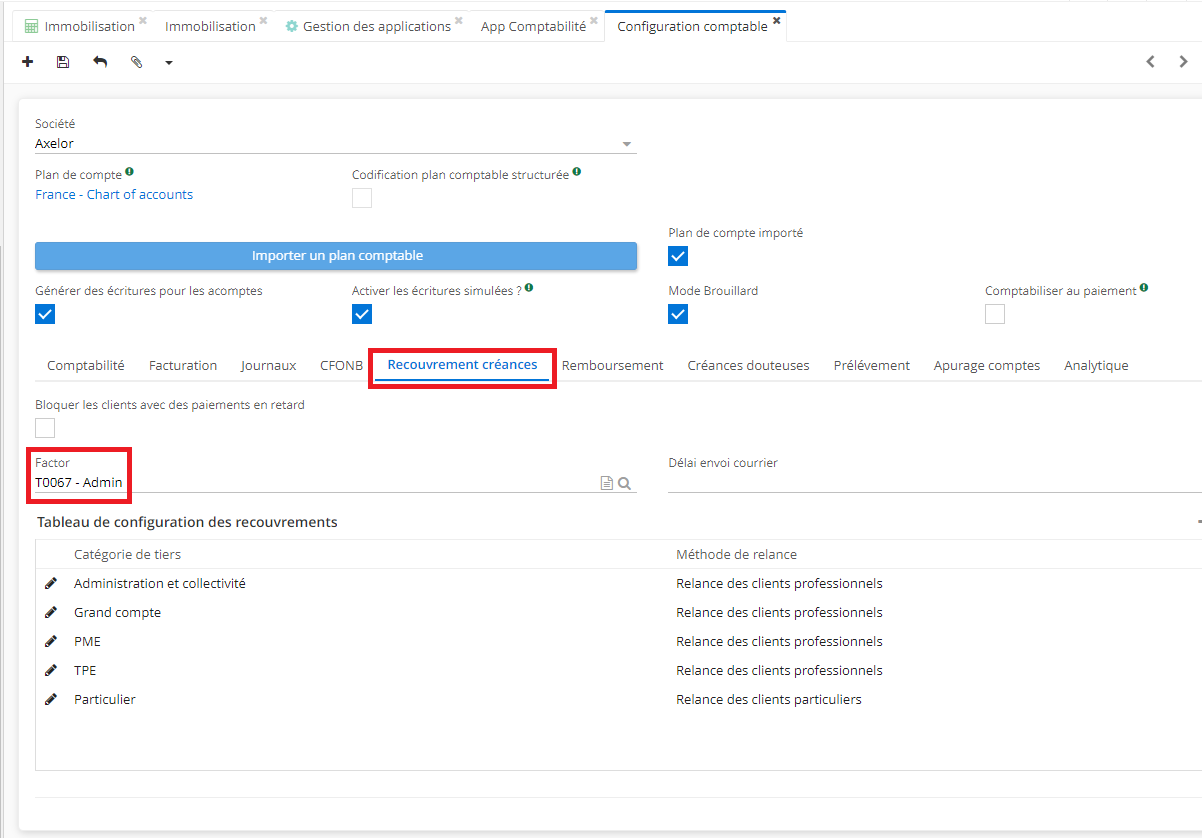
1) On the Accounting App page, check the "Manage factors" box. Once you've checked the box, click on the company's Accounting configuration at the bottom of the page→ click on the "Receivables recovery" tab. .
By clicking on the tab, you'll find the "Factor" field, which lets you select a partner. This partner will be used for invoice processing.
Generally, a company operates with a single factor.
1.1. Accounting app. Check the "Manage factors" box.
1.2. The Accounting Configuration page and its receivables recovery tab. By clicking on the "receivables recovery" tab, you'll find the Factor field, which lets you select the partners who will be the Factor.
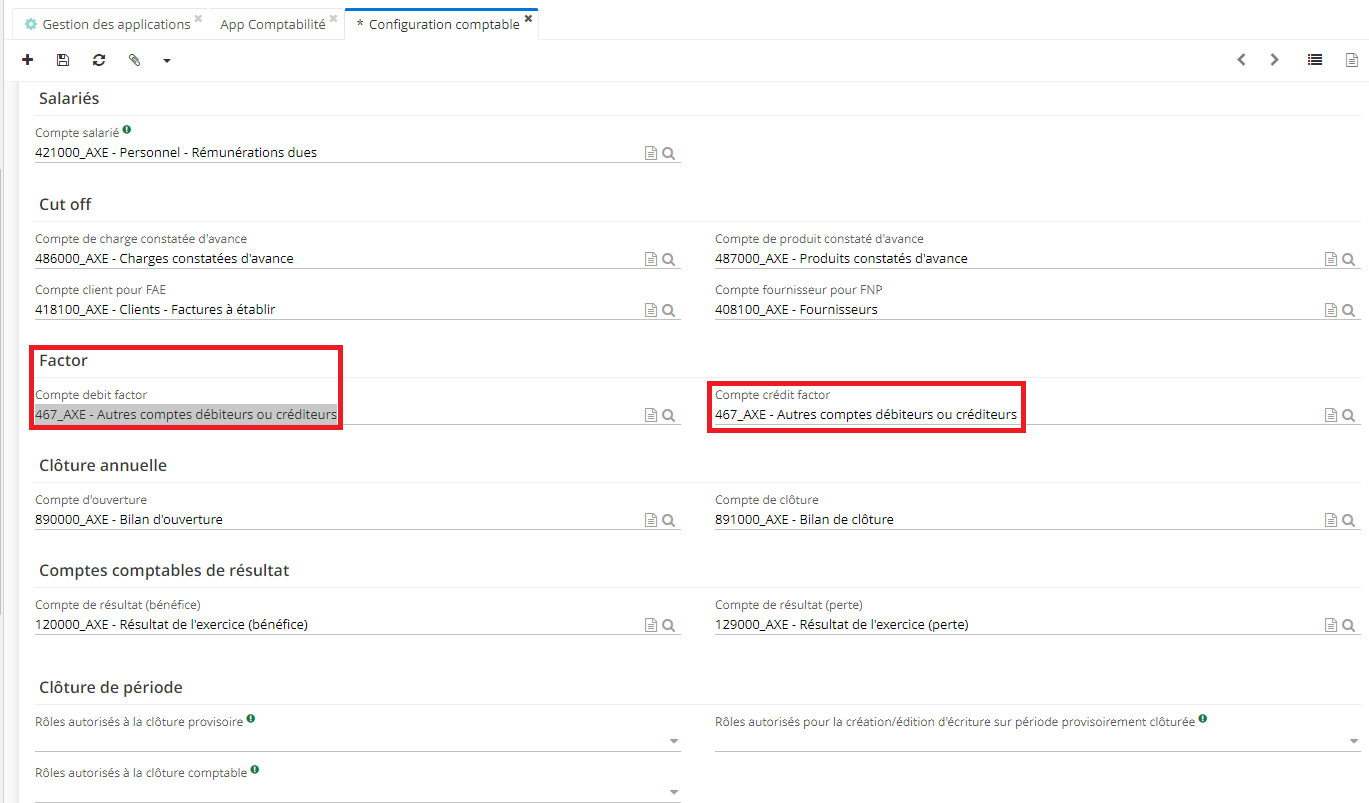
2) Still on the Accounting configuration page, click on the Accounting tab. In this tab you'll find the "Factor" field, which allows you to select the factor credit and factor debit accounts for processing account moves. Select account 467 "Other accounts receivable or payable".
1.3. On the Accounting configuration page, click on the Accounting tab. You'll find the Factor field, which lets you select the debit factor account and the credit factor account.
3) Application config -> Referential -> Partners
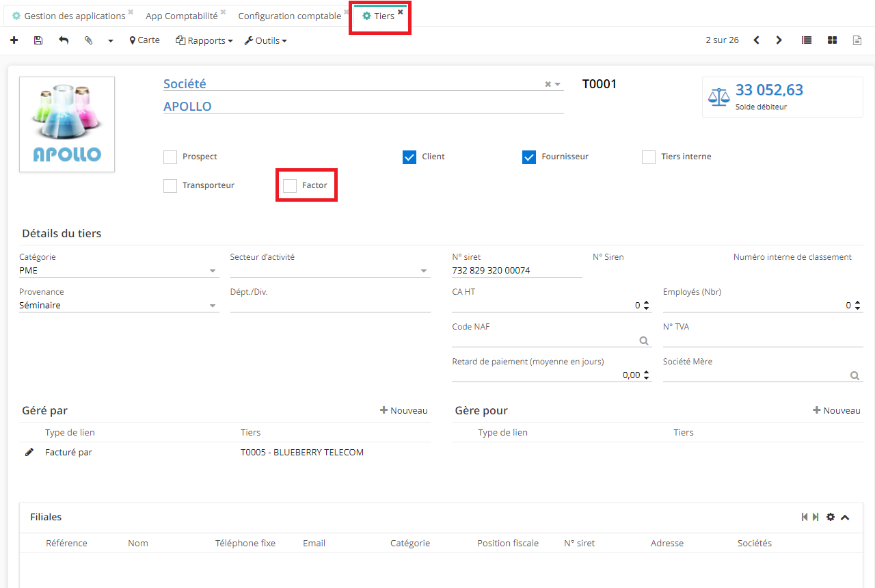
Activate the "Factor" checkbox on the partner form. Activating the checkbox will enable us to sort out and use this partner as a factor in future operations.
1.4 Activate the "Factor" checkbox on the partner form, so that this partner can be used in future operations.
Invoice issue. How do you determine whether a partner customer is factorized or not?
- Partner form
Access: Application config → Referential→ Partners
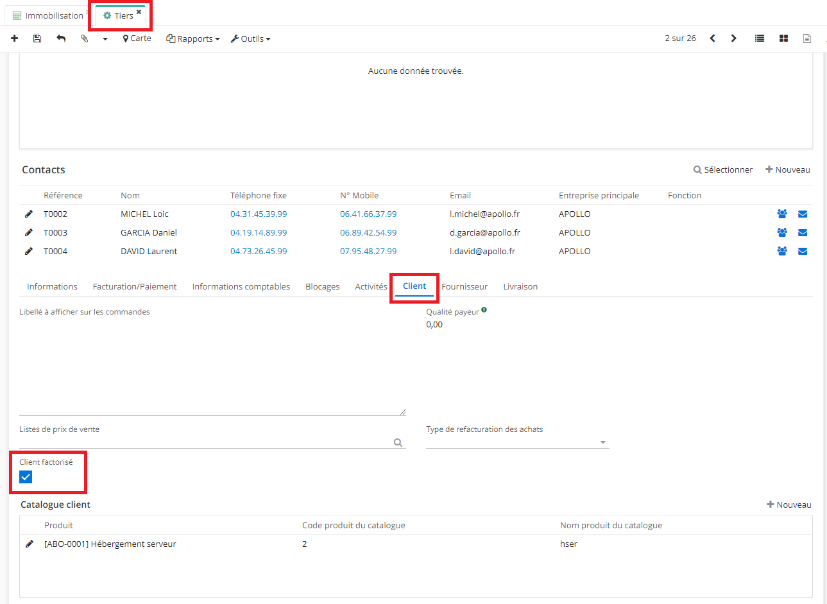
In the partners form, by clicking on the "Customer" tab, you'll find the "Factorized customer" checkbox at the bottom of the page.
This means that an invoice will be drawn up in the name of the factorized customer, so that these invoices can be recovered and put into a receipt to be sent to the factor.
Therefore, in such a situation, it is important to activate the "Factorized customer" box.
If this has not been done, the invoice will behave like a conventional invoice and will not receive the specific treatment reserved for the factorized customer.
1.5. Activate the "Factorized customer" checkbox on the "Customer" tab of the partner form.
- Invoicing
Access: Invoicing → Customer Invoice → New
Example: creation of a new customer invoice.
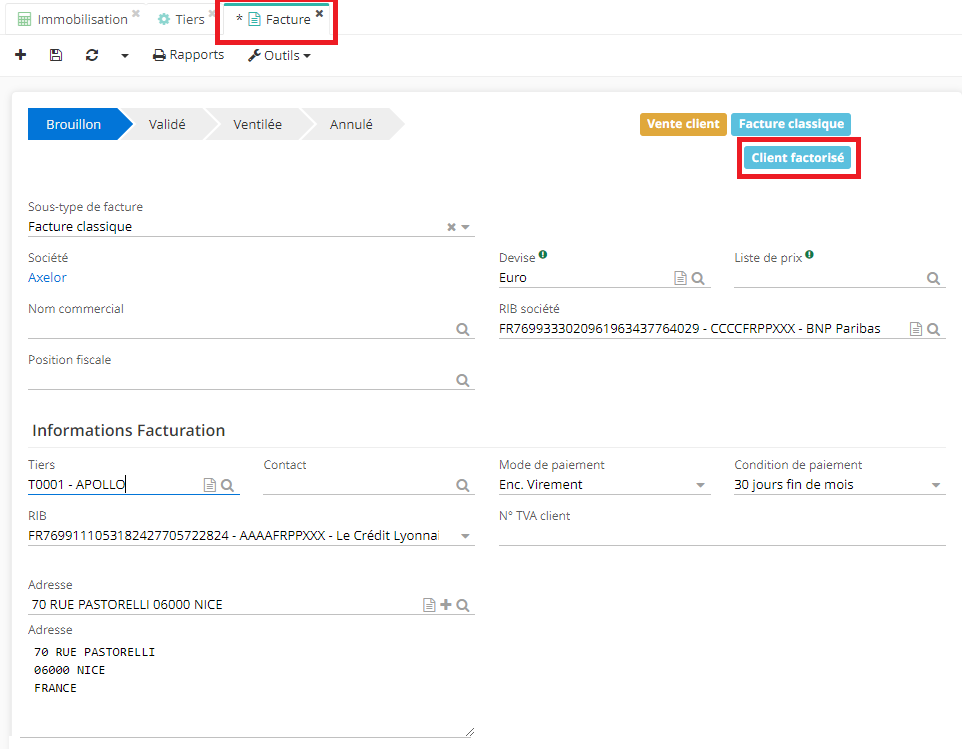
On the invoice form, when you add a partner who is activated as a "factorized customer", the form will reflect this fact by adding a "factorized customer" tag.
Important: for the invoice to reflect the fact that this is a factorized customer, you must first activate the factorized customer box on the customer form.
-
On the invoice form, fill in the information, indicate the dates and add a new invoice line in the content tab. Validate and then ventilate the invoice.
-
Invoice ventilation does not automatically record payment. It is therefore always possible to save the payment by clicking on the "Save payment" button, which allows you to confirm that you have received payment from the customer.
Pay attention to payment: factor & customer. Both can make the payment, but in this case you'll need to create a move to refund the money to the factor who advanced the payment.
-
Once this step is complete, you can submit releases to the factor.
1.6. On the invoice form, when you add a partner that is activated as a "factorizing customer", the form is given the label "factorizing customer".
Subrogation release
Access: Accounting → Debt recovery→ Factoring → Subrogation releases
Subrogation releases: is a statement of all invoices to be submitted to the factor so that the company can be paid.
How do I create a new subrogation release?
-
On the release form, click on "Save": the application will automatically enter the partner in the "Factor" field.
-
There are two ways to fill in this field. Either click on "Select" (and you'll be able to view all invoices attached to factorized partner), or (especially when there are a large number of invoices) you can click on the "Retrieve invoices from factorized customers" button.
Invoices entered in the "Release details" table can be selectively deleted at any time.
the system will only display invoices associated with factorized customers.
-
Then click on "Transmit release".
-
Once you've clicked on "Transmit release", you can print the PDF / export it to CVS.
The factor advances the funds. What does this mean? It is possible that the factor will only pay part of the release.
- "Transmit release" does not mean that it is automatically sent to the factor. The user will have to send the release to the factor himself.
- The date of transmission will then appear on the form.
The receipt changes status from "new release" to "release transmitted". .
- Once the documents and the release have been sent to the factor, the release can be accounted.
- Once the release has been transmitted, it is assigned a sequence number.
1.7. Subrogation release form.

1.8. The subrogated release form in "release transmitted" status, which now has a sequence number.

Accounting the release
1) On the subrogated release form, click on "Enter release in the accounts" to enter the accounting date.
2) You can see that the red amount appears in the table, i.e. the "amount remaining" to be paid.
3) Among the actions, you still have the "See Move Lines" button. If you click on this button, a new page will open (MoveLines).
4) On this new page, you can see the credit and debit lines for account 467 000.
5) On the release form, it is also possible to attach files and leave a comment in the dedicated space on the right below the dates and the "See Move Lines" button.
Factor payment on all invoices
-
First, you need to create a new move for the payment ("iFactor" partner payment journal).
-
On the move form, enter: the reference number of the subrogated release (in the description and in the "voucher reference" field), the partner (Factor), the date, and the payment method (e.g. payment by bank transfer).
-
Add the move line (on account 467 000).
-
Click on the "Generate counterpart" button. If all the information has been filled in (especially the payment method), the system will automatically find the associated bank account.
-
Click on "Daybook" and save. In this way, you record the payment associated with the factor (i.e. the factor has sent the payment).
However, you must indicate what has been paid. There are several ways of doing this.
For example:
-
Search the move lines (indicating account 467 000). It is necessary to search for transactions that have not yet been lettered.
-
Then, in the lines of account 467 000, you'll find the Credit of the amount concerned, and so you can select this line.
-
Reconcile the items by clicking on the "Accounting Reconcile" button on the move lines page (these are the move lines that appear in the "move lines" table on the account move form). In this situation, the factor has informed you that he has paid you, but you don't know whether the customer has paid the factor.
-
If you go back to Customer Invoices, you'll see that the Invoices are still not green (the Factor has made an advance but the customer hasn't paid yet).
-
Then you go back to the subrogated release form and refresh the page: for the moment, nothing has happened, you're still left with outstanding amounts that haven't been cashed in.
-
Still on the subrogated release form, click on the "View move lines" button. A new window opens, allowing you to consult the line referential. You can see that the debit lines have now been lettered and settled. However, it is impossible to know whether the payment has been received when you consult the subrogated release form.
Payment notification
Once you have accounted the release and paid factor, you can proceed with notification.
Notification can be found in the debt recovery section access: Accounting - Debt recovery - Factoring - Notifications).
-
For example, you receive a letter from the factor informing you that the factor has been paid by the customer. On the Notification form, enter the necessary information (Company, Factor, payment date). You can also select the subrogative release, which allows you to attach invoices to the release.
-
It is also possible to do this manually, by clicking on "+New" and selecting Invoice by Invoice which have been paid. Also select the type and amount paid.
-
You need to distinguish between "Payment to the factor" and "Payment to the factor after factor return", which is mainly a difference in lettering.
Please note: when you add invoice lines to the notification form (for example, by selecting a subrogative release which contains several invoice lines), it is possible to modify them but impossible to delete them.
-
Select a release, add Invoice lines if necessary, save your changes.
-
Click on "Validate" on the notification form when you are sure that the payment has been made. As a result, payment moves will appear, and it will be possible to view them either by clicking on a line or by clicking on the "see move lines" button.
-
You'll see that a transaction has taken place. The partner account will be credited with the amount paid by the customer, and then the Factor account will be debited. Moves will be Lettered.
What is the purpose of creating a notification? Lettering allows you to pay invoices (because the customer has paid the factor and this has been reported). For example, when you open the Customer Invoices page and refresh it, you'll notice that some invoices are colored green: this means they've been 100% paid.
-
On MovesLines (view move lines from the notification page) you can see that the lettering has been done on account 467 (i.e. the Factor account).
-
Return to release. Refresh the page and you'll see that the remaining amounts are no longer in red. The release has changed status, and is now a Release cleared.
-
The release has been sent, the payment has been retrieved, and processing has been completed. New move have appeared on the account move lines.