Customized reports
Introduction
Customized reports: the main idea is to enable users to build accounting reports quickly and easily, without any prior knowledge of the BIRT tool (accounting report generation tool).
In other words, a customized report allows the user to set up a report without having any technical knowledge, knowing that it is always possible to go further in the settings.
Custom reports, like all accounting reports, are based on accounting moves.
Rules: rules allow you to define which entry you will retrieve in which column/row. Then, the cross-referencing of these different rules is translated into a result displayed in a cell.
You must first create a Report Type, which will then be used in an Accounting Report.
General information on Report Types
Access: Accounting → Configuration → Exports/Imports → Report types
Or use the shortcut.
Please note that in the report types, there is a subdivision of reports called Custom report.
-
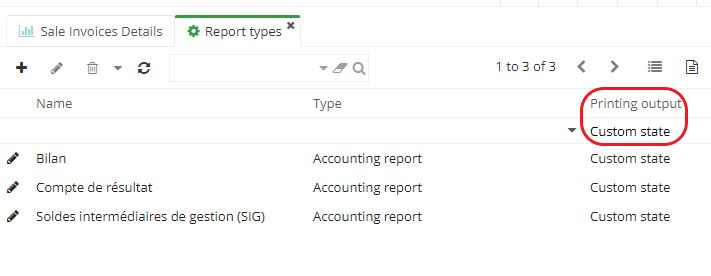
In the Accounting reports menu entry, select Custom state as Printing output.
-
Then press the Enter button on the keyboard to sort the report types.
-
On the Report Type form, you can import the report template by clicking on the Report Template button. However, there is no need to import the report template for a customized report.
-
It is possible to filter report types in the repository by selecting Printing output → Custom state and then pressing Enter.
-
There are 3 custom states: Balance Sheet / Income, Statement / Intermediate Operating Balances.
Custom state: is a generic printing format that allows you to create a layout according to a certain number of user-defined rules (you can sum or subtract from an account or a set of accounts, and then generate elements on a report, etc.).
-
On the report type form, the Comparison field allows you to compare the report with, for example, a report from the previous year. By default, this field has no value.
-
Lines rules table: Click on "new" on the lines rules table to access the lines rules tab. In this tab, you'll find the Accounts field, which lets you select accounts and perform mapping. You can also arrange the order of rows in the Line Rules table and add rows.
How to create a new custom report?
Access: Accounting → Configuration → Exports/Imports → Report types → click on "New".
- Enter an information: name, company, type (Accounting Report)
To create a customized report, you need to select the Accounting Report type. Furthermore, if you select an accounting export as type, the printing output will also be different, and it will be impossible to select the custom state required to create the Custom Report.
-
Specify the printing output(custom state) and report title.
-
Comparison - No comparison: no comparison is made at accounting level.
Comparison - Previous year: comparison between the previous year and the period selected in the accounting report.
Comparison - Same period on previous year: for example, if you only have an accounting report for two months, it will be interesting to compare it with the two months of the previous year.
Comparison - Other period: define the comparison period yourself
-
Report template: you can import a report template, but there's no need to download one if you want to create a customized report.
-
Column rules: constitute the main part of customized reports. The report contains several columns, so you'll need rules to build them.
-
Lines rules: these are lines that will be present when the accounting report is printed (for example, a VAT line). Lines rules include "no value"/"sum of accounts"/"custom rule" lines.

- Next, create the "Accounting Report" (access: Accounting → Accounting exports/reports → Accounting reports → New).
Access: Accounting → Accounting exports/reports → Accounting reports
-
On the accounting reports form, enter the necessary information
-
Indicate "Custom state" as the report type (the type you created yourself).
-
Enter the fiscal year and period.
Even when you have selected "no comparison" on the report type form, it is still possible to indicate the dates in the "Compare with period" section on the Accounting report form and then check the "Compute on comparison period" box on the Column rules configuration tab (on the report type form).
- Click on "Print".


The VAT report helps you declare VAT on receipts.
Example #1. Creation of a basic report.
Access the report type form (access: Accounting → Configuration → Exports/Imports → Report types → New)
A) First create a first column rule.
-
Add a new column rule: on the Column Rules tab, select the type, for example, "Value".
-
Enter the wording, e.g. TITLE I.
-
Rule type: no value (you can select "no value" if you just need to display the label).
-
Enter a code(there is no mandatory code to enter, it's up to you to define it).
-
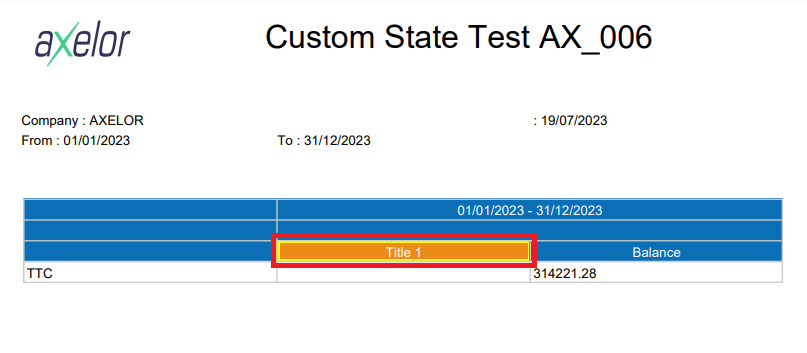
In the Configuration section, select a style (e.g. Highlighted). When printed, if you have indicated "Highlighted", the color will be different from the rest of the table on the generated document.

B) Then add another column rule.
-
Specify "Value" as Type.
-
"Sum of accounts" as rule type.
-
Label and code "Balance".
-
In the Accounts tab, define the rules for selecting accounts.
Select the desired result: Debit minus Credit / Credit minus Debit / Same as Line / Same as Group. In the example, the lines carry the results.

When you have different rules for your lines, for example, you'll define a certain line as Debit - Credit, while the other line will be configured as Credit - Debit.
It's important to avoid any contradiction between the column rules for this to work.
That is, the first line is Debit - Credit, and the second line is Credit - Debit, and in the column you have selected Debit - Credit.
The first line and column are identical, but there's a conflict between the second line and column. An error message will then be displayed.
Always set up so that either the columns or the lines carry the result.
In the example above, it has been decided that the lines will carry the results.
As a result, on the "Column rules" tab, the Result has been defined as "Same as Line".
- Select either an account type, a financial account or an analytic account.
For example, you want your balance to be computed according to the types of accounts that are Customers.
In this case, the system will filter out all entries in this column that have a customer account.
Same logic applies to Financial Accounts and Analytic Accounts.

-
Still on the Column rules tab, click on Configurations. In the Configurations section, you can configure the style.
-
Hidden checkbox: you can check the "Hidden" box if you don't want to display this column. For example, you're going to hide a column because it's going to be used for a computation later on that will be used as a custom rule (i.e., the rule type will be defined as a custom rule).
At the same time, the "Hidden" checkbox hides a column from printing. However, on the report form, the column rules remains visible, with the "Hidden" checkbox activated.
In the example, the "hidden" box is deactivated to demonstrate the computation.
The "do not compute intersections" box: if this box is checked on a column and on a line, when the cell which is the intersection of the line and column with the box checked is computed, the value will not finally be computed between the line and the column.
If you wish, you can make comparisons in the columns even if you have indicated "No comparison" in the "Comparison" field.
On the Column rules tab, in the Configuration section, you can activate the "Compute previous year" checkbox.
In this case, you will take into account the period of the accounting report, i.e. the period selected, and in this column you will indicate "Compute previous year". Therefore, even if comparison has not been activated, this column will be computed on the basis of the previous year.

C) Add a line rule
-
Type : value.
-
Rule type : sum of accounts.
-
Label : tax included.
-
Code : TI.
-
Result: Debit - Credit.
-
Save changes.
-
Open an accounting report in which you are going to use the report type.
D) Create a new accounting report
Access: Accounting → Accounting exports/reports → Accounting reports
-
On the accounting reports form, enter the necessary information
-
Indicate "Custom state" as the report type (the type you created yourself).
-
Enter the fiscal year and period.
Even if in the report type you have chosen "no comparison", it is still possible to indicate the dates in the "Compare with period" section and check the "Compute on comparison period" box on the Column rules configuration tab.
- Click on "Print".
Example #2. A more complex case: VAT, VAT-included, VAT-excluded lines and Sum of accounts & Percentage columns
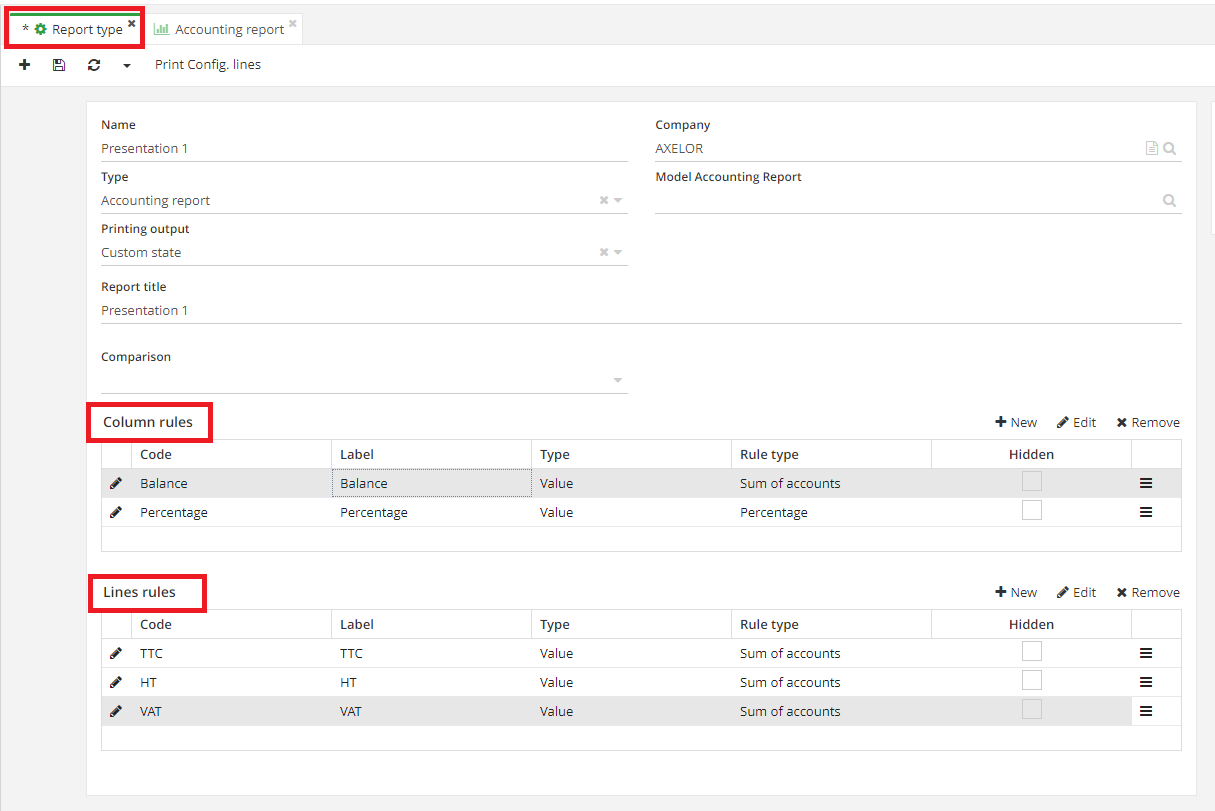
A) Configure the report type (here, the report type is named "Presentation 1")
Access: Accounting → Configuration → Exports/Imports → Report types
- Fill in the necessary information on the form. Enter the name (here, "Presentation 1").
-
Type : Accounting report.
-
Printing output : custom state.
-
Report title : Presentation 1.
-
Comparison : no comparison.
B) Next, configure the column rules
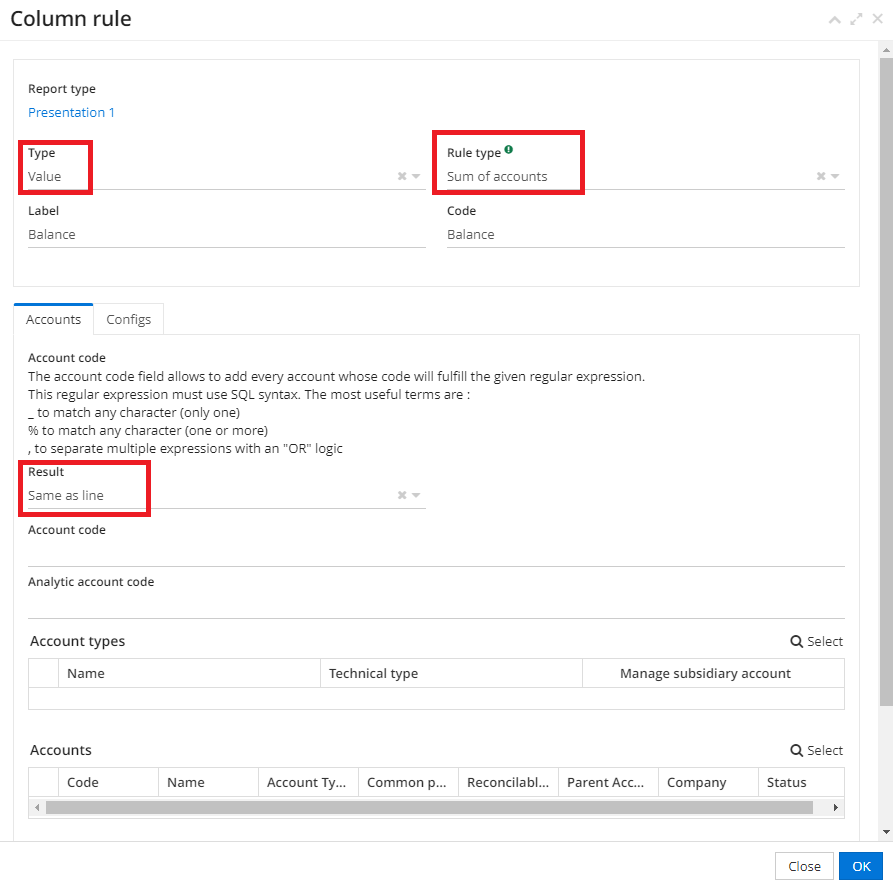
- First column rule is a Balance column. Specify following informations :
-
Type : value.
-
Rule type : sum of accounts.
-
Label : balance.
-
Code : BALANCE.
- In the Accounts section of the Column rules form, the Result is defined as "Same as line".
Financial accounts have not been defined, as they are managed by the Line rules.
- Second column rule is a Percentage column. The values are:
-
Type : value.
-
Rule type : percentage.
If you select the "Percentage" rule type, a new "Column to be used" field appears, where you must enter the column code. This is the column on which you want to compute the percentage.
-
Label : Percentage.
-
Code : PERCENT.
-
Column to be used : BALANCE (the code in the first column). The percentage will therefore be computed on the Balance column.

C) To control the columns, configure the Line Rules.
- VAT-included line. Configure a VAT-included line.
VAT : value added tax.
This VAT-included line represents the 100% base. In the example, this is the VAT-included line rule. The other lines will be computed according to this 100% base line (otherwise known as the total line).
The configuration of the VAT-included line rule in the example is as follows:
-
Type : value.
-
Rule type : sum of accounts.
-
Label : VAT-included.
-
Code : VAT-INCLUDED.
-
Total line : N/A (because it's a 100% line, so if you specify nothing, the default value will be 100%).
-
Detail line : don't detail.
In the Accounts section, on the Line rules tab, the result is Debit - Credit, Accounts - Class 4 accounts.
- Ex-tax line. Configure a ex-tax line.
Ex-tax : excluding tax.
Values used in the following example are :
-
Type -Value.
-
Rule type - Sum of accounts.
-
Label - Ex-tax.
-
Code - EX-TAX.
-
Total line - VAT-included, Detail line - Don't detail.
In the Accounts section, on the Line rules tab: Result is Credit - Debit, Account types - Income.
- VAT line. Configure a VAT line.
The configuration of the VAT line is as follows: Type - Value, Rule type - Sum of accounts, Label - VAT, Code - VAT, Total line - VAT, Detail line - Don't detail.
In the Accounts section, on the Line rule tab: Result is Credit - Debit, Account types - Tax.
D) Use the report type configured in the accounting report
Access: Accounting → Accounting exports/reports → Accounting reports.
- Configure the accounting report.
-
Fill in the dates.
-
Select the report type (here, the "Presentation 1" report with tax lines VAT-included, Ex-tax, VAT).
-
Click on "Print".

Errors may occur during computation.
For example, in the "Presentation 1" report type, the computation of the VAT-included line is configured as Debit - Credit, the computation of the Ex-tax line is Credit - Debit, and the computation of the VAT line is Credit - Debit.
For the column, the calculation result has been defined as "Same as line". In other words, the line drives the computation.
However, if the column rule includes the computation "Debit - Credit", a computation error will occur because of a conflict between columns and lines.
Custom rules and priority
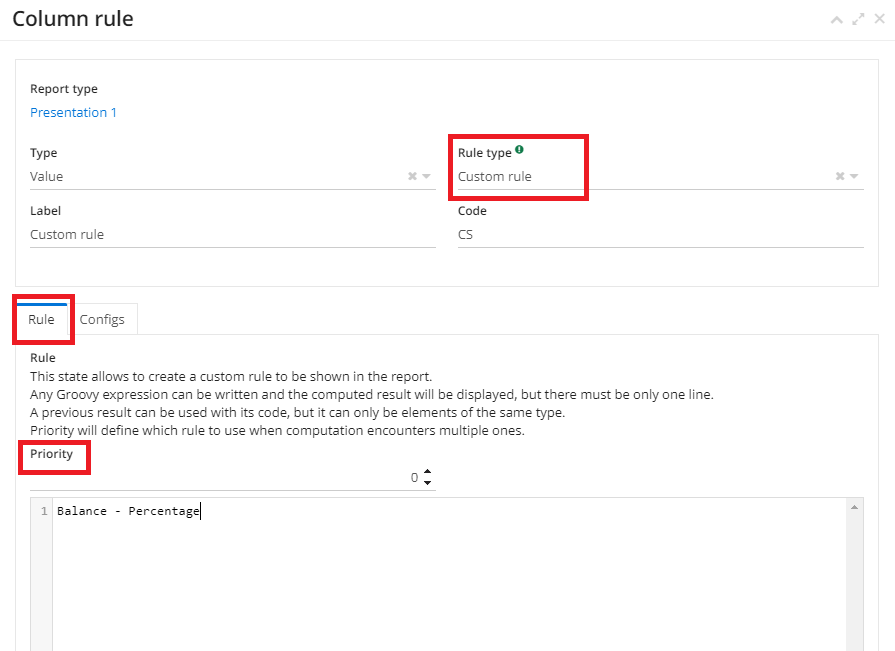
You can also configure a custom rule to suit your needs.
Use Groovy expressions to create your custom rules.
In parallel, you can use the rule codes to configure a custom rule, for example "BALANCE - PERCENT". All simple arithmetic operations are possible, for example:
BALANCE / PERCENT
BALANCE * PERCENT
Concept of priority
Priority is used to decide which custom rule is applied first when there are several custom rules, in order to avoid conflict.
For example, you have two custom rules, one in the column area and the other in the line area. In this case, the system will not know which custom rule it is supposed to process first. This is why the concept of priority has been introduced.
Please note that the lowest priority "wins". The custom rule with priority 0 will be processed first, while the custom rule with priority 1 will be processed next.
Example #3 with the application of group concept
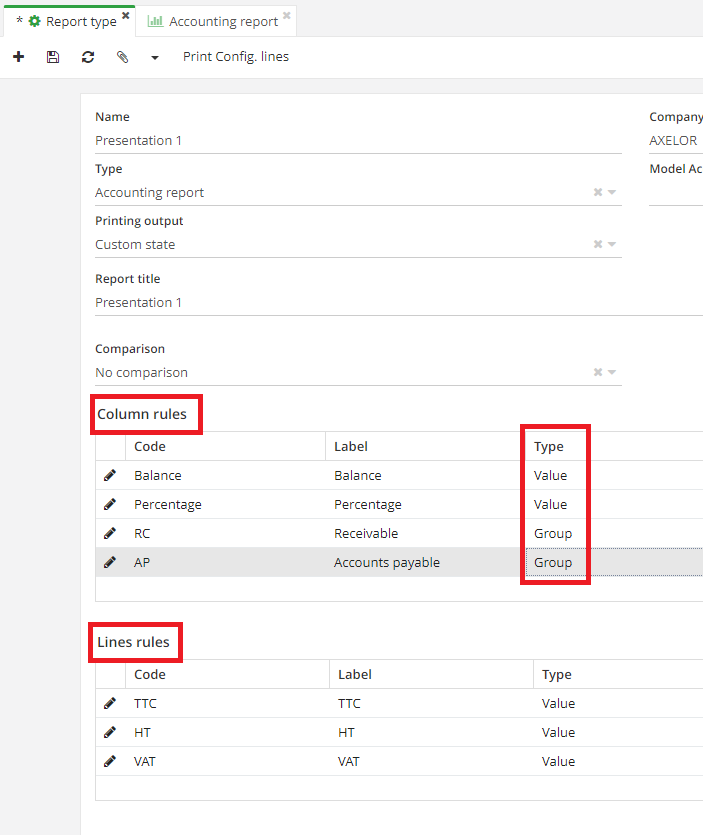
A group of columns (linked by account type, for example) allows you to avoid repeating columns.
The column group has been created on a report type form with the Balance and Percentage columns, as well as the VAT-included, ex-VTA, TVA rows (taken from the previous example).
For instance:
-
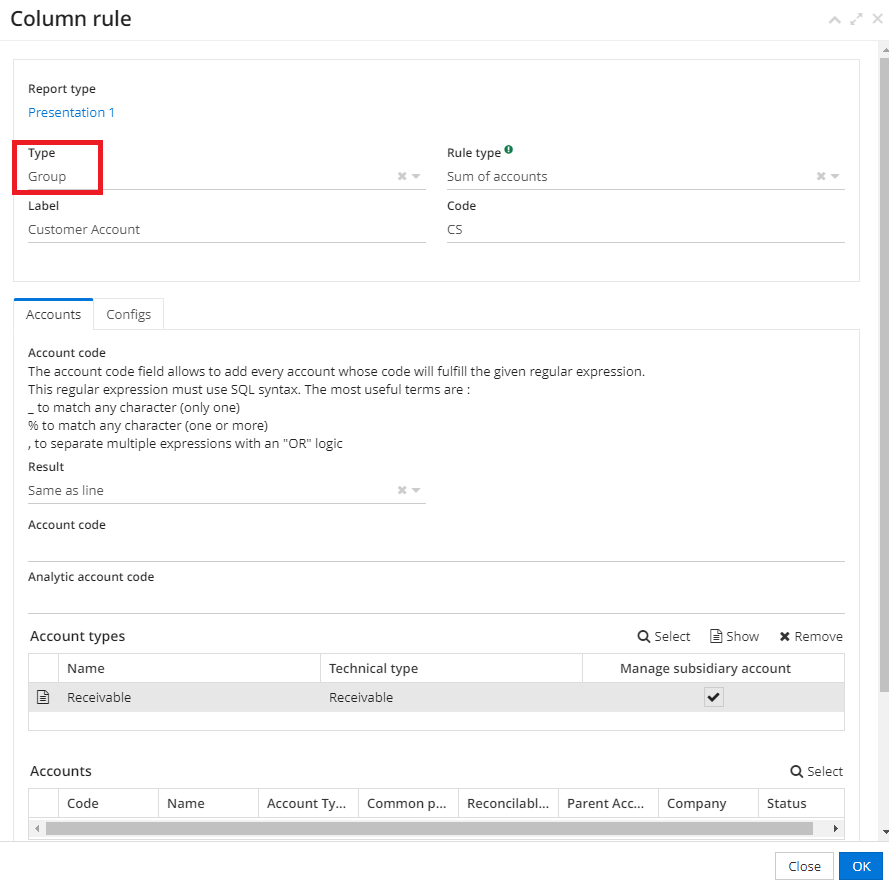
Create a column group for customers on the report type.
-
On the column rules tab, fill in the necessary information:
-
Type : group.
-
Rule type : sum of accounts.
-
Label : receivable accounts.
-
Code : CA (i.e., customer account).
-
Result : same as line.
-
Account types : receivable.
- Create another group for suppliers:
-
Type : group.
-
Rule type : sum of accounts.
-
Label : payable accounts, Code : PA (i.e., payable accounts).
-
Result : same as line.
-
Account types : payable.
- Now you have two groups of columns, and only one "Balance" column rule and one "Percentage" column. Using groups allows you to avoid duplicating the "Balance" and "Percentage" columns.
When you print out the accounting report form, you'll see that the various columns have been created (Receivable accounts with its "Balance" and "Percentage" columns, and Payable accounts with its "Balance" and "Percentage" columns for different periods).

Grouping by account
On the report type form (Accounting → Configuration → Exports/Imports → Report types) configure a column rule with the type "Grouping by account". Then select accounts on the Column rules tab.
For example, you have selected the "Receivable" account type. As a result, the system will group all receivable accounts.
Request details on a line rule
-
On the report type form, create a new line or modify an existing one.
-
Select a rule type.
-
You can detail the line by selected financial account. When you select a rule type "Sum of accounts", the field "Detail line" will appear.
-
On the line rules tab, click on the "Detail line" field and select an option :
-
Don't detail ;
-
Detail by account type ;
-
Detail by account ;
-
Detail by analytic account.
Detail by account type: this option allows you to make combinations. If you have selected "detail by account type", you don't have to select the account types.
For example, if you have receivable and payable accounts, the system will generate two lines, for receivable and payable accounts. In the example, the VAT-cinluded line is used.
- You can then proceed to create the accounting report.
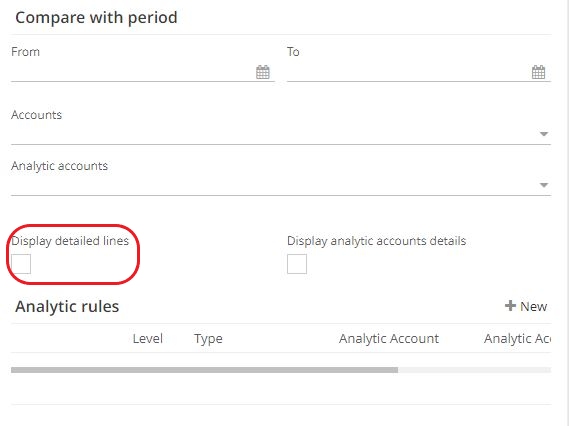
On the accounting report form, you must check the "Display detailed lines" box. If you do not check this box, the configuration of the "Detail line" - "Detail by account type" field will not work.
- Then click on "Print". You will see that the table displays information for each account type (customer and supplier).

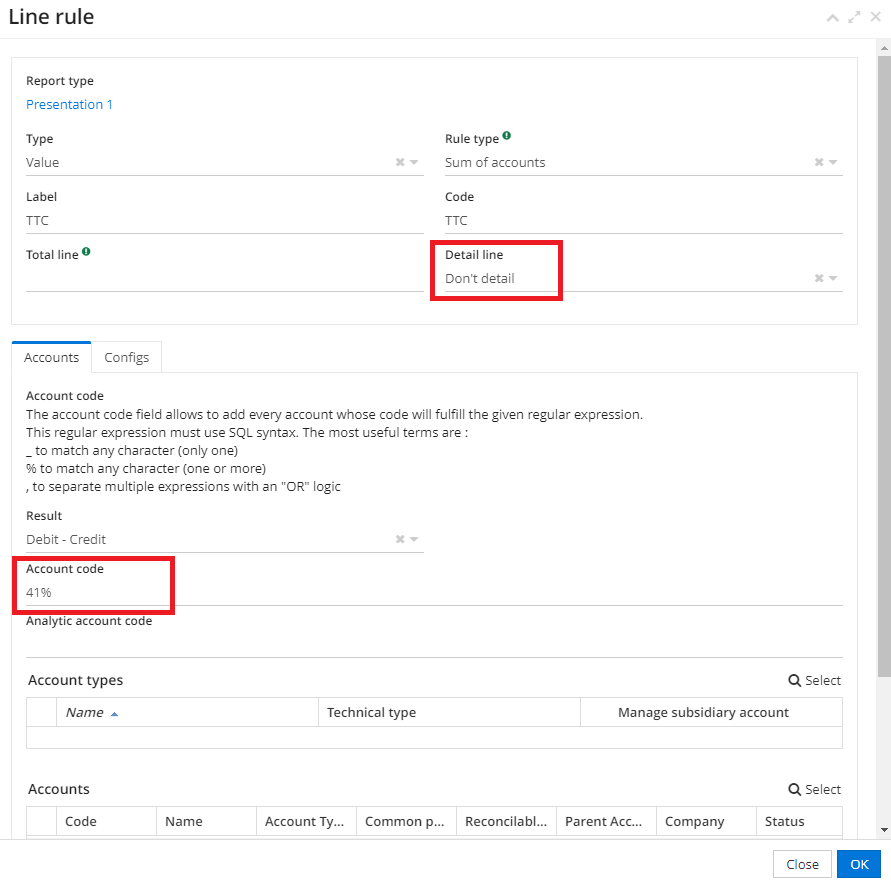
Accounting account code (Line rule tab)
The account code field is used to add all accounts whoStyle configurationse code complies with the regular expression entered. This regular expression must be in SQL.
Useful terms include:
-
"_" to replace with any character.
-
"%" to replace with any character(s).
-
"," to separate several expressions with "OR" logic.
For example, you want to select all accounts beginning with 41. In this case, simply enter 41% in the "Account code" field.
For example:
- On the report type, click on the VAT line and indicate on the Line rules tab in the "Account code" field the figure with the percentage symbol 41%. The 41% will filter and select only accounts starting with 41.
The report type configuration is taken from the previous example, with two columns Balances and Percentage, and three lines VAT-included, VAT, ex-VAT.
-
Make sure that there are no conflicts if you wish to apply the accounting account code, i.e. that, for example, the "display detailed lines" box is not ticked on the accounting report form. In addition, avoid leaving the "Detail" Line" field unconfigured (i.e. leave it empty), as these actions will prevent the Account code from working.
-
Once the report type has been configured with the Account code field completed, launch the accounting report and click on "Print". Lines are only displayed for accounts starting with 41.
Another example:
-
If you enter 41_ on the report form, in the line rules tab, in the "Account code" field, this means that you wish to select codes containing 3 digits and beginning with 41 (i.e. codes from 410 to 419).
-
If you wish to separate several expressions with an"OR" logic, you can apply the comma ",". To illustrate: on the Line rules tab, in the Account code field, enter 41% , 40%. Applying the comma means that the system will look for accounts that start with 41 and then 40 (the comma therefore applies the "OR" logic).
Style configuration
If you want to be able to differentiate one column/line from another, you can configure the style.
To define a style:
-
On the column/line rules tab, click on the Configs tab.
-
Then click on the "Style" field and select the required style (Bold / Italic / Highlighted etc).
-
At the same time, you can indicate the priority of a column/line in relation to another (the lowest priority "wins", i.e. priority 0 is more important than priority 1).
-
Once you've set up the styles on the line/column rules tabs, you can create an accounting report and print it out.
In the example, the Balance column is styled "Bold", while the percentage line is styled "Highlighted" (see image).


Analytical rules for accounting reports
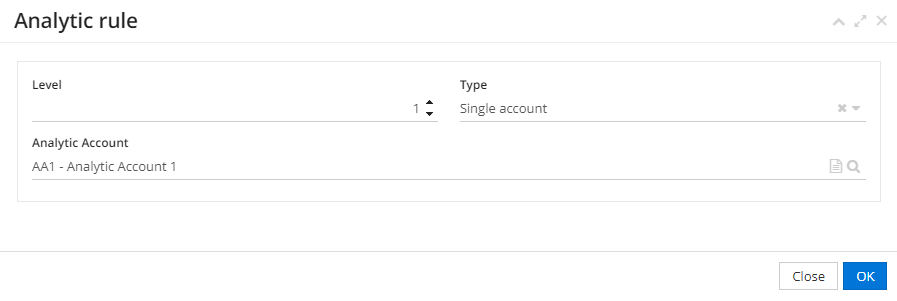
- On the Accounting Report form, in the "Analytic rules" section, click on "New" to add a new analytical rule. A new tab will appear on which you must enter the Level and Type, and then the analytic account.
Level: the level you define when creating an analytical rule is a tree structure (1, 2, 3 etc).
Analytical accounts apply the parent-child logic.
You need to know the layout of your existing analytical accounts in order to be able to configure analytical rules and define levels.
- When you add analytical rules, a table per level will be generated via the customized accounting report. This table is displayed in the printout.
The analytical accounts shown in the table respect the hierarchy, i.e. the system will first display the accounts with the highest level (for example, analytic account 6 has level 2 and is therefore displayed first, followed by analytic account 1 with level 1).
In the case of a large tree structure (one account with sub-accounts), the system will first display the highest-level cost account and then its sub-accounts, in order to respect the existing hierarchy.
