Treasury
Bank reconciliation
Bank statements
Access: Accounting → Bank statements → Bank statements.
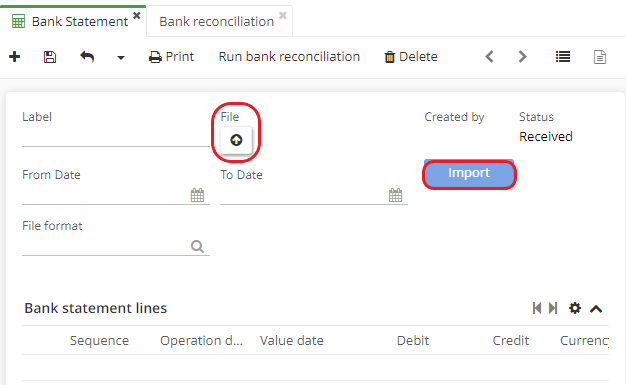
- On the bank statement file, you can attach a bank statement.
Click on the button with the "File" and an arrow to import a file.
- Enter the file name and format; the start date will be filled in automatically. Then click on "Import".
In the "Bank statement lines" table, the lines will appear automatically. Among the lines you'll find following information: Initial balance, Final balance, Mouvement.
- At the top of the Bank Statement page, you'll find the "Run bank reconciliation" button.
It is also possible to print the bank statement by clicking on the dedicated button.

Bank reconciliation
Access: Accounting → Bank reconciliation → Bank reconciliation
Either click on the "Run bank reconciliation" button on the Bank Statement sheet.
-
When you click on the "Run Bank Reconciliation" button on the Bank Statement sheet, it will initiate the processing. A new Bank Reconciliation file will be created automatically. You will be taken to the Bank Reconciliation repository page. Click on the line to access the Bank Reconciliation file.
-
"Load bank statements" button: by clicking on "Load bank statements", the system loads the bank statement according to all the parameters that have been configured.
The bank statement will also be available on the form once you click "Load bank statement".
However, if you are going to create a new Bank reconciliation, you will need to fill in the Bank statement field manually.
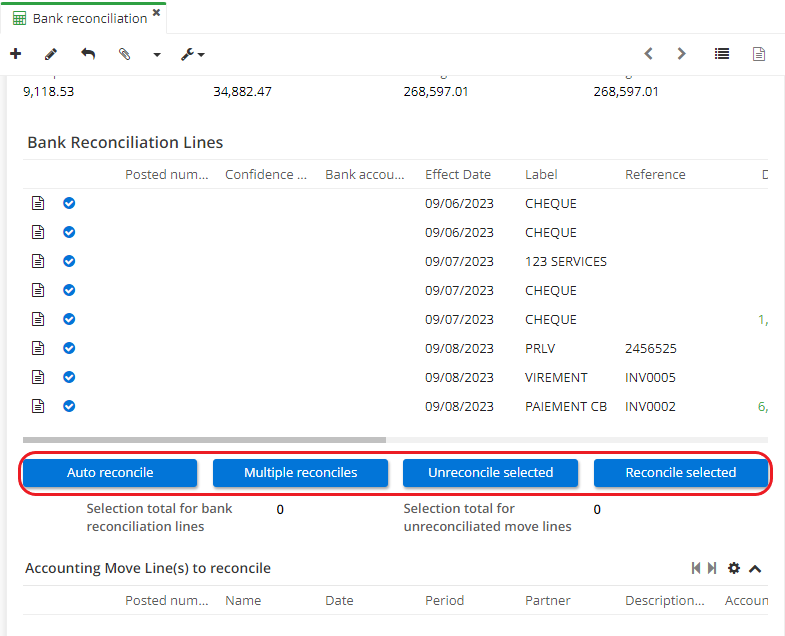
The information will be pre-filled on the Bank Reconciliation form once it has been launched via Bank Statement form (the "launch bank reconciliation" button).
However, if you wish to create a new Bank Reconciliation, you will need to fill in the information manually.
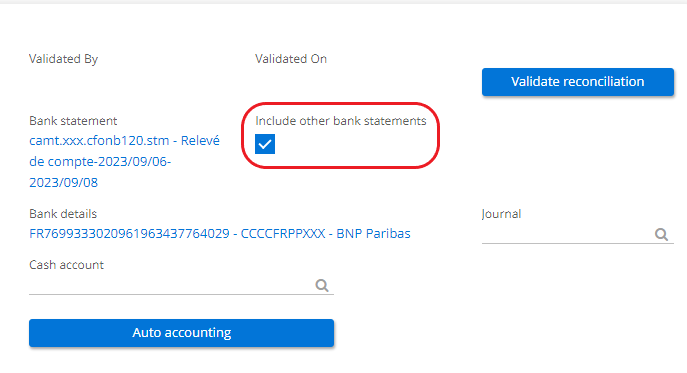
- The "Include other statements" button. If you haven't reconciled a previous statement, you can still validate the bank reconciliation. This way, the button allows you to carry out bank reconciliations that have not yet been carried out (for example, month by month).
The "Journal" and "Cash account" fields are associated with the Bank details field. In addition, on the Bank Reconciliation page, you will find Balance, Bank Reconciliation Lines and Accounting Move lines to Reconcile sections.
Reconciling moves
Select the Journal and the Bank Statement in order for the "Accountning Move lines" to display correctly. It is also important to enter Bank details on a Bank reconciliation form.
-
Which rule is applied when reconciling Accounting Move lines? Search for entries that correspond to the selected journal and bank account.
-
Include other bank statements checkbox : when this box is activated, it will allow you to reconcile anything that has not yet been reconciled (for example, when a user reconciles month by month, this box will allow him to reconcile all entries for the month).
In addition, there are two possibilities for bank reconciliation, depending on who the issuer is:
-
When the user himself is the issuer, he has the necessary accounting moves lines and can perform the reconciliation.
-
The sender is a third party. In this case, when the money is received, an entry must be created.
In addition, Bank Reconciliation lines are filtered by date (enter the dates on the Bank Reconciliation form).
Bank statement / Reconciliation
Interbank code / Payment mode
Access: Accounting → Configuration → Bank statement / Reconciliations → select between Bank statement rules, Bank statement queries or Interbank Code / Payment mode.
In the entry menu, you'll find Bank statement rules, Bank statement queries and Interbank codes / Payment methods.
These are various parameters used to categorize lines in order to customize the rules.
Interbank codes / Payment methods: each statement line contains an interbank (transaction) code supplied by the bank. Click on Interbank code / Payment mode. Once you've clicked on Interbank codes / Payment mode line in the repository or once you have clicked on "New", you will be taken to the account management page where you can define the Payment mode to apply, the Interbank code, the Journal, etc.

The interbank code is not always supplied in CSV format. For example, the transaction code is "Cheques paid", i.e. a cheque that has been issued by the user and sent to the third party.
Bank statement rules
- This menu lists all the rules.
It is always possible to sort the list, for example by entering Payment Method (e.g. "cheque") in the field at the top of the page. As a result, the system will only display lines that use cheques as its Payment Method.
-
If you wish to sort exisiting rules in order to sort bank statement rules by type, click on an icon of a triangle under "Rule type" at the top of the page and select a rule type you wish to apply (Auto accoutning / Reconciliation etc). The system will then display all files that correspond to search values.
-
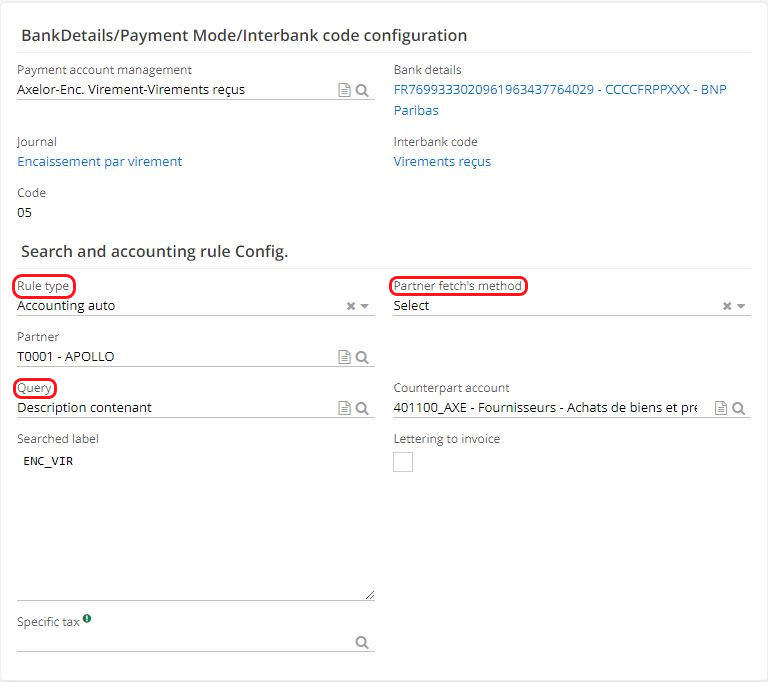
Click on a rule to open its file. On the file of Bank statement rule, you will find the field "Rule type".
For example, rule type "Auto Accounting" means that accounting entries will be generated automatically on a pre-configured Journal.
Configuration of Bank statement rules
-
Define Rule type : Auto accounting
-
Partner fetch's metod : None / Select / With (groovy) formula. If you choose "Select", you will need to fill in the "Third party" field. If you choose "None", the accounting entry will be generated without being associated to any third party.
-
Fill in the rest of the information, such as "Query" (for example, "Description containing & Code 01" (cheque issued)), or Counterpart Account (for example, account 401 Suppliers - Purchases of goods and services).
-
Save new configuration.
-
Next, run the bank reconciliation.
Bank Reconciliation file
Access : Accounting → Bank reconciliation → Bank reconciliation
"Automatic accounting" button is available on the file of Bank reconciliation.
However, there is another way. Open Application Config → Apps management → Bank payment → click on the company in question under Bank payment configurations. A new page opens, "Bank Payment Configuration". On this page, you will find Bank Statement section. It is possible to activate the following boxes : Automatic pointing and Automatic accounting. Save the changes. Note that this setting can be changed later.
Once these checkboxes have been activated, click on the "Load bank statement" button on a Bank reconciliation file. It will result in launching Automatic pointing and Automatic accounting.
-
Automatic pointing : allows to enable automatic pointing during reconciliation. It still can be done manually when incomplete.
-
Automatic accounting : allows to enable automatic accounting of entries when clicking on the "Load Bank statement" button on a Bank reconciliation form.
In addition, on the Bank Payment Configuration form (Application Config → Bank Payment → click on the "Company ") in the section reserved for the bank statement you will find the fields: "Confidence half-interval amount for amounts" and "Duration of half confidence interval for dates".
Bank statement queries
Access: Accounting → Configuration → Bank statement/Reconciliations → Bank statement queries.
-
Note that you can sort the list. For example, you can define the rule type ("Auto Reconciliation") in a way that the system displays the rules affected by automatic reconciliation. For example, a rule ("Auto Reconciliation" type) "Equal origins and amounts" enables the software to compare the Origin line of the entry and the Origin line of the statement cost.
-
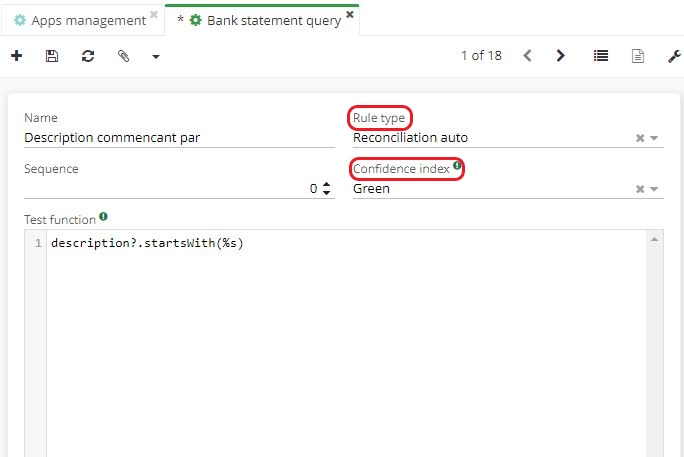
Next, create a new bank statement query. Notice that on the bank statement query form, when you select "Auto Reconciliation" as the rule type, it will be possible to define the Confidence index (green/orange/red). The confidence index is configurable.
For example :
Green index : equal amount and date.
Orange index : equal amounts, but the date is wrong.
Red index : neither the amount nor the date are correct.
Then, get back to the Bank Reconciliation form :
Access : Accounting → Bank reconciliation → Bank reconciliation.
-
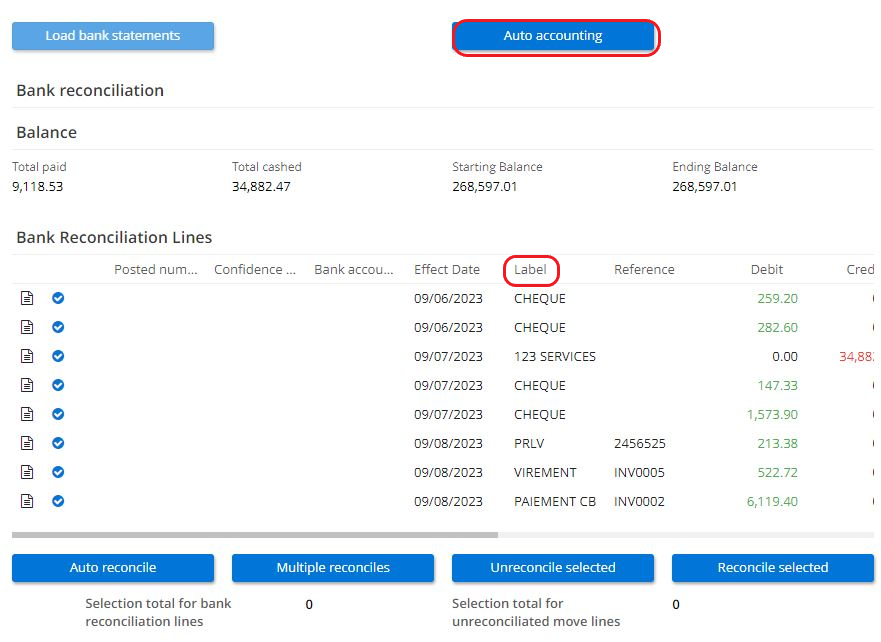
First, launch the Auto Accounting process by clicking on the button.
-
After this action, the "Bank Reconciliation Lines" table is filled in automatically.
-
For instance, in this table, you could find a "Cheque" label.
The "Cheque" label was found thanks to a Bank statement rule (on the Configured Record of the Statement Linked Rule, you could have indicated as "Search Label" : "Cheque "). This label in turn searches for "Cheque" and corresponds to the interbank code "Cheques paid". An entry is then automatically generated (on the Counterpart Account, which is also entered on the bank statement file, and on the Payment Account). New entries generated via this process can be viewed in Moves.
RIB / Bank details tree
Access: Accounting → Bank statements → Bank details tree
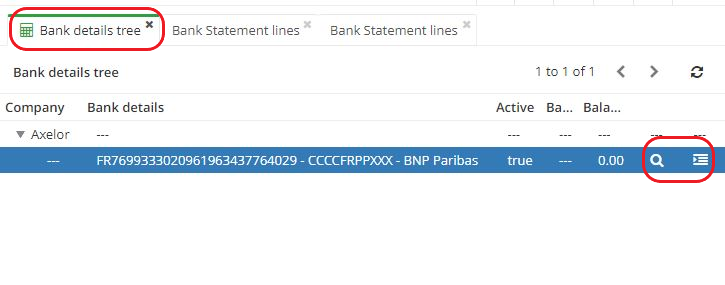
Two elements have been added to the Bank details tree when you click on selected company file in the repository:
-
The first allows you to access the various balances (the square pictogram). Clicking on this button will take you to the list of Bank Statement Lines (with only the Final Balance and Initial Balance lines, organised by date).
-
Another feature: if you click on the icon of magnifying glass, a new tab "Bank statement lines" will appear. In this new tab, you can view all Movement lines. However, if you remove the "Movement" filter, all lines will be displayed. Note, it is still possible to apply the filter in the dedicated space by selecting either "Balance" or "Movement".

How does automatic reconcile work ?
Access: Accounting → Bank statements → Bank statements.
-
On the Bank Statement form, fill in the necessary information. Click on "Import".
-
The space dedicated to Bank Statement Lines will then be automatically completed with Movement Lines and Final/Initial Balance Lines.
-
Next, create an entry if it does not already exist. On the Account move form (access: Accounting → Moves → Moves), enter the information. For example, select "Disbursement other" as the Journal. Indicate the Payment Method as Outgoing Other.
-
Still in the accounting move form, add a new Move Line (here, supplier payment). Click on "Generate counterpart".
-
Then click on "Daybook" (i.e. draw a draft).
-
Return to the bank statement form. Click on the button "Run bank reconciliation" You will then find yourself in the Bank Reconciliation repository, click on the bank reconciliation line that has just been created.
-
On the new Bank Reconciliation form, click on the "Load statements" button. The bank reconciliation lines will be generated automatically.
-
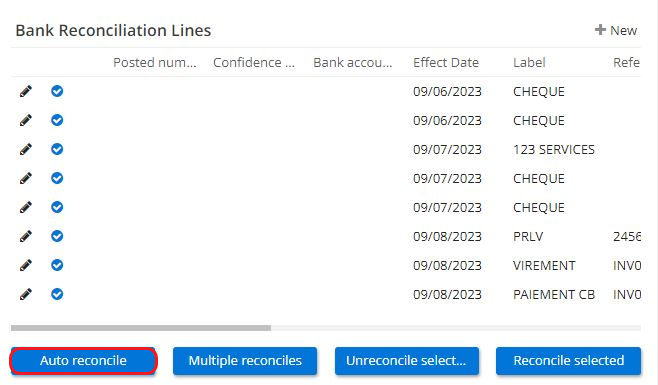
Still on the Bank Reconciliation form, click on the button "Auto reconcile".
Once the automatic reconciliation has been launched, the system will display in the "Bank reconciliation lines" table the number of points, the confidence index and the accounting rule.
Report type
Access: Accounting → Configuration → Export/Import → Report types
-
Note that in the report types there is a subdivision of reports called "Custom Report". It's possible to view all custom state reports in the list by simply selecting "Custom state" as "Printing output". Push Enter button to apply "Custom state" as "Printing output" and sort among reports.
-
Create a new report or select from existing reports. On a report form, select the type. In order to create a customized report, select "custom state" as Printing output. Find out more about configuring Customized reports on our documentation website (Accounting → General accounting → Customized reports).
Payment Sessions
Access: Accounting → Payments → Payment Sessions.
The payment sessions function enables you to make mass payments of due dates (both to suppliers and to direct debits).
This feature makes it easier to generate accounting moves for payments, as well as bank orders.
Payment modes
The payment session is essentially controlled by the Payment modes. For mass payments, use Transfer and Direct Debit.
Access: Accounting → Configuration → Payments → Payment modes.
An example of a Transfer Disbursement:
- On the Payment Mode form, click on General Accounting Configurations. In this tab, you will find the "Move generation trigger settings" field. You can choose between two values, "Immediate" and "None".
When you activate the "Generate bank orders" box in the Bank Order Configurations, the "Move generation trigger settings" field will have several values (None / Immediate / Bank Order Confirmation / Bank Order Validation / Bank Order Execution).
Bank Order Configurations are only present on Payment Mode records with the Transfer Disbursement and Direct Bank LCR Collection type.
- In addition, on the Payment Mode form, in the "Bank Order Config" tab, if you tick the box "Consolidate bank order lines per partner", an accounting move will be generated by selected third party; if this box is not ticked, the accounting move will be generated by document.
Select values in the "Move generation trigger settings" field, when you click on the General Accounting Configurations tab on the Payment Mode form. You can select from:
-
Value "None". This is used to prevent accounting entries from being triggered if you use this payment method. This value will only record Invoice Payment and not the rest.
-
Value "Immediate" : this means that there is no processing.
-
Bank order confirmation.
-
Bank order validation.
-
Execute bank order.

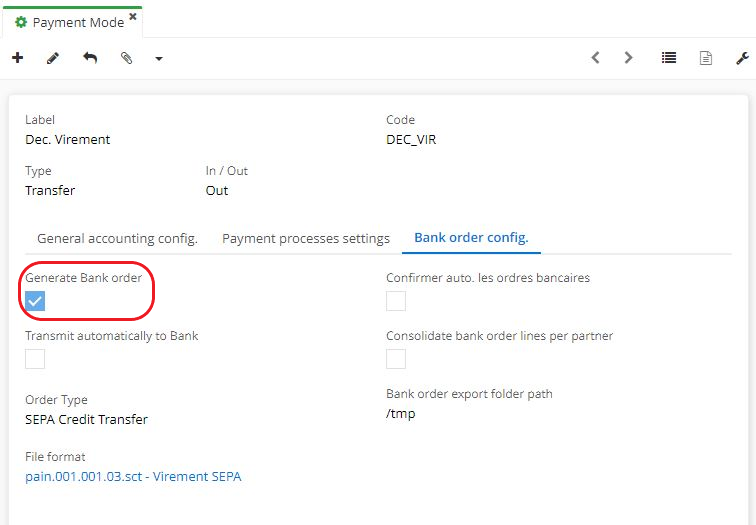
The "Payment process settings" tab on the payment mode form".
Here you will find the "Posting method" field (by invoice term / by partner / global).
-
By selecting "invoice term", you are going to create a move by due date (this is a classic payment entry). For example, if a third party has three due dates, three accounting moves will be created.
-
"By partner": entries will be grouped by partner (to illustrate, there are 3 due dates but 2 third parties, nonetheless there will be only 2 entries because there are only two third parties).
-
"Global": everything will be grouped together under a single move and a balancing move will be made after the event.
For example, you will have grouped accounts of 401/411 on the first entry with the offsetting entry on a suspense account 500 as on cheques. However, not all file formats allow you to apply the Global method.
Therefore, if you choose the global method as the move accounting method, by clicking on the Global Configuration (General Accounting Configuration tab), you will see in the Accounting Configuration window, in the Payment section, the global accounting account field. This is an offsetting account, i.e. you are going to collect on an account, and then you need to make an intermediary, and then take it to the payment account.
- The "Payment posting date" field offers 2 choices depending on how the entries are to be posted: either on the payment date "session date" / or on the due date of the original document.
-
On the payment date "session date": this means that there is a date on the payment session. You can specify on the move what date you are going to generate it. An entry will automatically be generated on the payment date.
-
Here, you can generate multidates for accounting moves and for bank file formats. You can generate an entry on different dates, and if there are bank orders generated afterwards, these lines will be generated on different dates.
Multidates
Normally, the international transfer allows the use of multidates (on the bank file format form it is possible to check the multidate box).
The Multidate box can be found on the Bank File Format form, in the field labelled "Specific attributes".
Access : Accounting → Configuration → Bank orders → Bank order file formats.
Invoice
Access: Invoicing → Supplier invoices → New
Fill in the necessary information. Add new Invoice Lines.
Accounting Account
- It is necessary to activate Due Dates for partner (i.e. third party) accounts as deactivating them could make payments impossible.
Access : Accounting → Configuration → Financial Accounts → select a financial account or create a new one
For example, open the account 401 (suppliers).
On the Accounts form, open the Settings tab and then click on the "Activate due dates" button.
This button is specific to Financial accounts of technical type payable.
- At the bottom of the Financial accounts page you will find the "Payment Session" field with the checkbox "Include in payment sessions?".
Why to do this? This checkbox allows you to include or exclude the account you are interested in on the holdbacks or on the accounts of suppliers of fixed assets, etc.
How to carry out a payment session
Access: Accounting → Payments → Payment Sessions
In order to carry out a payment session, it is important to select the file format in the Bank order configuration tab (on the Payment mode file). In the same tab, check the Generate bank orders box.
Then select the type of bank order (for example, SEPA transfer).
Also specify a payment deadline in Payment Process settings (always on the Payment Mode form).
On the Payment Session form:
-
Select the Payment Method (e.g. Dec.Transfer). The parameters indicated on the Payment Method will be retrieved (RIB, journal, bank account, etc.).
-
Enter the recipient type.
-
Indicate the payment date.
-
Select a Journal.
-
Select a currency.
-
The date of the next session (this is an important element). The system will take date management into account to determine whether the due date should be brought up now or whether it should be brought up later. This is very useful for planning payments.
Please note that it is possible to modify the Accounting settings.
- When all the information has been entered, click on the "Search due terms" button.
You will then be able to find all the due dates (at the bottom of the page, in the Due for payment / paid by third party field).
- Take into account moves that have not been booked
To ensure that unposted moves are taken into account during a Payment Session, configure following settings :
-
Access the Accounting Configuration via Application Config (Application Config → Apps management → click on the Company in the Account Configuration section → access the Accounting Configuration page).
-
On the "Accounting Configuration" page in the "Accounting" tab, in the "Payment Sessions" section there is a checkbox "Include due dates attached to Daybook accounting move" i.e. a draft accounting entry.
If this box is not ticked, the system will only retrieve documents in the payment sessions that have been entered in the accounts.
In other words, all moves (entries) that have not been posted will not be taken into account and will not be settled.
If this box is ticked, the drafts will also be recovered.

The "Refresh due date list" button
-
This button is used to remove the filters; following this action you will notice that a due date has appeared.
-
Deadlines are retrieved according to several criteria: the main criteria is the date. In addition, there must be a match with the payment method and the bank details, which have been entered either on the move or on the invoice.
If the payment method is incorrectly configured, the payment session will not work correctly with due dates.
Payment sessions work with due dates that have been generated via postings and invoices.
Use either invoice and posting together, or only posting.
-
In the Payment Session file, in the list of due dates to be paid/settled by third party, the due date lines can be selected or deselected (using the "+" and "-" buttons).
-
The person "+" and person "-" buttons can be used to select or deselect a third party (even if this third party occupies several lines, you only need to click once).
Email configuration (from the payment session).
Payment Advice Email: a standard email used to indicate that a payment advice has been sent.
-
Open a Payment Mode file → on the Payment Mode file, click on the General accounting settings tab → click on the Company in the "Accounting settings" table to access the "Accounting settings" tab. In this tab, you will find the "Email template for Payment notice" field.
-
Once the partner lines in the "Terms to pay by partner" table have been selected, you can send an email.
-
On the right: a button in the right-hand column allows you to send emails.
-
When you click on this button, it will change the status from "email not sent" to status "email sent". Once the email has been sent and you are ready, you can proceed to validate the payment session.
Validating the payment session
- Click on Validate to validate the payment session.
As soon as the session has been validated, the system will carry out the selected due date accounting method, after which a move will be created, and the system will accord the move to the payment date.
After configuring the trigger as "immediate", when you click on the "validate" button, the software will consider that the payment has been made.
- Then, when you have clicked on "Validate", the system will automatically display an "Information" message to say how many accounting moves have been successfully generated and a bank order will also be generated (provided the box is ticked).
To group by partner, you can tick "Consolidate bank orders by third party " on the Payment mode page (the "Bank order setup" tab). You can also consolidate moves by partner.
Due date management
Introduction
Since version 6.3.4, expiry date notions have been added to the payment terms. These notions allow you to have several values that define the due date instead of a single due date.
Another special feature is the inclusion of the concept of "Holdback". This is a specific accounting treatment.
The "Holdback " will generate a move on the account 411 and another move on a partner account (this accounting account will be different from 411). In other words, there will be class 7 accounts. In addition, there will be two lines (unlike one line in account 411).
Free checkbox: when this box is activated, it will allow the user to edit various due dates. The "Free" box can only be ticked on the Payment Terms form, but it remains visible to the user from the Payment Terms list.

Due dates and Payment conditions
Access: Accounting → Configuration → Payment → Payment conditions
To access the Payment Conditions file, select one and click to open it, or create a new one.
Once the form has been opened, the actions to be carried out on this form are:
-
Click on the file contained in the "Payment condition lines" table to open the tab.
-
On the Payment Condition Line tab, the "Holdback" box can be activated or deactivated. Once finished, close the tab.
-
The "Free" box can be activated or deactivated on a Payment condition page.
-
Note that it is also possible to modify the payment percentage.


An example of an invoice:
Access : click on the menu "Invoices" and select an invoice category. Create a new invoice or edit an existing one.
-
On the invoice form, in the "Invoicing Information" section, you need to fill in the "Payment conditions" field and select the payment conditions that were previously created.
-
Still on the invoice form: when the Payment Conditions are applied, the invoice due dates will be calculated according to the payment conditions. Click on the "Terms" tab to view various due dates.
-
Click on Terms tab on the invoice form. An Invoice term window with different settings will open. You can find BAP status. BAPs are now validated by due date.
Invoice term window
Click on a line in Invoice Terms table in order to open a new Invoice term window.
-
The "Is customized" notion: due dates will be generated by default according to the payment condition, and when a due date is modified, it becomes personalised and loses its link with the payment condition.
-
Once the payment is made, it becomes possible to tick the "paid" box.
-
The "Holdback" means that the sum of due dates must be equal to 100% of the invoice total including VAT.
-
As soon as the user confirms the payment of the invoice, the due date will appear in the move and the invoice. You can view the invoice and the associated posting line on the Terms tab.
For example, if you need to consult the move line for account 411, you will find the due date already there. Therefore, the holdback will be associated with the move line.


The Accounting Account and the Holdback.
- The account in question can be found in the Accounting Configuration (Access: Application configuration → Apps management → Accounting, configure → Accounting app → in the Accounting Configuration section click on a Company to access the Accounting Configuration page).
On the Accounting Configuration page, in the "Holdback" section, you will find the customer account.
- At invoice level :
First, you need to break down the invoice. The due date may be recalculated if necessary.
If you click on the due date of the invoice (on the invoice card, in the table), you will see that the due date is attached to the invoice (on the due date tab, you will find "Invoice" and "Entry line" with numbers).
Click on the number of the entry line to view it. It can also be viewed from the Transactions input menu (Accounting → Moves → Moves).

- At entry level :
The "Payment condition" field is located on the accounting entry card, where you can view the payment condition applied.
By clicking on a Transaction Line in the "Transaction Lines" table, you can access the "Due by" tab.

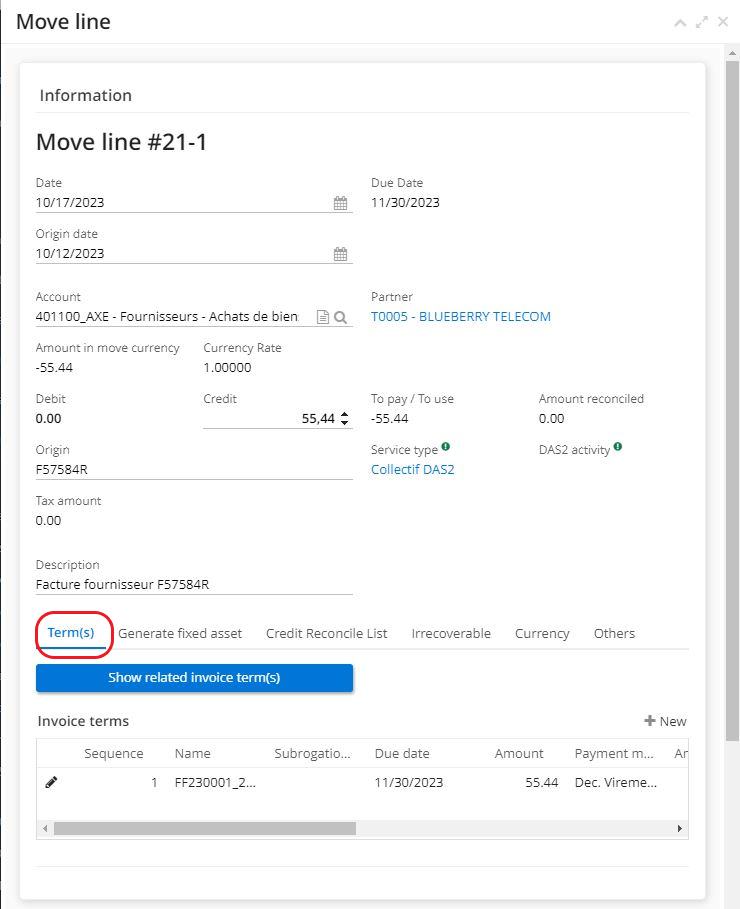
- The due date is also managed by the Payment Assistant
Access: Accounting → Payment → Payment assistant → New.
-
Create a new file.
-
Complete the information on a "Payment voucher" form (note, it is important to select a Partner).
-
By clicking on the "Search elements to pay" button, you can view the list of invoices/ other scheduled lines with remaining amount to pay.
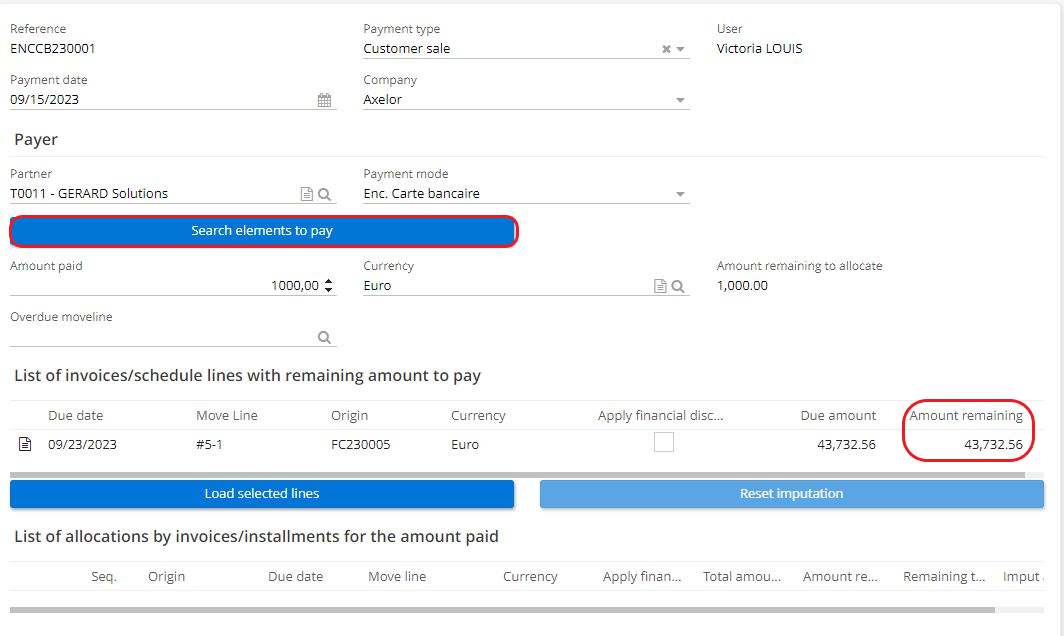
-
Select the lines in the table. Then click on the "Load selected lines" button.
-
Click on "Confirm payment".
-
Still on the "Payment voucher" form, on the right-hand side of the page you will find a new move line that was generated. To view it, click on the move line.
-
Consult due dates, Move line and invoice by clicking on a line in the "List of invoices/schedule lines with remaining amount to pay". At the same time, it's possible to view due dates via Move lines (Accounting → Moves → Moves → on an Account move form click on a line in the "Move lines" table and check the due date ).
On the accounting reports form (Accounting → Accounting Exports/Reports → Accounting reports) select "the aged trial balance" from the list. Then click on "Print" on the form. On the aged trial balance PDF, there is a column with the due date data.
