Fixed assets
How to generate fixed assets and start depreciation?
Access: Accounting → Fixed assets → Fixed assets
-
There is no need to activate Fixed Assets in the Application Config menu.
-
Fixed assets can be created either manually or automatically (via Purchases).
Manual creation
-
To create a new form, click on "New". Fill in the necessary information.
-
Select the fixed asset category (IT equipment, furniture, etc.).
-
Then, still in the fixed assets file, at the bottom of the page, click on the Fiscal information / Depreciation information / Derogatory tab → choose a computation method, Degressive or linear.
-
The "fiscal information", "depreciation information", "derogatory", "Associated fixed assets" and "Commentary" tabs will appear once the fixed asset category is selected.
Please remember to save any changes you make to the form.
- Other fields to complete are :
-
Purchase account: a fixed asset account is used for a fixed asset item. For example, for a computer, you will need to select the IT equipment account.
-
Analytic distribution template: this field must be filled in if you need to apply analytics.
-
Choose the depreciation plan (fiscal / economic / derogatory / IFRS), bearing in mind that you can activate several plans at the same time. The derogatory plan is the difference between the economic and fiscal plans. The IFRS plan allows us to have a correspondence in international accounting and to obtain something uniform; to date, the IFRS plan has been little applied and still needs to be reworked by hand. Work in progress.
-
Depreciation settings can be found in the Depreciation information tab.

The "Location" and "Tracking number" fields are used to trace fixed assets (for instance, these could be machines on a construction
In addition, the "Invoice lines" and "Purchase Account Move" fields can be filled in if you have a fixed asset that was automatically created at the time of purchase (triggering a purchase automatically generates a fixed asset). In this case, you'll use an invoice/entry to record the purchase.
- In the "Depreciation information" tab, complete the following information:
-
Select the calculation method (linear or degressive).
-
In the "Fiscal number of depreciation" field, indicate how many years you want to depreciate over (bearing in mind that long-term depreciation differs from product to product; for example, a computer is depreciated over 5 years and no more because of obsolescence). In addition, you can specify a different number of years for fiscal and economic depreciation, since the derogatory plan allows you to compute the difference between the two.
Degressive method: you will amortize more in the first few years (the amount will be higher). In later years, depreciation becomes linear (depreciation becomes identical). The degressive calculation is used in particular for new products.
Linear method: the same amount is amortized each year.
Periodicity type: you need to decide whether amortization is to take place over months or years. You must specify a period for economic depreciation (E) and a period for fiscal depreciation (F). The information must be entered in the fiscal information and depreciation information tabs respectively.

- On the right-hand side of the fixed asset form, you can enter the acquisition and first-in-service dates.
-
The first depreciation date can be found in the depreciation information tab, bearing in mind that the first service date is often the first depreciation date. In addition, the month of acquisition may differ from the month of first service, so your asset card may reflect this fact.
-
In fiscal information, you can indicate the first fiscal depreciation date, the reference date for the first depreciation.
In Depreciation information, you can check "Is Equal To Fiscal Depreciation" if your depreciation plan is fiscal. In this case, the fields "Computation method", "Fiscal number of depreciation" and "Periodicity type" will be predefined and impossible to change manually. The derogatory plan will also be inapplicable.
- Once the information has been filled in, you can validate the draft and then launch the computation. Following the computation, the depreciation board appears, which can be consulted in the depreciation / fiscal / derogatory information section.


Prorata Temporis
If you wish to apply Prorata Temporis (over 365 days) or Prorata Temporis US (360 days) in a fixed asset form, you will need to activate the checkbox from the fixed asset categories.
Access: Accounting → Configuration → Fixed asset categories → Edit or Create new category → In the category form, check "Prorata temporis". Save your changes.
Then the Prorata Temporis box will be applied automatically in the fixed asset form once you have selected a category.

Application of the derogatory plan
The derogatory depreciation plan makes up the difference between fiscal depreciation and economic depreciation (the economic plan is usually the most advantageous for the company).
-
Create a fixed asset form and fill in the necessary information.
-
Apply several depreciation plans: Fiscal / Economic / Derogation.
-
In the "Depreciation information" tab (i.e. economic depreciation), do not check the "Is Equal To Fiscal Depreciation" box (because, as the title indicates, the two depreciation plans in this case will be equal). In the example, the Fiscal number of depreciation is equal to 5 years and the Computation method is defined as "Degressive".
-
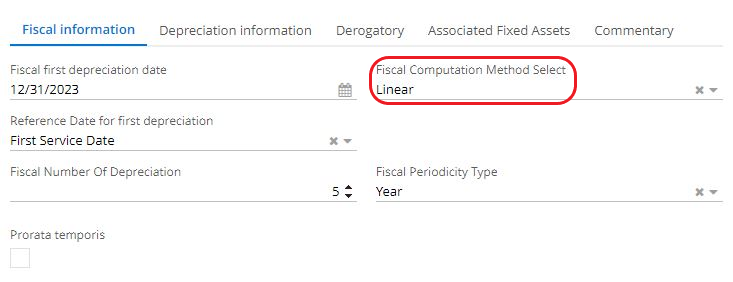
In the "fiscal information" tab, select the "linear" computation method, and enter the fiscal number of depreciation (e.g. 5 years).
-
Click on "Compute depreciation" and "Validate".
-
Click on the "Derogatory" tab. In the Fiscal Fixed Asset Line List, you can consult the "Income Depreciation Amount" and "Derogatory Amount" columns.
If you click on a line in the Fiscal Fixed Asset Line List (the derogatory tab), you'll open a new window called "Fixed asset derogatory lines".
In this window, you can view the "Derogatory Resumption Move" by clicking on the entry generated. For this type of move, a different financial account must be used (type 7, e.g. account 787250 "Derogatory depreciation").



How to start depreciation for a single line?
Access: Fixed Asset Form → Depreciation information → Depreciation board → click on a line to start depreciation → status will change from "planned" to "completed".
-
Click on the fixed asset form
-
In the form, click on the depreciation information tab
-
Next, click on a line in the depreciation board to access the "Fixed asset line" tab. In this tab, click on the "Realize" button (the form must be validated before you can click on it). Once this operation has been completed, the line will change status from "planned" to "completed" (the sentence in red is probably incorrect / obsolete).
You can only click on the depreciation lines scheduled for this year (the application will not let you depreciate the fixed asset for next year).
The account moves can be viewed by clicking on the line with "completed" status in the depreciation board.

How to launch mass depreciation?
-
Access: Application Config → Batches → Accounting batches → click on New → in the Action field, select "Realize fixed asset lines" (which is the equivalent of "trigger depreciation rate entries") → Complete the information on the form
-
Then, in the "Date range of realizing fixed asset lines" tab, enter the relevant period of time. For example, from 01/01/2023 to 12/31/2023.
-
Click on the "Realize fixed asset lines" button. You will notice that on the fixed asset form, in the depreciation board, the status of the lines will change from planned to completed.


How to split a fixed asset?
If you want to be able to track a fixed asset form individually, you can split an asset that contains several items (for example, you can split an asset that contains 5 computers).
A new immobilization window will then open, and the first window will be updated to reflect the correct quantity.
The forms remain linked: in the asset record, at the bottom of the page, the "Associated Fixed Assets" tab lets you view the link between the two split forms, since they come from a single purchase.
You can split the form after or before clicking on "Validate".
Example:
-
On a fixed asset form, enter the quantity and gross value (4 computers with a gross value of 9,000 euros).
-
Click on Split.
-
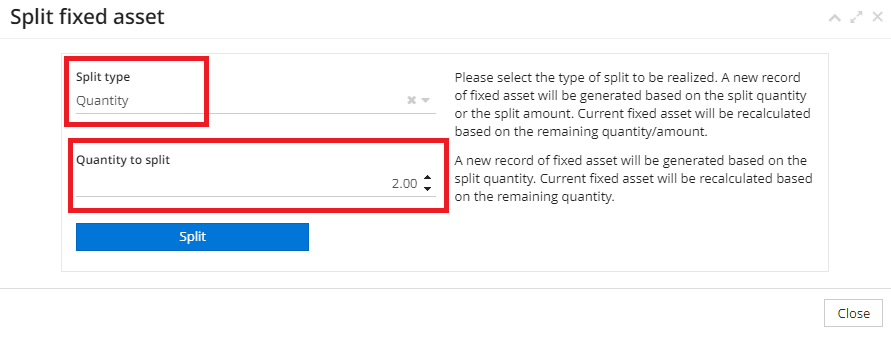
In the "Split fixed asset" window, select the type of split (e.g. Quantity).
-
Next, enter the Quantity to be split (e.g. 2). Once you've chosen the quantity to be split, a new Asset form with the new quantity is created. In the previous form, the quantity is recalculated.
-
On each form, it is possible to consult the "Associated Fixed Assets" tab, which is a link between two split forms representing a single purchase.


How to update the configuration of the fixed asset form?
Access: Accounting → Fixed assets → Fixed assets → Edit existing form.
-
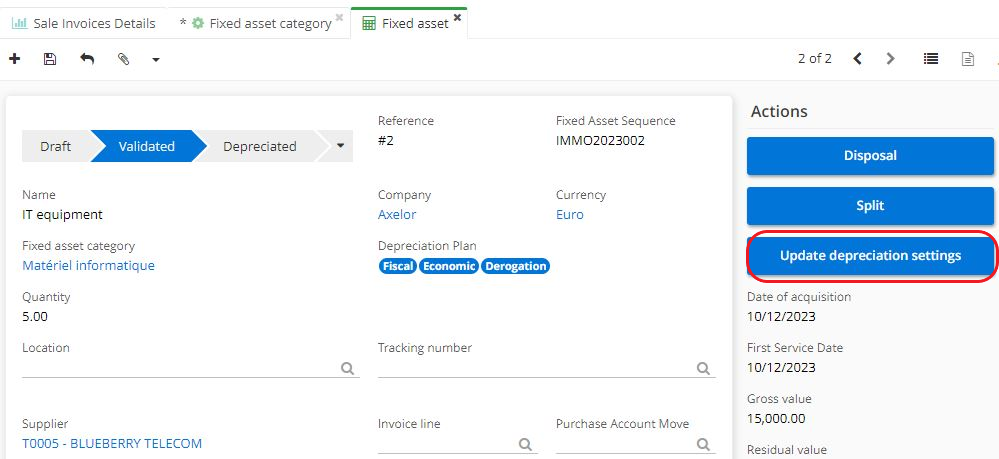
On the validated fixed asset form, you can click on the "Update depreciation settings" button, which allows you to enter the corrected accounting value and the Number of depreciations.
-
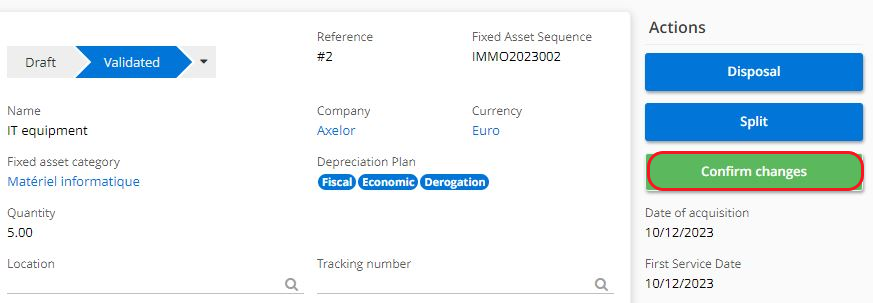
Once you have entered the corrected accounting value and the new depreciation number, you can click on the "Confirm changes" button.
-
Click on the "Save" icon for your changes to take effect.
Note that if the form is not in Edit mode, clicking on the "Update depreciation settings" button will have no effect.
You should also bear in mind that there is no need to update fiscal information, only depreciation information (i.e. the economic depreciation plan).
-
Corrected accounting value: can be changed at the end of the current period. It's extremely rare to have the accounting value corrected in the first year (which will be due to an exceptional event).
-
When revaluing a fixed asset, the price drop must be higher than 10%. You can either revalue both parameters at the same time, or just one.
-
Accounting value can only be revalued once a year (fixed assets cannot be revalued several times a year).
Once you have made changes to the corrected accounting value field, the new data will be reflected in the depreciation board in the column entitled "Corrected Accounting Value". Of course, there will also be a change in the amount of depreciation.
In addition, by validating a planned line in the depreciation board and knowing that depreciation has taken place, a depreciation entry will be created. It can be view in the "Fixed asset line" tab. To open this tab, click on the line in the depreciation table.

Create a fixed asset form from an invoice
Thanks to this feature, the fixed asset form will appear in the fixed asset repository (Accounting → Fixed asset → Fixed asset) when the invoice is split.
The fixed asset form created in this way will have draft status.
However, if you want the asset form to be created with a validated status, you need to activate it:
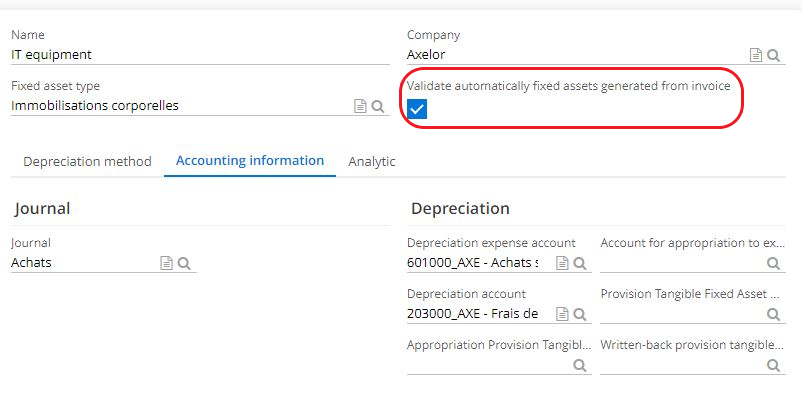
Accounting → Fixed assets → Configurations → Fixed asset categories → Choose the relevant Category (for example, if you order a server, in the invoice in the invoice line you will choose the asset category "IT equipment") → In the category form, activate the "Validate automatically fixed assets generated from invoice" checkbox → The fixed asset form will be generated automatically with the status validated.
Access: Invoicing → Suppl. invoices → Edit or New
-
Fill in the necessary information on the form. If necessary, create a new Invoice Line.
-
On the Invoice form, click on the Content tab. Then click on the invoice line in the table. In the newly opened tab, click on Accounting, then activate the "Fixed Assets" checkbox.
-
Once the "Fixed Assets" box is ticked, enter the fixed asset category. If necessary, enter the cut-off period. Click "Ok".
-
Validate and ventilate the invoice.
-
You can now view the fixed asset form in the repository, which can be found at accounting → fixed assets → fixed assets.

How to trigger an asset via Purchases
Access: Purchases → Purchase orders → New
-
Fill in the necessary information on the quotation form.
-
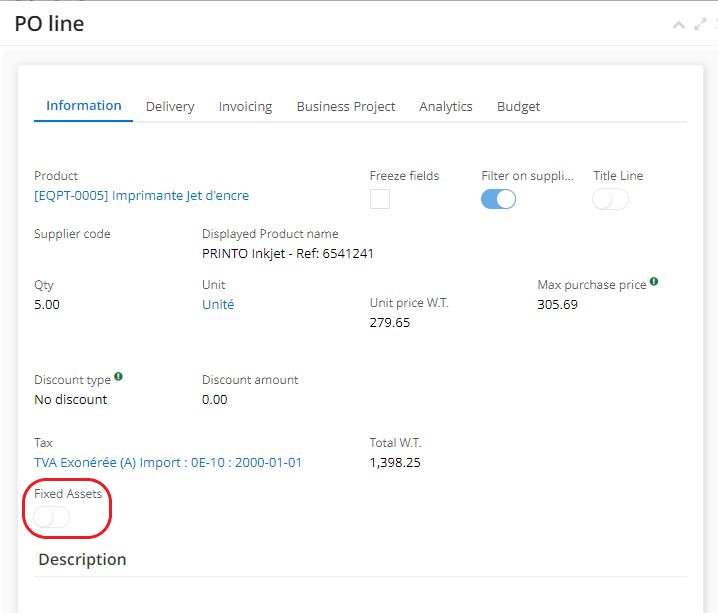
On the Purchase Order form, in the Contents tab, on the Detail field, click on New → in the window called PO Line, check the "Fixed assets" box to activate the automatic creation of a fixed asset for the current order.
-
Uncheck "filter on supplier" if the supplier catalog has not been filled in, to be able to select the product you want.
-
Please note that if you tick "Fixed assets" in the PO line, you must respect the minimum amount for a fixed asset (from 500 euros).
-
Click on "Requested", fill in the reception dates and press "Validate".
-
Then click on "Generate control invoice" to post it in the tool.
Concerning the product, it is necessary to indicate the fixed asset category and the financial account (Application Config → Referential → Product → Modify or New Product). The form will be filled in automatically if you have indicated the asset category in the accounting family.
If the product file does not contain the asset category, it must be completed in the product accounting family.
The product accounting family
Access : Application Config → Referential → Configuration → Product accounting families.
Click on Edit → in the Accounts Configurations window, fill in the "Fixed asset category" field and the "Account of purchase fixed assets" field.
Click OK and save your changes.
If this information is missing, the following message will be displayed: "Information: the accounting configuration is missing for the product...".

Trigger an asset from an account move.
Access: Accounting → Moves, Moves → New.
On the form, select "Purchase" in the Journal field. Complete the following information on the form:
-
Complete the Move lines (click on New) → select the Account (e.g. account 218100 for computer equipment) → fill in the Partner → Put the correct amount in the "Debit" field → complete the Description → click on "Confirm".
-
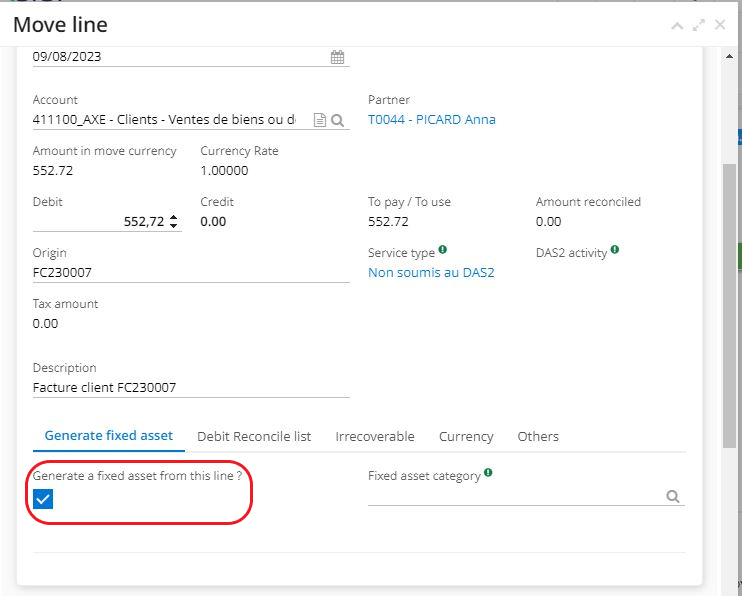
Then click on "Edit" in the move line → in the move line window, check "Generate a fixed asset from this line" (the "Generate fixed asset" tab).
-
Press "Generate counterpart" to generate the taxes.
-
Switch to daybook mode by clicking on "Daybook" → at this point, the creation of an asset record will be triggered.
-
Click on "Account".
-
Save your changes. A new fixed asset form will appear in the asset repository (accounting → fixed assets → fixed assets).
In the fixed asset form just created, there is no Invoice line because this form was triggered by an account move.
Barcodes for fixed assets.
- First, you need to activate barcodes in the Accounting application.
In order to activate them: Application Config → Apps Management → Accounting, Configure → Fixed Asset Tracking number → tick the box "Activate bar code generation for fixed asset " → select the barcode type (this will be the automatically generated barcode by default).
Alternatively, you can activate the "Specify the barcode type by fixed asset" checkbox, allowing you to choose a barcode for each asset.
- Then save the changes you've made by clicking on "Save", refresh by clicking on "Refresh" in the same task bar at the top (in the drop-down menu), and, as this involves activating module functionalities in Application Config, for the change to take effect, refresh the Browser.
Save → Refresh in drop-down menu → Refresh Browser.
-
In the fixed asset form, you'll find a new Barcode tab at the bottom of the page.
-
Click on "Barcode". You can enter the serial number and, if you have ticked the "Specify the barcode type by fixed asset" box, you can select the desired barcode.
Otherwise, it will be predefined and selected by default, with no possibility of modifying it.
- Once you've entered the information (serial number and barcode type), the barcode will be generated and can no longer be modified. Please note that the serial number must be entered by the user.

Disposal of fixed assets
How to apply a cession?
If you need to sell a computer or any other type of machine that is useful to you on the long-term, you'll need to remove it from the fixed assets (select Cession) in the menu "Disposal type").
Access: Accounting → Fixed assets → Fixed assets → click on the asset form concerned.
- In the file, click on the "Disposal" button, then in the window that opens, indicate the disposal type (in this case Cession), and the reason for disposal (external or internal). If you opt for "Cession", also indicate the type of quantity to be transferred (total or partial).
The reason for external or internal exits is for information purposes only and has no impact on the Cession.
-
Enter the sales price before tax to calculate the capital gain/loss.
-
Check "Generate sales move" check box. In this case, you'll need to fill in the "Tax line" field, which is generally 20% VAT in the EU.
-
Click on "Disposal".
-
Once the checkout has been completed, the checkout/sales moves will be created and can be viewed in the right-hand column.
Please check the dates before launching the disposal: the asset must first be depreciated before the disposal can be done (e.g. depreciation on 10/01/2022 and sale/disposal on 12/01/2022 - the disposal cannot be reversed).
How to dispose of a fixed asset, scrapping type?
Access: Accounting → Fixed assets → Fixed assets → Edit an existing fixed asset form → in the fixed asset form, click on the "Disposal" button.
-
In the Disposal window, enter the date. The disposal date is the date that will be used to generate the accounting entry for the disposal date.
-
Choose the type of disposal (from Disposal Cession, Scrapping, Ongoing Cession), in this example, it's "Scrapping".
-
Indicate the reason for disposal (breakage, obsolescence, damage, transfer). Click on "Confirm disposal". The default disposal reasons are: breakage / obsolescence / damage / transfer.
It's possible to add a disposal reason in the list: accounting → fixed assets → configuration → Asset disposal reasons.
-
Once you have confirmed the disposal, the system will recognize the end of depreciation up to the date of disposal, and you will see a recalculation in the depreciation table.
-
An outgoing entry has been generated. It's on the right, under the heading "Fixed asset Disposal Move". If you click on the Fixed asset Disposal Move, you will be able to view several lines, such as depreciation allowances.
Disposal of ongoing fixed assets
No depreciation is provided for this asset. You will therefore cancel the ongoing fixed asset and write it off as an expense. In other words, since the ongoing fixed asset has not been capitalized at year-end, it cannot be depreciated. Disposal of an ongoing fixed asset does not generate an entry. Generally speaking, creating an ongoing fixed asset record allows you to keep track of a future asset that is being built or entrusted to a third party, and retiring an ongoing fixed asset record allows you to close this record and then create a real fixed asset record.
It is not possible to convert an ongoing fixed asset into a fixed asset ready for depreciation.
