User Tasks
Introduction BPMN
The user task is represented in the BPMN standard by this rectangular shape containing a pictogram of a person.
It is used to represent a task that must be performed by a user and whose action results in a modification of the data allowing the process to progress.
General Configuration
A user task has several configuration tabs, allowing its behavior to be defined. Here we focus on the first one - General.

Common Configuration
The common configurations for all nodes are as follows:
-
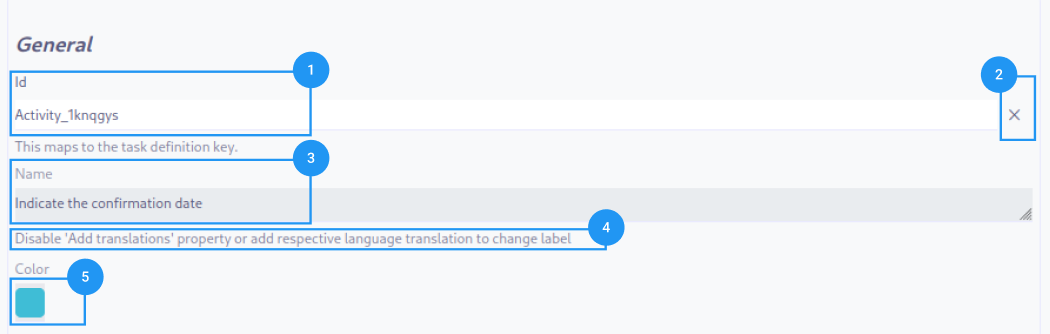
Id (1): Unique ID auto-generated by the system when the node is inserted, it can be manually modified by direct input or by clicking on the cross (2).
| It is strongly discouraged to change the ID of a process element after the first deployment to avoid generating migration errors. |
| If translations are available for the task name, it is read-only (4). |
-
Color (5): Allows defining the color of the task, it is used to differentiate tasks on the diagram.
Technical Configuration
A user task is characterized by an initial state and a final state, as indicated in the standard. In this section, the user must indicate how to transition from one to the other. There are 3 possibilities:
-
Create a script condition that returns true or false
-
Click on one or more buttons to proceed to the next step
-
Satisfy a condition and click on one or more buttons
| It is strongly discouraged to use the buttons, as they are only accessible from the client and on certain views only. |
-
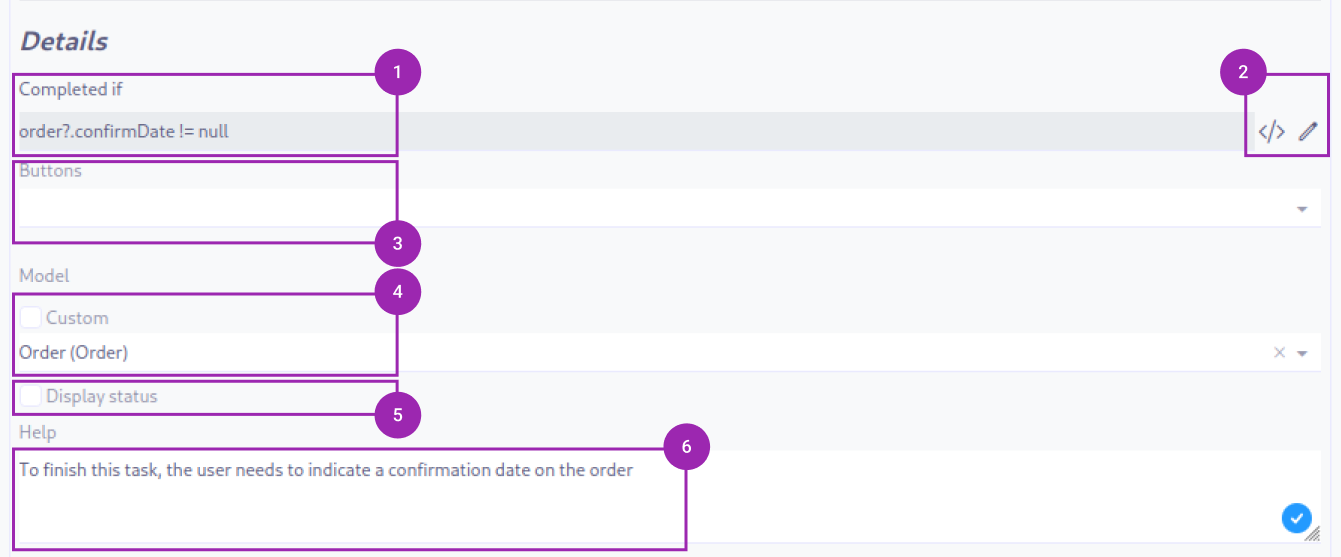
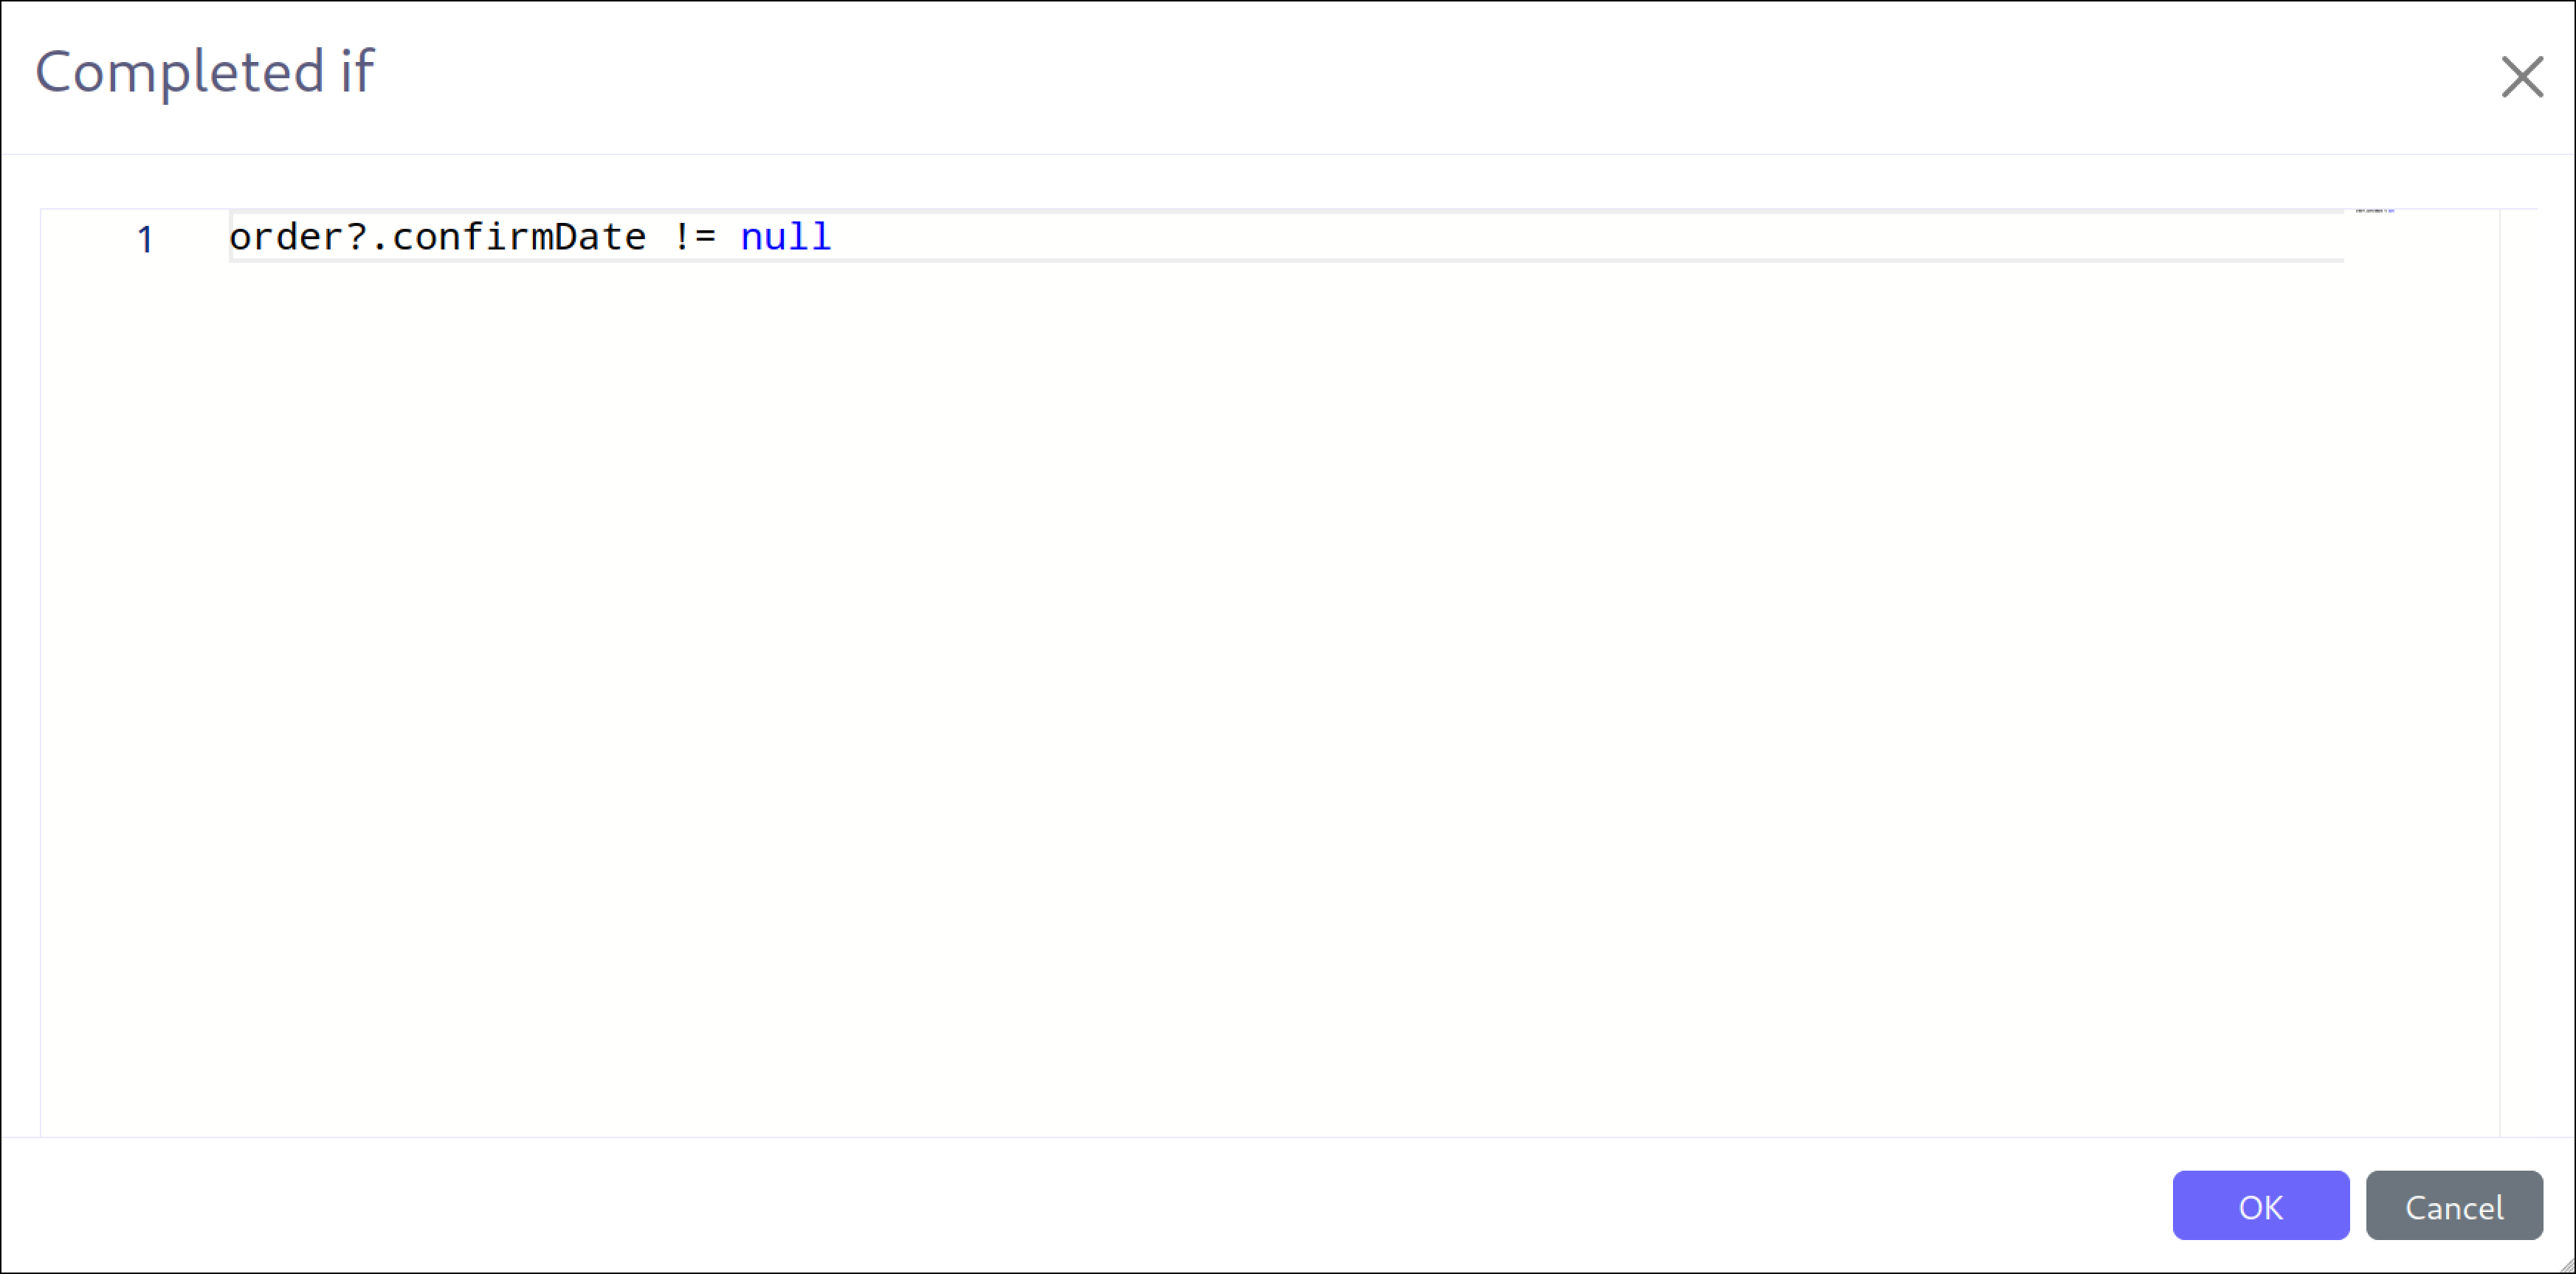
Completed if (1): Allows defining a script condition that must be satisfied for the task to be considered complete. It must necessarily return true or false.
-
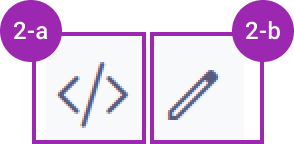
Script buttons (2): These two buttons allow:
-
Manually edit the condition script (2-a)
-
Use the script builder to generate the script (2-b)
-
| It is possible to manually edit a script generated by the expression builder, but this action will lose the expression builder settings. |
-
Buttons (3): Allows selecting the buttons available on the view to proceed with the user task.
Axelor Specificities
-
Model selection (4): Allows selecting a data model to benefit from additional configurations Axelor. The Custom box allows searching for custom models.
-
Display status (5): Allows displaying the status (name) of the user task on the view.
-
Contextual help (6): Allows displaying contextual help on the view in the form of a tooltip, provided that the status display is selected.
Translations
It is possible in BPM to indicate translations directly in the properties for the name of the nodes:

-
Translations (1): Allows adding translations for the name of the node. Translations are added by clicking on the + button.
-
List of translations (2): List of translations added for the node. They can be deleted by clicking on the cross on the right.
-
Language (3): Language of the translation.
View/Attributes
Introduction
Executing a user task allows modifying certain attributes of form view elements, as listed below:
-
Hidden
-
Hidden if
-
Required
-
Required if
-
Read-only
-
Read-only if
-
Precision
-
Scale
-
Prompt
-
Icon
-
Selection-in
-
Title
-
Active
-
Domain
-
Refresh
-
Url
-
Value
| This is an exhaustive list of modifiable attributes, but not all are necessarily applicable to each element. |
Configuration
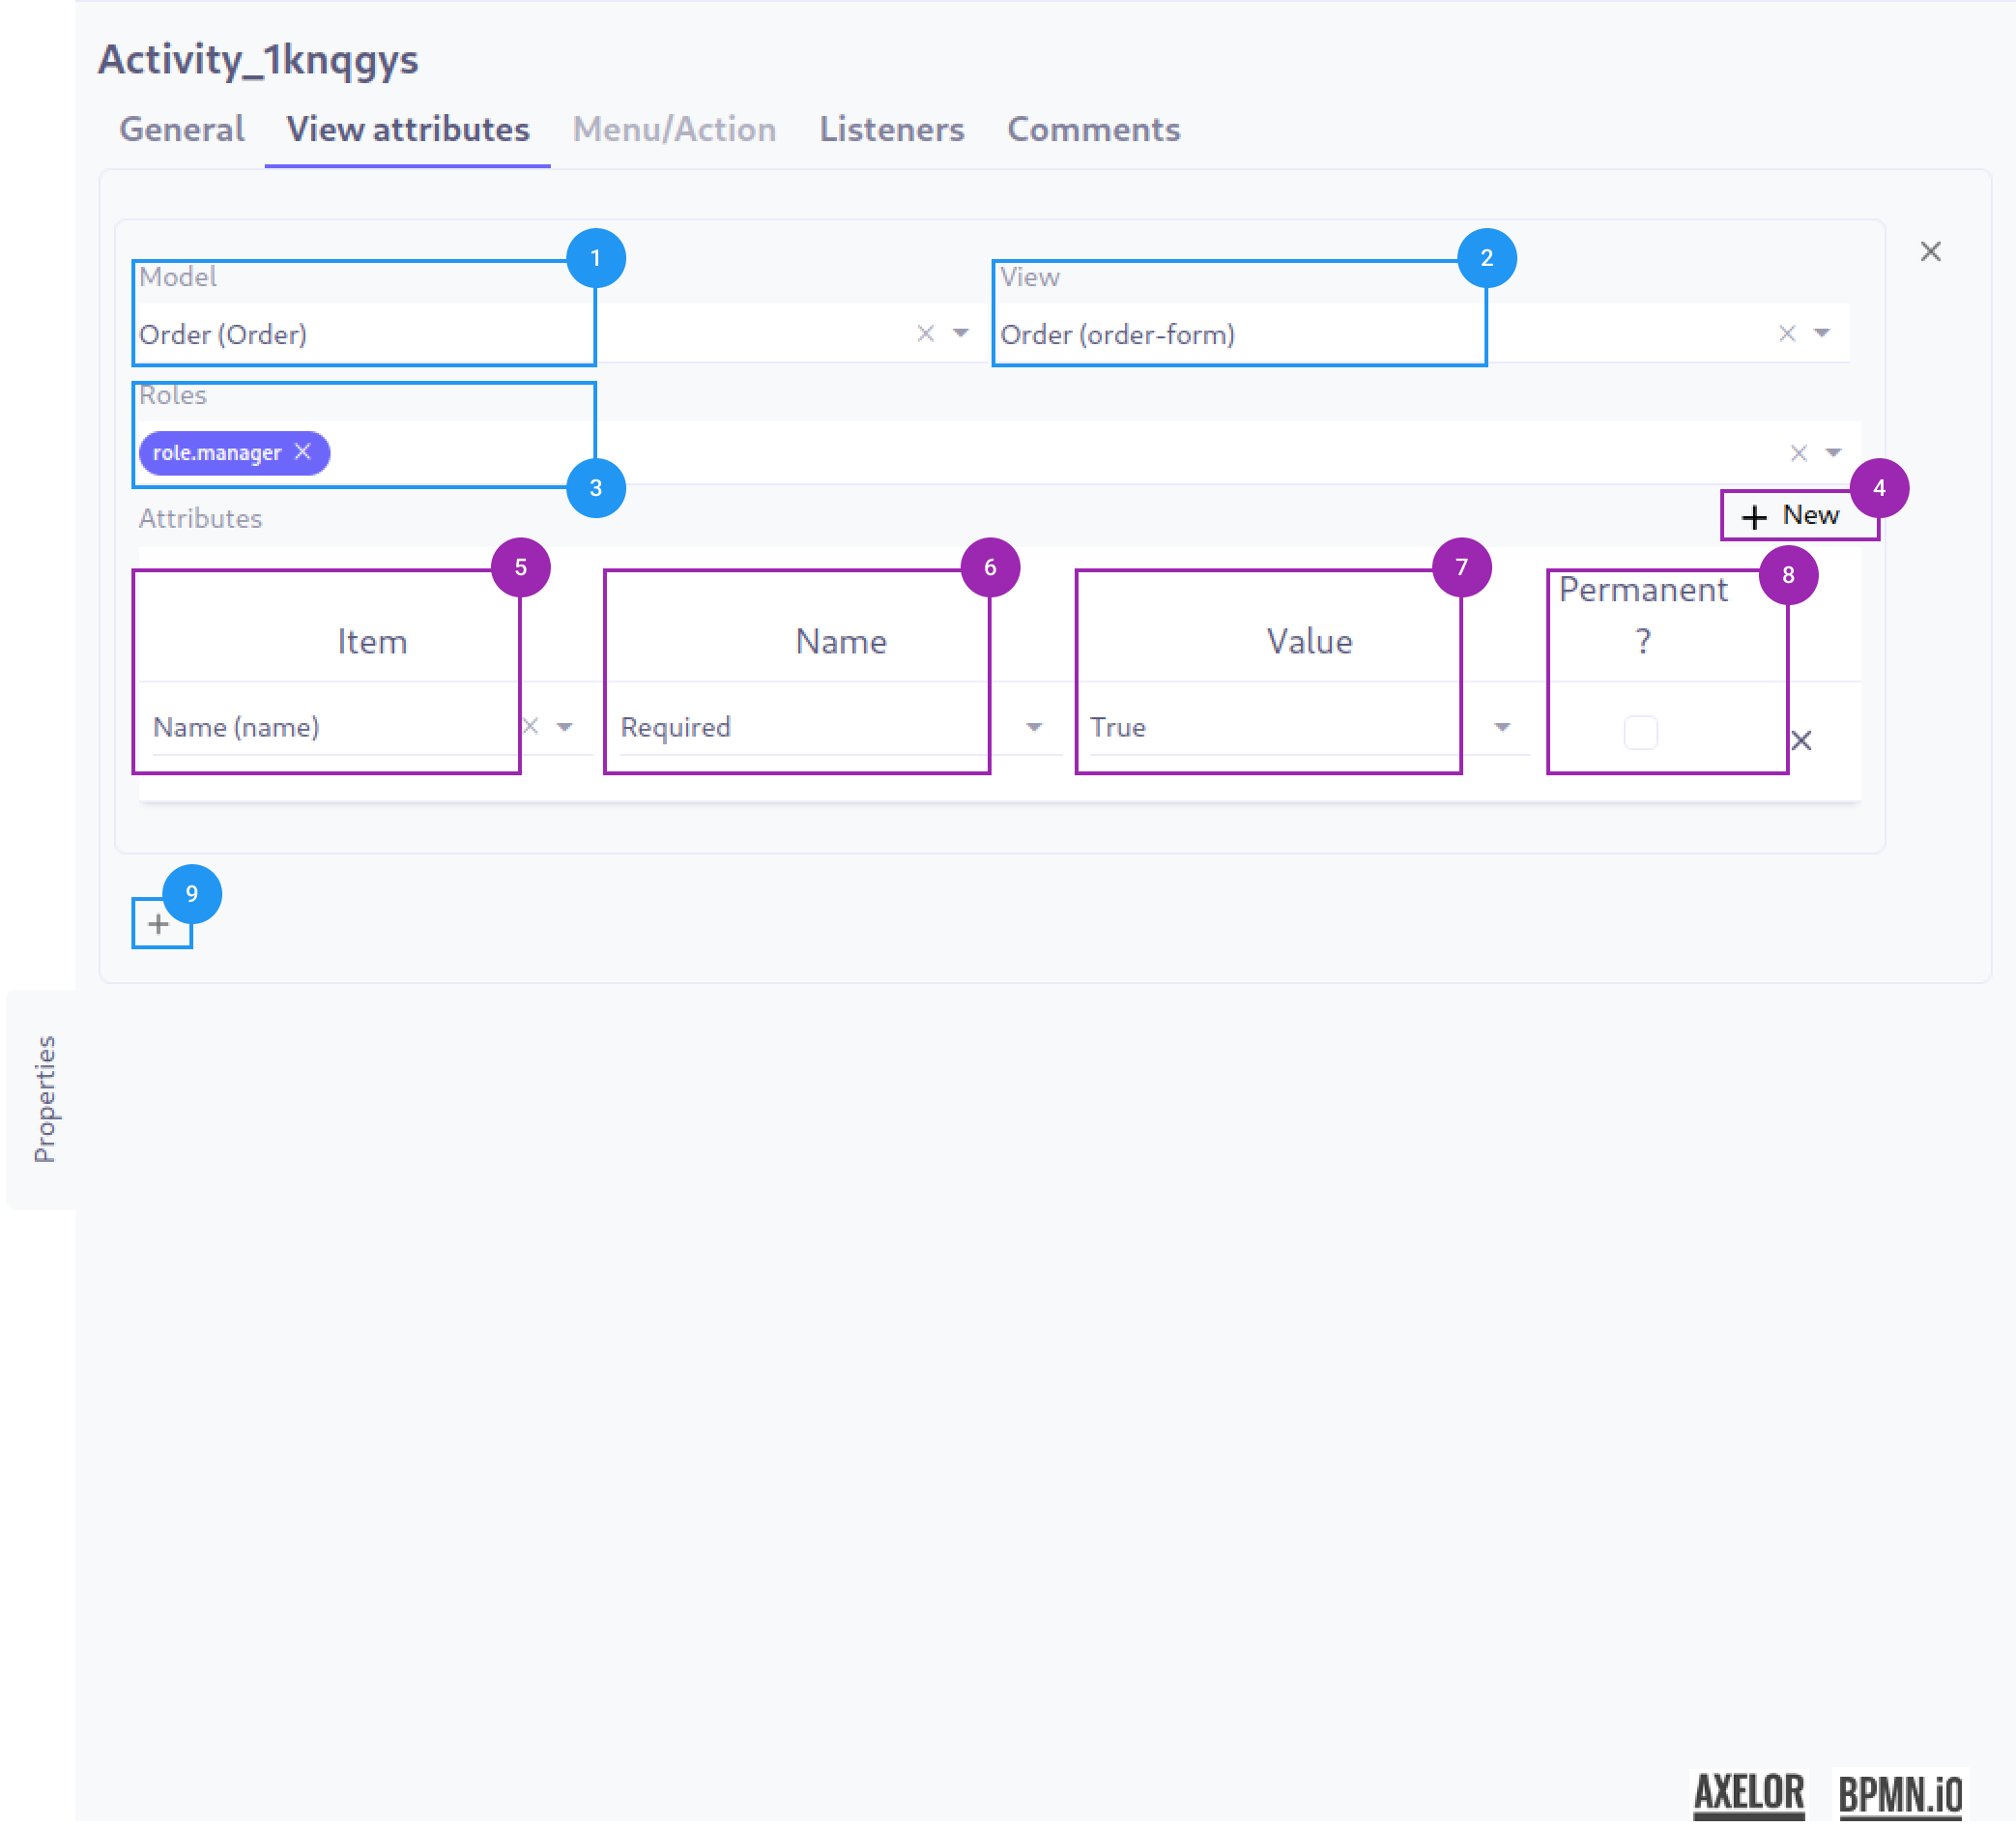
The assignment of one or more view attributes is done in the following order:
-
Select the data model (1) from those available in the process.
-
Select the relevant view (2) from those available for the model.
-
Apply these modifications to certain roles only (3), only the selected roles will see the modifications, if no role is selected, the modifications will be visible to all.
-
Add a view attribute (4) by clicking the + button.
-
List of view elements to be modified (5).
-
Relevant view attribute (6).
-
Attribute value (7).
-
Persistence of the modification (8).
-
Add a new block of view attributes (9) by clicking the + button.
Technical Details
Adding view attributes to a user task uses the view attributes provided by AOP
com.axelor.meta.db.MetaAttrsThe records of this table can be accessed via the menu entry Administration > View management > View attributes.
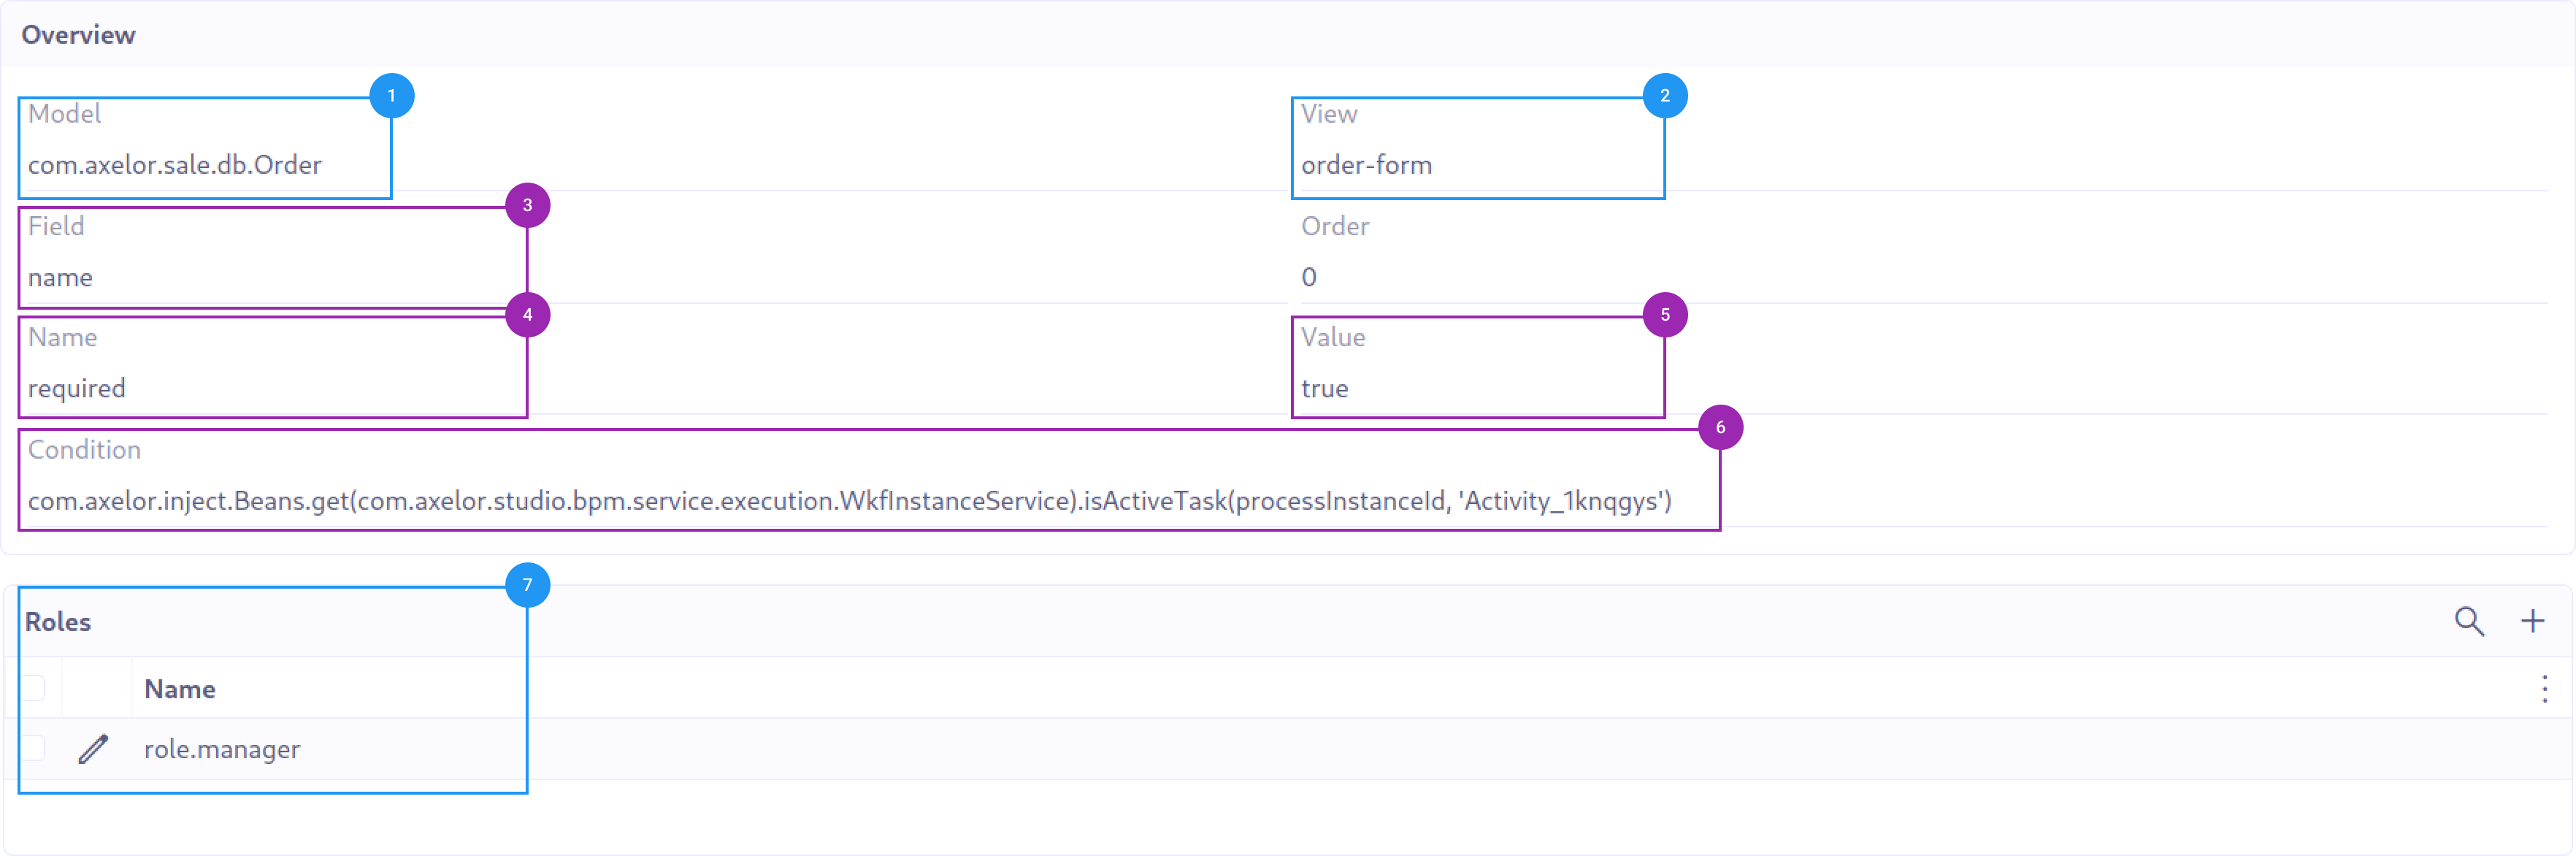
The result of the view attribute configuration in the example above is as follows:
-
Data model (1)
-
Relevant view (2)
-
Relevant field (3)
-
View attribute (4)
-
Attribute value (5)
-
Condition generated by BPM for applying the attribute (6)
-
Relevant role (7)
Note that the condition generated by BPM is a Groovy condition that determines whether the attribute should be applied or not by calling the method:
-
isActiveTask if the permanent attribute is not checked
-
isActivatedTask if the permanent attribute is checked
/**
 * Checks if a task is active for a given process instance.
 *
 * @param processInstanceId the ID of the process instance
 * @param taskId the ID of the task
 * @return true if the task is active, false otherwise
 */
public boolean isActiveTask(String processInstanceId, String taskId) {

  // Return false if either processInstanceId or taskId is null
  if (processInstanceId == null || taskId == null) {
    return false;
  }

  // Query the history service to count the number of unfinished tasks
  // for the given processInstanceId and taskId
  long tasks =
      engineService
          .getEngine()
          .getHistoryService()
          .createHistoricActivityInstanceQuery()
          .processInstanceId(processInstanceId)
          .unfinished()
          .activityId(taskId)
          .count();

  // Return true if there are unfinished tasks, false otherwise
  return tasks > 0;
}
This method ensures that the view attribute is only applied if the user task is active in the first case.
Menu/Actions
Introduction
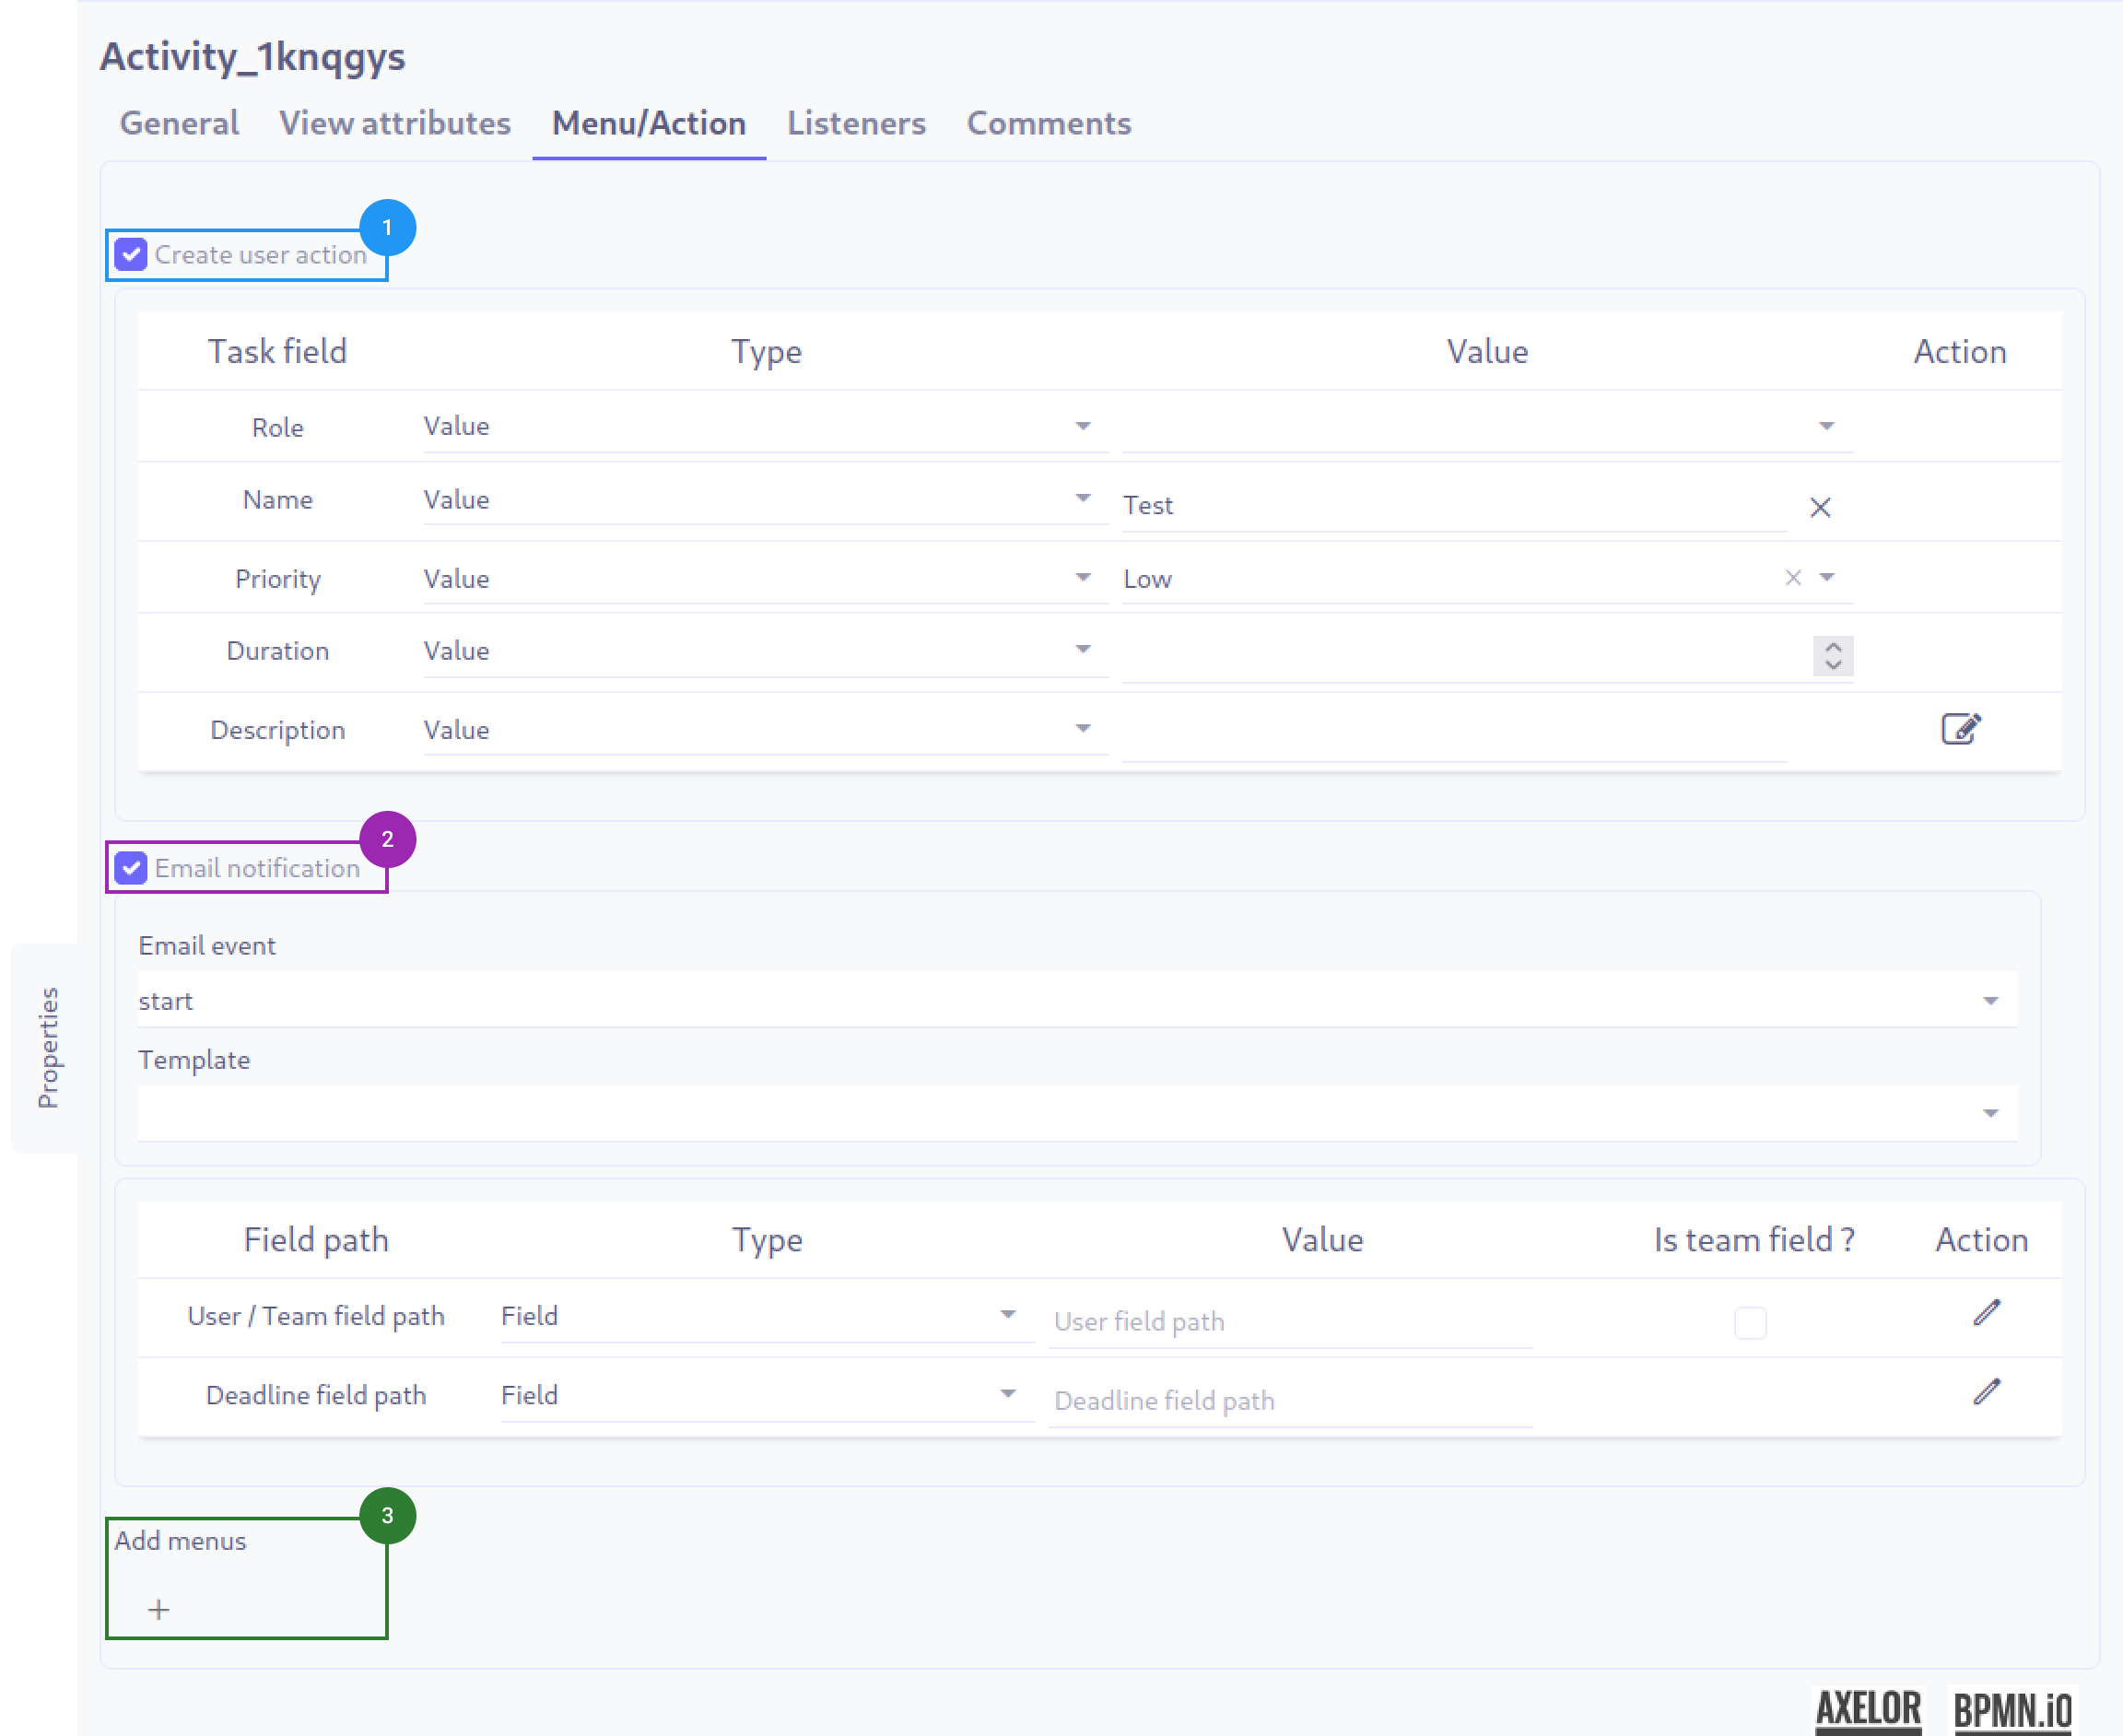
The user task can be associated with actions (1) and (2):
-
An action directly reflected by an AOP task (1)
-
Sending an email (2)
But also menu creations (3)
Action (task)
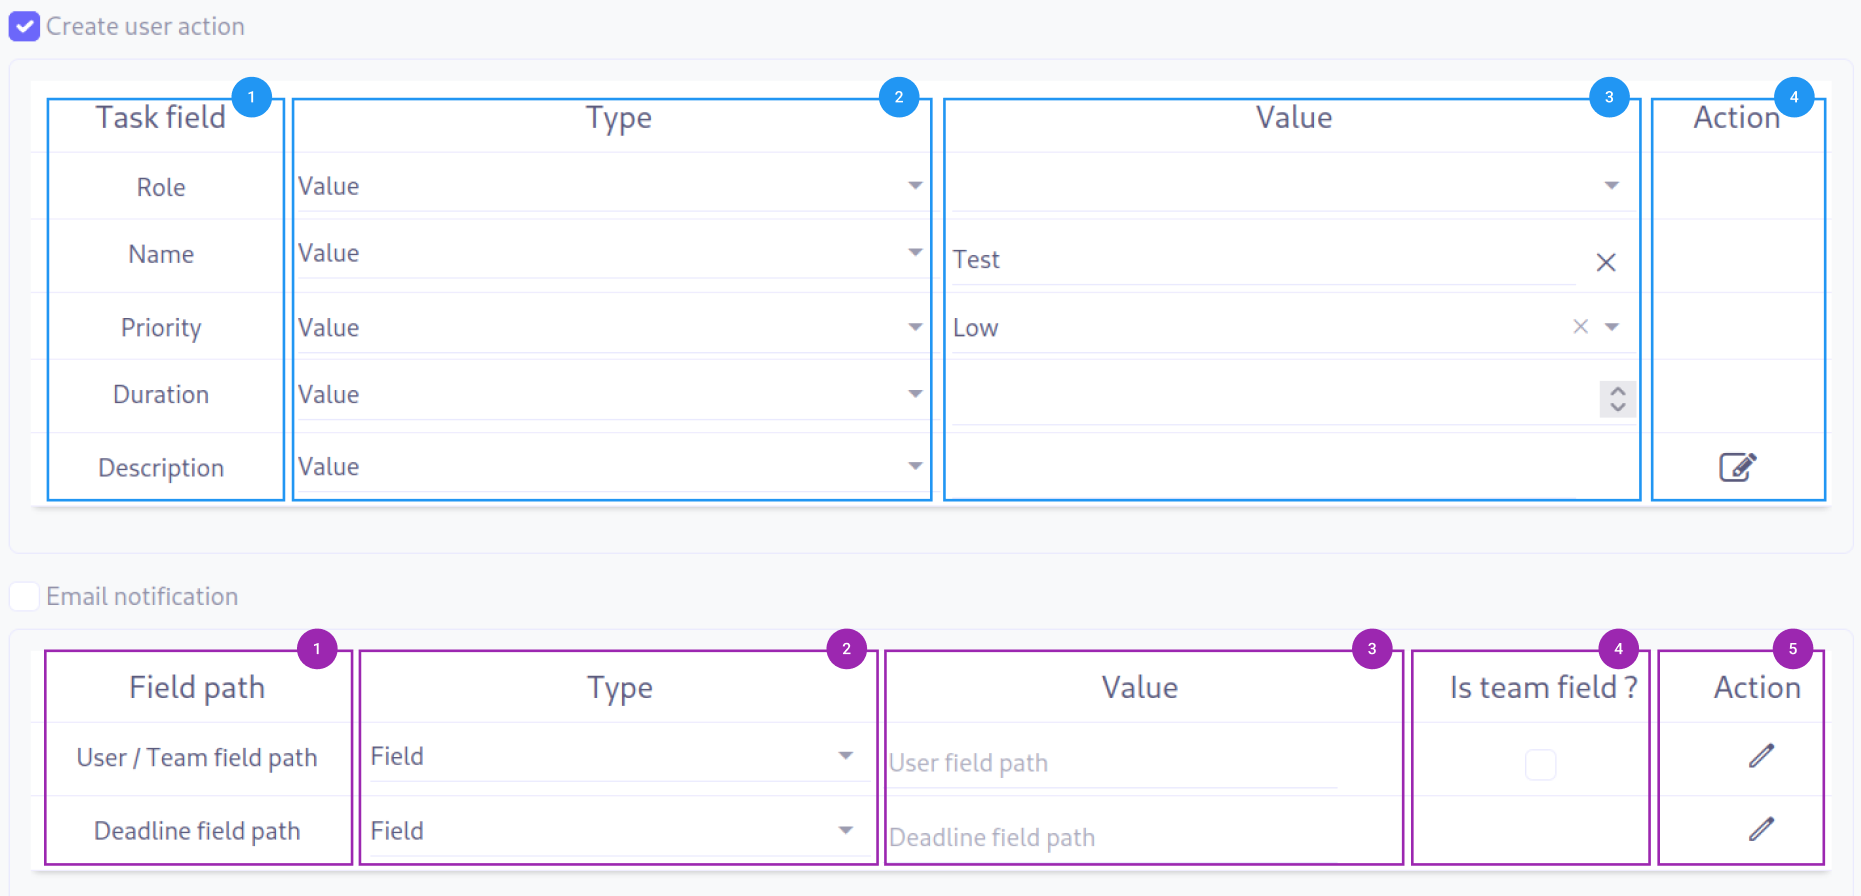
The configuration of the different fields of a task can accept several types of data:
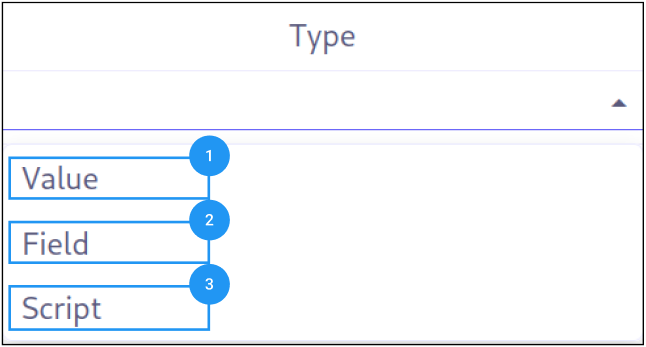
-
A direct value (1)
-
A field from the configured object on the user task corresponding to the expected data type (2)
-
A script (3), which can be of two types:
-
A Groovy expression for the following configurations:
-
Role
-
Priority
-
User/Team example:
__studiouser__ -
Deadline example:
__date__.plusDays(6)
-
-
Groovy templating for the following fields:
-
Name
-
Description
-
-
Example:
When defining an action, it is possible to define several parameters:
-
Name: Name of the task, it can be modified at any time.
-
Priority: Allows defining the priority of the task.
-
Description: Description of the task to be performed.
-
Deadline: Deadline to complete the task.
The assignment management can be done according to three parameters, only one can be chosen:
-
Role: Allows defining the role that must perform the task, all users with this role will have access to the task.
-
User: Only the designated user has access to the task.
-
Team: All team members have access to the task, choosing a team implies checking the "Is team field?" box.
As a result, a task is created with the information determined in the user task.
| If the user task that created the task is completed (condition satisfied), then the task is marked as completed. If the user task is canceled, the task is also canceled. |

Multi-Instance Configuration
A user task (as well as other tasks and subprocesses) can be configured as a multi-instance activity, meaning it is executed multiple times — either sequentially or in parallel. This is useful for tasks that need to be repeated for each item in a collection (e.g., approve each line of a purchase order).
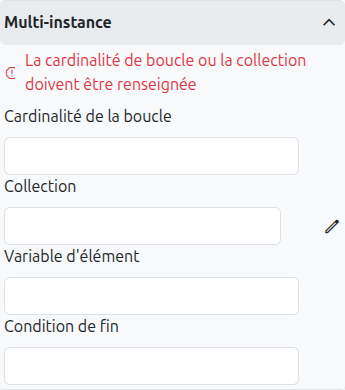
| Field | Type | Description |
|---|---|---|
Sequential |
Checkbox |
When checked, instances are executed one after the other (sequential). When unchecked, all instances are created simultaneously (parallel). |
Loop Cardinality |
Text |
The number of instances to create. Can be a fixed number or an expression that evaluates to an integer. If set, the task is executed this many times regardless of the collection size. |
Collection |
Text + Model/Field selector |
A process variable (typically a list) over which the multi-instance iterates. Each element in the collection triggers one instance of the task. |
Element Variable |
Text |
The name of the variable that holds the current element of the collection for each instance. This variable is available within the task’s execution scope. |
Completion Condition |
Text |
An expression that is evaluated after each instance completes. If it returns true, the remaining instances are cancelled and the multi-instance activity completes early. Useful for majority voting or first-approval patterns. |
|
Use multi-instance with a collection variable for common patterns like:
|
| When multi-instance is configured, the task icon on the BPMN diagram shows three horizontal lines (sequential) or three vertical lines (parallel) at the bottom of the task shape. |
Listeners
It is possible in a BPM model, regardless of the configurable element, to define listeners via the appropriate tab.
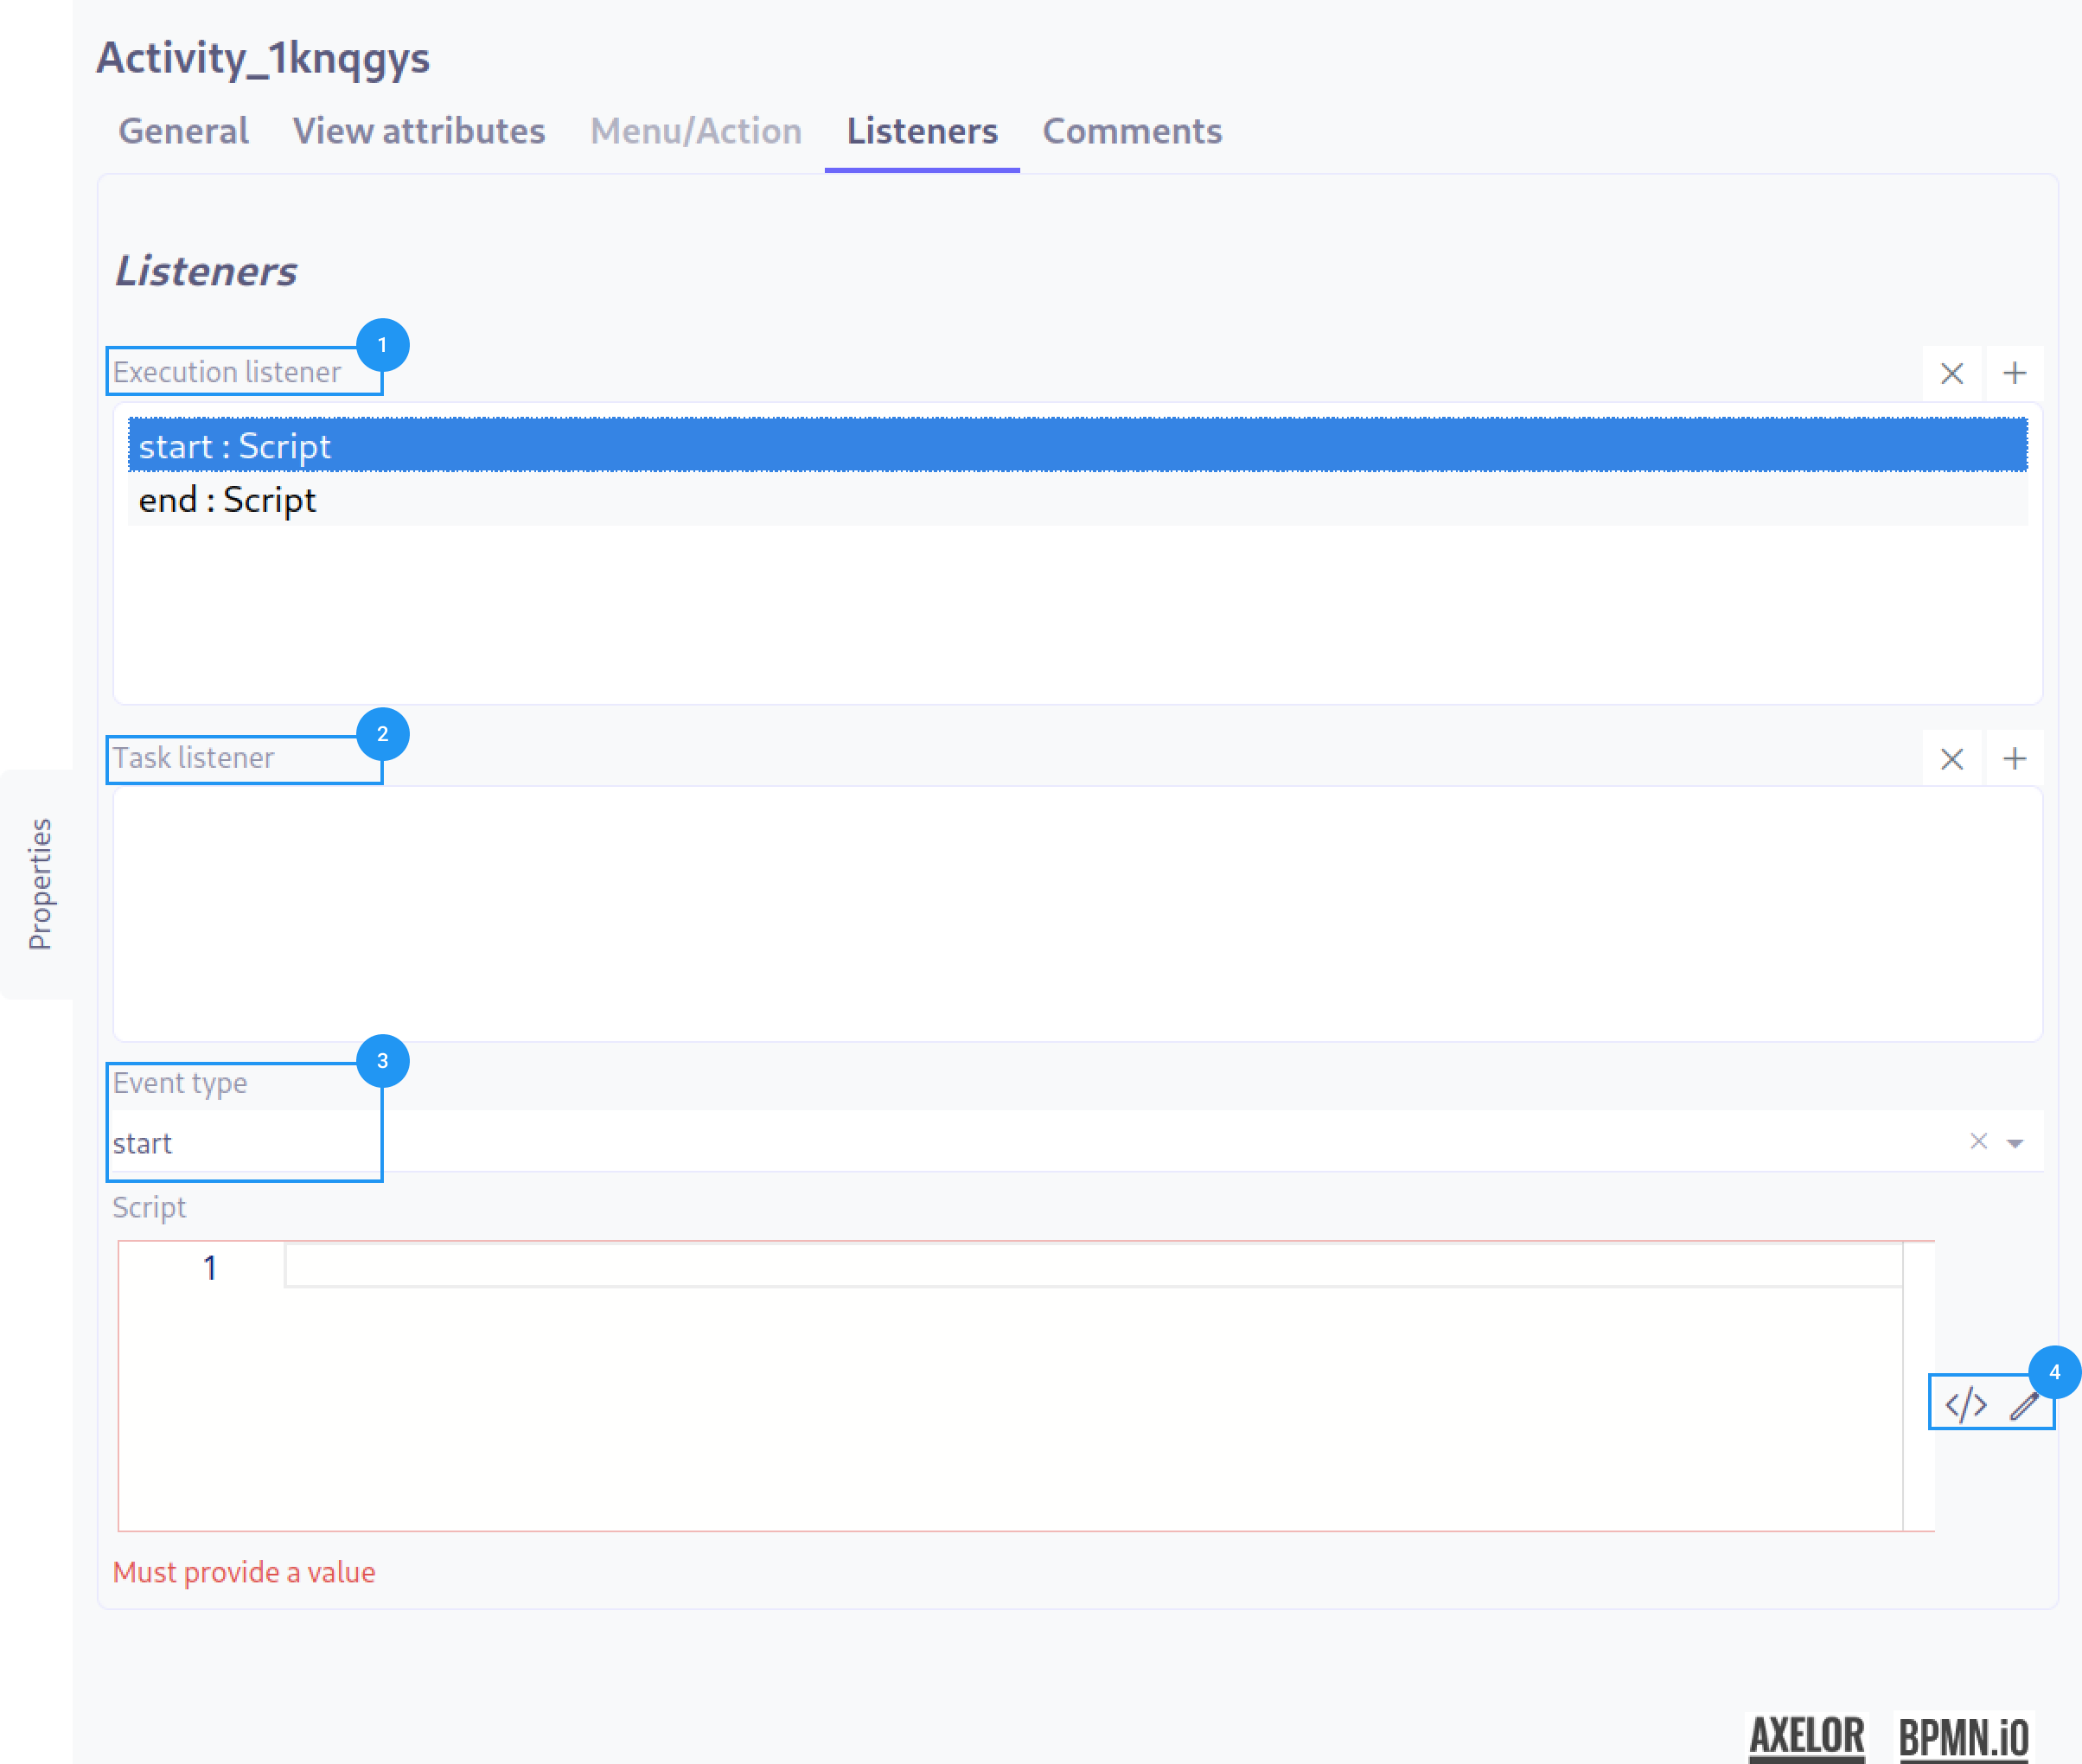
Execution Listener (1)
An execution listener is created by clicking the plus + button in the list of concerned listeners in the tab.
It applies its Groovy script at the activation or the completion (depending on the user’s choice) of the task. The script can be written with or without the script builder (4).
Task Listener (2)
A task listener is created by clicking the plus button in the list of concerned listeners in the tab.
There are 6 types of events that can trigger the listener and thus the application of the script:
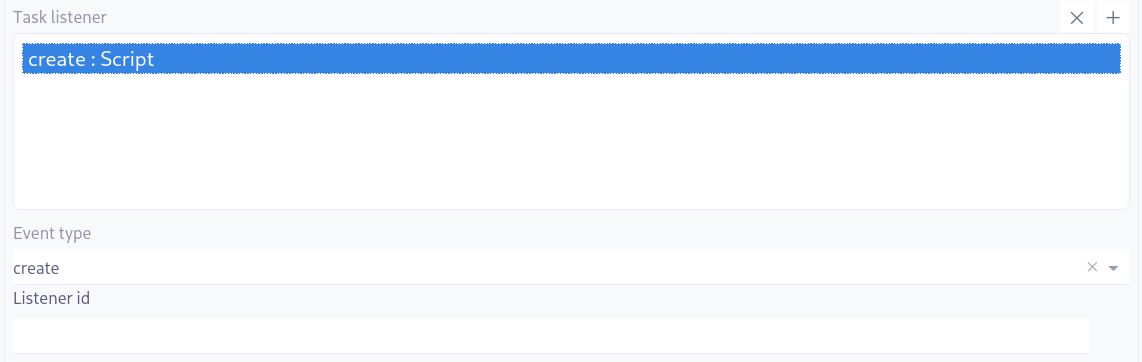
| You can manually set an id for the listener associated to the event you are attaching to the task. |
-
Create: The script is the very first thing that applies when the process reaches the task.
-
Update: Not currently implemented.
-
Assignment: Not currently implemented.
-
Timeout: The script applies if there is a Timer linked to the current task, and it has reached the end of its cycle.
-
Complete: The script is the last thing the task will do before reaching the end of its life and moving to the next step if it has encountered no issues.
-
Delete: The script is the last thing the task will do before reaching the end of its life and moving to the next step if it has encountered an interruptive event or needs to return an unexpected error.